- Windows builder in java
- Breadcrumbs
- Primary Links
- WindowBuilder — is a powerful and easy to use bi-directional Java GUI designer
- Eclipse Window Builder Tutorial for GUI Creation
- 1.Introduction
- 2.Simple Java Window Application
- 2.1 System requirements
- 2.1.1 Eclipse
- 2.1.2 Java
- 3. Open New Project
- 4. New SWT Application
- 5. Components in the editor
- 6. Editor Features
- 7. Layouts in SWT
- 8. New UI Page
- 9. Source View
- 10. Button Listener
- 11. Conclusion
- 12. Download the Code Project
- Паттерн проектирования Builder (Строитель) в Java
- Паттерн проектирования Builder
- Пример со сборкой автомобилей с использованием паттерна проектирования Builder
- Пример с оформлением заказа в ресторане с использованием паттерна Builder
- Напитки:
- Упаковка:
Windows builder in java
Community
Participate
Eclipse IDE
Breadcrumbs
Primary Links
WindowBuilder — is a powerful and easy to use bi-directional Java GUI designer
WindowBuilder is composed of SWT Designer and Swing Designer and makes it very easy to create Java GUI applications without spending a lot of time writing code. Use the WYSIWYG visual designer and layout tools to create simple forms to complex windows; the Java code will be generated for you. Easily add controls using drag-and-drop, add event handlers to your controls, change various properties of controls using a property editor, internationalize your app and much more.
WindowBuilder is built as a plug-in to Eclipse and the various Eclipse-based IDEs (RAD, RSA, MyEclipse, JBuilder, etc.). The plug-in builds an abstract syntax tree (AST) to navigate the source code and uses GEF to display and manage the visual presentation.
Generated code doesn’t require any additional custom libraries to compile and run: all of the generated code can be used without having WindowBuilder Pro installed. WindowBuilder Pro can read and write almost any format and reverse-engineer most hand-written Java GUI code. It also supports free-form code editing (make changes anywhere. not just in special areas) and most user re-factorings (you can move, rename and subdivide methods without a problem).
Your browser does not support the video tag.
Eclipse Window Builder Tutorial for GUI Creation
Posted by: Mohanraj Gurubatham in Eclipse December 24th, 2015 1 Comment Views
1.Introduction
In this example, we will show you how to develop Java GUI Application using Eclipse WindowBuilder plug-in.
Eclipse WindowBuilder is a powerful and easy to use bi-directional Java GUI designer that makes it very easy to create Java GUI applications without spending a lot of time writing code to display simple forms.
The bi-directional Java GUI designer means the developer can seamlessly move between a Drag n’ Drop designer and the generated code.
Using Eclipse WindowBuilder, the developer will enjoy creating Java GUI based applications. One can create complicated windows in minutes using WindowBuilder.
WYSIWYG (What You See Is What You Get) layout tools in WindowBuilder are used to generate back-end java code by drag-and-drop of components to the container.
2.Simple Java Window Application
Now, we will see how fast a simple Java GUI application can be created uisng Eclipse WindowsBuilder.
2.1 System requirements
Tools required to run this example are:
2.1.1 Eclipse
WindowBuilder is built as a plug-in to Eclipse. ‘Eclipse for RCP and RAP Developers’ is the default IDE bundled with ‘Windows Builder’ plug-in. This IDE has a complete set of tools for developers who want to create Eclipse plug-ins, Rich Client Applications (RCA).
Download ‘Eclipse for RCP and RAP Developers’ from here. Please refer the picture given below to identify the correct IDE.
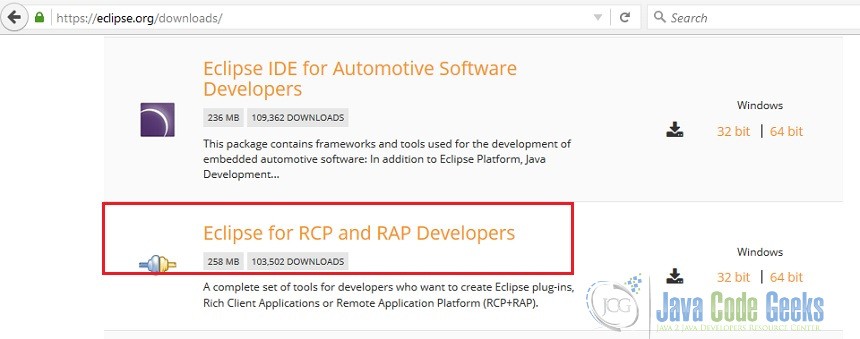
Eclipse IDE for RCP and RAD
2.1.2 Java
- Download Java SE 7 or above from here
3. Open New Project
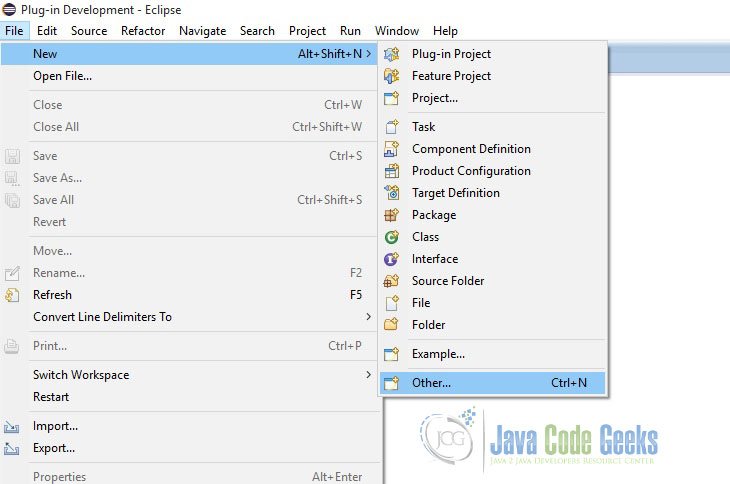
Let us create a new ‘SWT/JFace Java Project’ to see the usage of WindowBuilder for building GUI components. Open ‘File – New – Other’ and then click ‘SWT/JFace Project’ as depicted below

SWT/JFace Java Project
The reason for creating new project as ‘SWT/JFace Java Project’ is to have all the necessary JARs and native libraries included by the IDE itself. Otherwise, you have to add all these dependent JARs and native libraries on your own.
The Standard Widget Toolkit (SWT) is a graphical widget toolkit to be used with the Java platform. It provides a portable graphics API independent of the OS but that relies on the native widgets.
JFace is a UI toolkit with classes for handling many common UI programming tasks. JFace is window-system-independent in both its API and implementation, and is designed to work with SWT without hiding it.
JFace is a higher-level user interface toolkit that uses the raw SWT widgets to provide model-driven widgets, and to some extent some functionality that isn’t available in the Swing libraries, such as advanced editors, dialog boxes, and wizards.
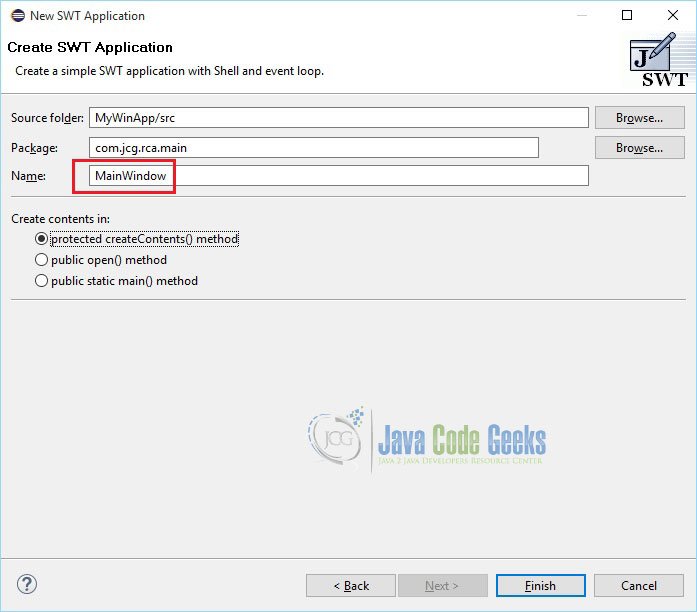
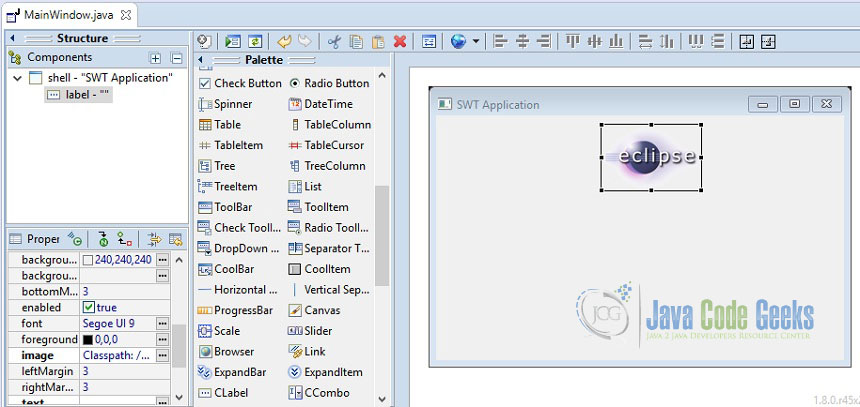
4. New SWT Application
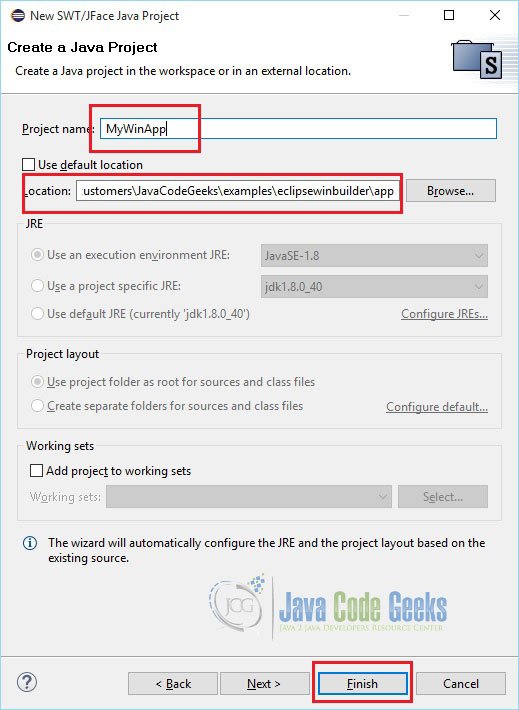
Let us add widget to the project. As a main window, create Application Window as shown below. Right click on the project and select ‘New – Other – Window Builder – SWT Designer – SWT – Application Window’. And then click ‘Next’
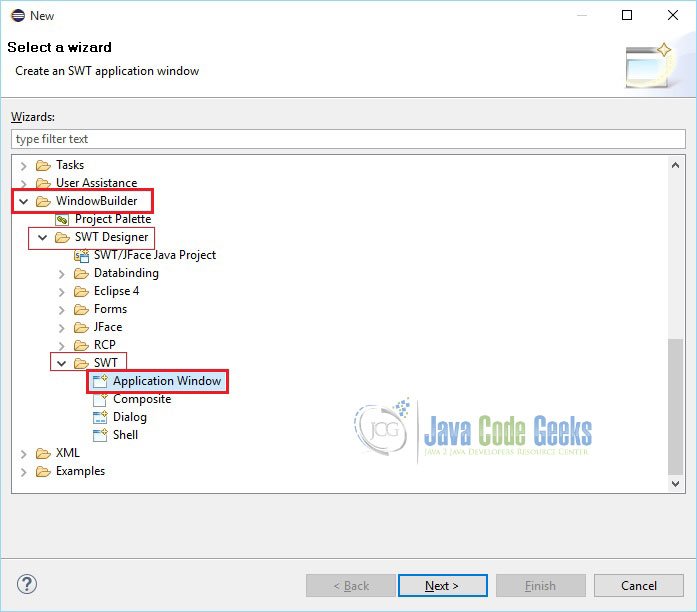
Enter Class Name and click ‘Finish’
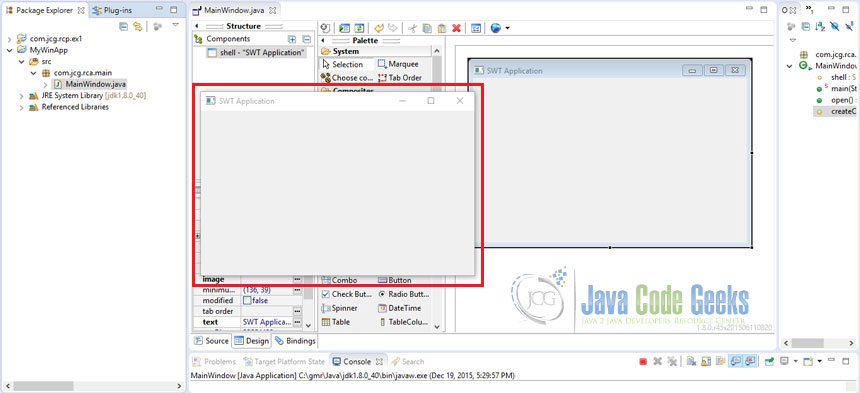
A basic window application has been created. Window Builder can be used to get your UI up and running quickly. Click ‘Design’ tab as shown below.
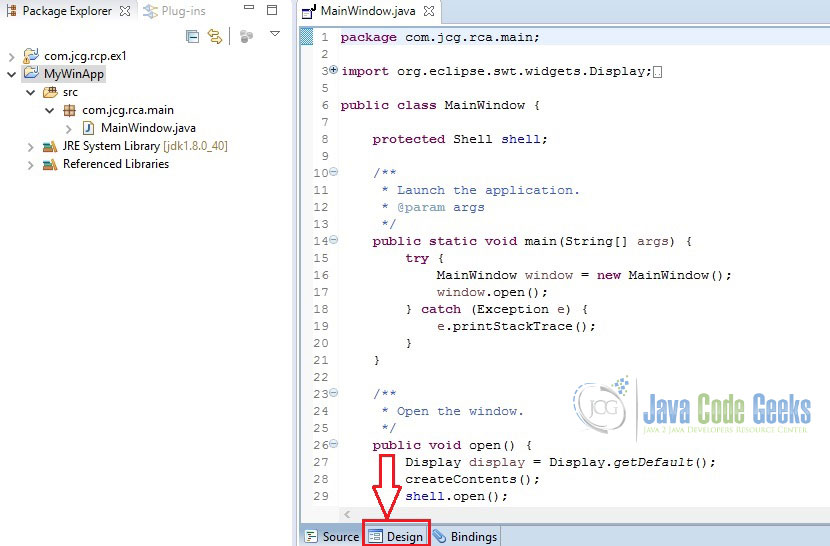
Basic Window Application
Now, you will see the graphical representation (Design View) of your code.
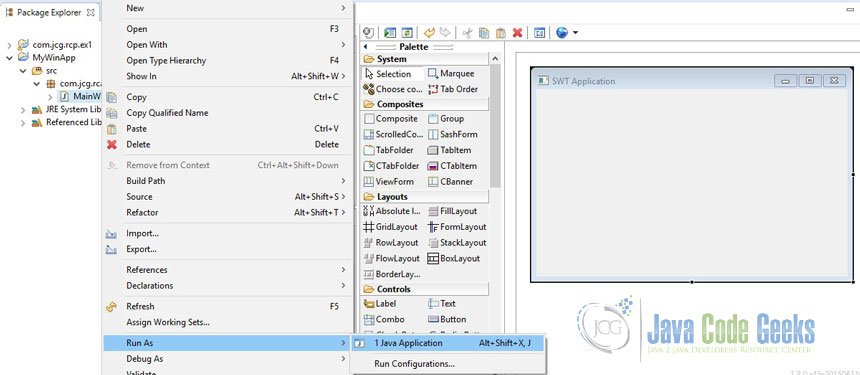
This application can be simply executed like any other java program with main method. Right click on the class name and ‘Run As – Java Application’
As we have not yet added any other elements, you will see a simple window popping-up as a result of the execution.
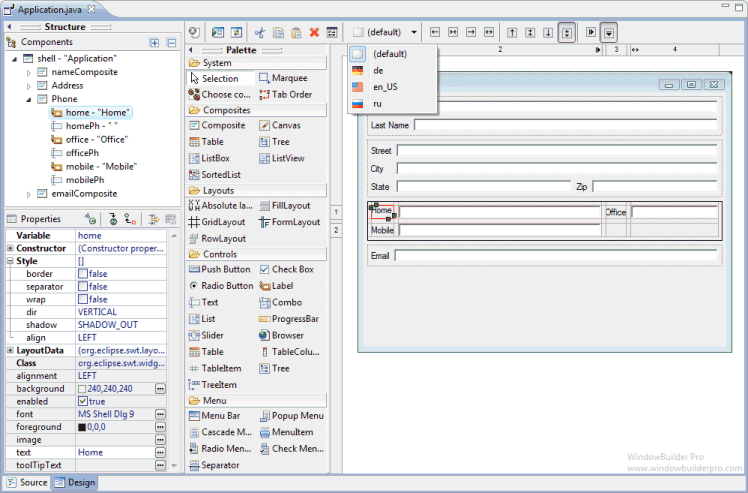
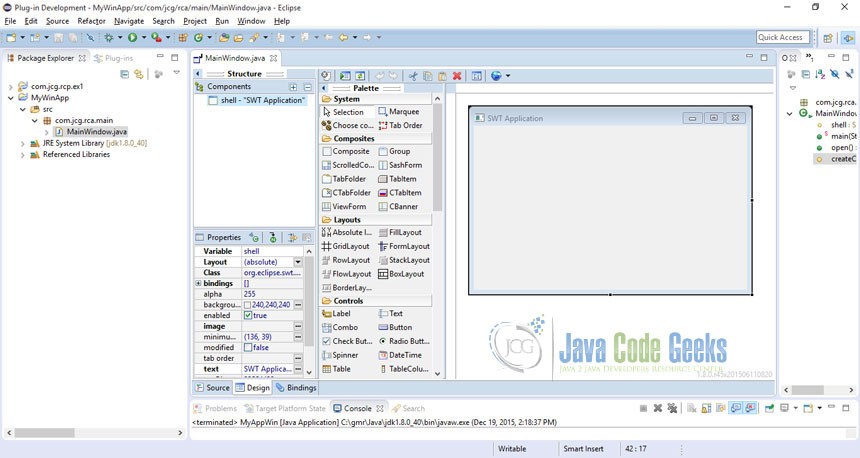
5. Components in the editor
As shown above, the editor is composed of the following major components:
- Design View – the main visual layout area.
- Source View – write code and review the generated code
- Structure View – composed of the Component Tree and the Property Pane.
- Component Tree – shows the hierarchical relationship between all of the components.
- Property Pane – displays properties and events of the selected components.
- Palette – provides quick access to toolkit-specific components.
- Toolbar – provides access to commonly used commands.
- Context Menu – provides access to commonly used commands.
6. Editor Features
The editor supports the following major features;
- Bi-directional Code Generation – read and write almost any format and reverse-engineer most hand-written code
- Internationalization (i18n) / Localization – externalize component strings, create and manage resource bundles.
- Custom Composites & Panels – create custom, reusable components.
- Factories – create custom factory classes and methods.
- Visual Inheritance – create visual component hierarchies.
- Event Handling – add event handlers to your components.
- Menu Editing – visually create and edit menubars, menu items and popup menus.
- Morphing – convert one component type into another.
7. Layouts in SWT
Layouts are non-visible widgets used to give GUI windows a specific look and it helps to control the position and size of children in a Composite.
To make sure the GUI application developed in one environment works perfect in another platform, Java provides a system of portable layout managers. We use these layout managers to specify rules and constraints for the layout of the UI in a way that will be portable.
Layout managers gives you the advantages as given below,
- Correctly positioned components that are independent of fonts, screen resolutions, and platform differences.
- Intelligent component placement for containers that are dynamically resized at runtime.
- Ease of translation. If a string increases in length after translation, the associated components stay properly aligned.
SWT Designer supports the following layout managers.
| Layout Manager | Description |
|---|---|
| AbsoluteLayout | AbsoluteLayout or Null Layout helps to specify the exact position, the width and the height of components. In a generic environment where the size of the screens may vary, this layout manager should be avoided. |
| FillLayout | FillLayout is the simplest layout class. It lays out controls in a single row or column, forcing them to be the same size. |
| RowLayout | Puts the widgets in rows or columns and allows you to control the layout with options, e.g., wrap, spacing, fill and so on. |
| GridLayout | Arranges widgets in a grid. |
| FormLayout | Arranges the widgets with the help of the associated attachments. |
| StackLayout | A StackLayout object is a layout manager for a container. It treats each component in the container as a card. Only one card is visible at a time, and the container acts as a stack of cards. |
| BorderLayout | BorderLayout lays out a container, arranging and resizing its components to fit in five regions: north, south, east, west, and center. Each region may contain no more than one component, and is identified by a corresponding constant: NORTH, SOUTH, EAST, WEST, and CENTER. |
| BoxLayout | BoxLayout allows multiple components to be laid out either vertically or horizontally. The components will not wrap so, for example, a vertical arrangement of components will stay vertically arranged when the frame is resized. Nesting multiple panels with different combinations of horizontal and vertical gives an effect similar to GridBagLayout, without the complexity. |
| FlowLayout | A flow layout arranges components in a left-to-right flow, much like lines of text in a paragraph. Flow layouts are typically used to arrange buttons in a panel. It will arrange buttons left to right until no more buttons fit on the same line. |
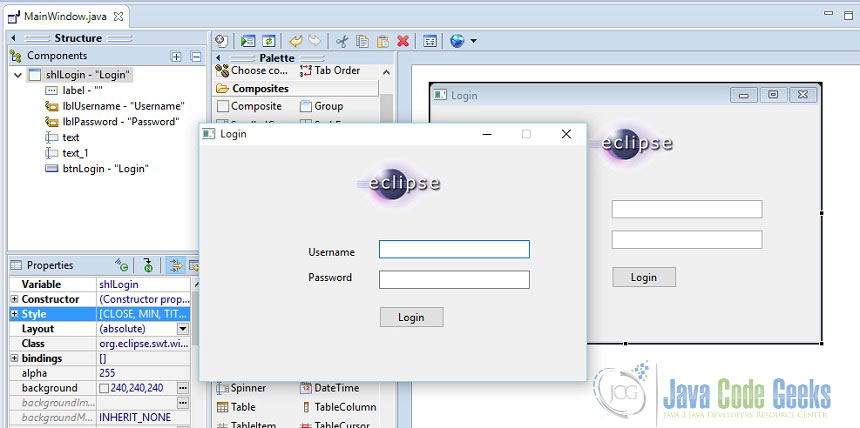
8. New UI Page
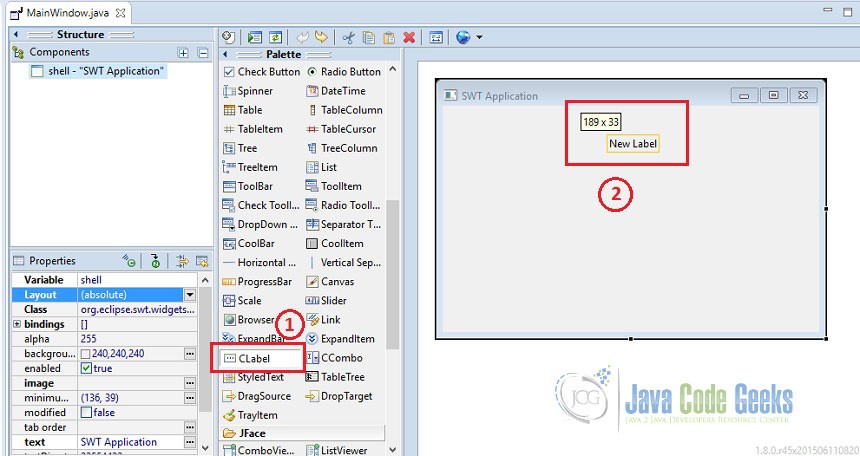
We will now design a new Login UI page using Window Builder. For this normal size screen, we will continue with the default (absolute) layout. We are going to have an image, two labels, one text field, one password field and a button on the screen.
To display image use CLabel widget. CLabel supports aligned text and/or an image and different border styles.
As shown below, click ‘CLabel’ once and keep your cursor on the screen and click. Now, the ‘CLabel’ is placed on the screen.
Let us attach an image with ‘CLabel’. For this, you need to have an image in the folder where your ‘MainWindow’ source file is placed. For this example, I have used eclipse logo.
Click on the ‘CLabel’ and then, in the ‘Properties’ window select ‘image’.
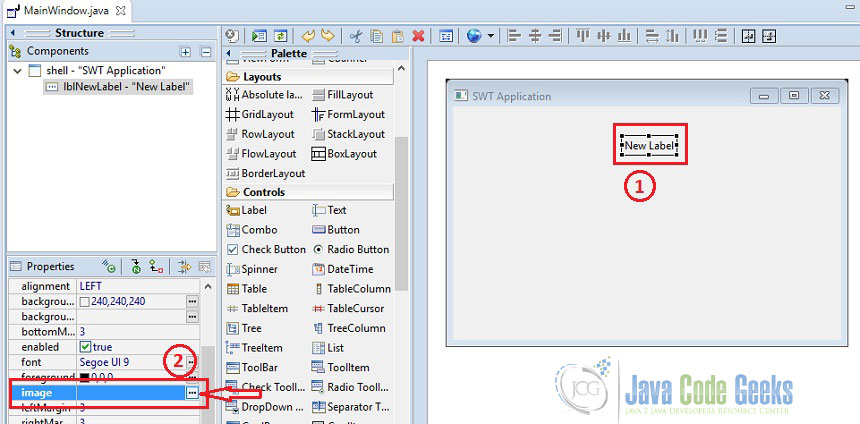
You will now see the Image chooser window pops up. Select ‘Classpath resource’ option and navigate to the image file, select it and then click ‘OK’.
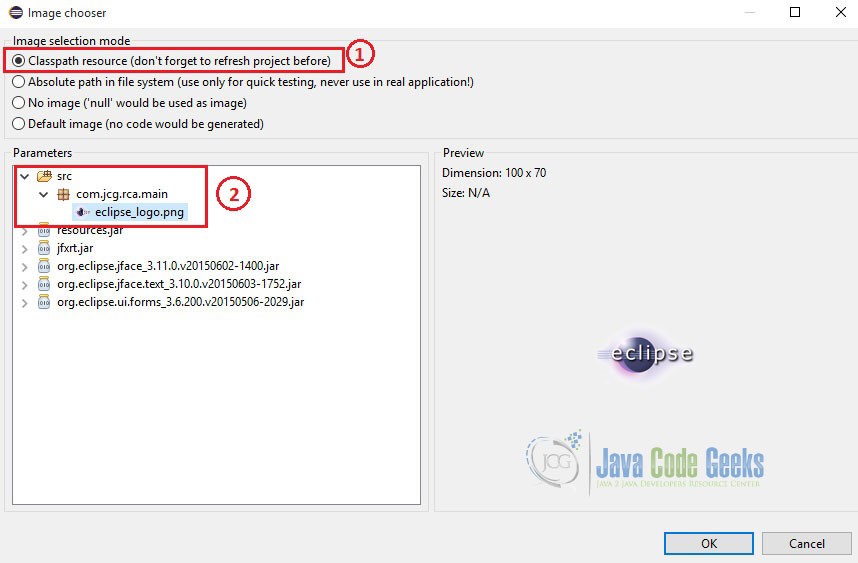
Adjust the field bounds according to the size of the logo so that the image is visible on the screen.
Similarly, add Labels, Text Fields and a Button. Finally the screen will be looking like the one shown below.
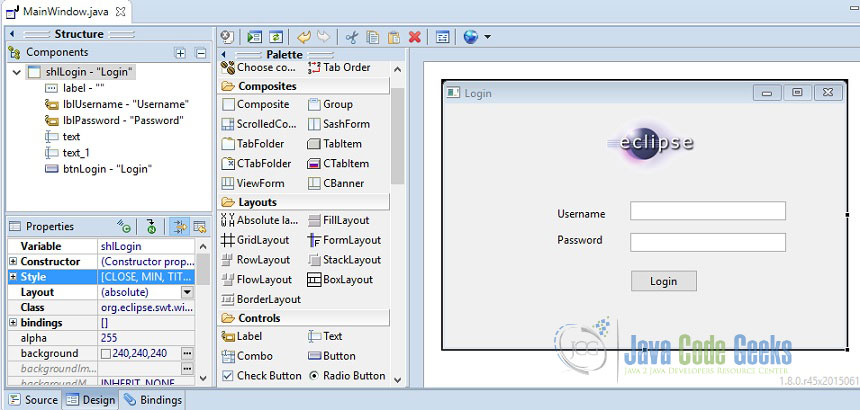
To test this design, right click on the window and select ‘Test/Preview’ from the popup menu.

9. Source View
Click ‘Source’ tab to see the code generated by the IDE. Single line of code in this was not written manually.

10. Button Listener
Attach listener with the button to validate field entries. Refer the source code of the main file given below.
11. Conclusion
From this example, we learned how quickly a Java GUI application can be developed using Eclipse Window Builder. WindowBuilder Engine provides a rich API for creating UI designers. It supports Java-based UI frameworks such as Swing, SWT/RCP, eRCP, GWT etc. It also supports XML-based UI frameworks like XWT, GWT UiBinder, Android etc.
12. Download the Code Project
This was a Tutorial about Eclipse Window Builder for GUI Creation.
Паттерн проектирования Builder (Строитель) в Java
Приглашаем также всех желающих на открытый демо-урок «Шаблоны GRASP». На этом занятии мы проанализируем функциональное разделение функционала и рассмотрим 9 шаблонов GRASP. Присоединяйтесь!

А вот и я со своей очередной статьей о паттернах проектирования, а именно о паттерне проектирования Builder (он же Строитель). Очень полезный паттерн проектирования, который позволяет нам шаг за шагом конструировать сложные объекты.
Паттерн проектирования Builder
Паттерн проектирования Builder разработан для обеспечения гибкого решения различных задач создания объектов в объектно-ориентированном программировании.
Паттерн проектирования Builder позволяет отделить построение сложного объекта от его представления.
Паттерн Builder создает сложные объекты, используя простые объекты и поэтапный подход.
Паттерн предоставляет один из лучших способов создания сложных объектов.
Это один из паттернов проектирования банды четырех (GoF), которые описывают, как решать периодически возникающие задачи проектирования в объектно-ориентированном программном обеспечении.
Этот паттерн полезен для создания разных иммутабельных объектов с помощью одного и того же процесса построения объекта.
Паттерн Builder — это паттерн проектирования, который позволяет поэтапно создавать сложные объекты с помощью четко определенной последовательности действий. Строительство контролируется объектом-распорядителем (director), которому нужно знать только тип создаваемого объекта.

Итак, паттерн проектирования Builder можно разбить на следующие важные компоненты:
Product (продукт) — Класс, который определяет сложный объект, который мы пытаемся шаг за шагом сконструировать, используя простые объекты.
Builder (строитель) — абстрактный класс/интерфейс, который определяет все этапы, необходимые для производства сложного объекта-продукта. Как правило, здесь объявляются (абстрактно) все этапы (buildPart), а их реализация относится к классам конкретных строителей (ConcreteBuilder).
ConcreteBuilder (конкретный строитель) — класс-строитель, который предоставляет фактический код для создания объекта-продукта. У нас может быть несколько разных ConcreteBuilder-классов, каждый из которых реализует различную разновидность или способ создания объекта-продукта.
Director (распорядитель) — супервизионный класс, под конролем котрого строитель выполняет скоординированные этапы для создания объекта-продукта. Распорядитель обычно получает на вход строителя с этапами на выполнение в четком порядке для построения объекта-продукта.
Паттерн проектирования Builder решает такие проблемы, как:
Как класс (тот же самый процесс строительства) может создавать различные представления сложного объекта?
Как можно упростить класс, занимающийся созданием сложного объекта?
Давайте реализуем пример со сборкой автомобилей, используя паттерн проектирования Builder.
Пример со сборкой автомобилей с использованием паттерна проектирования Builder
Шаг 1: Создайте класс Car (автомобиль), который в нашем примере является продуктом:
Обратите внимание, что я добавил в класс проверочный метод doQualityCheck . Я считаю, что Builder не должен создавать неполные или невалидные Product-объекты. Таким образом, этот метод поможет нам в проверке сборки автомобилей.
Шаг 2: Создайте абстрактный класс/интерфейс CarBuilder , в котором определите все необходимые шаги для создания автомобиля.
Обратите внимание, что я сделал тип CarBuilder типом возврата всех этапов, созданных здесь. Это позволит нам вызывать этапы по цепочке. Здесь есть один очень важный метод build , который заключается в том, чтобы получить результат или создать конечный объект Car . Этот метод фактически проверяет годность автомобиля и выпускает (возвращает) его только в том случае, если его сборка завершена успешно (все валидно).
Шаг 3: Теперь пора написать ConcreteBuilder . Как я уже упоминал, у нас могут быть разные варианты ConcreteBuilder , и каждый из них выполняет сборку по-своему, чтобы предоставить нам различные представления сложного объекта Car .
Итак, ниже приведен код ClassicCarBuilder , который собирает старые модели автомобилей.
Теперь напишем еще один строитель ModernCarBuilder для сборки последней модели автомобиля.
И еще один SportsCarBuilder для создания спортивного автомобиля.
Шаг 4: Теперь мы напишем класс-распорядитель AutomotiveEngineer , под руководством которого строитель будет собирать автомобиль (объект Car ) шаг за шагом в четко определенном порядке.
Мы видим, что метод manufactureCar вызывает этапы сборки автомобиля в правильном порядке.
Теперь пришло время написать класс Main для выполнения и тестирования нашего кода.
Ниже приведен вывод программы:
Я надеюсь, что вы хорошо разобрались в объяснении и примере, чтобы понять паттерн Builder . Некоторые из нас также находят у него сходство с паттерном абстрактной фабрики (Abstract Factory), о котором я рассказывал в другой статье. Основное различие между строителем и абстрактной фабрикой состоит в том, что строитель предоставляет нам больший или лучший контроль над процессом создания объекта. Если вкратце, то паттерн абстрактной фабрики отвечает на вопрос «что», а паттерн строитель — «как».
Я нашел паттерн Builder невероятно полезным и одним из наиболее часто используемых в приложениях в настоящее время. Я пришел к выводу, что Builder лучше подходит для работы с иммутабельными объектами. Все мы знаем, как много есть хороших иммутабельных объектов, и их использование увеличивается день ото дня, особенно после релиза Java 8.
Я использую Builder для написания своих сложных иммутабельных классов, и я бы хотел продемонстриовать здесь эту идею.
В качестве примера у нас есть класс Employee , в котором есть несколько полей.
Предположим, только два поля EmpNo и EmpName являются обязательными, а все остальные — опциональные. Поскольку это иммутабельный класс, у меня есть два варианта написания конструкторов.
Написать конструктор с параметрами под все поля.
Написать несколько конструкторов для разных комбинаций параметров, чтобы создать разные представления объекта Employee .
Я решил, что первый вариант мне не подходит, так как мне не нравится, когда в методе больше трех-четырех параметров. Это выглядит не очень хорошо и становится еще хуже, когда многие параметры равны нулю или null .
Второй вариант тоже не очень хорош, так как мы создаем слишком много конструкторов.
Итак, вот решение с помощью паттерна Builder :
Я написал EmployeeBuilder как публичный статический вложенный класс. Вы можете написать его как обычный публичный класс в отдельном файл Java. Большой разницы я не вижу.
Теперь напишем программу EmployeeMain для создания объекта Employee :
Надеюсь, вам понравилась идея. Мы можем использовать это при создании более сложных объектов. Я не реализовал здесь распорядителя (Director), так как все шаги (сбор значений для полей) не являются обязательными и могут выполняться в любом порядке. Чтобы убедиться, что я создаю объект Employee только после получения всех обязательных полей, я написал метод проверки.
Пример с оформлением заказа в ресторане с использованием паттерна Builder
Я хочу еще показать вам пример кода для оформления заказа в ресторане, где Order (заказ) является иммутабельным объектом и требует тип обслуживания заказа — Order Service Type (Take Away — с собой/Eat Here — в заведении), всех необходимых нам продуктов питания (Food Items) и имени клиента (Customer Name — опционально) в время оформления заказа. Продуктов питания может быть сколько угодно. Итак, вот код этого примера.
Код для перечисления OrderService :
Код для интерфейса FoodItem :
Код для класса Meal (блюдо). Класс Meal предлагает заранее определенные продукты питания со скидкой на цену товара (не на цену упаковки).
Код для класса Burger :
Код для класса ChickenBurger :
Код для класса VegBurger (веганский бургер):
Код для класса Nuggets :
Код для класса CheeseNuggets :
Код для класса ChickenNuggets :
Напитки:
Напитки бывают разных размеров. Итак, вот код перечисления BeverageSize :
Код для класса Drink :
Код для класса ColdDrink :
Код для класса CocaCola :
Код для класса Pepsi :
Код для класса HotDrink :
Код для класса Cuppuccinno :
Код для класса HotChocolate :
Упаковка:
Код интерфейса Packing :
Код для класса Bottle :
Код для класса Container :
Код для класса MultiPack . Упаковка MutiPack служит вспомогательной упаковкой для еды, когда мы используем разные упаковки для разных продуктов.
Код для класса SipperMug :
Код для класса Wrap :
Код служебного класса BillPrinter , который я написал для печати детализированного счета.
Почти все готово. Пришло время написать наш иммутабельный класс Order :
А вот код для OrderBuilder , который конструирует объект Order .
Готово! Теперь пришло время написать Main для выполнения и тестирования результат:
А вот и результат работы программы:
Ну вот и все! Я надеюсь, что этот урок помог освоить паттерн Builder.


