- Help in deleting built-in administrator account in Windows 10
- Replies (4)
- How to delete the inbuilt Administrator Account in Windows 10
- How to delete the built-in Administrator Account
- Related Posts
- You must have Read permissions to view the properties of this object
- You require permission from TrustedInstaller to make changes to this folder
- How to remove deleted User Account from login screen in Windows 10
- [email protected]
- How to Enable or Disable built in Administrator account in Windows 10
- Disable or Enable built-in Administrator account
- How to Delete Built-in Administrator Account in Windows 10, 8 and 7
- How to Delete Built-in Administrator Account?
- 2 ways to enable built-in Administrator account on Windows 10 without logging in
- Way 1: Activate built-in Administrator account on Windows 10 with password recovery disk
- Way 2: Enable hidden Administrator account in Windows 10 with Setup disk
Help in deleting built-in administrator account in Windows 10
I’m trying to revert to Windows 7 after several complications with Windows 10 (won’t let me use any other browsers other than Edge, won’t let me download, won’t let me open programs or games).
It has only been a day since I posted this, so the offer should still stand for returning to 7 for free.
However, when I try to reset it to 7, it says that I need to delete the built in administrator account. But when I try to do that, it says that «you cannot perform this operation with built-in accounts.» (I’m doing all this in the local account that is also an administrator)
Please help! I’m at such a loss at what is going on and I just want to go back!
Replies (4)
![]()
Thank you for posting in Microsoft Community, we appreciate your interest in Windows 10.
I understand your concern to perform reset on Windows 10, we will help you with this issue.
The error might be due to enabled built-in admin account, I suggest you to do the following to disable the built-in administrator account:
Steps to: Disable Built-in administrator.
Also I would like to inform that, if you perform reset you will not be able to revert back to previous Operating System.
I suggest you to refer to the below article by J W Stuart about Rollback feature and check if it helps:
Hope it helps. Feel free to contact us for further assistance on Windows Operating System, we will be happy to help you.
How to delete the inbuilt Administrator Account in Windows 10
With nothing more than a generic Windows 10 installation disc or USB flash drive, one can enable the built-in Administrator account with a little simple trick – and then use it to lock you out of your own system, or worse, access your private and sensitive files. In this post, we will walk you through the steps to delete the inbuilt Administrator Account in Windows 10.
By default, the built-in Windows 10 administrator account is disabled. The built-in administrator account in Windows 10 does not even require a password. If you enable the built-in Windows 10 administrator account by choice, you should always create a strong password to use with it.
Caution: It’s strongly recommended NOT to delete the inbuilt Administrator account.
How to delete the built-in Administrator Account
To delete the inbuilt Administrator account in Windows 10, do the following:
Since this is a registry operation, it is recommended that you back up the registry or create a system restore point as necessary precautionary measures. Once done, you can proceed as follows:
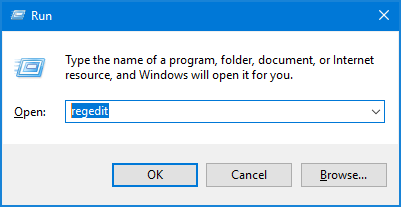
- Press Windows key + R to invoke the Run dialog.
- In the Run dialog box, type regedit and hit Enter to open Registry Editor.
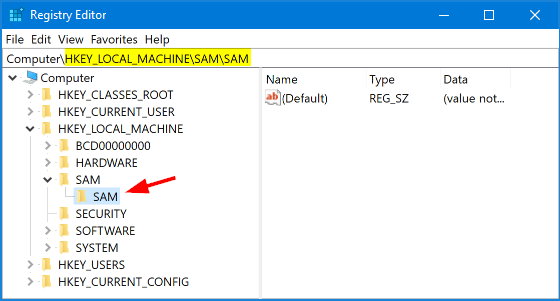
- Navigate or jump to the registry key path below:
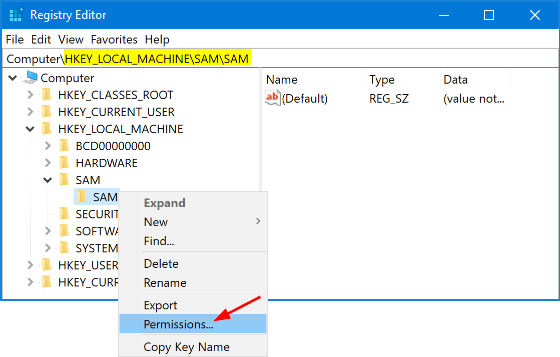
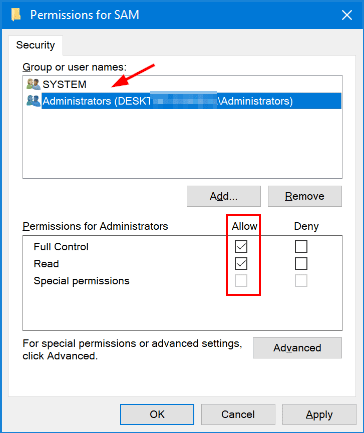
- At the location, on the left pane, right-click the expanded SAM folder, and then click Permissions on the pop-up context menu.
- In the Permissions for SAM window, select the Administrators group. Then, enable the Full-Control and Read options under the Allow header.
- Click Apply >OK.
- Next, click View on the Registry Editor window menu bar, and then click Refresh.
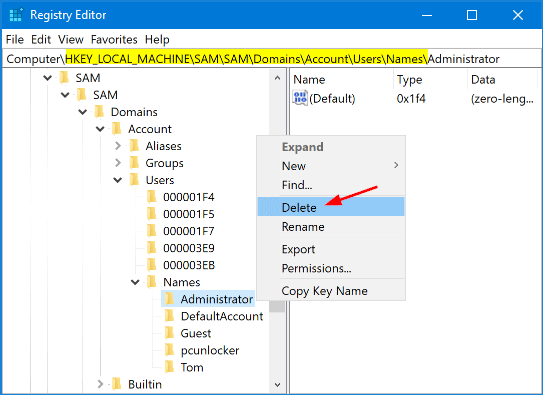
- Now, expand the subfolders underneath the SAM folder until you get to the Names folder. The path is as follows:
SAM > Domains > Account > Users > Names
- Expand the Names folder to reveal the list of user accounts on the system.
- Right-click the Administrator folder, and then click Delete.
That’s it! You have successfully deleted the Windows 10 built-in Administrator account.
You can use the same process to delete the Default Account and Guest Account in Windows 10 as well.
To verify that the built-in admin account has indeed been deleted, you can open a command prompt by pressing the Windows key + R, then type cmd and hit Enter. In the command prompt window, type net user and hit Enter. This command will list all accounts on the system – even if they have been disabled.
Once the command executes, Windows will display a list of all accounts on the system. Note that the Administrator account is no longer visible.
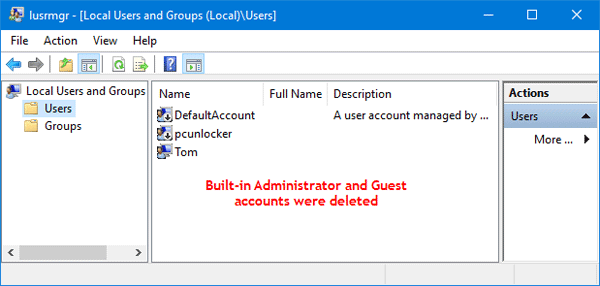
You can also verify that the built-in Windows admin account is gone by opening the Computer Management console in Windows 10.
To do this, invoke the Run dialog box, then type compmgmt.msc and hit Enter. Then, click Local Users and Groups and select the Users folder. Again, note that the Administrator account is not visible.
Related Posts
You must have Read permissions to view the properties of this object
You require permission from TrustedInstaller to make changes to this folder
How to remove deleted User Account from login screen in Windows 10
[email protected]
Obinna Onwusobalu, has studied Information & Communication Technology and is a keen follower of the Windows ecosystem. He runs a computer software clinic. He says it’s best practice to create a System Restore Point before making any changes to your PC. You can contact him on Twitter @ChidumOsobalu.
How to Enable or Disable built in Administrator account in Windows 10
In Windows XP and the earlier Windows versions, there was only one Administrator account, and most single users used it as their main account. But Windows Vista and later, i.e., Windows 10 and Windows 8/7, have another built-in Administrator account, which may be referred to as a secret hidden super built-in Administrator account. It is hidden & turned off by default, and is similar to the ‘root’ account in Unix.
Disable or Enable built-in Administrator account
To enable, activate, or turn on this built-in Administrator account, type CMD in the search box. CMD will appear at the top. Right-click on it to ‘Run as administrator’.
To enable this built-in Administrator account, type this command & hit Enter:
To disable this built-in Administrator account, type this command & hit Enter:
If you decide that you need a password for the administrator’s account that you are going to activate or if you are unable to activate it with a blank password run the following commands:
You will get a message: The command completed successfully. (Where [email protected]$$w0rd has been taken as an example password)
Switch the user and log on using this password.
Alternatively, you may also type secpol.msc in the search box and hit Enter. This will bring up the Local Security Policy.
On the left side click on Local Policies > Security Options. Now on the right side, you will see the first entry as Accounts:Administrator account – Disabled.
Right-click on it > Click Properties > Enable. Close.
TIP: You can also use our Ultimate Windows Tweaker to easily enable or disable this built-in Administrator Account.
And why would you want to operate this account?
- You don’t want to be ‘annoyed’ by UAC.
- This ‘super’ administrator account has elevated privileges. This means that you can run CMD with unrestricted access to the command line.
- You need to carry out some serious troubleshooting.
- You have locked out your main account by accident, and you want a backdoor entry.
How to Delete Built-in Administrator Account in Windows 10, 8 and 7
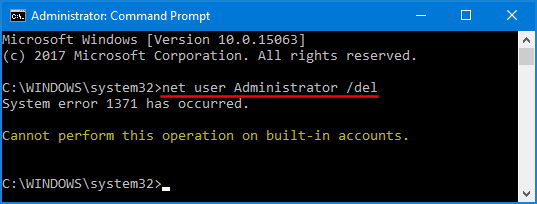
How do I remove the Guest account on Windows 10? Every Windows installation has at least two built-in accounts: Administrator and Guest. These accounts cannot be deleted by default. When you try to delete it from an elevated Command Prompt, you’ll receive the error message:
«System error 1371 has occurred. Cannot perform this operation on built-in accounts«.
If you don’t want to use the built-in Administrator account as it can open up potential security risks, you can disable it or permanently delete it from your computer. In this tutorial we’ll walk you through the steps of deleting built-in Administrator account using a registry hack. Before you proceed, make sure you back up the entire registry, so that you can restore it when you messed up the registry.
How to Delete Built-in Administrator Account?
You should have created at least one administrative account as an alternative, so you won’t lose admin rights to Windows after deleting the built-in Administrator account.
Press the Windows key + R to open the Run command box. Type regedit and press Enter.
Once the Windows Registry is opened, navigate to the SAM key: HKEY_LOCAL_MACHINE\SAM\SAM.
Right-click the SAM key and select Permissions from the context menu.
The above action will open the Permissions window. Select the Administrators group and check Allow checkbox in the Full Control row, and click OK.
Now, back to the Registry Editor window. Select the SAM key in the left pane and press F5 to refresh registry.

You can continue expanding to the key: HKEY_LOCAL_MACHINE\SAM\SAM\Domains\Account\Users\Names. You will find a list of all user accounts on the machine. To delete Windows’s built-in Administrator account, right-click the Administrator name and select Delete.
Close Registry Editor and restart your computer. When you open the Local Users and Groups window, you’ll find the built-in Administrator account was deleted successfully.
If you want to restore the built-in Administrator account after deleted, just restore previously backed up registry and the built-in account will be back again.
2 ways to enable built-in Administrator account on Windows 10 without logging in
Windows 10 generates an Administrator account during the installation, and this administrator account is hidden by default due to security reasons. The built-in Administrator account runs all programs and tools with admin rights by default, and it is usually used to troubleshoot problems met on Windows. However, when you are locked out of Windows 10 system, how to enable the built-in Administrator account?
If you still can get into computer, go and see the 5 ways to activate/hidden Administrator account in Windows 10 to get more methods.
Way 1: Activate built-in Administrator account on Windows 10 with password recovery disk
Video guide to activate Administrator account in Windows 10 without logging:
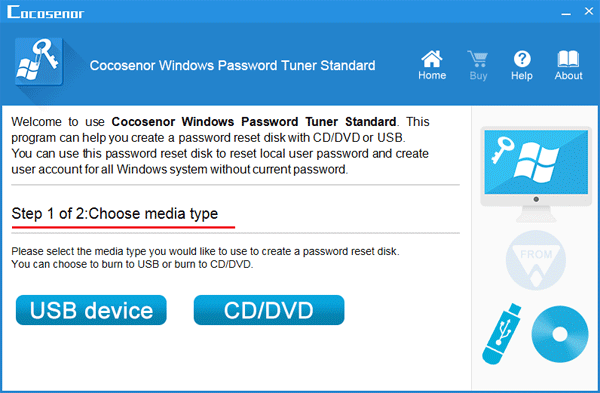
1. Download a Cocosenor Windows password recovery utility, install it on an accessible PC.
2. Insert a USB or CD disk, and follow the instructions on program screen to create a Windows password recovery disk.
3. When the program is burned to the USB or CD disk successfully, take it insert into your locked computer.
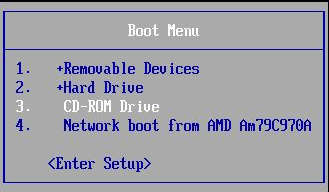
4. Restart the computer, and press boot menu key to open the Boot Menu. Select the USB or CD drive on the menu, and press Enter to boot from it.
5. When the Cocosenor Windows password Tuner program shows up, select Windows 10 system, and select the Administrator account on the table list.
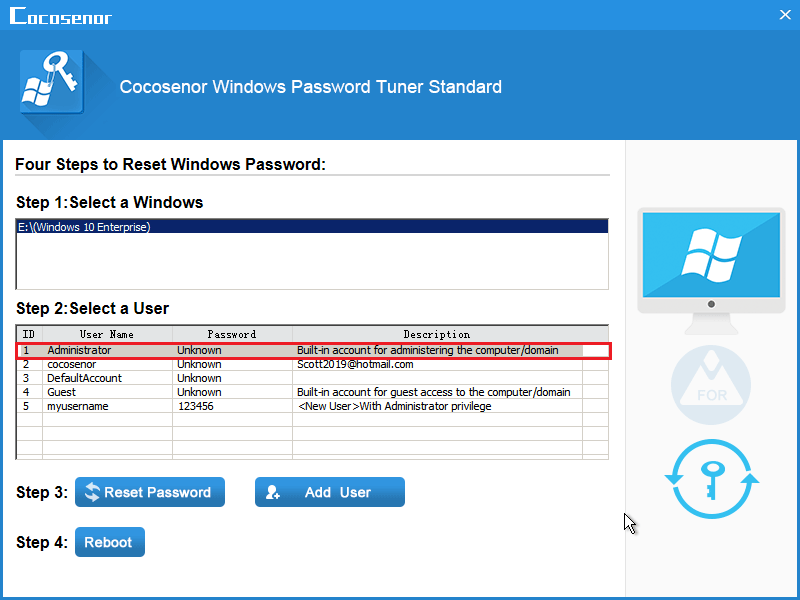
6. Click on «Reset password» , and then a dialog box comes up telling you the password will be set to blank. Just click on «Yes» to accept it.
7. Eject the USB or CD drive from computer, click on «Reboot» , and click on «Yes» to restart computer.
8. When goes to the logon screen normally, you will see the Administrator account is that, just click on it, you will login automatically without password.

Way 2: Enable hidden Administrator account in Windows 10 with Setup disk
Video guide to enable Administrator account in Windows 10 with setup disk:
1. Connect the setup disk or Windows 10 recovery disk to your computer.
2. Power on computer, and set it to boot from the setup disk. You can follow this tutorial to see how to boot computer from CD-ROM.
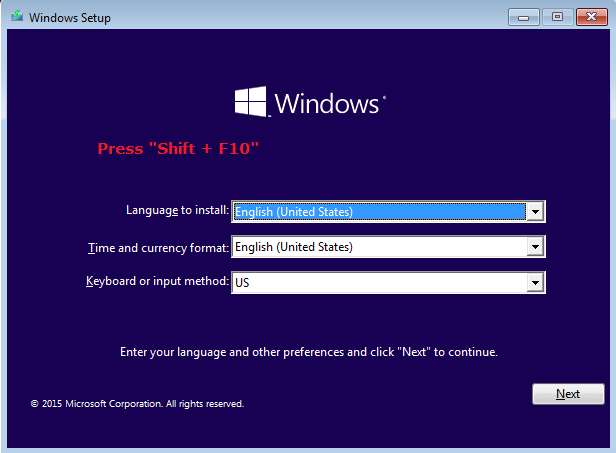
3. When boots to Windows installation screen, press «Shift + F10» on the keyboard, this will bring up command line screen.
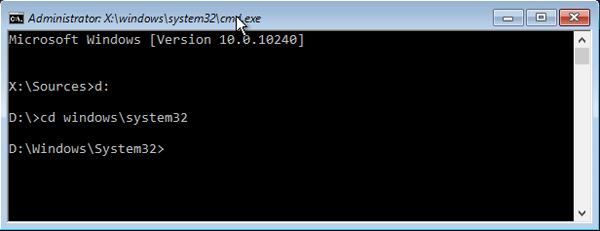
4. Get into system drive and system 32 file using the command below:
d:
cd windows\system32
(«d:» is my windows 10 system drive, replace it with your system drive letter, like «c:» or the others.)
5. Replace the «osk.exe» with «cmd.exe» application with the command bellow:
copy cmd.exe cmd.exe.ori
copy osk.exe osk.exe.ori
del osk.exe
ren cmd.exe osk.exe
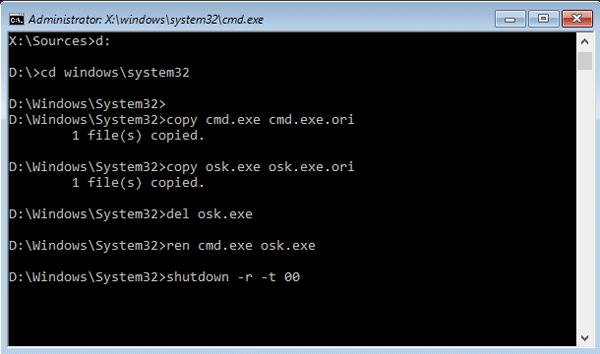
6. After running the command above successfully, eject the setup disk, and then restart computer with the command: shutdown -r-t 00 .
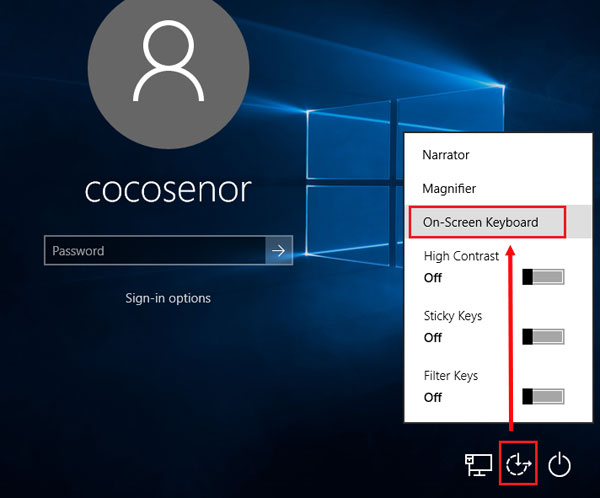
7. When boots to the logon screen normally, click on the icon «Ease of access» , and then select «On-screen Keyboard» . (Don’t be surprised to that the Command Prompt window shows up, because you have replaced the osk.exe application with cmd.exe with the command above.)
8. And now you can type in the command to activate built-in administrator account: net user administrator /active:yes .
At last remember to boot computer from the setup disk and replace the cmd.exe back to osk.exe with the command below:
d:
cd windows\system32
del osk.exe
ren cmd.exe.ori cmd.exe
ren osk.exe.ori osk.exe
Eject the setup disk, and restart computer with this command: shutdown -r-t 00 .
If don’t need the built-in administrator account any more, hidden it with the command: net user administrator /active:no .


