- How to Enable/Disable the Built-in Administrator Account on Windows 10?
- What is Built-in Administrator Account on Windows?
- How to Enable the Built-in Administrator Account on Windows 10?
- Lost Administrator Privileges (Password) on Windows 10
- Enable and Disable the Built-in Administrator Account
- Enabling the Built-in Administrator Account
- Use an answer file
- Log on by using audit mode
- Use the Local Users and Groups MMC (server versions only)
- Disabling the Built-in Administrator Account
- Configuring the Built-in Administrator Password
- Enable or Disable the Built-in Administrator Account in Windows 10
- How to Enable the Built-in Administrator Account in Windows 10
- Enable Built-in Administrator from Command Prompt (Windows 10 Home)
- What’s the Built-in Administrator Account for?
How to Enable/Disable the Built-in Administrator Account on Windows 10?
As you know, during Windows 10 installation the system prompts creating a user account and grants local administrator privileges to this account. However, during the installation another built-in (hidden) administrator account is created, which is disabled for security reasons. In this article we’ll tell about the built-in Windows 10 Administrator account, what it is used for, how to enable or disable it, and reset the password.
What is Built-in Administrator Account on Windows?
The Administrator account is created automatically during Windows installation and is used to initialize the operating system. This account is then disabled and the user is prompted to create their own account, which is added to the local Administrators group.
The built-in administrator account has full unlimited privileges on a computer. This account is not subject to UAC (User Account Control), and all programs are executed without a UAC prompt (this is an important difference from user accounts with administrator privileges). The built-in Administrator in Windows is somewhat similar to root in Linux – it has maximum rights on the system (not as NT AUTHORITY\SYSTEM, of course, but close ones).
The built-in Administrator is disabled by default in Windows 10 and Windows Server 2016. This account cannot be removed or excluded from the Administrators group.
If you boot Windows in Safe or Recovery Mode, the administrator account is automatically enabled.
Renaming the administrator account somewhat reduces the risks, but the main problem is that its SID doesn’t change. The built-in administrator account always has the well-known SID S-1-5-domain-500 .
How to Enable the Built-in Administrator Account on Windows 10?
Let’s take a look at some simple ways to enable the built-in Administrator account in Windows 10.
The quickest and easiest way to activate the administrator account is from the command prompt (or PowerShell console) running with elevated privileges.
To do this, run the command:
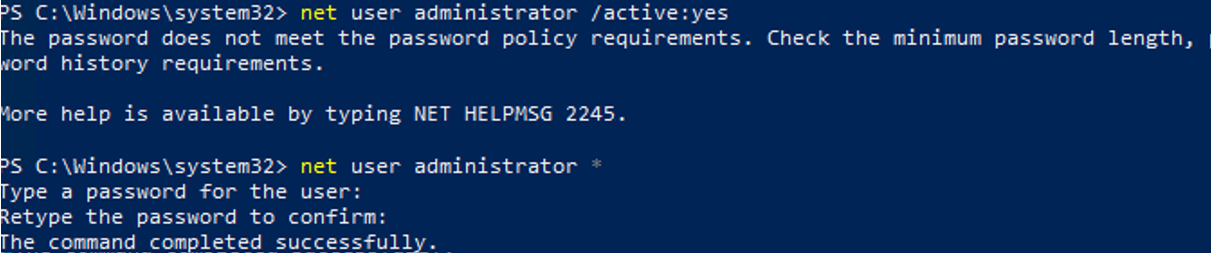
net user administrator /active:yes

Get-LocalUser -Name «Administrator» | Enable-LocalUser
As we said earlier, in modern versions of Windows, there is no password set for the administrator account. If a domain password complexity policy is applied to your computer, you may see the following message when you try to enable the administrator account:
In this case, before enabling the administrator account, you need to set a password for it:
net user administrator *
Don’t use a weak password for the built-in administrator (you can generate it using a simple PowerShell script).
If the previous command returns “ The user name could not be found ”, most likely the administrator account on the computer has been renamed.
You can find out the name of the built-in administrator account on your computer by its known SID (at the end it necessarily contains -500 ). Use the command:
wmic useraccount where «SID like ‘S-1-5-%-500′» get name

In this case, the built-in account has been renamed to admin. To enable it, run:
net user admin /active:yes
In order to list all local accounts:
If you get an “ System error 5 has occurred. Access is denied ” when you try to enable the built-in Windows administrator, make sure that the cmd.exe or powershell.exe console is running as an administrator (elevated). Also check that your account is a member of the local Administrators group.

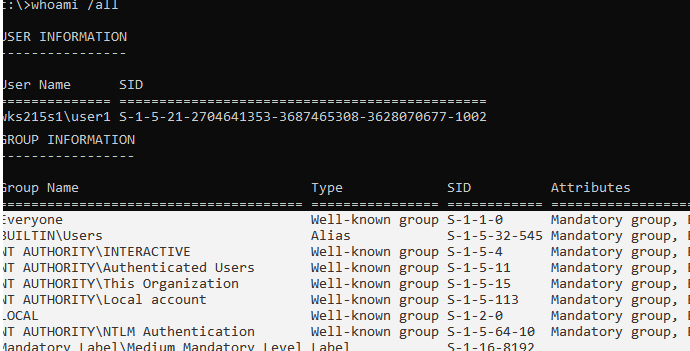
List the groups your account is member of:
In this example, user1 is not a member of the local Administrators group, and therefore doesn’t have permissions to enable the administrator account.
You can display a list of users in the local administrators group in Windows like this:
net localgroup administrators 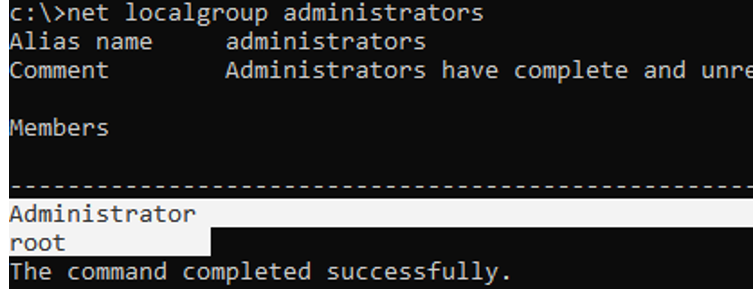
In this example, there are only two accounts in the Administrators group. If you don’t know the password for any of them, then you don’t have administrator rights on the computer. To enable the built-in administrator account and grant your user account local admin permissions, see the next section of the article
Open the MMC snap-in Local Users and Groups by entering lusrmgr.msc in the search bar or in the command prompt. In the console window, expand the Users section. Find the account named Administrator and double-click it, then uncheck Account is Disabled. Save the changes.

The administrator account is now enabled. You can change its password in this console by selecting Set Password option in the context menu.
You can enable the built-in administrator account through the local GPO. Open the Local Group Policy Editor gpedit.msc (or Local Security Policy Editor — secpol.msc ). Go to Computer Configuration -> Windows Settings -> Security Settings -> Local Policies -> Security Options. Find Accounts: Administrator account status policy and set it to Enable.

Update the Group Policy settings with the command: gpupdate /force or just reboot your computer.
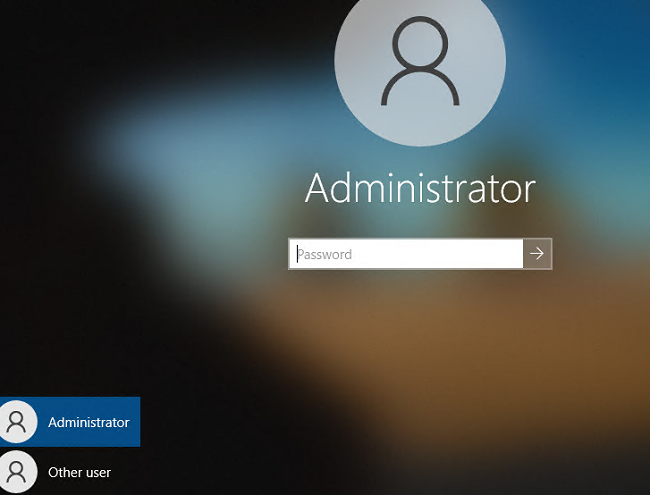
After enabling the administrator account in any of the above ways, it will be displayed on the Windows logon screen.
To disable the built-in administrator account, use the command
net user administrator /active:no
If you enabled the built-in Administrator through the Accounts: Administrator account status policy, you will have to disable it (or completely reset all local GPO settings).
Lost Administrator Privileges (Password) on Windows 10
There are situations when you have accidentally disabled your user account with administrator privileges or removed your account from local admins group. Let’s look on how to enable the built-in Administrator or add your account to the local Administrators group (even if you can’t logon Windows).
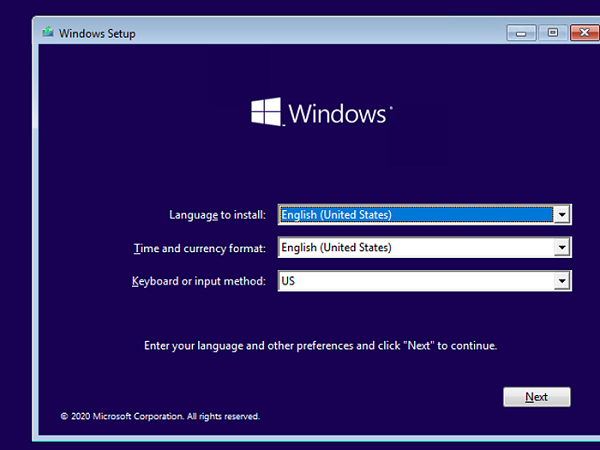
You need to boot your computer from a LiveCD (but not an MSDaRT recovery image) or a Windows 10 install media. The easiest way to create a bootable USB stick with a Windows 10 install image is using the Media Creation Tool.
Press Shift + F10 on the Windows Setup screen. A command prompt will open.
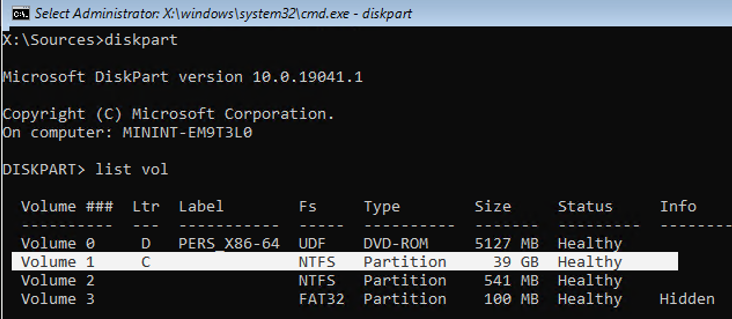
Now you need to determine which drive your Windows is installed on. Run diskpart and enter list vol . In my example, you see that Windows is located on the C: drive. This is the drive letter I will use in the following commands. Type exit to close the diskpart session.
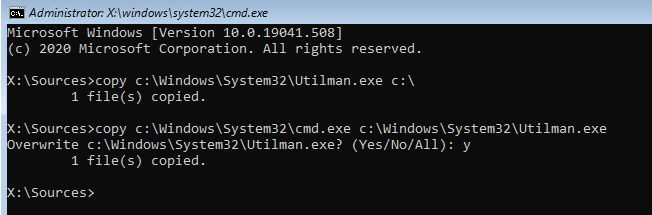
Run the following commands to create a copy of utilman.exe (Ease of Access applet) and replace it with the executable cmd.exe:
copy c:\windows\System32\utilman.exe c:\
copy c:\windows\System32\cmd.exe c:\windows\System32\utilman.exe
Reboot your computer:
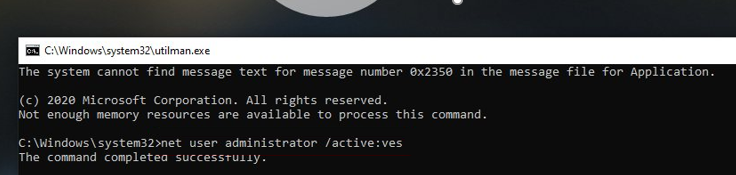
Boot Windows normally. On the Windows login screen (with a list of accounts), press the Win + U keys combination.
A command prompt window will open with System privileges. To add your account to the local Administrators group, enable the built-in Windows administrator and reset its password, run the commands:
net localgroup administrators user1 /add
net user Administrator /active:yes
net user administrator *
Now you can logon Windows under built-in Administrator or your user account, which has been assigned the local administrator permissions.
Enable and Disable the Built-in Administrator Account
When manufacturing PCs, you can use the built-in Administrator account to run programs and apps before a user account is created.
NoteВ В This topic is about manufacturing PCs. For help with the admin account on your own PC, try one of these pages:
This account is used when you log into the system by using audit mode, or when you add scripts to the auditUser configuration pass.
Enabling the Built-in Administrator Account
You can use any of the following methods to enable the built-in Administrator account:
Use an answer file
You can enable the built-in Administrator account during unattended installations by setting the AutoLogon setting to Administrator in the Microsoft-Windows-Shell-Setup component. This will enable the built-in Administrator account, even if a password is not specified in the AdministratorPassword setting.
You can create an answer file by using Windows® System Image Manager (Windows SIM).
The following sample answer file shows how to enable the Administrator account, specify an Administrator password, and automatically log on to the system.
NoteВ В Both the Microsoft-Windows-Shell-Setup\ Autologon section and the Microsoft-Windows-Shell-Setup\ UserAccounts \ AdministratorPassword section are needed for automatic logon in audit mode to work. The auditSystem configuration pass must include both these settings.
The following XML output shows how to set the appropriate values:
To prevent having to enter a password for the built-in Administrator account after you complete the out-of-box experience, set Microsoft-Windows-Shell-Setup\ UserAccounts \ AdministratorPassword in the oobeSystem configuration pass.
The following XML output shows how to set the appropriate values:
For Windows Server® 2012, the built-in Administrator password must be changed at first logon. This prevents the built-in Administrator account from having a blank password by default.
Log on by using audit mode
If the computer has not yet gone through Out-Of-Box Experience (OOBE), you can enter the built-in Administrator account by re-entering audit mode. For more information, see Boot Windows to Audit Mode or OOBE.
Use the Local Users and Groups MMC (server versions only)
Change the properties of the Administrator account by using the Local Users and Groups Microsoft Management Console (MMC).
Open MMC, and then select Local Users and Groups.
Right-click the Administrator account, and then select Properties.
The Administrator Properties window appears.
On the General tab, clear the Account is Disabled check box.
Administrator access is now enabled.
Disabling the Built-in Administrator Account
For new installations, after the end user creates a user account in OOBE, the built-in Administrator account is disabled.
For upgrade installations, the built-in Administrator account remains enabled when there is no other active local administrator on the computer, and when the computer is not joined to a domain.
Use either of the following methods to disable the built-in administrator account:
Run the sysprep /generalize command
When you run the sysprep /generalize command, the next time that the computer starts, the built-in Administrator account will be disabled.
Use the net user command
Run the following command to disable the Administrator account:
You can run this command after you configure the computer and before you deliver the computer to a customer.
Original equipment manufacturers (OEMs) and system builders are required to disable the built-in administrator account before delivering the computers to customers. To do this, you can use either of the following methods.
Configuring the Built-in Administrator Password
Instructions
When you run the sysprep /generalize command on Windows Server 2012 and Windows Server 2008 R2, the Sysprep tool resets the built-in Administrator account password. The Sysprep tool only clears the built-in Administrator account’s password for server editions, not for client editions. The next time that the computer starts, Setup displays a prompt for a password.
NoteВ В In Windows ServerВ 2012, Windows ServerВ 2008В R2, and WindowsВ ServerВ 2008, the default password policy requires a strong password for all user accounts. To configure a weak password, you can use an answer file that includes the Microsoft-Windows-Shell-Setup\ UserAccounts \ AdministratorPassword setting. You cannot configure a weak password, either manually or by using a script such as the net user command.
Enable or Disable the Built-in Administrator Account in Windows 10


Windows 10 includes a hidden Administrator account you can use to manage all the resources of the computer. In previous versions of Windows, such as Windows XP, this account was readily available when you set up your computer for the first time. Starting with Windows Vista, the built-in administrator account is disabled by default. In this article, we’ll take a look at how you can enable this built-in administrator account in Windows 10 and why you may or may not want to.
How to Enable the Built-in Administrator Account in Windows 10
There are two ways to enable the built-in administrator account. The easiest method is from within Computer Management.
Note: Computer Management is only available in Windows 10 Pro. Use the Command Prompt instructions below for Windows 10 Home.
Right-click the Start menu (or press Windows key + X) > Computer Management, then expand Local Users and Groups > Users.
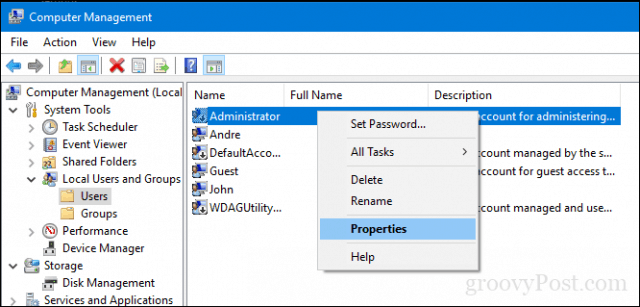
Select the Administrator account, right click on it then click Properties. Uncheck Account is disabled, click Apply then OK.

Enable Built-in Administrator from Command Prompt (Windows 10 Home)
The command line can also be used to enable and disable the administrator account.
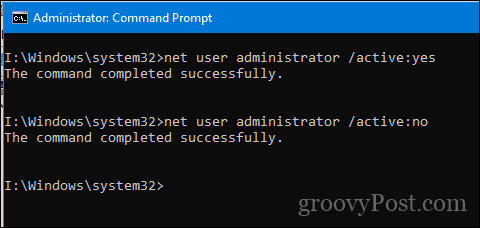
Open Start, type: CMD, right-click Command Prompt then click Run as administrator.
Type the following command and press Enter:
net user administrator /active:yes
To disable it, type the following command and press Enter:
Disabling it is just as easy, type net user administrator /active:no
What’s the Built-in Administrator Account for?
Explaining how to enable the built-in administrator account in Windows 10 is a lot easier than explaining why you would want to. Simply put, unless you know why you want to use the built-in administrator account, you probably don’t need it. In fact, you should probably leave it disabled—the built-in administrator account has free rein across your entire system which makes it a security vulnerability. But more to the point, there’s practically nothing that the built-in administrator account can do that a standard Windows 10 administrator account can’t do. When you first set up and configure Windows 10, the first account you create will be an administrator account.
If you’ve accidentally demoted, locked out, or forgotten the password to your administrator account, using the built-in administrator account may be your saving grace, but only if you’ve already enabled it beforehand since you need administrative privileges to enable or disable it. If that’s the purpose you’re using it for, you’re still better off creating a separate standard administrator account, rather than using the widely-known and abused built-in administrator account.
So, why does the built-in administrator account exist in the first place? It’s mostly for OEM system builders, who may want to make tweaks to the system before the out-of-box-experience is complete. If that’s not you, then you’ll be hard-pressed to find a reason to ever use the built-in administrator account.


