- How to Mount and Burn ISO Files in Windows 10 and Previous
- How to Mount and Unmount an ISO File in Windows
- How to Burn an ISO file to Disc
- How to Mount and Burn ISO Images in Windows 10
- Mount ISOs in Windows 10
- Burning an ISO
- How to Burn ISO Image to Bootable USB Drive on Windows 7/8/10
- Method 1: Burn ISO Image to USB Drive with WizISO
- Method 2: How to Burn ISO Image to USB Drive Using RMPrepUSB
- Conclusion:
- How to Burn ISO Files in Windows 10
- Burn ISO Files in Windows 10
- Burn ISO Files using Command Prompt
How to Mount and Burn ISO Files in Windows 10 and Previous
By Melanie Pinola 28 January 2016
Microsoft and other companies often distribute software as an ISO file, an exact copy of a DVD. In Windows 8 and Windows 10, you can easily work with these files without needing third-party software. Here’s how to mount the ISO image so you can see the contents and burn it to a physical disc so you can install the software on any computer.

How to Mount and Unmount an ISO File in Windows
Mounting or opening an ISO file is as simple as double-clicking on it, thanks to Windows’ built-in ISO-handling capabilities. In Windows 7 and earlier, you’d need to use a utility like Virtual Clone Drive to mount an ISO.
When you double-click on an ISO file in Windows 8 and above, however, it opens to show you the contents, just as if you were browsing a CD or DVD.
In fact, it shows up as a virtual DVD drive and is assigned a drive letter. You can open and copy individual files and folders from the ISO once it’s mounted.
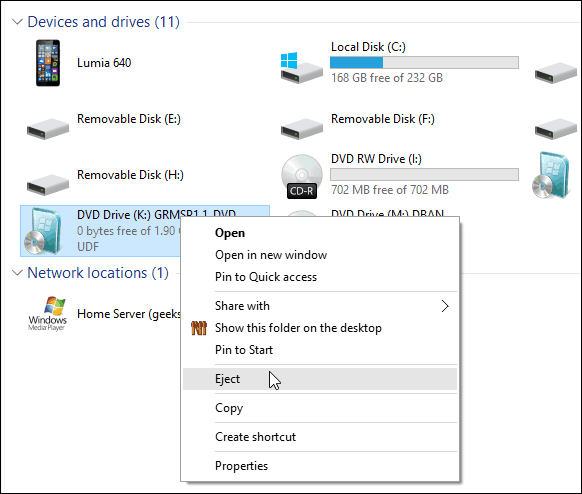
When you no longer need to work with the ISO, here’s how to unmount it: Right-click on the drive and select Eject.
How to Burn an ISO file to Disc
Creating a disc of the ISO contents, whether as a backup or to install the software on other computers, is a cinch too.
1. Insert a blank CD or DVD in your writable optical drive.
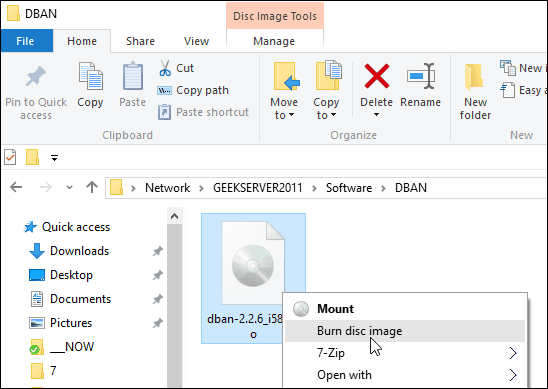
2. Right-click on the ISO file and select «Burn disk image.»
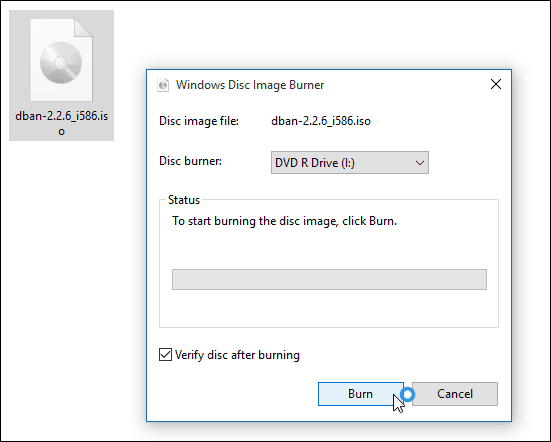
3. Select «Verify disc after burning» to make sure the ISO was burned without any errors.
4. Click Burn.
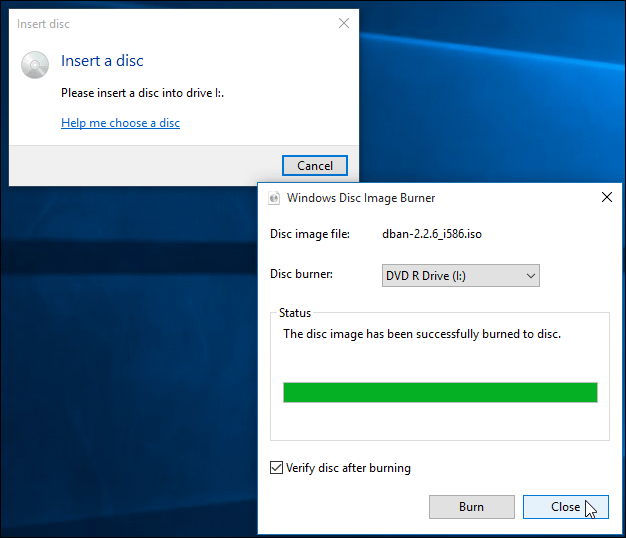
That’s it! Windows Disc Image Burner will do its thing and let you know when it’s finished.
Windows 10 doesn’t include any built-in way to create an ISO file from a DVD, but there are free utilities that will help you do this, such as open-source InfraRecorder.
How to Mount and Burn ISO Images in Windows 10

When Windows 7 was released, a significant new built-in feature was the ability to burn ISO images to disc. When Windows 8 came around, it included the ISO burning and allowed mounting of ISO images natively without third-party software.
If you skipped Windows 8 and upgraded Windows 7 to Windows 10, here’s a look at using both features that are still present in Microsoft’s new OS.
Mount ISOs in Windows 10
First off, we’ll take a look at mounting an ISO file. In previous versions of Windows, you needed to use a third-party tool like Virtual Clone Drive to mount an ISO or a utility like ImgBurn to burn them to disc.
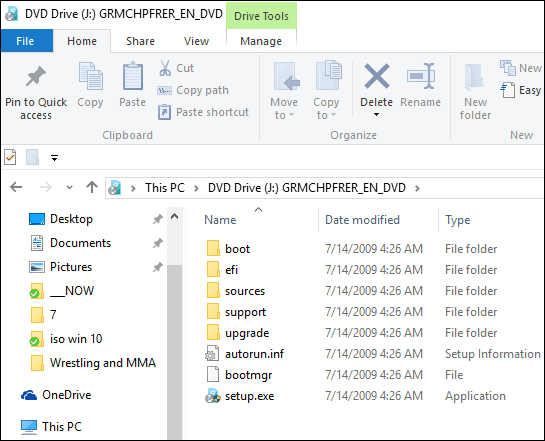
However, since Windows 8, mounting an ISO is a simple as a double click. That will mount the disc image as a virtual drive, and you can see the contents.

Like in the example below I just double clicked the Windows 7 image to reveal the files on it.
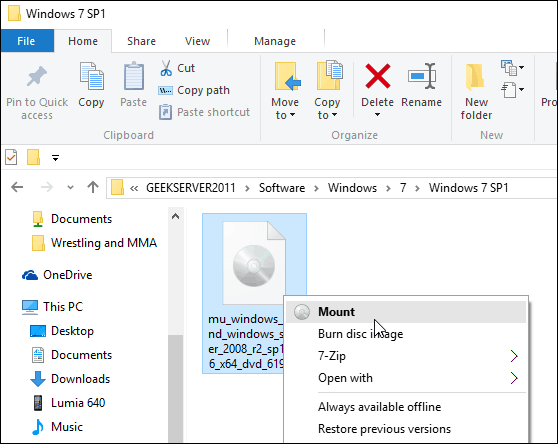
Alternately, you can right-click the ISO file and select Mount from the context menu; note that just below that is the option to Burn disc image.
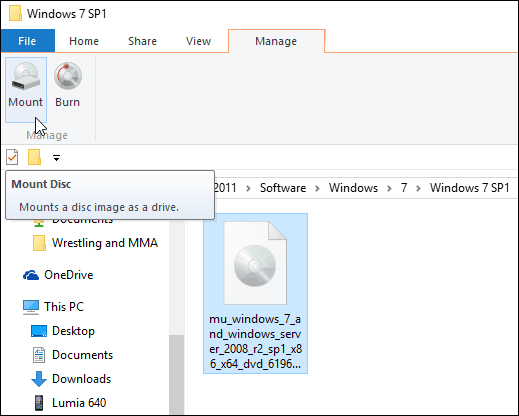
You can also select the ISO file, and from the Ribbon go to Manage > Mount…; note that by using this navigation method you also get the burn icon as well.
No matter how you choose to mount your ISO, it mounts it as a virtual disc, and it will show up in This PC as a drive. For example, in the shot below I have three different ISO files mounted.
Then you can access them just as if there was a physical disc in your drive.

Also, note that if you want to unmount the ISO, just right-click and select Eject.
Burning an ISO
As I explained above, the option to burn an image is either on the Ribbon or the context menu. Burning an ISO to disc is essentially the same as it was in Windows 7. Pop in a blank disc and right-click and select Burn disc image.
Then the Windows Disc Image Burner tool kicks off. Select the drive with your blank CD or DVD. I also suggest checking Verify disc after burning. That will make sure there are no errors on the disc during the burning process.
After it’s done, the drive will pop open with your completed disc. That’s all there is to it!
While it’s usually faster to create a USB installation drive for software, some people are just more comfortable using a physical DVD, CD, or Blu-ray disc. Flash drives have a tendency to be lost easily. If you need to burn a retail copy of Windows 7 or higher to disc for any reason, head to the Microsoft Software Download site.
There you will find an ISO for 32 and 64-bit versions of Windows 7, 8.1, and Windows 10.
One more thing. If you have a file compression utility installed, like 7-zip, it might have taken over the file association for ISOs. If so, you will need to change it to Windows Explorer. To do that, head to Settings > System > Default Apps > Choose default apps by file type. Scroll down and make Windows Explorer the default.

And if you have questions, concerns, or suggestions about Microsoft’s new OS, make sure to sign up for our free Windows 10 Forums.
How to Burn ISO Image to Bootable USB Drive on Windows 7/8/10
USB drive can be made bootable, but it is not as straightforward as it may sound. Copy-pasting the ISO image to the drive will not cut it. You will need to burn the file. This is the reason why you need an application that can help you with the process. Basically, ISO image files are compressed with numerous data that can be read once it is burned on a disc or thumb drive. Now, burning ISO images to a USB lash drive is not similar to copying music, videos, pictures etc. to your flash drive. First, you will be required to burn the file using an external software then you can read the files contained inside the ISO image file.
Here we will list two ways to help you burn ISO file to your USB drive.
Method 1: Burn ISO Image to USB Drive with WizISO
iSeePassword WizISO — It’s a flawless little powerful tool that helps to burn or write Windows 10/7/7 ISO image files to USB flash drives or CD/DVD with just 1 click. It is a very small program yet very effective and powerful. You can even create bootable Windows operating system disks by burning the Windows ISO image files using this program. It is faster than any program available online and you can even change the drive format to FAT 32, FAT, NTFS easily.
WizISO — Directly Burn Windows 10/7/8 ISO to USB/DVD,CD with Just One-Click
- Specialized tool for creating bootable USB, DVD, CD from ISO file without getting any errors.
- Support writing 4 system file: FAT, FAT32, exFAT, and NTFS file system.
- All the necessary features are available: ISO create, burn, extract, copy disc, edit.
- Fully support two partition style: MBR(legacy BIOS/CMS boot) and GPT (UEFI boot).
- Easy to use, no professional skills required.
What You Need:
1) A USB flash drive or DVD/Cd (a minimum of 4GB is recommended).
2) Source Microsoft ISOs for Windows 10/Win7/Win8, 8.1, XP, Vista.
3) The WizISO file (click the download button here)
1 Directly download the program on any Windows computer and install it, then run it as soon it is finished. As you can it’s very
2 This tool is extremely easy to use. Simply click on «Browse» and import your ISO file to program.
3 Once the right ISO image has been chosen, just below the ‘Create a bootable disk using’ option. Insert a CD/DVD or USB flash drive to your PC. Click on the Burn button to begin the process. You will get the warning that all the data on the chosen device will be destroyed. Click on OK to proceed.
4 Click on «Burn» and within few moments, your disk will be ready.
If you’re locked out of Windows 7 and can’t recall the password at all, don’t worry, resetting Windows 7 password will be extremelyВ easy with the help of Windows Password Recovery Pro.
Method 2: How to Burn ISO Image to USB Drive Using RMPrepUSB
The first thing you need to do is download RMPrepUSB on your computer. USB drive created using RMPrepUSB will enable you to easily access the ISO file and change it into a bootable device. The RMPrepUSB executable file is portable and you will not need to install it after saving it on your computer.
Step 1. Once the download is complete, locate the file RMPrepUSB on your hard drive and double-click on it. It will run the program straightaway without having to install. So, there won’t be any registry entries. Remember that burning any file to the USB drive will format it first.
Step 2. Insert the USB drive that you wish to burn the ISO image file to. RMPrepUSB application will automatically detect all the USB drives connected to your computer.
Step 3. Select the desired USB drive from the drop-down labeled as ‘Device’. You will see the name of the device and the amount of free space available in the drive. It will also show the drive letter allocated to the USB drive. This helps you make sure you are only choosing the right drive and prevents any accidental formatting of any other device.
Step 4. Do not make any changes to the next three fields, namely ‘Partition scheme and target system type, Cluster Size, and File System’, unless of course you know exactly what you are doing and intend to make the changes.
Step 5. You can choose the New Volume Label; you can give it the name you desire. However, even if you leave it untouched, it will not affect anything. You can change the volume label name later as well.
Step 6. There are several format options under the ‘Bootloader’ section. Most of them could be left alone as the default settings are most appropriate. However, if you suspect any issues with your USB drive, you can always choose ‘Check device for bad blocks. It is okay to choose ‘1 Pass’. However, if you feel that your device may have some serious issues, you can choose a bigger number (more passes.)

Step 7. This is where you need to select the right ISO image to create the bootable drive. Click on the icon of CD/DVD to locate the desired ISO image that you wish to burn to your USB drive. Once you find the file click on the ‘Open’ button.
Step 8. The program will now begin the inspection of the ISO image you selected. It may take a few seconds. If you receive the message that the ISO image is unsupported, it would mean that the ISO file is not right. You will need to find the right ISO image first.
Cons:
- Quite complicated, not intended for the beginner.
- Don’t support UEFI boot.
- Files are often corrupted or not burned properly many times.
- Slow program, can take up to 30 minutes to burn Windows operating system files.
Conclusion:
ISO image files are mainly used to create Windows bootable disks and WinISO does a tremendous job making sure that your ISO image file is successfully burned so that you can directly boot from the disk. Also, if you need to extract any data from an ISO image file then also you can use this program without any anticipation.

Vicky is a professional Windows technology author with many experience, focusing on computer technology. She’s very much enjoy helping people find solutions to their problems. Her knowledge and passion always drive her to discover everything about technology.
How to Burn ISO Files in Windows 10
Do you know that you can burn ISO files in Windows 10 without using any third party software? If your answer is No, then we recommend you to check out this tutorial. In this tutorial, we will teach you how to do that.
At the time of Windows XP and Windows Vista, you need to use third party software to burn ISO files, but in Windows 7 company introduced its own ISO burner application named as Windows Disc Image Burner. All you will require is an empty CD/DVD disc and ISO image or ISO file which you want to burn.
A very less number of Windows users are aware of this thing that you can use Windows native ISO burner software to burn regular data or ISO images. So if you’re wondering to burn ISO files to a DVD? Check out how it can be done in Windows 10:
Keep in mind: If you’re using any file compression application like Winrar or 7-zip, then chances are it might take over the file association for ISOs. To use this feature, you need to set it to Windows Explorer. For that, you need to launch the Settings app ->System -> Default Apps -> Choose default apps by file type. From the list of file type locate the .iso and change it to Windows Explorer
Burn ISO Files in Windows 10
The process of burning ISO image in Windows 10 is similar to Windows 7. You will find options to burn an ISO image in the context menu or in Ribbon. For burning ISO file:
1. First, you need to pop in a blank DVD or CD disc in a drive
2. Make right click on the ISO Image and from the context menu select “Burn Disc Image“

3. A new window will appear in which you will see an option labeled as Disc Burner. Click on the dropdown which is on the right side and select the drive with blank DVD or CD.

Tip: You must check the box with option “Verify disc after burning“. This will assure that there is no flaw on the DVD or CD through the burning process
4. Once burning process is completed, the drive will automatically eject the completed disc.
Alternatively, you can also burn ISO images in Windows 10 using Command Prompt and if you’re interested in this method, then keep reading.
Burn ISO Files using Command Prompt
Windows 10 comes with a hidden tool named as isoburn that helps in burning ISO image right from the Command Prompt. This method also follows the same procedure as mentioned in method one. You can find this tool at this location:
You have to use the following usage syntax to burn ISO files using this utility:
Follow the steps below to successfully burn an ISO file in Windows 10:
1. Launch the Command prompt
2. After that, type the following command and hit enter:
In above command:
- /Q argument will start the burning process
- F: is the location of the DVD or CD Drive
- C: \Sample.ISO is the location where iso file is stored.

So make sure to change the above information according to your computer.
3. Next steps are same as mentioned in Method One.
So these are two simple and easy to use method using which you can burn ISO images or files in Windows 10. The good thing about these two methods is that you’re not using any third party software. Why don’t you try these methods and let us know, if you have any query?


