- Настройка шаблона сертификата сервера Configure the Server Certificate Template
- Настройка шаблона сертификата To configure the certificate template
- Create Windows CA Certificate Templates for CUCM
- Available Languages
- Download Options
- Contents
- Introduction
- Prerequisites
- Requirements
- Components Used
- Background information
- Configure
- Callmanager Template
- Tomcat Template
- IPsec Template
- CAPF Template
- TVS Template
- Generate a Certificate
- Verify
- Troubleshoot
Настройка шаблона сертификата сервера Configure the Server Certificate Template
Применяется к: Windows Server (Semi-Annual Channel), Windows Server 2016 Applies to: Windows Server (Semi-Annual Channel), Windows Server 2016
Эту процедуру можно использовать для настройки шаблона сертификата, который Active Directory ® служб сертификации (AD CS) используется в качестве основания для сертификатов сервера, зарегистрированных на серверах в сети. You can use this procedure to configure the certificate template that Active Directory® Certificate Services (AD CS) uses as the basis for server certificates that are enrolled to servers on your network.
При настройке этого шаблона можно указать серверы по Active Directory группе, которые должны автоматически получить сертификат сервера из AD CS. While configuring this template, you can specify the servers by Active Directory group that should automatically receive a server certificate from AD CS.
Приведенная ниже процедура содержит инструкции по настройке шаблона для выдаче сертификатов для всех следующих типов серверов: The procedure below includes instructions for configuring the template to issue certificates to all of the following server types:
- Серверы, на которых выполняется служба удаленного доступа, включая серверы шлюзов RAS, входящие в группу Серверы RAS и IAS . Servers that are running the Remote Access service, including RAS Gateway servers, that are members of the RAS and IAS Servers group.
- Серверы, на которых выполняется служба сервера политики сети (NPS), входящие в группу серверов RAS и IAS . Servers that are running the Network Policy Server (NPS) service that are members of the RAS and IAS Servers group.
Членство в группах «Администраторы предприятия » и «Администраторы домена корневого домена» является минимальным требованием для выполнения этой процедуры. Membership in both the Enterprise Admins and the root domain’s Domain Admins group is the minimum required to complete this procedure.
Настройка шаблона сертификата To configure the certificate template
В CA1 в диспетчер сервера выберите Сервис, а затем щелкните центр сертификации. On CA1, in Server Manager, click Tools, and then click Certification Authority. Откроется консоль управления (MMC) центра сертификации. The Certification Authority Microsoft Management Console (MMC) opens.
В консоли управления (MMC) дважды щелкните имя ЦС, щелкните правой кнопкой мыши шаблоны сертификатов, а затем выберите пункт Управление. In the MMC, double-click the CA name, right-click Certificate Templates, and then click Manage.
Откроется консоль Шаблоны сертификатов. The Certificate Templates console opens. Все шаблоны сертификатов отображаются в области сведений. All of the certificate templates are displayed in the details pane.
В области сведений выберите шаблон сервер RAS и IAS . In the details pane, click the RAS and IAS Server template.
В меню действие выберите пункт дублировать шаблон. Click the Action menu, and then click Duplicate Template. Откроется диалоговое окно Свойства шаблона. The template Properties dialog box opens.
Перейдите на вкладку Безопасность . Click the Security tab.
На вкладке Безопасность в поле имена групп или пользователей щелкните Серверы RAS и IAS. On the Security tab, in Group or user names, click RAS and IAS servers.
В области разрешения для серверов RAS и IAS в разделе Разрешить убедитесь, что выбран параметр Регистрация , а затем установите флажок Автоматическая регистрация . In Permissions for RAS and IAS servers, under Allow, ensure that Enroll is selected, and then select the Autoenroll check box. Нажмите кнопку ОК и закройте оснастку MMC «Шаблоны сертификатов». Click OK, and close the Certificate Templates MMC.
В консоли MMC центр сертификации щелкните шаблоны сертификатов. In the Certification Authority MMC, click Certificate Templates. В меню действие наведите указатель на пункт создать и выберите пункт Выдаваемый шаблон сертификата. On the Action menu, point to New, and then click Certificate Template to Issue. Откроется диалоговое окно Включение шаблонов сертификатов . The Enable Certificate Templates dialog box opens.
В окне Включение шаблонов сертификатов щелкните имя только что настроенного шаблона сертификата и нажмите кнопку ОК. In Enable Certificate Templates, click the name of the certificate template that you just configured, and then click OK. Например, если вы не изменили имя шаблона сертификата по умолчанию, щелкните Копия RAS-сервера и IAS-сервер, а затем нажмите кнопку ОК. For example, if you did not change the default certificate template name, click Copy of RAS and IAS Server, and then click OK.
Create Windows CA Certificate Templates for CUCM
Available Languages
Download Options
Contents
Introduction
This document provides a step-by-step procedure in order to create certificate templates on Windows Server-based Certification Authorities (CA), that are compliant with X.503 extension requirements for every type of Cisco Unified Communications Manager (CUCM) certificate.
Prerequisites
Requirements
Cisco recommends that you have knowledge of these topics:
- CUCM version 11.5(1) or later
- Basic knowledge of Windows Server administration is also recommended
Components Used
The information in this document is based on these software and hardware versions:
- The information in this document is based on CUCM Version 10.5(2) or later.
- Microsoft Windows Server 2012 R2 with CA services installed.
The information in this document was created from the devices in a specific lab environment. All of the devices used in this document started with a cleared (default) configuration. If your network is live, ensure that you understand the potential impact of any command.
Background information
There are five types of certificates that can be signed by an external CA:
Presented at secure device registration, can sign Certificate Trust List (CTL)/Internal Trust List (ITL) files, used for secure interactions with other servers such as secure Session Initiation Protocol (SIP) Trunks.
· Cisco Call Manager
· Cisco CTI Manager
Presented for Secure Hypertext Transfer Protocol (HTTPS) interactions.
· Single Sign-On (SSO)
Used for backup file generation, as well as IP Security (IPsec) interaction with Media Gateway Control Protocol (MGCP) or H323 gateways.
· Cisco DRF Master
· Cisco DRF Local
Used to generate Locally Significant Certificates (LSC) for phones.
· Cisco Certificate Authority Proxy Function
Used to create a connection to the Trust Verification Service (TVS), when the phones are not able to authenticate an unknown certificate.
· Cisco Trust Verification Service
Each of these certificates has some X.509 extension requirements that need to be set, otherwise, you can encounter misbehaviours on any of the aforementioned services:
X.509 Extended Key Usage
· Web Server Authentication
· Web Client Authentication
· Web Server Authentication
· Web Client Authentication
· Web Server Authentication
· Web Client Authentication
· IPsec End System
· IPsec End System
· TWeb Server Authentication
· Web Client Authentication
· Web Server Authentication
· Web Client Authentication
Configure
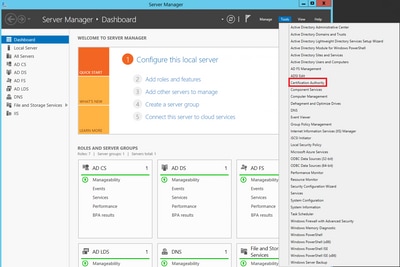
Step 1. On the Windows Server, navigate to Server Manager > Tools > Certification Authority, as shown in the image.
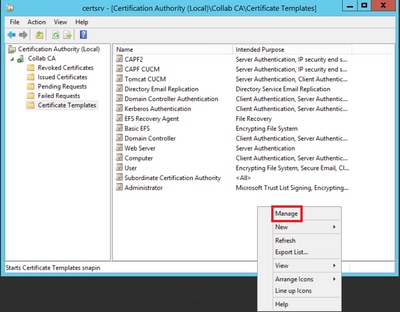
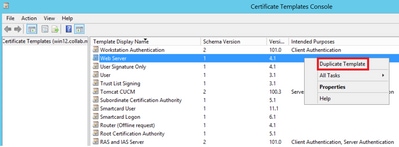
Step 2. Select your CA, then navigate to Certificate Templates, right-click on the list and select Manage, as shown in the image.
Callmanager Template
Step 1. Find the Web Server template, right-click on it and select Duplicate Template, as shown in the image.

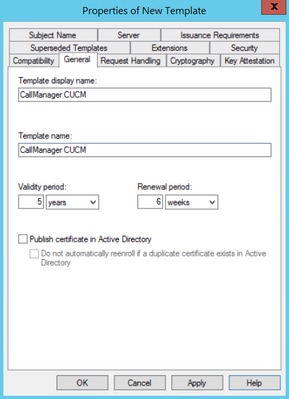
Step 2. Under General, you can change the certificate template’s name, display name, validity, etc.
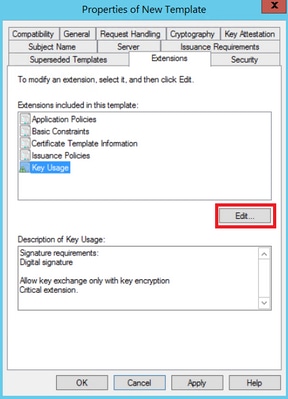
Step 3. Navigate to Extensions > Key Usage > Edit, as shown in the image.
Step 4. Select these options and click OK, as shown in the image.
- Digital signature
- Allow key exchange only with key encryption (key encipherment)
- Allow encryption of user data

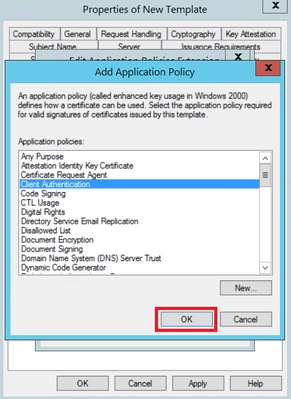
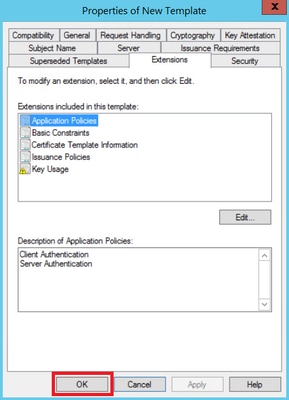
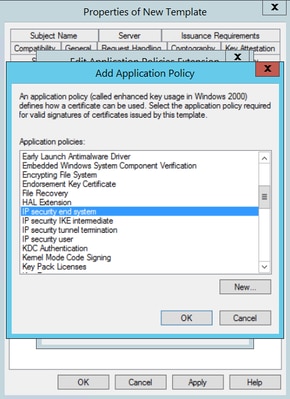
Step 5. Navigate to Extensions > Application Policies > Edit > Add, as shown in the image.


Step 6. Search for Client Authentication, select it and click OK on both this window and the previous one, as shown in the image.
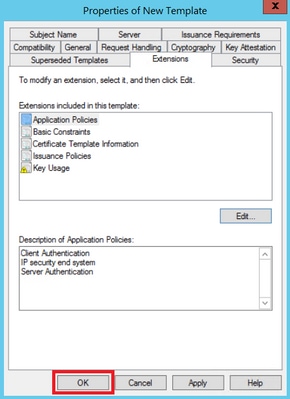
Step 7. Back on the template, select Apply and then OK.
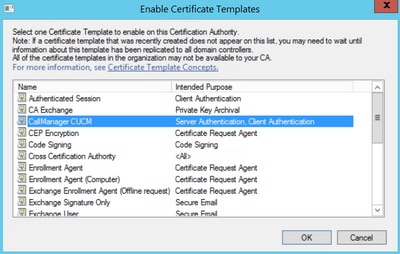
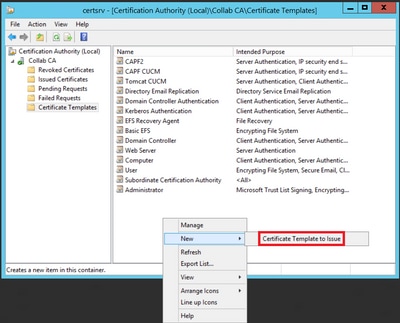
Step 8. Close the Certificate Template Console window, and back on the very first window, navigate to New > Certificate Template to Issue, as shown in the image.

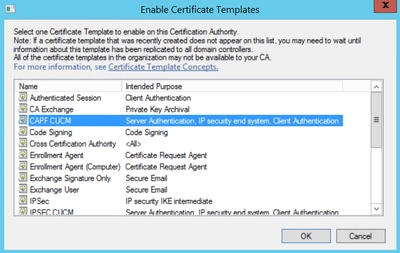
Step 9. Select the new CallManager CUCM template and select OK, as shown in the image.
Tomcat Template
Step 1. Find the Web Server template, right-click on it and then select Duplicate Template, as shown in the image.
Step 2. Under General, you can change the certificate template’s name, display name, validity, etc.
Step 3. Navigate to Extensions > Key Usage > Edit, as shown in the image.

Step 4. Select these options and click OK, as shown in the image.
- Digital signature
- Allow key exchange only with key encryption (key encipherment)
- Allow encryption of user data
Step 5. Navigate to Extensions > Application Policies > Edit > Add, as shown in the image.

Step 6. Search for Client Authentication and select it and then select OK on both this window and the previous one.

Step 7. Back on the template, select Apply and then OK, as shown in the image.

Step 8. Close the Certificate Templates Console window, and back on the very first window, navigate to New > Certificate Template to Issue, as shown in the image.

Step 9. Select the new Tomcat CUCM template and click on OK, as shown in the image.

IPsec Template
Step 1. Find the Web Server template, right-click on it and select Duplicate Template, as shown in the image.
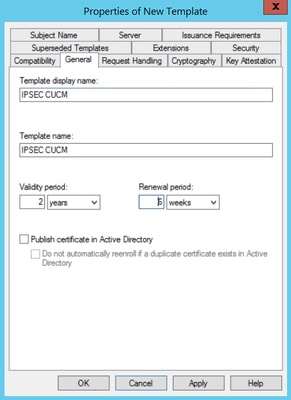
Step 2. Under General, you can change the certificate template’s name, display name, validity, etc..
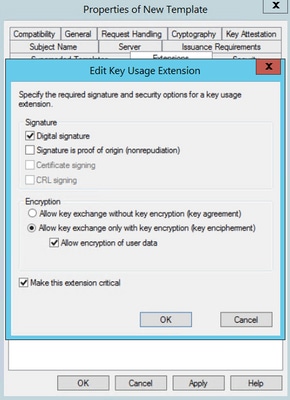
Step 3. Navigate to Extensions > Key Usage > Edit, as shown in the image.
Step 4. Select these options and select OK, as shown in the image.
- Digital signature
- Allow key exchange only with key encryption (key encipherment)
- Allow encryption of user data
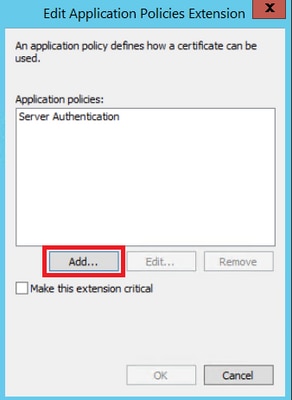
Step 5. Navigate to Extensions > Application Policies > Edit > Add, as shown in the image.

Step 6. Search for Client Authentication, select it and then OK, as shown in the image.

Step 7. Select Add again, search for IP security end system, select it and then click OK on this and on the previous window as well.

Step 8. Back on the template, select Apply and then OK, as shown in the image.
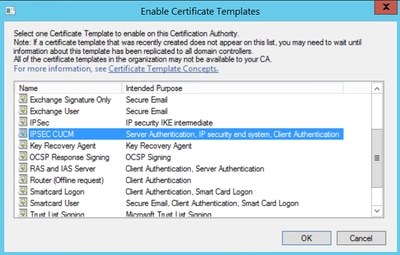
Step 9. Close the Certificate Templates Console window, and back on the very first window, navigate to New > Certificate Template to Issue, as shown in the image.
Step 10. Select the new IPSEC CUCM template and click on OK, as shown in the image.
CAPF Template
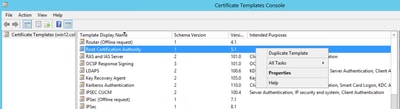
Step 1. Find the Root CA template and right-click on it. Then select Duplicate Template, as shown in the image.
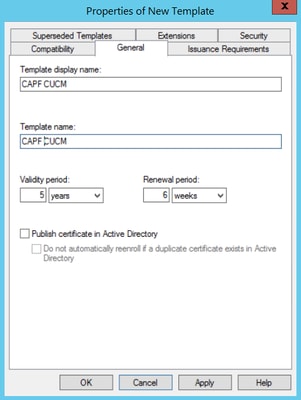
Step 2. Under General, you can change the certificate template’s name, display name, validity, etc.
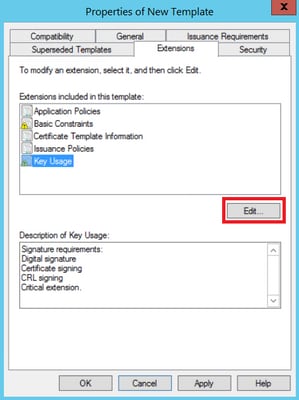
Step 3. Navigate to Extensions > Key Usage > Edit, as shown in the image.
Step 4. Select these options and select OK, as shown in the image.
- Digital signature
- Certificate signing
- CRL signing

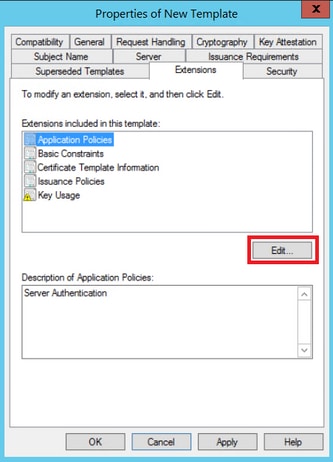
Step 5. Navigate to Extensions > Application Policies > Edit > Add, as shown in the image.

Step 6. Search for Client Authentication, select it and then select OK, as shown in the image.

Step 7. Select Add again, search for IP security end system, select it and then click OK on this and on the previous window as well, as shown in the image.
Step 8. Back on the template, select Apply and then OK, as shown in the image.
Step 9. Close the Certificate Templates Console window, and back on the very first window, navigate to New > Certificate Template to Issue, as shown in the image.

Step 10. Select the new CAPF CUCM template and select OK, as shown in the image.

TVS Template
Step 1. Find the Root Certification Authority template and right-click on it. Then select Duplicate Template, as shown in the image.

Step 2. Under General, you can change the certificate template’s name, display name, validity, etc.

Step 3. Navigate to Extensions > Key Usage > Edit, as shown in the image.

Step 4. Select these options and then OK, as shown in the image.
- Digital signature
- Allow key exchange only with key encryption (key encipherment)
- Allow encryption of user data

Step 5. Navigate to Extensions > Application Policies > Edit > Add, as shown in the image.


Step 6. Search for Client Authentication and select it and then select OK on both this window and the previous one, as shown in the image.

Step 7. Back on the template, select Apply and then OK, as shown in the image.

Step 8. Close the Certificate Templates Console window, and back on the very first window, navigate to New > Certificate Template to Issue, as shown in the image.

Step 9. Select the new TVS template and click OK, as shown in the image.

Generate a Certificate
Use this example in order to generate a CallManager certificate with the use of the newly created templates. The same procedure can be used for any certificate type, you just need to select the certificate and template types accordingly:
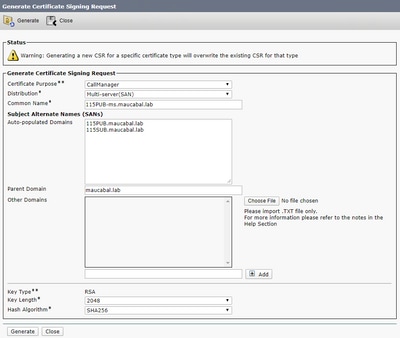
Step 1. On CUCM, navigate to OS Administration > Security > Certificate Management > Generate CSR.
Step 2. Select these options and select Generate, as shown in the image.
- Certificate Purpose: CallManager
- Distribution:

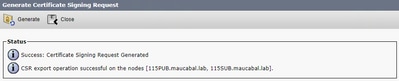
Step 3. A confirmation message is generated, as shown in the image.

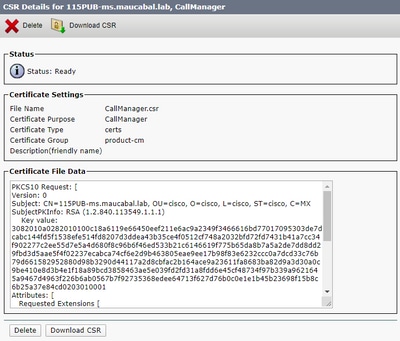
Step 4. On the certificate list, look for the entry with type CSR Only and select it, as shown in the image.

Step 5. On the pop-up window, select Download CSR, and save the file on your computer.

Step 6. On your browser, navigate to this URL, and enter your domain controller administrator credentials: https:// /certsrv/.
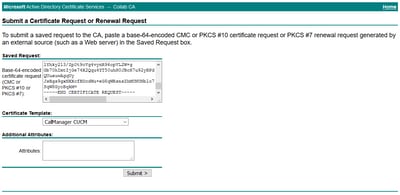
Step 7. Navigate to Request a certificate > advanced certificate request, as shown in the image.


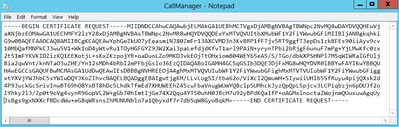
Step 8. Open the CSR file and copy all its contents:

Step 9. Paste the CSR on the Base-64-encoded certificate request field. Under Certificate Template, select the correct template and click Submit, as shown in the image.

Step 10. Finally, select Base 64 encoded and Download certificate chain, the generated file can now be uploaded the CUCM.

Verify
The verification procedure is actually part of the configuration process.
Troubleshoot
There is currently no specific troubleshooting information available for this configuration.


