- Заметки
- [Fixed] Windows Cannot be Installed to This Disk. The Selected Disk Is of the GPT Partition Style
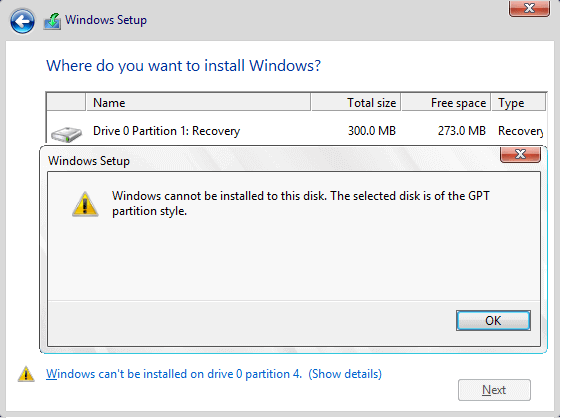
- Error: ‘Windows cannot be installed to this disk. The selected disk is of the GPT partition style.’
- Fix ‘Windows Cannot Be Installed to This Disk’ withВ GPT Partition Style Error -В 3 Solutions
- Method 1. Convert to MBR via Partition Manager SoftwareВ — No Data LossВ
- Method 2. Convert GPT to MBR Using Diskpart — Request Wiping Disk
- Method 3. Reformatting DiskВ to MBR Using Windows SetupВ — RequestВ Deleting Partitions
- Fix Windows Cannot Be Installed to This Disk GPT Is Possible Now
- Extended Reading: What Is GPT Partition Style
- Решение проблемы с GPT-дисками при установке Windows
- Решаем проблему дисков GPT
- Способ 1: Настройка параметров BIOS
- Способ 2: Флешка UEFI
- Способ 3: Конвертирование GPT в MBR
- Способ 4: Удаление разделов
- Заключение
Заметки
Когда мы можем столкнуться с этой ошибкой?
Вот несколько примеров:
» Я пытаюсь установить Windows 7 на отдельном разделе в 100 ГБ рядом с разделом Windows 8 (dual boot). Загрузочные разделы диска в порядке, но я не могу выбрать свой раздел ( диск 0 раздел 5 ) из-за ошибки : «The selected disk is of the GPT partition style».
«П ытаюсь установить Windows Server 2008 R2 . При выборе раздела получаю ошибку: «Windows cannot be installed on this disk. The selected disk is of the GPT partition style».
«При попытке снести Windows 7 и установить Windows 8 выскакиевает ошибка: «Windows cannot be installed to this disk. The selected disk is of the GPT partition style».
Как решить эту проблему простейшим путём?
Я неспроста сказал «простейшим путём». Кроме предложенного существует много решений, но мы пойдём именно этим: сконвертируем GPT-диск в MBR утилитой DISKPART.
- Запустите установку Windows (той версии, которая уже установлена), выберите вариант «Восстановление системы» и запустите командную строку (Shift + F10).
- В командной строке вводим DISKPART и жмём Enter.
- Вводим LIST DISK. Смотрим и запоминаем номер диска, на который хотим производить установку (обычно это Disk 0).
- Вводим SELECT DISK 0 (указываем диск из предыдущей команды).
- Вводим CLEAN для очистки текущего раздела диска. ВНИМАНИЕ! ВСЕ ВАШИ ДАННЫЕ БУДУТ УДАЛЕНЫ!
- Вводим CONVERT MBR, чтобы сконвертировать GPT в MBR.
- Вводим EXIT для завершения операции.
После этого можно устанавливать Windows в обычном режиме.
[Fixed] Windows Cannot be Installed to This Disk. The Selected Disk Is of the GPT Partition Style
Don’t worry if Windows SetupВ reportsВ «Windows cannot be installed to this disk. The selected disk is of the GPT partition style» error. Here are three quick fixes that you can apply toВ get rid of this error from your PC:
Error: ‘Windows cannot be installed to this disk. The selected disk is of the GPT partition style.’
This error isВ also known asВ «Windows cannot be installed to this disk GPT» whichВ oftenВ occurs during Windows installation on Windows 10/8/7. So what caused theВ «Windows Cannot Be Installed to This Disk — GPT Partition Style» error on your PC? Let’s see.
Cause of ‘The selected disk is of the GPT partition style’ Error
During Windows setup, you must choose to install Windows using the MBR or GPT partition style. Also, your hard drive partition style must be set up to support either UEFIВ mode or LegacyВ mode:
- UEFI в†’ GPT
- Legacy BIOS в†’ MBRВ (Read further: UEFI vs. BIOS)
When you receive «Windows Cannot be installed to this disk. The selected disk is of the GPT partition style», it suggests that your computer is currently booted in Legacy BIOS mode but your hard drive is not configured for LegacyВ mode. So the best way out is to convert the GPT partition style disk to MBR to fit the PC’s Legacy boot mode.
Fix ‘Windows Cannot Be Installed to This Disk’ withВ GPT Partition Style Error -В 3 Solutions
As mentioned, the error message indicates that Windows is booted in UEFI mode that requires the system disk to be GPT partition style. The direct solution to «The selected disk is of the GPT partition style» is to change the MBR disk to GPT. After figuring out the reasons, the troubleshooting becomes much easier now. Here, you may follow one of the next three solutions to fix this error on your own.
Method 1. Convert to MBR via Partition Manager SoftwareВ — No Data LossВ
For the easiest GPT to MBR conversion solution, we strongly advise you choose a non-data-destroying method. Here, a third-party powerful partition toolВ -В EaseUS Partition Master with its disk conversion feature can help. It allows you to convert GPT to MBRВ without losing data.
You have two options to convert the disk: 1. Convert the disk to GPT onВ a new computer; 2. Convert the disk to GPT via a WinPE bootable disk. Both data and partitions are safely protected. Let’s see the details:
#1. Convert Disk to GPT on a New Computer
Take off your target disk and connect it to a new computer. Install and run EaseUS Partition Master on the new PC to start the disk conversation with the following steps.
- Right-click the GPT disk that you want to convert and select «Convert to MBR».В
- Click the «Execute Operation» button at the top-left corner.
- Next, click «Apply» and begin to convert GPT disk to MBR.В
#2. Convert Disk to GPT on Current PCВ from WinPE Bootable Disk
If you don’t have a second computer, you can run the EaseUS partition managerВ to create a WinPE Bootable diskВ on a USB flash drive.В Then complete the disk conversion process as shown below:
Step 1. Reboot the PC from the USB bootable disk to enter a WinPE environment.
Step 2.В OnВ EaseUS Partition Master, right-click the system disk andВ select «Convert to MBR». Click «OK».
Step 3.В Click the «Execute Operation 1» button, click «Apply» to save the changes.
After this, you can continue with the process of installing Windows OS on your target computer again.
Method 2. Convert GPT to MBR Using Diskpart — Request Wiping Disk
The other way that you can try is to run Diskpart and convert the disk to GPT by booting up the PCВ via a Windows installation DVD or USB. This method needs you to manually wipe a drive and convert it to GPT.В
Note: If the data matters, go back to Method 1 and convert to MBR using EaseUS Partition Master, preservingВ your data.
Let’s see how to convert GPT to MBR with the following steps:
Step 1. Turn off the PC and plug inВ the Windows installation DVD or USB.
Step 2. Boot the PC from the DVD or USB.
Step 3. In Windows Setup, press «Shift + F10» to start Command Prompt.
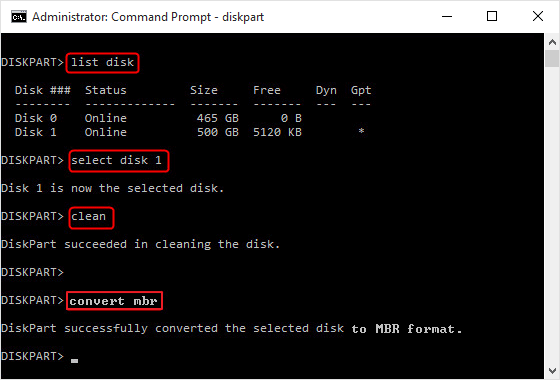
Step 4.Type the following command in order and hit Enter each time:
- diskpart
- list disk
- select disk
- clean
- convert mbr
Step 5.В Type exitВ to close Diskpart Command Prompt.
Step 6. Continue the Windows installation.
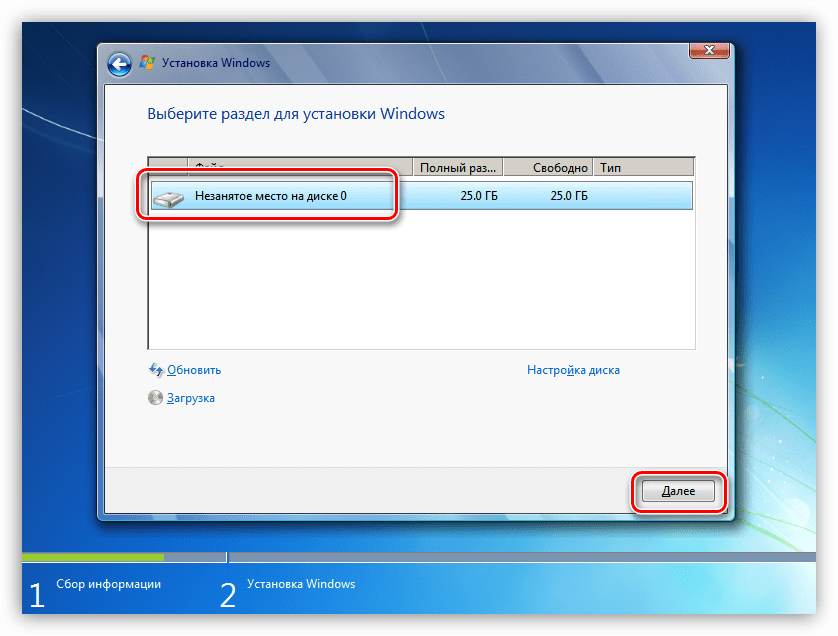
After the conversion, the drive will appear as a single area of unallocated space. Choose the unallocated space and click Next. Windows will begin the installation without sending the same error.
Method 3. Reformatting DiskВ to MBR Using Windows SetupВ — RequestВ Deleting Partitions
The last way that you can try is to turn to Windows Setup that allows you to delete partitions and reformat the disk to MBR while installing Windows OS. Here are the steps:
Step 1.Boot PC from Windows installation USB or disk.
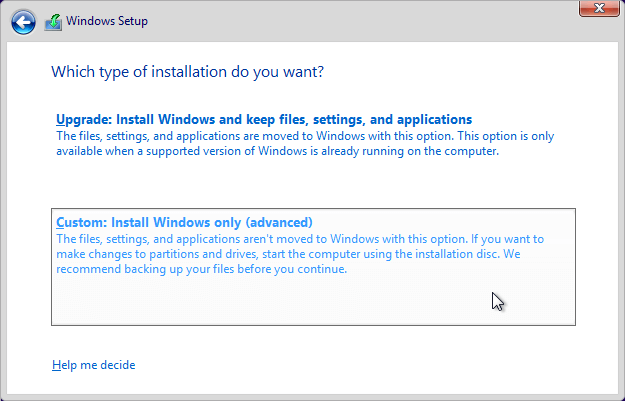
Step 2.Click «Custom» while prompt choosing an installation type.
Step 3.В Select each partition on the target drive and click «Delete» on the Where do you want to install Windows screen.
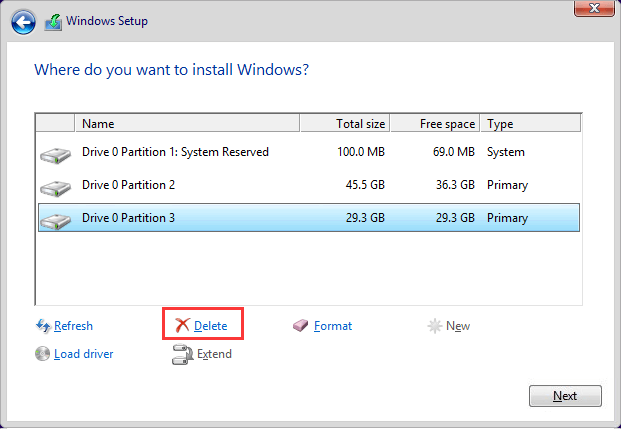
Step 4.В Once you delete all partitions, select the unallocated space and click «Next».В
Windows will detect the target disk and reformat to use it as an MBR partition style, and then begin the installation. All you need is to wait patiently to complete the installation process.
You May Also Interest In:
Sometimes, you may encounter another similar error while installing Windows OS, which displays as the this:

«Windows cannot be installed to this disk. The selected disk has an MBR partition table. On EFI systems, Windows can only be installed to GPT disks.»
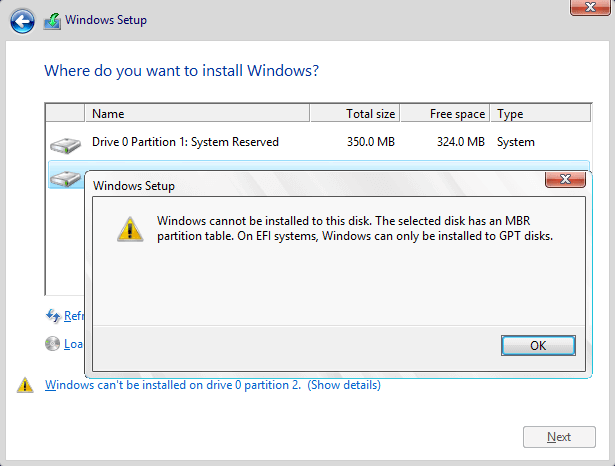
To fix this issue, you can onlyВ convert MBR to GPTВ since legacy BIOS is not supported by the computer.
Fix Windows Cannot Be Installed to This Disk GPT Is Possible Now
On this page, we explained that whenВ installing Windows, using the MBR or GPT highly depends on your computer firmwareВ UEFI-GPT or BIOS-MBR.
If you get a BIOS-based computer, you can only install Windows on an MBR disk.В If you get a UEFI-based PC, choose GPT instead.В Therefore, it’s the disk partition style issue when you getВ «Windows Cannot be installed to this disk. The selected disk is of the GPT partition style.» error message during the Windows installation process.
On this page, we provided 3 ways to help you fix this issue. For the easiest and most secure way out, EaseUS Partition Master deserves your trust. No data or partition loss will happen.
Don’t worry anymore when you get this error. Take action and start to fix it on your computer now.
Extended Reading: What Is GPT Partition Style
According to some Windows users who have «Windows cannot be installed to this disk. The selected disk is of the GPT partition style» error, they also haveВ related concerns aboutВ the GPT partition style. Continue reading to learn more about it.В
What Is GPT Partition Style?В
GPT is part of the UEFI standard, which means a UEFI-based system should be installed on a GPT disk. GPT partition style allows you to create theoretically unlimited partitions on the disk and enables you to fully use disks that are larger than 2TB. Besides, compare GPT and MBR, GPT is safer and has better compatibility with modern hardware.
How do I get rid of GPT partition style?
You cannot get rid of a GPT partition style. A partition style is necessary for Windows to access the data on the device. But you can change the GPT partition style to MBR by conversion with provided methods as shown above.В
How do I create a GPT partition?
The partition style of the disk is decided when you first initialize it. When you initialize a disk, you need to choose GPT so as to create a GPT partition. If you have set the disk as MBR, you can convert the MBR disk to GPT so as to createВ GPT partitions.
For a step-by-step guide, you may refer toВ How to Partition a GPT DiskВ for help.В
Решение проблемы с GPT-дисками при установке Windows
Решаем проблему дисков GPT
На сегодняшний день в природе существует два типа форматов дисков — MBR и GPT. Первым пользуется BIOS для определения и запуска активного раздела. Второй применяется с более современными версиями микропрограммного обеспечения – UEFI, которые имеют графический интерфейс для управления параметрами.
Ошибка, о которой мы сегодня говорим, возникает из-за несовместимости BIOS и GPT. Чаще всего это происходит из-за неправильных настроек. Также ее можно получить при попытке установки Windows х86 или несоответствии загрузочного носителя (флешки) требованиям системы.
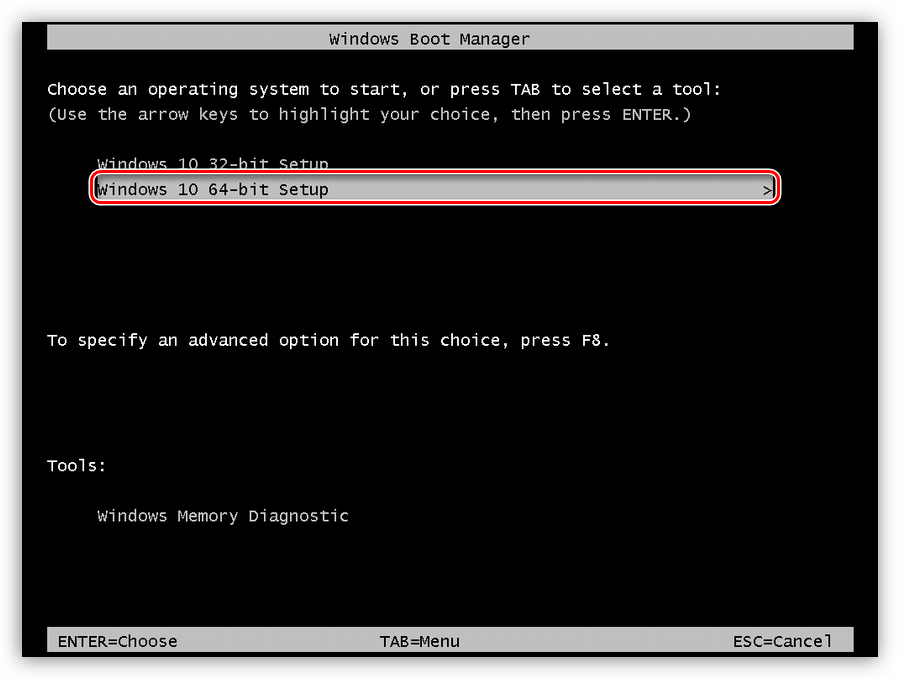
Проблему с разрядностью решить довольно просто: перед началом установки убедитесь, что на носитель записан образ х64 операционной системы. Если образ универсальный, то на первом этапе нужно выбрать соответствующий вариант.
Далее разберем способы решения остальных проблем.
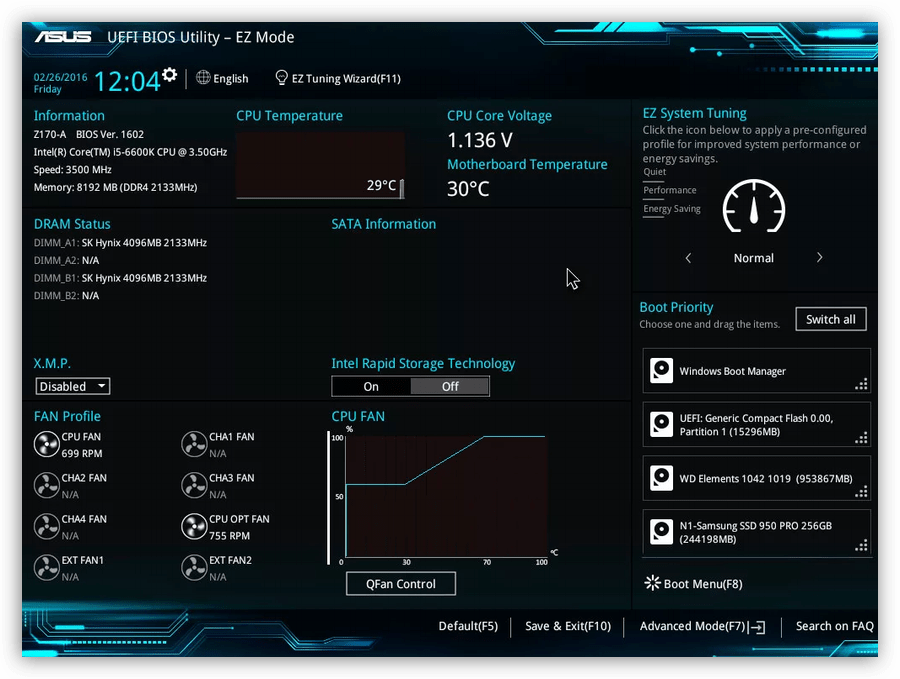
Способ 1: Настройка параметров BIOS
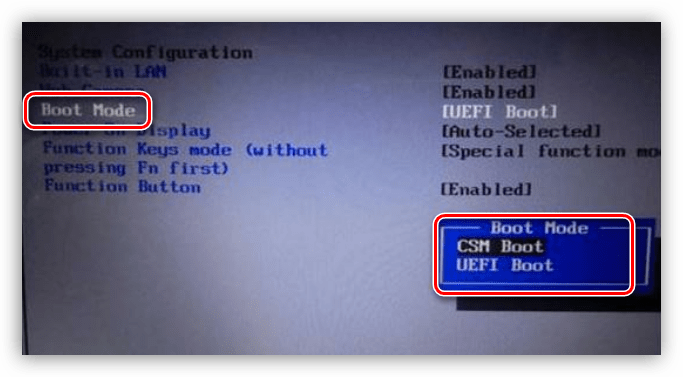
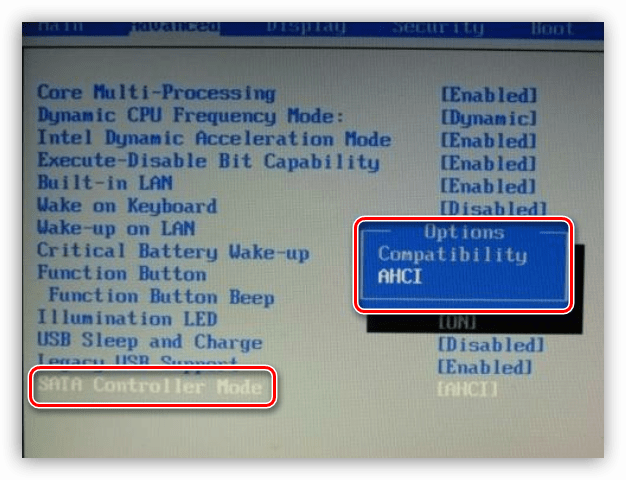
К возникновению данной ошибки могут привести измененные настройки БИОС, в котором отключена функция загрузки UEFI, а также включен режим «Secure Boot». Последний препятствует нормальному определению загрузочных носителей. Также стоит обратить внимание на режим работы SATA – он должен быть переключен в режим AHCI.
- UEFI включается в разделе «Features» либо «Setup». Обычно параметром по умолчанию является «CSM», его необходимо переключить на нужное значение.
Режим защищенной загрузки можно отключить, выполнив в обратном порядке действия, описанные в статье ниже.
Подробнее: Отключаем UEFI в BIOS
Режим AHCI можно включить в разделах «Main», «Advanced» или «Peripherals».
Если в вашем БИОС отсутствуют все или некоторые параметры, то придется поработать непосредственно с самим диском. Об этом поговорим ниже.
Способ 2: Флешка UEFI
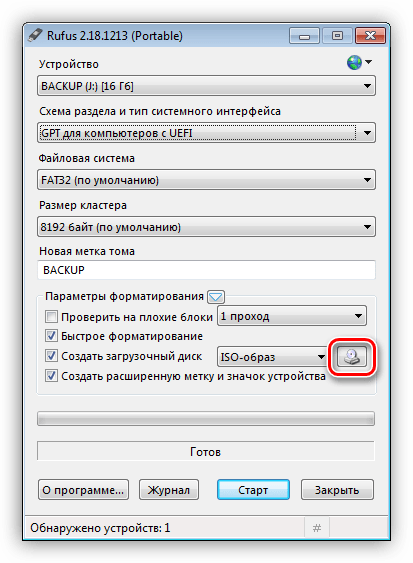
Такая флешка представляет собой носитель с записанным на него образом ОС, поддерживающий загрузку в UEFI. Если планируется установка Windows на GPT-диск, то желательно озаботиться ее созданием заранее. Делается это с помощью программы Rufus.
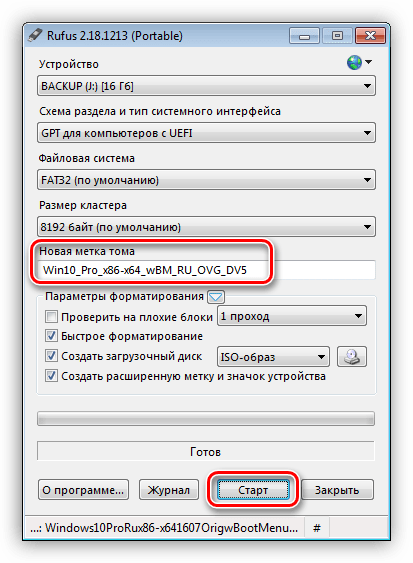
- В окне софта выбираем носитель, на который необходимо записать образ. Затем в списке выбора схемы раздела выставляем значение «GPT для компьютеров с UEFI».

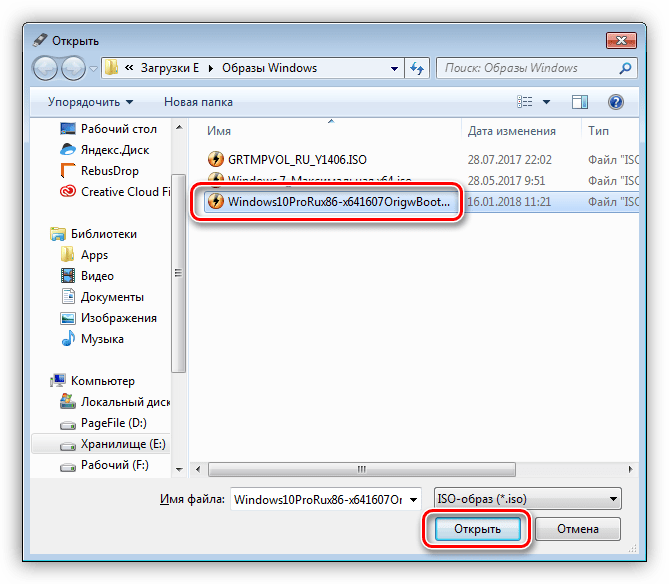
Нажимаем кнопку поиска образа.
Находим соответствующий файл на диске и нажимаем «Открыть».
Метка тома должна поменяться на название образа, после чего жмем «Старт» и ждем окончания процесса записи.
Если возможности создать UEFI-флешку нет, переходим к следующим вариантам решения.
Способ 3: Конвертирование GPT в MBR
Данный вариант подразумевает преобразование одного формата в другой. Сделать это можно как из загруженной операционной системы, так и непосредственно при установке Windows. Обратите внимание, что все данные на диске будут безвозвратно утрачены.
Вариант 1: Системные средства и программы
Для конвертирования форматов можно воспользоваться такими программами для обслуживания дисков, как Acronis Disk Director или MiniTool Partition Wizard. Рассмотрим метод с применением Акрониса.
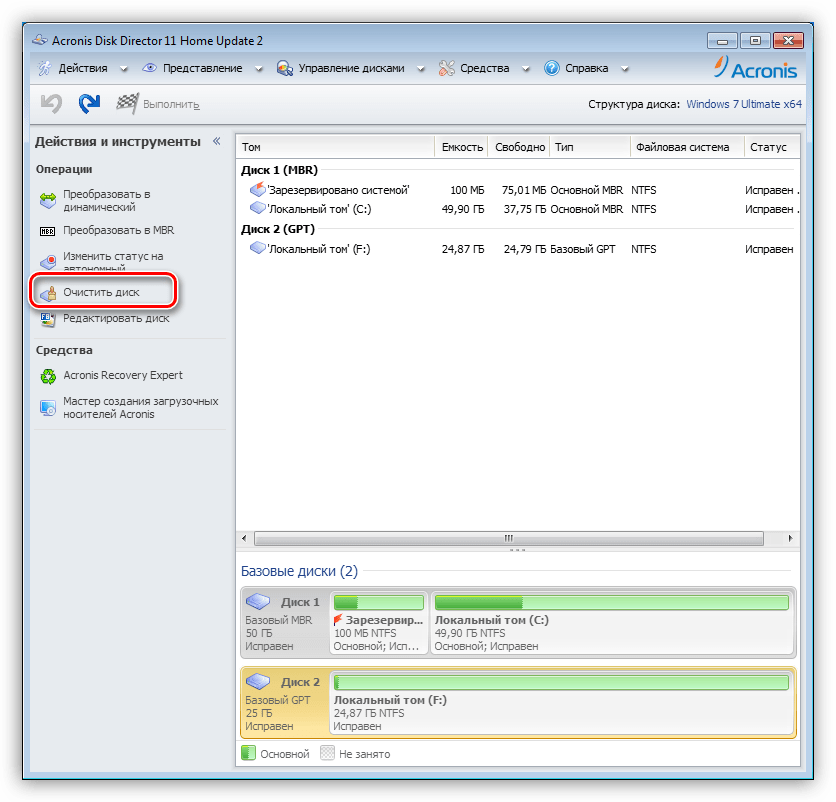
- Запускаем программу и выбираем наш диск GPT. Внимание: не раздел на нем, а именно весь диск (см. скриншот).

Далее находим в списке настроек слева «Очистить диск».
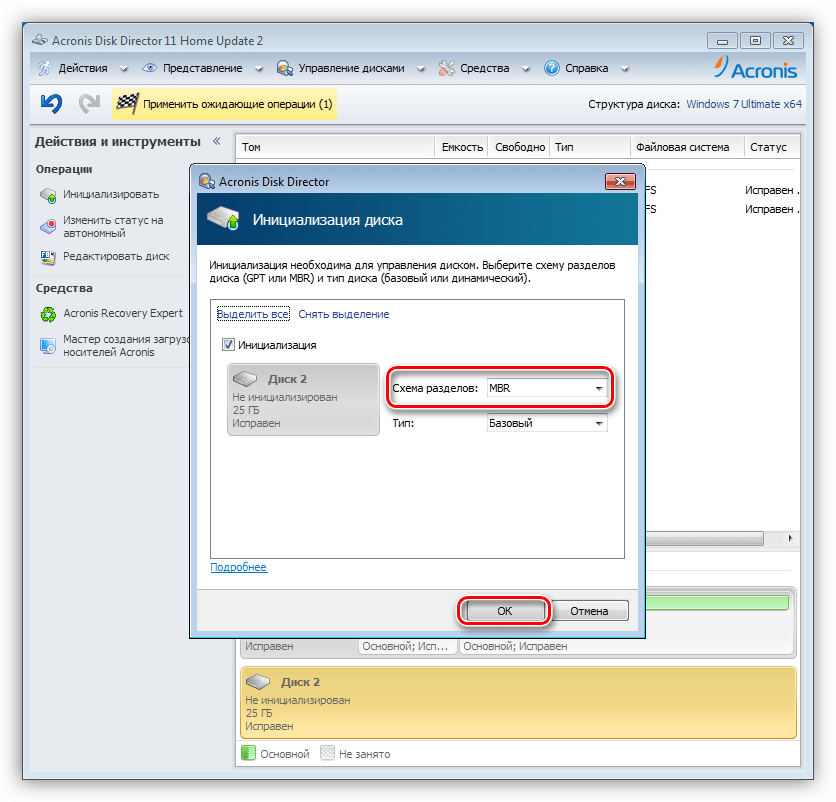
Кликаем по диску ПКМ и выбираем пункт «Инициализировать».
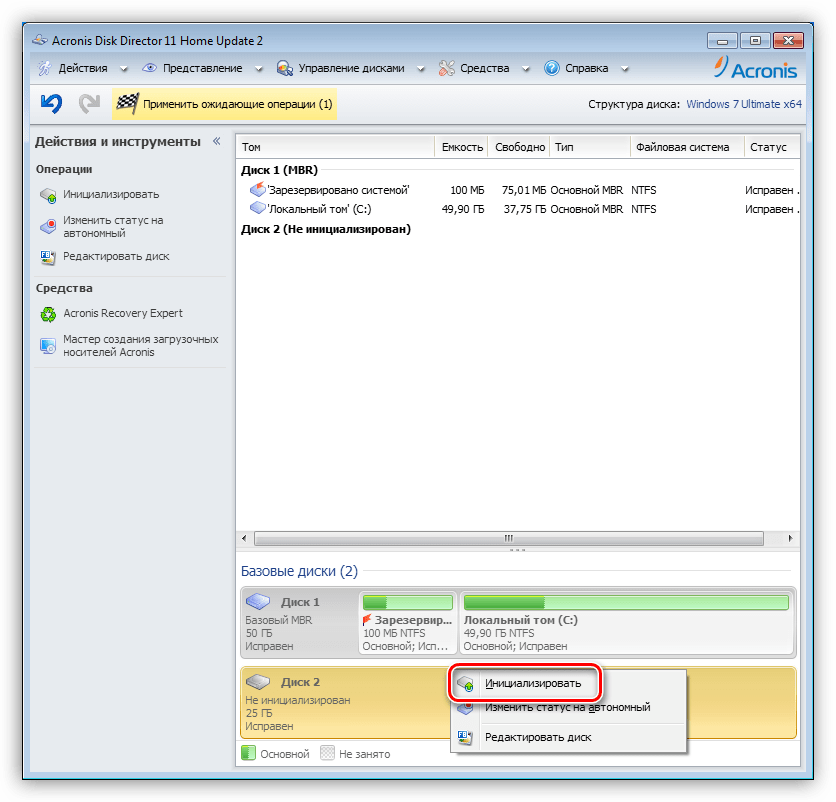
В открывшемся окне настроек выбираем схему разделов MBR и жмем ОК.
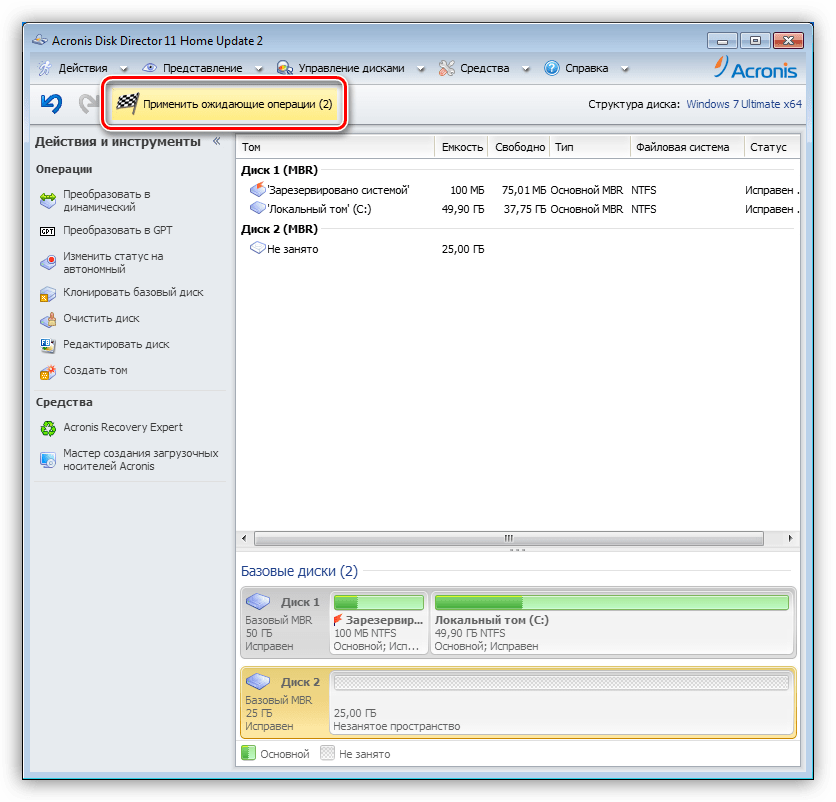
Применяем ожидающие операции.
Средствами Windows это делается так:
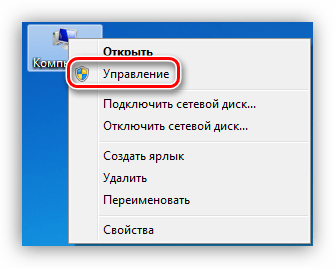
- Нажимаем ПКМ по значку компьютера на рабочем столе и переходим к пункту «Управление».
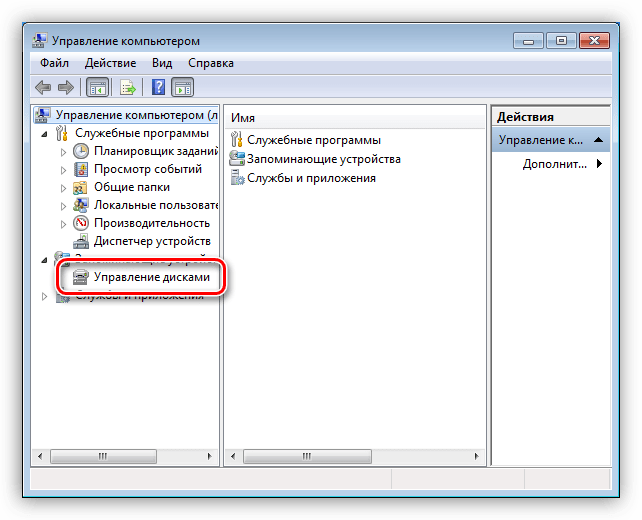
Затем идем в раздел «Управление дисками».
Выбираем в списке наш диск, жмем ПКМ на этот раз по разделу и выбираем пункт «Удалить том».
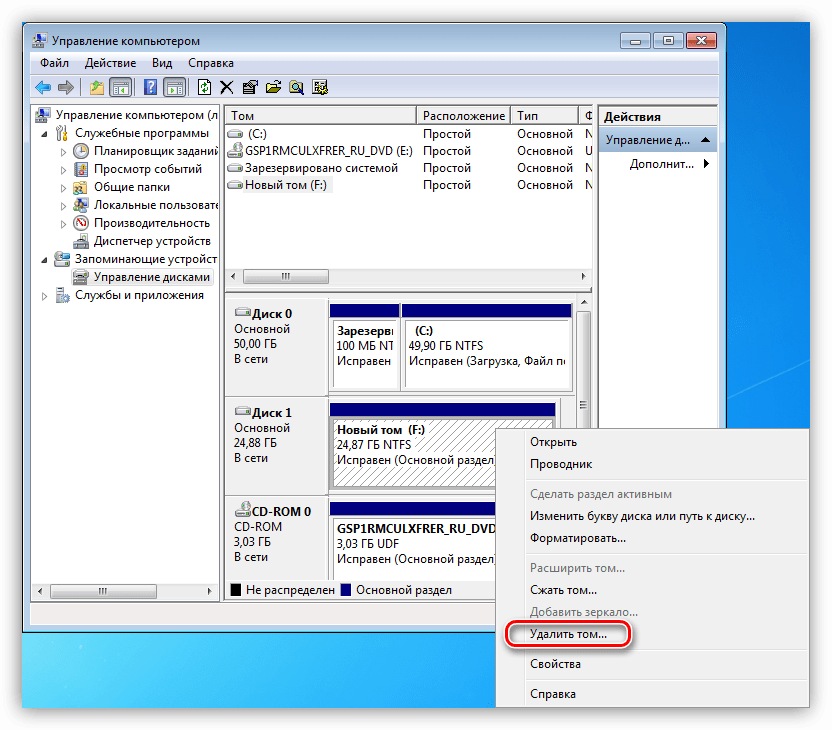
Далее кликаем правой кнопкой по основанию диска (квадрату слева) и находим функцию «Преобразовать в MBR-диск».

В таком режиме можно работать только с теми дисками, которые не являются системными (загрузочными). Если требуется подготовить к установке рабочий носитель, то это можно сделать следующим способом.
Вариант 2: Конвертирование при загрузке
Данный вариант хорош тем, что работает независимо от того, доступны ли в данный момент системные средства и софт или нет.
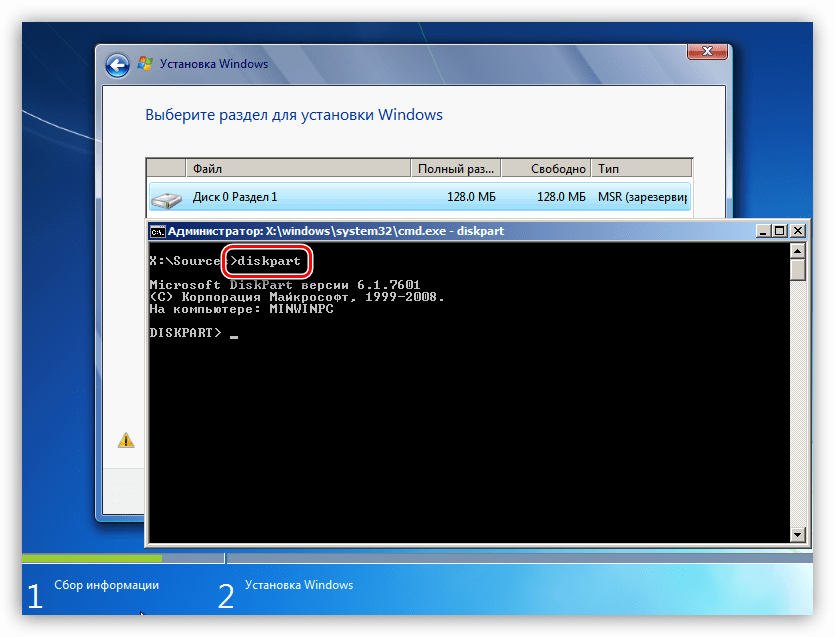
- На этапе выбора диска запускаем «Командную строку» с помощью комбинации клавиш SHIFT+F10. Далее активируем утилиту управления дисками командой
Выводим на экран список всех установленных в систему жестких дисков. Делается это путем ввода следующей команды:
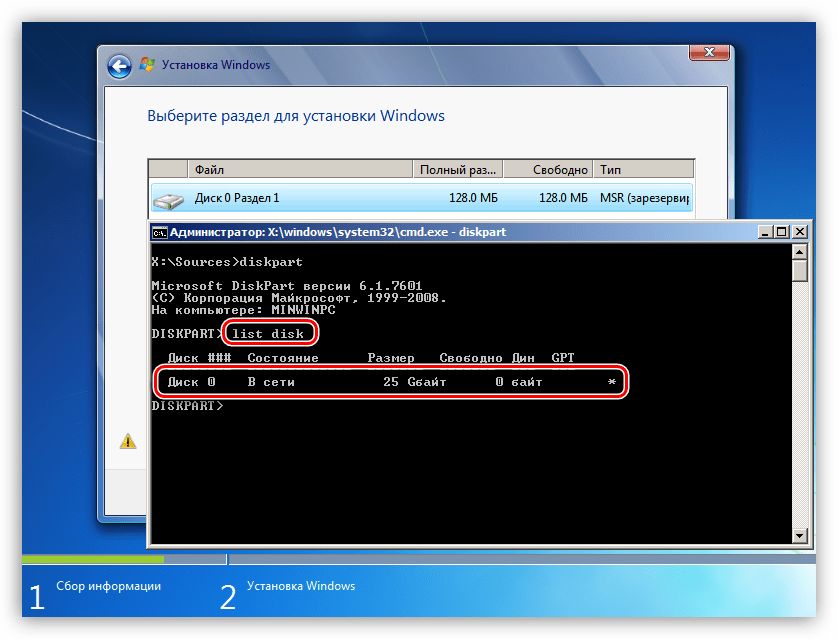
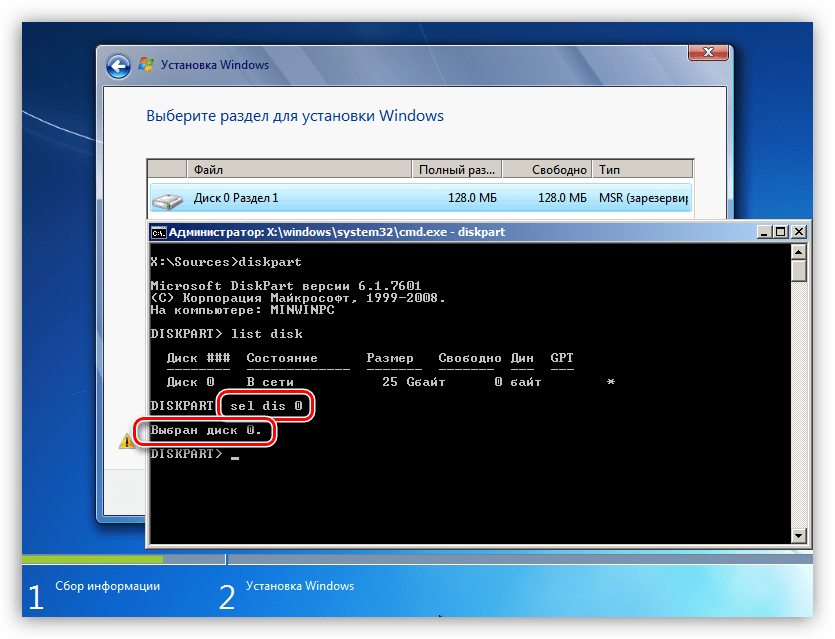
Если дисков несколько, то необходимо выбрать тот, на который мы собираемся установить систему. Отличить его можно по размеру и структуре GPT. Пишем команду
Следующий шаг – очистка носителя от разделов.
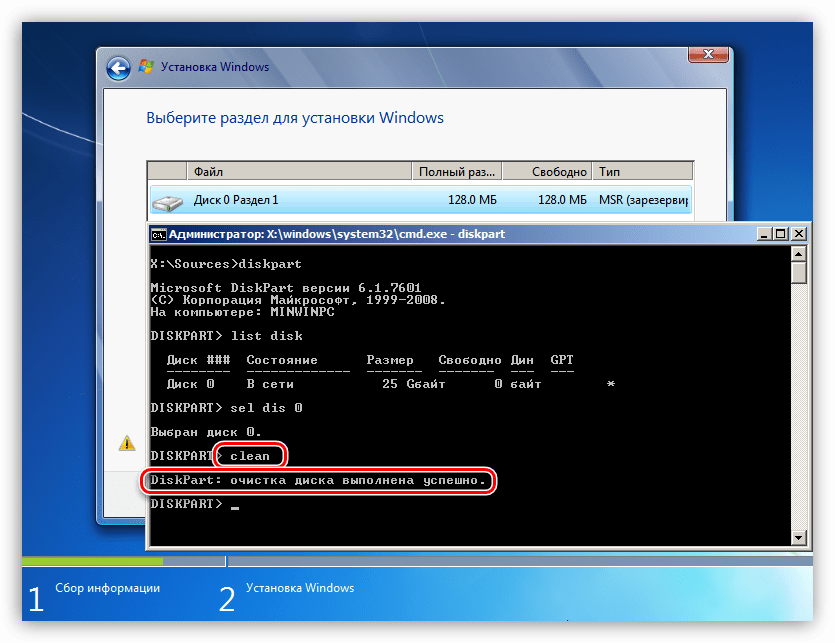
Заключительный этап – конвертирование. В этом нам поможет команда

Осталось только завершить работу утилиты и закрыть «Командную строку». Для этого дважды вводим
с последующим нажатием ENTER.

После закрытия консоли жмем «Обновить».

Готово, можно продолжать установку.
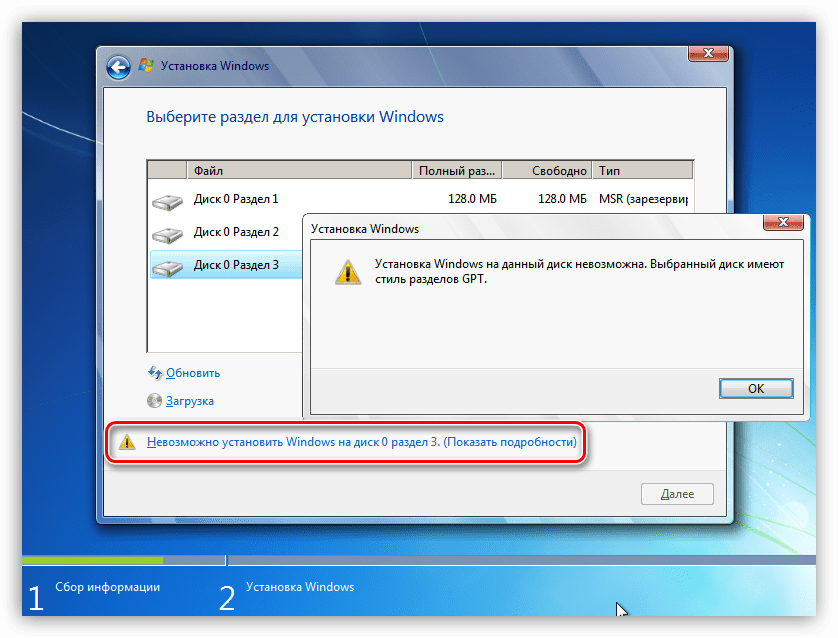
Способ 4: Удаление разделов
Этот способ поможет в тех случаях, когда по какой-то причине невозможно воспользоваться другими инструментами. Мы просто вручную удалим все разделы на целевом жестком диске.
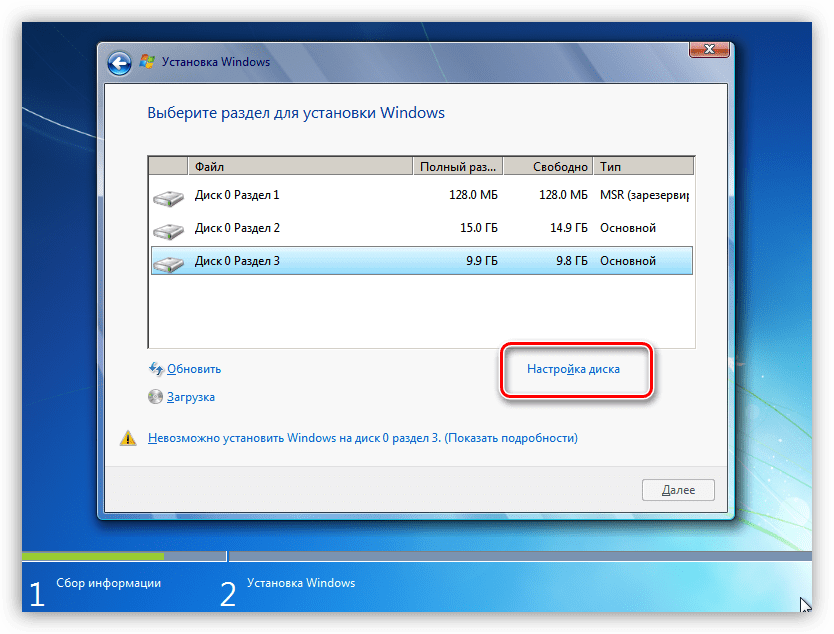
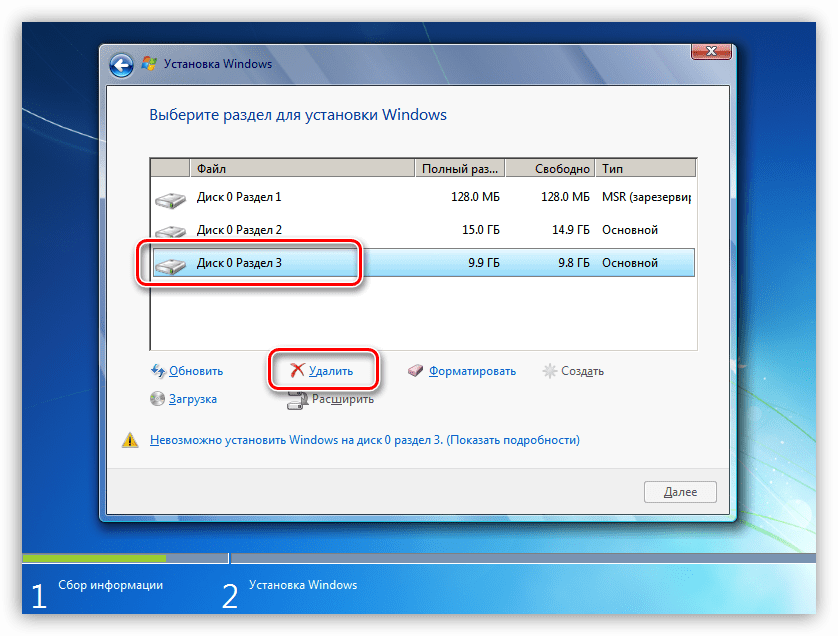
Выбираем каждый раздел по очереди, если их несколько, и жмем «Удалить».
Теперь на носителе осталось только чистое пространство, на которое можно без проблем инсталлировать систему.

Заключение
Как становится ясно из всего написанного выше, проблема с невозможностью установки Windows на диски со структурой GPT решается довольно просто. Все приведенные способы могут выручить вас в разных ситуациях – от устаревшего БИОС до отсутствия под рукой необходимых программ для создания загрузочных флешек или работы с жесткими дисками.


