- Ошибка «Windows could not complete the installation. To install Windows on this computer restart the installation» при запуске клонированной виртуальной машины Hyper-V с Windows Server 2012 R2
- Windows could not complete the installation. To install windows on this computer, restart the installation
- Windows10 «Windows could not complete the installation. To install Windows on theis compuiter, restart the installation.»
- Replies (89)
- Windows could not complete the installation
- Windows could not complete the installation
- 1] Run Automatic Startup Repair
- 2] Enable Administrator Account
- 3] Start Account Creation Wizard
- 4] Change Password Requirements
- 5] Modify some registry key values
- 6] Disable Audit Mode
- Related Posts
- How to find the Installation date for apps and programs on Windows 10
- Fix Office installation Error Code 1603 on Windows 10
- This tool can’t upgrade your PC – Language or Edition isn’t supported
- [email protected]
Ошибка «Windows could not complete the installation. To install Windows on this computer restart the installation» при запуске клонированной виртуальной машины Hyper-V с Windows Server 2012 R2
 Это первая часть очередной истории о том, как можно наступить на грабли, там, где обычно этого не ожидаешь. Началось всё с того, что для очередного развёртывания нескольких однотипных виртуальных машин Hyper-V с гостевой ОС Windows Server 2012 R2 был подготовлен эталонный образ виртуального диска с установленной ОС. В эталонный образ были включены все актуальные обновления, после чего для уменьшения размера диска был применён метод очистки хранилища компонент Windows в каталоге WinSxS, а логический том системного диска по своему объему был усечён таким образом, что на нём оставалось около 5GB свободного пространства. Перед отключением ВМ в эталонной гостевой ОС по законам жанра была выполнена утилита sysprep. В дальнейшем с этого образа было успешно развёрнуто несколько ВМ, имеющих конфигурацию ВМ, сопоставимую с эталонной ВМ. Спустя некоторое время после всей этой истории с пониманием того, что ранее несколько развёртываний с образа прошли успешно, была предпринята попытка развернуть ещё пару ВМ с этого же образа.
К нашему удивлению при первом же запуске новой ВМ гостевая ОС отказалась загружаться с сообщением об ошибке » Windows Setup could not configure Windows to run onthis computer’s hardware » на этапе первичной инициализации.
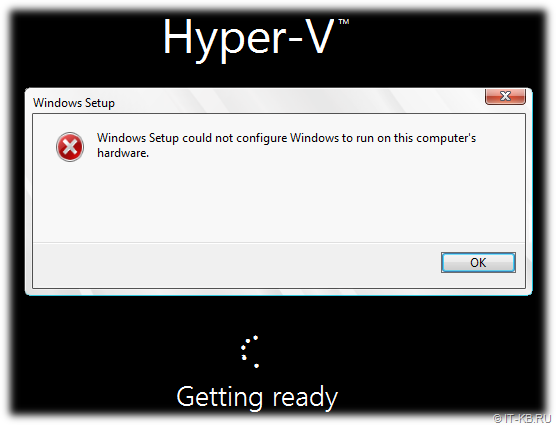
Аналогичная ситуация повторилась и на второй новой ВМ, которую мы попытались развернуть с этого же образа. Попытка повторного перезапуска на обеих ВМ привела к другому сообщению об ошибке » Windows could not complete the installation. To install Windows on this computer restart the installation «
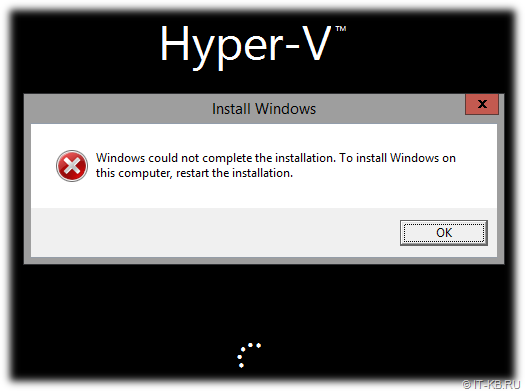
Далее после нажатия кнопки «OK» система отправлялась в перезагрузку и при следующей загрузке ситуация со второй ошибкой повторялась.
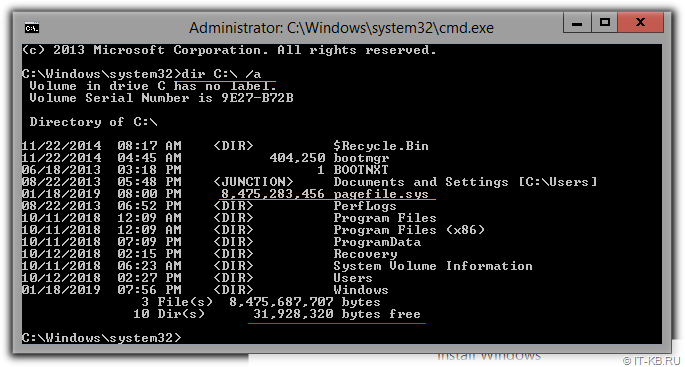
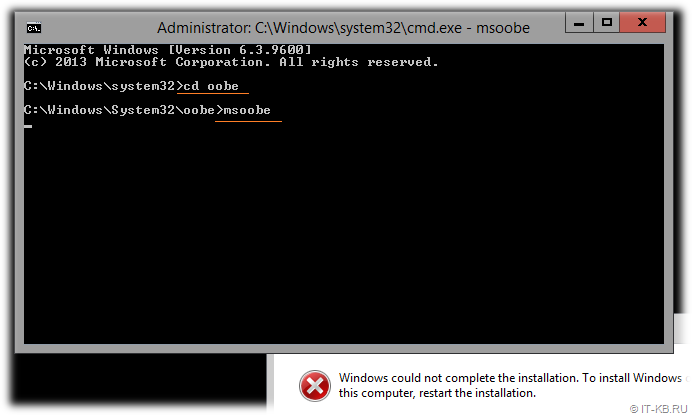
В попытках понять суть происходящего, в момент возникновения последней ошибки (не нажимая кнопки «OK» в окне сообщения об ошибке) жмём волшебную комбинацию клавиш Shift+F10 и попадаем в окно командной строки, выполняемое в контексте прав Администратора. Выполняем листинг содержимого файлов на системном диске C:\ …
…и обнаруживаем, что свободного места на диске практически нет. При этом размер файла подкачки pagefile.sys , размещаемого по умолчанию в корне этого диска имеет внушительный размер.
И здесь мы вспоминаем про то, что предыдущие успешные развёртывания с данного образа виртуального диска выполнялись на виртуальные машины, имеющие небольшой объём ОЗУ, а последние две ВМ, где мы столкнулись с проблемой, при создании были сконфигурированы на использование большого объема ОЗУ. И предположительно, причиной невозможности корректной первичной инициализации системы стал раздутый файл подкачки.
В такой ситуации можно попробовать умерить аппетиты гостевой ОС на расширение файла подкачки, установив на время ограниченный максимальный размер файла. Для этого из уже открытой командной строки можем вызвать апплет управления свойствами системы sysdm.cpl. В открывшейся форме переходим на закладку управления расширенными настройками Advanced и в блоке Performance нажимаем кнопку Settings. В дополнительно открывшейся форме переходим на вкладку Advanced и в разделе Virtual memory используем кнопку Change чтобы изменить параметры файла подкачки.
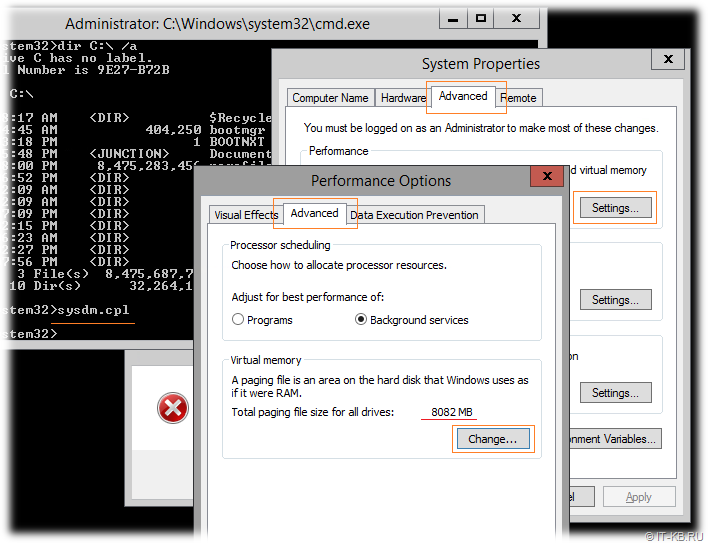
Отключим используемое по умолчанию автоматическое определение размера файла подкачки, укажем первичный и максимально допустимый размеры файла через опцию Custom size (например, от 512MB, но не больше 2GB) и нажмём Set, затем OK.

Теперь можно попробовать перезагрузить виртуальную машину, и при следующей загрузке гостевой ОС свободного места на системном диске должно быть достаточно для нормальной первичной инициализации системы. В нашем случае одна из ВМ загрузилась успешно, а вторая ВМ, не смотря на доступность места на диске продолжила выдавать ошибку » Windows could not complete the installation… «. Вероятно, в процессе первого запуска ОС с наличием проблемы с нехваткой свободного места на диске с механизмом OOBE (Out-of-Box Experience) что-то пошло не так.
На фоне сообщения об ошибке жмём уже знакомую комбинацию клавиш Shift+F10 и, попав в командную строку, перемещаемся в каталог C:\Windows\System32\oobe , где выполняем ручной запуск утилиты msoobe.exe
В случае успешного вызова этой утилиты перед нами должно появиться стандартное окно первичной настройки параметров системы, которое появляется при первом запуске ранее sysprep-нутой системы.
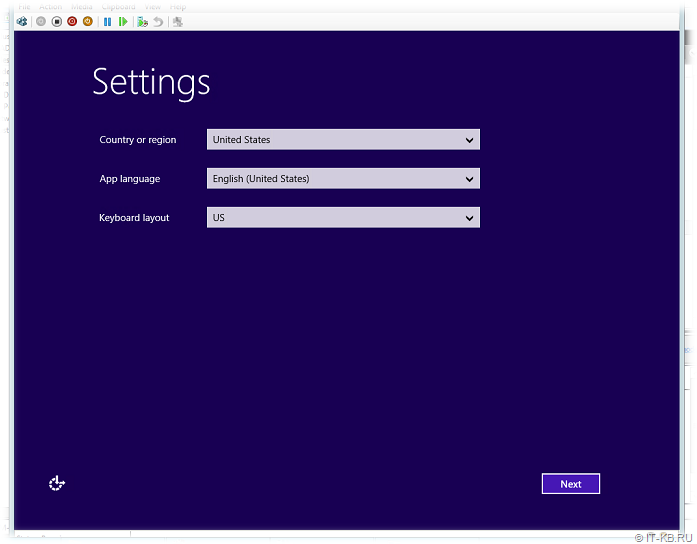
После того, как определим языковые параметры, и на следующих двух экранах примем лицензионное соглашение и укажем учётные данные администратора, мастер первичной инициализации закроется и мы снова вернёмся на первоначальный чёрный экран с открытой командной строкой, в которой вызовем команду штатной перезагрузки гостевой системы:
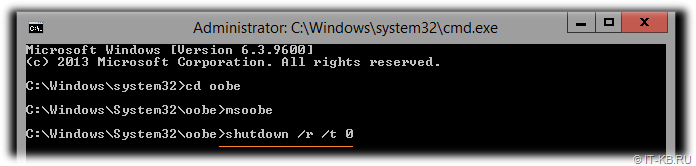
В нашем случае после перезагрузки гостевая система успешно загрузилась.

Если ранее установили небольшой фиксированный файл подкачки, то не забываем его вернуть обратно в автоматический режим, либо указываем другой устраивающий нас размер.
Делаем вывод, что если нам заранее известно то, что внутри шаблонного виртуального диска на системном томе гостевой ОС немного свободного места, то перед первым запуском ВМ лучше установить минимальный объём ОЗУ, исходя из которого система не будет пытаться создать файл подкачки большого размера. А уже после окончания процесса первичной инициализации можно будет увеличить размер ОЗУ ВМ до нужного объёма. Ну или же при создании эталонного диска можно устанавливать небольшой фиксированный размер файла подкачки, который, возможно, потребуется после первичной инициализации новой гостевой ОС, выставлять обратно в автоматический режим либо увеличивать под свои нужды.
С другой стороны, если Вам критична стабильность и предсказуемость работы развёрнутой из шаблона гостевой ОС и Вы испытали проблемы в ходе первичной инициализации OOBE, то лучше пытаться выполнять развёртывание повторно до тех пор, пока оно не отработает штатно. То есть лучше безжалостно удалять виртуальный диск, где первичная инициализация ОС прошла с ошибками и цеплять шаблонный диск к новой ВМ повторно для получения нужного результата. В противном случае с такой «кое-как взлетевшей» системой может случиться ещё несколько историй в духе «О сколько нам открытий чудных …». Одной из таких дивных историй я поделюсь в следующей заметке.
Windows could not complete the installation. To install windows on this computer, restart the installation
hi, i am using the windows 7 starter with Acer desktop.
this message appear when i performing system restore,
« Windows could not complete the installation. To install windows on this computer, restart the installation»
when i click ok, then the computer will automatically restart and then come back to this message.
i have restart many times but the result still the same. The Windows 7 starter is come with the desktop, so i don’t have the disc.
anyone can help me solve this problem. thanks a lot
How did you perform system restore? Did you use theSystem restore feature in Windows or you used the Recovery partition on your computer to restore?
Step 1: Check if you’re able to boot into Safe mode
a. Use F8 while restarting the computer.
b. Under Windows Advanced Boot Options menu, select Safe mode and press Enter.
c. Check if you’re able to boot to Windows in Safe mode.
If you’re able to boot into Windows, try performing system restore from Safe mode.
Note: You cannot undo system restore if you perform system restore from Safe mode.
Step 2: Perform a startup repair
Note : You can perform this step only if Windows Recovery Environment mode is enabled on your computer by the system manufacturer (Acer). This mode will let you to use the recovery options.
Hope this information is helpful and let me know if you need any further assistance.
Mouneshwar R – Microsoft Support
Visit our Microsoft Answers Feedback Forum and let us know what you think
Windows10 «Windows could not complete the installation. To install Windows on theis compuiter, restart the installation.»
Windows 10.0.16299.19 upgrade failed and it gives the message: «Windows could not complete the installation. To install Windows on theis compuiter, restart the installation.» i tried the method in https://answers.microsoft.com/en-us/windows/forum/windows_7-windows_install/windows-could-not-complete-the-installation-to/bf09c3c5-298b-459f-aed5-4f431b8398f5?auth=1 but it does not work. There is no cursor on the screen, there is no “local user and group” in Double click Computer Management (Local) -> System Tools -> Local Users and Groups -> Users -> Double Click Administrator -> Uncheck Account is disabled -> OK this step
there is no response when i try oobe> msoobe
Please help me, thank you!
Moved from:( Windows / Windows 10 / Windows update, recovery, & backup )
Replies (89)
* Please try a lower page number.
* Please enter only numbers.
* Please try a lower page number.
* Please enter only numbers.
The «Windows could not complete the installation. To install Windows on this computer, restart the installation error» occurs when there is a corruption in the installation file. We’ve checked the link that you’ve included in your post and found out that the solution was for Windows 7, that’s why it did not work on your Windows 10 PC. To help resolve your issue, we suggest following the troubleshooting steps provided by Andre Da Costa in this thread that was found helpful in resolving similar concern.
Should you need further assistance, feel free to post your query anytime.
28 people found this reply helpful
Was this reply helpful?
Sorry this didn’t help.
Great! Thanks for your feedback.
How satisfied are you with this reply?
Thanks for your feedback, it helps us improve the site.
How satisfied are you with this reply?
Thanks for your feedback.
We just finished a new computer. Fall Creators Update 1709 rolled out and completely ruined the installation, giving us the exact same error as listed above, although a slightly different build. It did not create a system restore point. It did not leave the previous installation on the disk so that we could roll back to the previous build.
MicroShaft shafted us out of several hours troubleshooting, and we resetup windows again, only to see the same thing happen AGAIN. In the end we disabled windows update service to keep this install from going through. We made a backup restore disk since it won’t do a restore point or roll back to the previous build, and we will be waiting to turn on windows update until the next major update.
All data on the disk is still there but even a windows repair won’t repair windows. Only reinstalling windows completely, and reinstalling all applications gets us back to where we were before windows killed the computer.
Running an Asus Prime B350M-E motherboard, with AMD Athlon X4 950 processor, AMD Radeon HD 3600 graphics, and 8 GB DDR4 RAM, if any of that helps.
Windows could not complete the installation
If you’re encountering the error message Windows could not complete the installation on your Windows 10 computer, then this post is intended to help you. In this post, we will identify the possible causes, as well as provide the most appropriate solutions you can try to help you remediate this issue.
When you encounter this issue. you’ll receive the following full error message;
Windows could not complete the installation. To install Windows on this computer, restart the installation.
You can encounter this issue when a fresh Windows installation is interrupted before a user account is created. This error may also occur when upgrading from Windows 7/8.1 to Windows 10 or upgrading Windows 10 to a newer version/build. In some cases, you may encounter this issue when you try to reset Windows 10 as reported by some users.
However, this error essentially means you are using Audit Mode to install Windows which is the main cause of this error. When Windows boots for the very first time then either it can boot to OOBE or Audit Mode.
Windows could not complete the installation
If you’re faced with this issue, you can try our recommended solutions below in no particular order and see if that helps to resolve the issue.
- Run Automatic Startup Repair
- Enable Administrator Account
- Start Account Creation Wizard
- Change Password Requirements
- Modify some registry key values
- Disable Audit Mode
Let’s take a look at the description of the process involved concerning each of the listed solutions.
1] Run Automatic Startup Repair
As you’re receiving the error message Windows could not complete the installation after/during updating/upgrading Windows 10, you can try running Automatic Startup Repair and see if the issue will be resolved.
2] Enable Administrator Account
Do the following:
- On the error screen press Shift + F10 to open Command Prompt.
- Type mmc and hit Enter.
- In the window that opens, click File > Add/Remove Snap-in.
- Select Computer Management and then double-click on it.
- In the new window that opens select Local computer.
- Click Finish.
- Click OK.
- Then double-click Computer Management (Local) > System Tools > Local Users and Groups > Users > Administrator.
- Make sure to uncheck the Account is disabled option.
- Click OK.
- Next, right-click on the Administrator then select Set Password and set a strong password to get started.
You can now exit MMC console and restart your computer and see if the issue is resolved or not. If the latter is the case, continue with the next solution.
3] Start Account Creation Wizard
Do the following:
- Again open the Command Prompt on the error screen by pressing Shift + F10 key combination.
- Type the directory path below and hit Enter.
- Next, type msoobe and hit Enter.
The above will start the user account creation wizard, so create a generic account and it’s password. Your Product Key might be required here.
- Once done hit Finish, exit everything and restart your PC.
On boot, check if the Windows could not complete the installation issue is resolved. Else, proceed with the next solution.
4] Change Password Requirements
If you’re in Audit Mode and the computer has just been joined to a domain, you’ll receive the Windows could not complete the installation error. The error is caused by password requirements added to the local security policy. This typically includes a minimum password length and password complexity.
To change password requirements, do the following:
- On the error screen press Shift + F10 to open Command Prompt.
- Type secpol.msc and hit Enter.
- Navigate to Account Policies > Password Policy.
- Now change Minimum password length to 0 and disable Password must meet complexity requirements option.
- Apply the changes and then exit the Security Policy console.
- Click OK on the error message to reboot your PC.
If the issue persists, try the next solution.
5] Modify some registry key values
Do the following:
- On the error screen press Shift + F10 key combo to open Command Prompt.
- Type regedit and hit Enter.
In the registry editor windows that opens, navigate or jump to the registry key path below and on the right pane double-click on the following registry keys one after the other and modify the Value data field accordingly:
Audit: 0
setup.exe: 3
audit.exe: 0
CleanupState: 2
GeneralizationState: 7
auditSystem: 0
Once done, reboot your PC and the Audit Mode will be disabled and Windows 10 will start normally and boot into the Out of Box Experience mode.
6] Disable Audit Mode
Do the following:
- On the error screen press Shift + F10 key combo to open Command Prompt.
- Type the command below and hit Enter.
This will disable the Audit Mode.
- Now exit CMD prompt and reboot your PC normally.
The Windows could not complete the installation issue should be resolved. However, If you’re still facing this issue then again open CMD prompt and do the following:
- Type regedit and hit Enter.
- Navigate to the following registry key:
- At the location, in the right pane, right-click the ImageState entry and select Delete.
- Exit CMD prompt and restart your PC.
Hope this helps!
Date: August 27, 2020 Tags: Installation
Related Posts
How to find the Installation date for apps and programs on Windows 10
Fix Office installation Error Code 1603 on Windows 10
This tool can’t upgrade your PC – Language or Edition isn’t supported
[email protected]
Obinna Onwusobalu, has studied Information & Communication Technology and is a keen follower of the Windows ecosystem. He runs a computer software clinic. He says it’s best practice to create a System Restore Point before making any changes to your PC. You can contact him on Twitter @ChidumOsobalu.


