- How to Fix the Error Can’t connect to this network on Windows 10
- Method 1: Tweak Wireless Network Adapter Drivers
- Method 2: Power Cycle your Router or Modem
- Method 3: Run the Windows Troubleshooter
- Method 4: Change Network Key (Security/Encryption) from WPA-PSK/WPA2-PSK to WPA2-PSK with TKIP/AES for your Wireless Adapter
- Method 5: Forgetting Network
- Method 6: Network Reset
- Method 7: Changing Transmission Mode
- Method 8: Re-Enabling Wireless Adapter
- Method 9: Changing Network Name
- Method 10: Network Reset
- Fix Wi-Fi connection issues in Windows
- Troubleshooting network problems in Windows
How to Fix the Error Can’t connect to this network on Windows 10
The “can’t connect to this network” can be regarded as one of the biggest problems that Windows users face. The Internet has become a fundamental necessity and when you are denied access to connect to your for no apparent reasons. The methods listed in this guide are the most likely culprits of this issue.
Pay careful attention and note down any changes you may have made, such as updating or replacing the router or changing the security key of your wireless network, or anything else prior to the issue. Depending on what exactly happened, you can choose one of the methods below or if you do not know anything at all about changing anything then simply start from Method 1 till the end until the issue is sorted out.
Method 1: Tweak Wireless Network Adapter Drivers
In the first method, we will be showing you how you can manually update the network adapter drivers to resolve this issue. Most of the time, this problem is caused by outdated network adapter drivers and this has to be the first solution you should try:
- Press Windows key + X to invoke the menu above the start button.
- Select Device Manager from the list.
- From the list, select Network Adapters and then your network adapter (The names can differ based on the make of your computer).
- Right-click on the adapter and select “Update driver software”.
- Select “Search automatically for updated driver software” from the list.
- The updated driver will then begin downloading and will install itself. Click on “Close” when done.

- Restart your computer. If it cannot find the driver or update it you can also re-install the driver by connecting your computer via Ethernet to the router and then going to the manufacturer’s site to download the driver.
- If this doesn’t work, repeat the process till the fourth step and choose the “Browser my Computer for Driver Software” and then select the “Let me pick from a list of devices“.
- Uncheck the “Show compatible Hardware” option and then select the appropriate driver from the list. Unchecking the “Show Compatible Hardware” option.
- Check to see if the issue persists
- If the issue still persists, try to roll back your drivers by repeating the process till step 3 and then selecting “Properties” after right-clicking on the driver.
- Click on the “Driver” tab and then select the “Rollback Driver” option. Selecting “Rollback Driver” option
- Follow the onscreen prompts to roll back the driver and check to see if the issue persists.
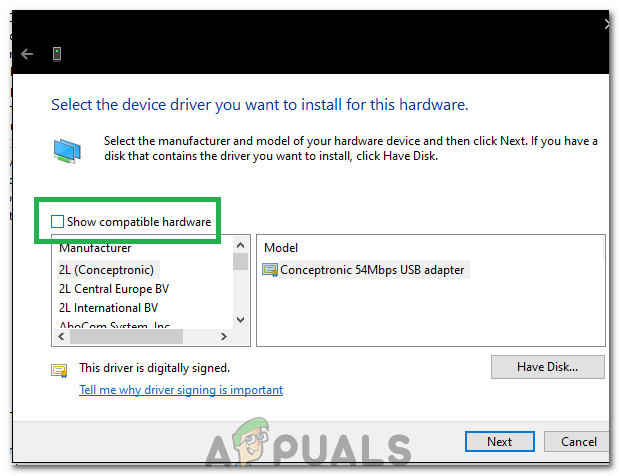 Unchecking the “Show Compatible Hardware” option.
 Selecting “Rollback Driver” option
Method 2: Power Cycle your Router or Modem
As a second method, we will be showing you how you can try to fix the issue by turning your router off for some time and then trying to connect again:
- Press the power button at the back of your router to turn it off.
- Wait for 30 minutes before turning it on again.
- When the network starts showing on your Wi-Fi connection search list, try connecting with it again to see if the problem is still there.
This didn’t solve the issue for you either? Try the next method.
Method 3: Run the Windows Troubleshooter
Follow these steps:
- Press Windows key + R and write Control Panel in the Run dialog. Press enter.
- In the “Search control panel” bar present at the top right-hand side of the window, type “Troubleshooter” and press enter.
- From the search results, select “Troubleshooting”
- Now move over to the Hardware and sound panel by clicking on it.
- Click on Hardware and devices.
- From the Hardware and sound tab, click on ”Configure a device” and follow to see if you have Windows 1o compatible drivers. If not, continue to the next step.
- Download the network drivers from your manufacturer’s website and save them on your desktop.
- Press Windows key + R and type “devmgmt.msc” in the Run dialog. Running the Device Manager
- Find your network adapter under the Network adapters section and right-click on it.
- Select properties from the list and then move to the driver tab and select Follow the on-screen instructions to complete the uninstallation.
- Go to the driver that you have downloaded. Right-click on it and select
- Move over to the compatibility
- Find the checkbox behind the “Run this program in compatibility mode for” option and select “Windows 7” from the list. Uncheck Run this Program in Compatibility Mode
- Now right click on the downloaded driver file. Select “Run as administrator” from the dropdown list and when prompted, say “Okay”.
- Complete the installation and then restart.
 Running the Device Manager
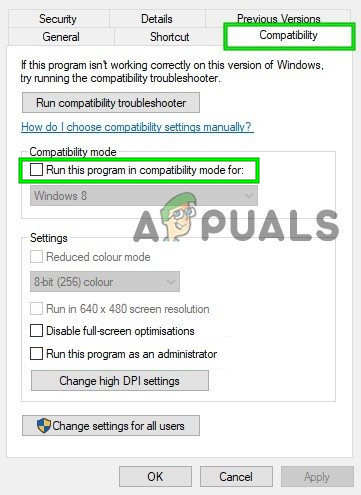 Uncheck Run this Program in Compatibility Mode
If this still doesn’t solve the issue, then continue reading.
Method 4: Change Network Key (Security/Encryption) from WPA-PSK/WPA2-PSK to WPA2-PSK with TKIP/AES for your Wireless Adapter
Wired Equivalent Privacy or WEP is the algorithm that was supported by most of the operating systems before Windows 8. From Windows 8 and onwards, Microsoft removed the support for WEP and WPA-PSK. So if your network connection is using WEP (or WPA-PSK) still, you won’t be able to connect to it. To confirm this, follow these steps: (Note: To find this out, you need to be connected to the network that is giving you problems. For this purpose, you can either use a LAN cable or just connect from a computer that doesn’t have this issue. Also, these steps are for Windows 10. Follow similar ones on Windows 8 or other versions.)
- Press Windows Key + A to invoke the action center.
- Select Settings from the list.
- Then click on Network and Internet.
- Now click on advanced options.
- Here, under the properties section and against Security type you will see the one that your network is using.
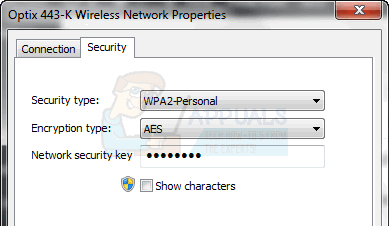
If the current one is WEP, ask your network provider to change it to WPA-personal and use the TKIP algorithm for encryption purposes; that should enable you to connect to the network. Advanced users can also try this method themselves by connecting the PC via a LAN cable and then going to the wireless security tab on your router to change the WEP or WPA-PSK to WPA2-PSK with TKIP/AES encryption. The easiest way to access the router settings is by locating your Default Gateway IP and then typing that IP into the browser’s address bar. You can get the IP from the command prompt, by clicking Start -> typing cmd and in the command prompt type ipconfig /all.
Go through the list of the information until you see Default Gateway IP
Method 5: Forgetting Network
In some cases, the network might not have been working properly due to the wrong configuration by the computer. Therefore, in this step, we will be forgetting the network and then reconnecting to fix this issue. For that:
- Right-click on the “Wifi” icon in the system tray and select “Open Network and Internet Settings” option.
- Click on the “Wifi” button in the left column.
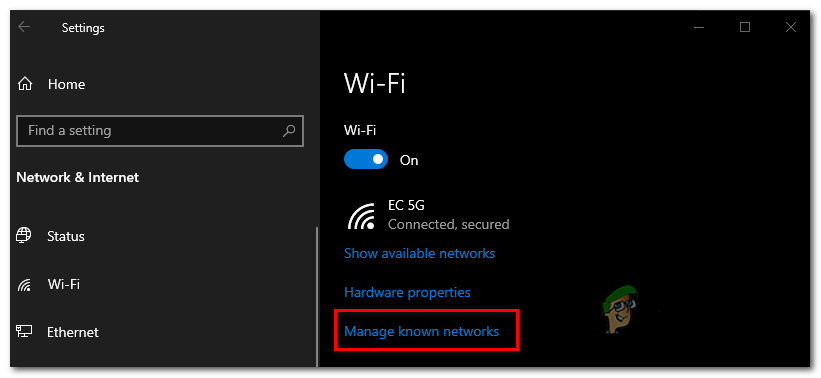
- Select the “Manage Known Networks” button and then click on your current Wifi network. Accessing the Manage known networks menu
- Select the “Forget” button and then close the settings.
- Connect to your internet connection again and then check to see if the issue is fixed.
 Accessing the Manage known networks menu
Method 6: Network Reset
In some cases, the issue can be triggered if there are bugs/glitches in the Windows 10 network settings. Therefore, in this step, we will be resetting our network configurations. For that:
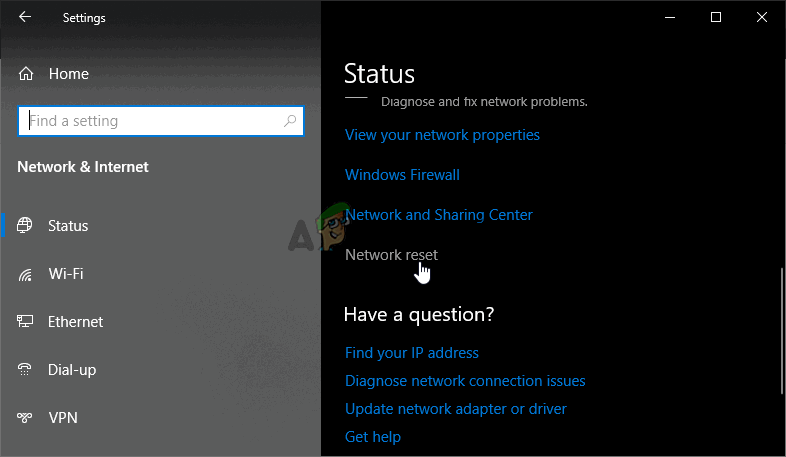
- Press “Windows” + “I” to open settings.
- Click on the “Network& Internet” option and then select “Network Reset” from the list. Performing a network reset
- Click on the “Reset Now” button and wait for it to be reset.
- Check to see if the issue persists.
 Performing a network reset
Method 7: Changing Transmission Mode
In some cases, the transmission channel that you might have selected in the transmission settings might not be supported by your router. Therefore, in this step, we will be changing the transmission mode and then check if that fixes this issue. For that:
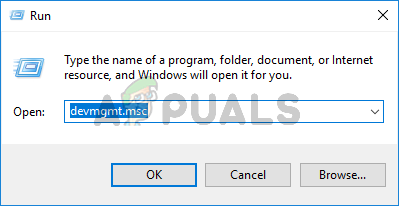
- Press “Windows” + “R” to open Run prompt.
- Type in “Devmgmt.msc” and press “Enter”.Type devmgmt.msc and Press Enter to Open Device Manager
- Expand the “Network Adapters” list and right-click on your “Network Adapter”.Clicking on the “Network Adapters” option
- Click on “Properties” and then select the “Advanced” tab.
- Select the “802.11n” mode from the list and select “Disabled” from the “Value” dropdown. Clicking on the “Advanced” tab and disabling the option
- Check to see if the issue persists.
 Type devmgmt.msc and Press Enter to Open Device Manager
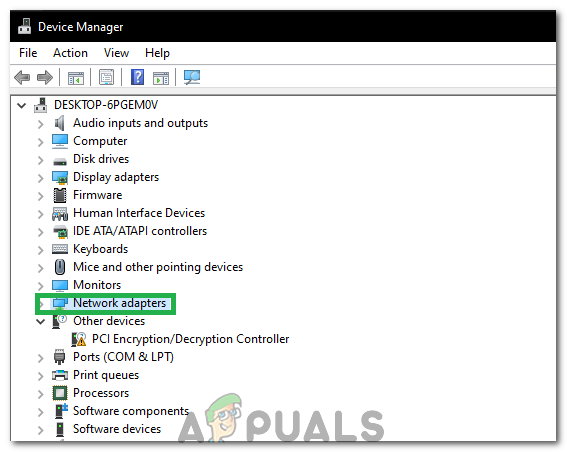 Clicking on the “Network Adapters” option
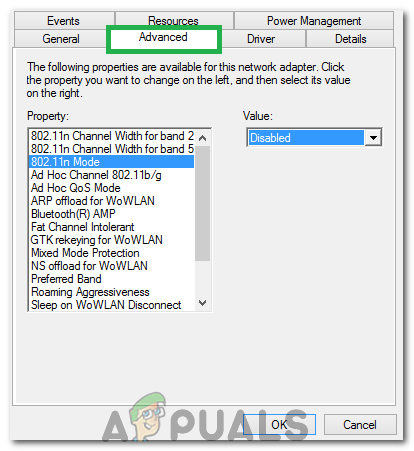 Clicking on the “Advanced” tab and disabling the option
Method 8: Re-Enabling Wireless Adapter
In certain situations, the issue is simply fixed by first disabling the network adapter and then enabling it back up. This reportedly gets rids of the glitch with the network adapter and causes it to load right up. In order to do this, follow the guide below.
- Press “Windows” + “R” to open Run prompt.
- Type in “Devmgmt.msc” and press “Enter”.Type devmgmt.msc and Press Enter to Open Device Manager
- Expand the “Network Adapters” list and right-click on your “Network Adapter”.Clicking on the “Network Adapters” option
- Right-click on your adapter and select “Disable Device”.
- After waiting for 10 seconds, right-click on it again and select “Enable Device”.
- Also, try to disable all other Network adapters inside and only keep the one used by the PC enabled.
- Check to see if the issue persists.
Method 9: Changing Network Name
In a weird turn of events, this issue was fixed for some people by simply changing their network name from the router. This can be done by logging on to the router page and then navigating to network settings. Under which, you can change your network name. This differs from router to router and ISP to ISP so consult your router manual for detailed instructions.
Method 10: Network Reset
This error can also be fixed by performing a Network Reset. In order to do so, we have to open up an elevated command prompt and then type in the reset command into it. For that:
- Press “Windows” + “R” to open the Run prompt.
- Type in “cmd” and press “Shift” + “Ctrl” + “Enter” to grant administrative privileges.
- Type in the following commands and press “Enter” to execute it.
Note: Also try rebooting the router by unplugging it from power and then connecting after 30 seconds. In addition to that, disconnect all your peripherals from the computer such as Keyboard, mouse, headset and monitor temporarily and check if that fixes this issue.
Fix Wi-Fi connection issues in Windows
Troubleshooting network problems in Windows
If you can’t get email, browse the web, or stream music, chances are you’re not connected to your network and can’t get onto the internet. To fix the problem, here are some things you can try.
Try these things first to help you fix or narrow down the connection problem.
Make sure Wi‑Fi is turned on. Select the «No internet connection» icon  on the right side of the taskbar, and make sure Wi-Fi is turned on. If it isn’t, select it to turn it on. Also, make sure Airplane mode is turned off.

Afterwards, see if a Wi-Fi network you recognize and trust appears in the list of networks. If it does, select the Wi-Fi network, and they try to connect to it. If it says Connected underneath the network name, select Disconnect, wait a moment, and then select Connect again.
Try connecting to a network on a different frequency band. Many consumer Wi-Fi routers broadcast at two different network frequency bands: 2.4 GHz and 5 GHz. These will appear as separate networks in the list of available Wi-Fi networks. If your list of available Wi-Fi networks includes both a 2.4 GHz network and a 5 GHz network, try connecting to the other network. To learn more about the differences between 2.4 GHz networks and 5 GHz networks, check out Wi-Fi problems and your home layout.
Make sure the physical Wi‑Fi switch on your laptop is turned on. (An indicator light usually shows when it’s on.)
Run the Network troubleshooter. The Network troubleshooter can help diagnose and fix common connection problems.
To run the Network troubleshooter
Select the Start button > Settings > Network & Internet > Status.
Open Network & Internet Status settings
Under Change your network settings, select Network troubleshooter.
Follow the steps in the troubleshooter, and see if that fixes the problem.
Restart your modem and wireless router. This helps create a new connection to your internet service provider (ISP).
When you do this, everyone that is connected to your Wi-Fi network will be temporarily disconnected. The steps you take to restart your modem and router can vary, but here are the general steps. ( Note: If you have a cable modem/Wi-Fi router combo device, you only need to follow the steps for the single device.)
Unplug the power cable for the router from the power source.
Unplug the power cable for the modem from the power source.
Some modems have a backup battery. If you unplug the modem and lights stay on, remove the battery from the modem.
Wait at least 30 seconds or so.
If you had to remove the battery from the modem, put it back in.
Plug the modem back into the power source. The lights on the modem will blink. Wait for them to stop blinking.
Plug your router back into the power source.
Wait a few minutes for the modem and router to fully power on. You can usually tell when they’re ready by looking at the status lights on the two devices.
On your PC, try to connect again.
Connection problems can be due to a variety of reasons—problems with the website, your device, the Wi-Fi router, modem, or your Internet Service Provider (ISP). Try the following steps to help narrow down the source of the problem.
If the «Wi-Fi connected» icon appears on the right side of the taskbar, visit a different website. If the website opens, there might be a problem with the specific website. If you can’t connect to another website, go to the next step.
On another laptop or phone, try to connect to the same network. If you can connect, the source of the problem is likely due to your device—go to the section Network troubleshooting on your device. If you can’t connect to the network on any device, continue to the next step.
Check to see if there is a problem with the connection to your Wi-Fi router. Do this by using a ping test.
In the search box on the taskbar, type Command prompt. The Command Prompt button will appear. To the right of it, select Run as administrator > Yes.
At the command prompt, type ipconfig, and then select Enter. Look for the name of your Wi-Fi network within the results, and then find the IP address listed next to Default gateway for that Wi-Fi network. Write down that address if you need to. For example: 192.168.1.1
At the prompt, type ping and then select Enter. For example, type ping 192.168.1.1 and select Enter. The results should be something like this:
Reply from 192.168.1.1: bytes=32 time=5ms TTL=64
Reply from 192.168.1.1: bytes=32 time=5ms TTL=64
Reply from 192.168.1.1: bytes=32 time=5ms TTL=64
Reply from 192.168.1.1: bytes=32 time=5ms TTL=64
Ping statistics for 192.168.1.1: Packets: Sent = 4, Received = 4, Lost = 0 (0% loss), Approximate round trip times in milli-seconds: Minimum = 4ms, Maximum = 5ms, Average = 4ms
If you see results like this and are getting a reply, then you have a connection to your Wi-Fi router, so there might be a problem with your modem or ISP. Contact your ISP or check online on another device (if you can) to see if there’s a service outage.
If the results of the ping test indicate that you are not getting a reply from the router, try connecting your PC directly to your modem by using an Ethernet cable (if you can). If you can connect to the internet using an Ethernet cable, it confirms the connection problem is due to the Wi-Fi router. Make sure you’ve installed the latest firmware and see the documentation for your router.
Run network commands
Try running these network commands to manually reset the TCP/IP stack, release and renew the IP address, and flush and reset the DNS client resolver cache:
In the search box on the taskbar, type Command prompt. The Command Prompt button will appear. To the right of it, select Run as administrator > Yes.
At the command prompt, run the following commands in the listed order, and then check to see if that fixes your connection problem:
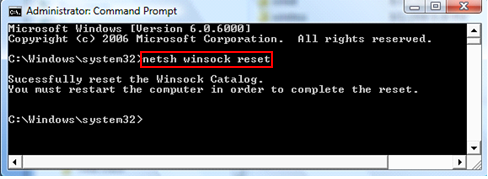
Type netsh winsock reset and select Enter.
Type netsh int ip reset and select Enter.
Type ipconfig /release and select Enter.
Type ipconfig /renew and select Enter.
Type ipconfig /flushdns and select Enter.
Uninstall the network adapter driver and restart
If the previous steps didn’t work, try to uninstall the network adapter driver, and then restart your computer. Windows will automatically install the latest driver. Consider this approach if your network connection stopped working properly after a recent update.
Before uninstalling, make sure you have drivers available as a backup. Visit the PC manufacturer’s website and download the latest network adapter driver from there. If your PC can’t connect to the internet, you’ll need to download a driver on a different PC and save it to a USB flash drive so you can install the driver on your PC. You’ll need to know the PC manufacturer and model name or number.
In the search box on the taskbar, type Device Manager, and then select Device Manager from the list of results.
Expand Network adapters, and locate the network adapter for your device.
Select the network adapter, and then select Uninstall device > the Delete the driver software for this device check box > Uninstall.
After uninstalling the driver, select the Start button > Power > Restart.
After your PC restarts, Windows will automatically look for and install the network adapter driver. Check to see if that fixes your connection problem. If Windows doesn’t automatically install a driver, try to install the backup driver you saved before uninstalling.
Check if your network adapter is compatible with the latest Windows Update
If you lost your network connection immediately after upgrading or updating Windows 10, it’s possible that the current driver for your network adapter was designed for a previous version of Windows. To check, try temporarily uninstalling the recent Windows Update:
Select the Start button, then select Settings > Update & Security > Windows Update > View update history > Uninstall updates.
Select the most recent update, then select Uninstall.
If uninstalling the most recent update restores your network connection, check to see if an updated driver is available:
In the search box on the taskbar, type Device Manager, and then select Device Manager from the list of results.
Expand Network adapters, and locate the network adapter for your device.
Select the network adapter, select Update driver > Search automatically for updated driver software, and then follow the instructions.
After installing the updated driver, select the Start button > Power > Restart if you’re asked to restart, and see if that fixes the connection issue.
If Windows can’t find a new driver for your network adapter, visit the PC manufacturer’s website and download the latest network adapter driver from there. You’ll need to know the PC manufacturer and model name or number.
Do one of the following:
If you couldn’t download and install a newer network adapter driver, hide the update that’s causing you to lose your network connection. To learn how to hide updates, see Hide Windows Updates or driver updates.
If you could successfully install updated drivers for your network adapter, then reinstall the latest updates. To do this, select the Start button, then select Settings > Update & Security > Windows Update > Check for updates.
Use network reset
Using network reset should be the last step you try. Consider using it if the steps above don’t help to get you connected.
This can help solve connection problems you might have after upgrading from a previous version of Windows to Windows 10. It can also help to fix the problem where you can connect to the internet, but can’t connect to shared network drives. Network reset removes any network adapters you have installed and the settings for them. After your PC restarts, any network adapters are reinstalled, and the settings for them are set to the defaults.
Note: To use network reset, your PC must be running Windows 10 Version 1607 or later. To see which version of Windows 10 your device is currently running, select the Start button, then select Settings > System > About.
Select the Start button, then select Settings > Network & Internet > Status > Network reset.
Open Network & Internet Status settings
On the Network reset screen, select Reset now > Yes to confirm.
Wait for your PC to restart, and see if that fixes the problem.
After using network reset, you might need to reinstall and set up other networking software you might be using, such as VPN client software or virtual switches from Hyper‑V (if you’re using that or other network virtualization software).
Network reset might set each one of your known network connections to a public network profile. In a public network profile, your PC is not discoverable to other PCs and devices on the network, which can help make your PC more secure. However, if your PC is part of a homegroup or used for file or printer sharing, you’ll need to make your PC discoverable again by setting it to use a private network profile. To do this, select the Start button, then select Settings > Network & Internet > Wi-Fi . On the Wi-Fi screen, select Manage known networks > the network connection you want to change > Properties. Under Network profile, select Private.
Check your Wi-Fi settings
Wi-Fi adapter manufacturers might have different advanced settings you can change based on your network environment or connection preferences.
Check the Wireless Mode setting for your network adapter and make sure it matches the capabilities of the network you’re trying to connect to. If it doesn’t match, you won’t be able to connect, and the network might not appear in the list of available networks. The Wireless Mode will often be set to Auto or something similar by default, which enables connection for every kind of network that’s supported.
To find the wireless mode setting
In Device Manager, select Network adapters, and then double-click the network adapter name.
Select the Advanced tab and look for a Wireless Mode setting. Make sure it’s set to the mode your network is using.
Wi-Fi profile settings
Windows uses the Wi-Fi profile to save the settings that are needed to connect to a Wi-Fi network. These settings include the network security type, key, network name (SSID), and so on. If you can’t connect to a Wi-Fi network that you could connect to before, it’s possible that the network settings might have changed or the profile is corrupted.
To fix this, remove (or «forget») the network connection, then reconnect to the network. When you forget a network connection, it removes the Wi-Fi network profile from your PC.
To forget a network
Select the Wi-Fi network icon on the right side of the taskbar, then select Network & Internet settings.
Select Wi-Fi , then select Manage known networks.
Select the network you want to forget, then select Forget.
Afterwards, select the Wi-Fi icon on the taskbar and try to reconnect to the desired network to renew the network connection.
Check your home layout
Your Wi-Fi network might be affected by the network’s frequency band, channel congestion, and/or signal strength. For more info, see Wi-Fi problems and your home layout.
Check for additional symptoms for the «No internet connection» icon
There may be additional troubleshooting steps you can try, depending on which symptoms you’re having. To view these steps, check out Wi-Fi connection icons and what they mean.
Make sure Wi-Fi is turned on.
Swipe in from the right edge of the screen, select Settings, then select the Network icon.
Make sure the physical Wi‑Fi switch on your laptop is turned on. (An indicator light usually shows when it’s on.)
Make sure your PC isn’t in airplane mode.
Swipe in from the right edge of the screen, select Settings, then select the Network icon.
Turn off Airplane mode.
Move closer to the router or access point if you can.
If you don’t see the network name at all, the router or access point might not be set to broadcast the network name. In this case, you’ll need to connect to it manually.
Swipe in from the right edge of the screen, and then select Settings.
Select the Network icon, and then select Hidden network.
Type the network name and select Next.
Type the password and select Next.
Follow any additional instructions to get connected.
The network will be added to your list of networks and will be available to connect to when your computer is in range of the network. To connect to the network, follow these steps:
Open Connect to a Network by selecting the network icon in the notification area.
Select Unnamed Network, select Connect, and then type the network information. The network will be added to your list of networks and will be available to connect to in the future when your computer is in range of the network..
Let Windows try to help you fix the problem. Try running the Network troubleshooter to see if it can diagnose and fix the problem.
Select the Start button, start typing Network problems, and then select Identify and repair network problems in the list.
The Network Troubleshooter (mentioned above) can help diagnose and fix common connection problems. After using that, try running the network commands below because the combination of doing these two things can help you get connected.
If your problem isn’t fixed after running the Network troubleshooter, try to:
Reset the TCP/IP stack.
Release the IP address.
Renew the IP address.
Flush and reset the DNS client resolver cache.
Here’s how to run networking commands in a command prompt:
Select the Start button, start typing cmd, right-click Command Prompt in the list, select Run as Administrator, and then select Yes.
At the command prompt, run the following commands in the listed order and then check to see if that fixes your connection problem:
Type netsh winsock reset and press Enter.
Type netsh int ip reset and press Enter.
Type ipconfig /release and press Enter.
Type ipconfig /renew and press Enter.
Type ipconfig /flushdns and press Enter.
This helps create a new connection to your Internet service provider (ISP). When you do this, everyone that is connected to your Wi-Fi network will be temporarily disconnected.
The steps you take to restart your modem and router can vary, but here are the general steps:
Unplug the power cable for the router from the power source.
Unplug the power cable for the modem from the power source.
Some modems have a backup battery. So if you unplug the modem and lights stay on, remove the battery from the modem.
Wait at least 30 seconds or so.
If you had to remove the battery from the modem, put it back in.
Plug the modem back into the power source. The lights on the modem will blink. Wait for them to stop blinking.
Plug your router back into the power source.
Wait a few minutes for the modem and router to fully power on. You can usually tell when they’re ready by looking at the status lights on the two devices.
On your PC, try to connect again.
Make sure it’s not a problem with your cable modem or Internet service provider (ISP). If it is, contact your ISP.
Select the Start button, start typing cmd, right-click Command Prompt in the list, select Run as Administrator, and then select Yes.
At the command prompt, type ipconfig.
Look for the IP address listed next to Default gateway. Write down that address if you need to. For example, 192.168.1.1.
At the prompt, type ping and press Enter. For example, type ping 192.168.1.1 and press Enter.
The result should be something like this:
Reply from 192.168.1.1: bytes=32 time=5ms TTL=64
Reply from 192.168.1.1: bytes=32 time=5ms TTL=64
Reply from 192.168.1.1: bytes=32 time=5ms TTL=64
Reply from 192.168.1.1: bytes=32 time=5ms TTL=64
Ping statistics for 192.168.1.1: Packets: Sent = 4, Received = 4, Lost = 0 (0% loss), Approximate round trip times in milli-seconds: Minimum = 4ms, Maximum = 5ms, Average = 4ms
If the ping is successful and you see results similar to the results above, but you can’t connect to the Internet on your PC, there may be a problem with your modem or Internet service provider (ISP).
If you’re still having trouble connecting to a network, it might be related to your network adapter.
Try using the Network Adapter troubleshooter to automatically find and fix some problems. This troubleshooter will disable and re-enable the adapter, and try some other common repairs.
Select the Start button, start typing Troubleshooting, and then select Troubleshooting in the list. Select View all > Network Adapter.
Update the network adapter driver. An outdated or incompatible network adapter driver can cause connection problems. Check to see if an updated driver is available.
Select the Start button, start typing Device Manager, and then select it in the list.
In Device Manager, select Network adapters, right-click your adapter, and then select Properties.
Select the Driver tab, and then select Update Driver.
Select Search automatically for updated driver software.
If Windows can’t find a new driver for your network adapter, visit the PC manufacturer’s website and download the latest network adapter driver from there. If your PC can’t connect to the Internet, you’ll need to download a driver on a different PC and save it to a USB flash drive so you can install the driver on your PC. You’ll need to know the PC manufacturer and model name or number.
Here are some things to check and try with your router if you’re at home and having trouble getting connected.
If you don’t see the network name, sign in to your router and check to see if it’s set to broadcast the network name.
Connect your PC to your router using an Ethernet cable.
Open your web browser and type the IP address for your wireless router. (For example, 192.168.1.1 or 172.16.0.0—check the documentation for your router to find the default IP address.)
Sign in with your user name and password, then make sure an option labeled Enable SSID Broadcast, Wireless SSID broadcast, or something similar is turned on. This setting is often on a Wireless Settings page.
Check to see if your Wi-Fi network uses Media Access Control (MAC) address filtering for security. If it does, you’ll need to add the MAC address for your PC to the access list on your router before you can connect.
Select the Start button. Start typing cmd and right-click Command Prompt in the list. Select Run as Administrator, and then select Yes.
At the command prompt, type ipconfig /all.
Write down the address that appears next to Physical Address for your wireless network adapter. This is the address you’ll need to add to the access list on your router.
To add the MAC address to the access list on your router:
Open your web browser and type the IP address for your wireless router. (For example, 192.168.1.1 or 172.16.0.0—check the documentation for your router to find the default IP address.)
Sign in with your user name and password, then look for a setting that says MAC Address Filter or something similar.
Add the MAC address you wrote down for your PC to the access list and save your changes.
On your PC, try to connect to the Wi-Fi network again.
Make sure Wi-Fi is turned on.
On a laptop, open Windows Mobility Center by selecting the Start  button and then selecting Control Panel > Mobile PC > Windows Mobility Center.
Look in the Wireless Network section. If Wi-Fi is on, the button should say Turn wireless off.
Make sure the physical Wi‑Fi switch on your laptop is turned on. (An indicator light usually shows when it’s on.)
Check and make sure your PC isn’t in airplane mode.
Move closer to the router or access point if you can.
If you don’t see the network name at all, the router or access point might not be set to broadcast the network name. In this case, you’ll need to connect to it manually.
Open Manage Wireless Networks by selecting the Start button, and then selecting Control Panel. In the search box, type wireless and then select Manage wireless networks.
Select Add, and then select Manually create a network profile.
Type the network information.
If you want Windows to automatically connect when the network is in range, select the Start this connection automatically check box.
Select the Connect even if the network is not broadcasting check box, select Next, and then select Close.
The network will be added to your list of networks and will be available to connect to when your computer is in range of the network. To connect to the network, follow these steps:
Open Connect to a Network by selecting the network icon in the notification area.
Select Unnamed Network, select Connect, and then type the network information. The network will be added to your list of networks and will be available to connect to in the future when your computer is in range of the network..
Let Windows try to help you fix the problem. Try running the Network troubleshooter to see if it can diagnose and fix the problem.
Open the Network troubleshooter by right-clicking the network icon in the notification area and then selecting Troubleshoot problems.
The Network Troubleshooter (mentioned above) can help diagnose and fix common connection problems. After using that, try running the network commands below because the combination of doing these two things can help you get connected.
If your problem isn’t fixed after running the Network troubleshooter, try to:
Reset the TCP/IP stack.
Release the IP address.
Renew the IP address.
Flush and reset the DNS client resolver cache.
Here’s how to run networking commands in a command prompt:
Select the Start button . Type cmd in the search box, right-click cmd in the list, select Run as administrator, and then select Yes.
At the command prompt, run the following commands in the listed order and then check to see if that fixes your connection problem:
Type netsh winsock reset and press Enter.
Type netsh int ip reset and press Enter.
Type ipconfig /release and press Enter.
Type ipconfig /renew and press Enter.
Type ipconfig /flushdns and press Enter.
This helps create a new connection to your Internet service provider (ISP). When you do this, everyone that is connected to your Wi-Fi network will be temporarily disconnected.
The steps you take to restart your modem and router can vary, but here are the general steps:
Unplug the power cable for the router from the power source.
Unplug the power cable for the modem from the power source.
Some modems have a backup battery. So if you unplug the modem and lights stay on, remove the battery from the modem.
Wait at least 30 seconds or so.
If you had to remove the battery from the modem, put it back in.
Plug the modem back into the power source. The lights on the modem will blink. Wait for them to stop blinking.
Plug your router back into the power source.
Wait a few minutes for the modem and router to fully power on. You can usually tell when they’re ready by looking at the status lights on the two devices.
On your PC, try to connect again.
Make sure it’s not a problem with your cable modem or Internet service provider (ISP). If it is, contact your ISP.
Select the Start button . Type cmd in the search box, right-click cmd in the list, select Run as administrator, and then select Yes.
At the command prompt, type ipconfig.
Look for the IP address listed next to Default gateway. Write down that address if you need to. For example, 192.168.1.1.
At the prompt, type ping and press Enter. For example, type ping 192.168.1.1 and press Enter.
The result should be something like this:
Reply from 192.168.1.1: bytes=32 time=5ms TTL=64
Reply from 192.168.1.1: bytes=32 time=5ms TTL=64
Reply from 192.168.1.1: bytes=32 time=5ms TTL=64
Reply from 192.168.1.1: bytes=32 time=5ms TTL=64
Ping statistics for 192.168.1.1: Packets: Sent = 4, Received = 4, Lost = 0 (0% loss), Approximate round trip times in milli-seconds: Minimum = 4ms, Maximum = 5ms, Average = 4ms
If the ping is successful and you see results similar to the results above, but you can’t connect to the Internet on your PC, there may be a problem with your modem or Internet service provider (ISP).
If you’re still having trouble connecting to a network, it might be related to your network adapter.
Try using the Network Adapter troubleshooter to automatically find and fix some problems. This troubleshooter will disable and re-enable the adapter, and try some other common repairs.
Open the Network Adapter troubleshooter by selecting the Start button and then selecting Control Panel. In the search box, type troubleshooter and then select Troubleshooting > View all > Network Adapter.
Update the network adapter driver. An outdated or incompatible network adapter driver can cause connection problems. Check to see if an updated driver is available.
Open Device Manager by selecting the Start button , selecting Control Panel, selecting System and Security, and then, under System, selecting Device Manager  . If you’re prompted for an administrator password or confirmation, type the password or provide confirmation.
In Device Manager, select Network adapters, right-click your adapter, and then select Properties.
Select the Driver tab, and then select Update Driver.
Select Search automatically for updated driver software.
If Windows can’t find a new driver for your network adapter, visit the PC manufacturer’s website and download the latest network adapter driver from there. If your PC can’t connect to the Internet, you’ll need to download a driver on a different PC and save it to a USB flash drive so you can install the driver on your PC. You’ll need to know the PC manufacturer and model name or number.
Here are some things to check and try with your router if you’re at home and having trouble getting connected.
If you don’t see the network name, sign in to your router and check to see if it’s set to broadcast the network name.
Connect your PC to your router using an Ethernet cable.
Open your web browser and type the IP address for your wireless router. (For example, 192.168.1.1 or 172.16.0.0—check the documentation for your router to find the default IP address.)
Sign in with your user name and password, then make sure an option labeled Enable SSID Broadcast, Wireless SSID broadcast, or something similar is turned on. This setting is often on a Wireless Settings page.
Check to see if your Wi-Fi network uses Media Access Control (MAC) address filtering for security. If it does, you’ll need to add the MAC address for your PC to the access list on your router before you can connect.
Select the Start button. Type cmd in the search box and right-click cmd in the list. Select Run as administrator, and then select Yes.
At the command prompt, type ipconfig /all.
Write down the address that appears next to Physical Address for your wireless network adapter. This is the address you’ll need to add to the access list on your router.
To add the MAC address to the access list on your router:
Open your web browser and type the IP address for your wireless router. (For example, 192.168.1.1 or 172.16.0.0—check the documentation for your router to find the default IP address.)
Sign in with your user name and password, then look for a setting that says MAC Address Filter or something similar.
Add the MAC address you wrote down for your PC to the access list and save your changes.
On your PC, try to connect to the Wi-Fi network again.


