- FIX: Windows Cannot Install Required Files 0x8007025D
- What is Error 0x8007025D?
- Bad HDD or SSD space
- Corrupt or bad RAM
- Solutions to Fix Error 0x8007025D
- Method 1: Unplug all other external devices
- Method 2: Reduce the size of HDD or SSD disk space and format it
- Method 3: Download a new Windows 10 ISO image file
- Method 4: Try writing the image onto another USB drive
- Method 5: Run a memory diagnostic on your RAM and replace a bad RAM stick
- Note:
- Windows 7 install error «Windows cannot install required files. Make sure all files required for installation are available, and restart the installation. Error code: 0x80070522»
- Windows cannot copy files required for installation. Make sure all files required for installation are available, and restart the installation. Error code: 0x80070570
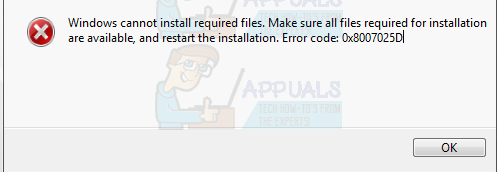
FIX: Windows Cannot Install Required Files 0x8007025D
Windows 10 has come with many perks but has been one of the hardest systems to update to owing to the numerous errors consumers encounter during installation. One of them is error 0x8007025D that appears and halts installation after a certain percentage. Retrying will only give you the same error. Several people who have sought answers from online indicated that they were running a clean install from their USB drive.
This page is going to explain to you why error 0x8007025D appears. The error might be brought by several issues, but they are all related to the USB buffering system. After a brief explanation of what the error means we will the give you the steps to resolve this error.
What is Error 0x8007025D?
According to windows support, 0x8007025D = ERROR_BAD_COMPRESSION_BUFFER = the specified buffer contains ill-formed data. USB 3.0 uses the Message Signaled Interrupt (MSI) mode for communications with the system. USB 2.0 uses the much older Interrupt Request (IRQ) system. One feature of the new MSI system that USB 3.0 devices use is asynchronous handling of data transfer between the device and system. This requires a buffer through which data is streamed to at high data rates (“SuperSpeed”), which is then decoded by the system. If you receive error 0x8007025D then probably your PNY devices are sending bad or corrupted data to the buffers, your device’s buffers are choked or your device can’t decode the data properly. Here are the reasons why you might be receiving this error.
Corrupt data on the USB drive means that this data cannot be decoded properly thus throwing this error. Corrupt data may be from the corrupt .ISO image file used to create the bootable USB drive. If the file that should be copied is missing or corrupt, you will get this error. The issue might also arise from a bad flash drive that is corrupt of unreadable at a certain section. In the case where you might have plugged in another USB device that is read as another disk drive, the data sent to the buffer by this devices might cause the error.
Bad HDD or SSD space
If the HDD or SSD has a bad sector or record and the Windows installation tries to copy files to this space, an error is returned to the buffer, which in turn displays error 0x8007025D. This can be caused by prolonged use of a disk space (e.g. to play computer games) or storage space that needs to be checked or formatted. A failing HDD can also be the issue causing you error 0x8007025D.
Corrupt or bad RAM
A bad RAM is also likely to be a cause to this error. Since a clean install does not fight for space with other programs, it means that the whole RAM can be dedicated to installing windows 10 so even a tiny corrupt or bad section of the RAM can cause this issue. Windows 10 needs at least 1GB of RAM to install. If data is copied to a bad section of the RAM, then the buffer technology will receive an error therefore displaying error 0x8007025D on your screen.
Solutions to Fix Error 0x8007025D
Here are the things you need to do in order to resolve the issues. If the first method does not work for you, proceed to the next one since this error might be as a result of several different issues. We have listed them beginning from the simplest and least expensive to do, to the hardest and most expensive method.
We are not going to talk about how to install Windows 10 in this page, only on how to resolve the error 0x8007025D. If you need help with the clean installation of Windows 10, please go to our Windows 10 installation guide page here or here.
Method 1: Unplug all other external devices
Unplug all your USB devices and other peripheral devices including the internet cable. Most of the times the Windows installation will throw an error because of bad hardware drivers or outdated drivers.
It also turns out that after copying the files to your computer, windows installation might not need your USB drive anymore. Just unplug your drive and see if the installation will continue from where it left off.
Retry to see if this works, if not, go to the next method.
Method 2: Reduce the size of HDD or SSD disk space and format it
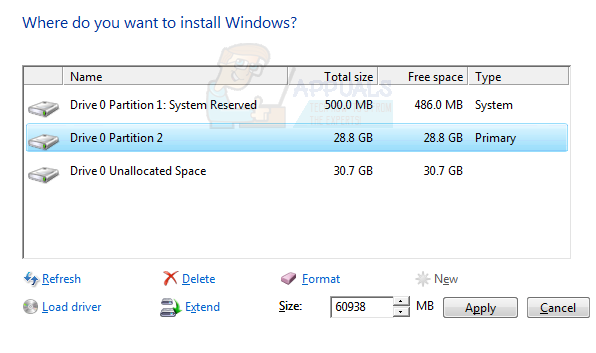
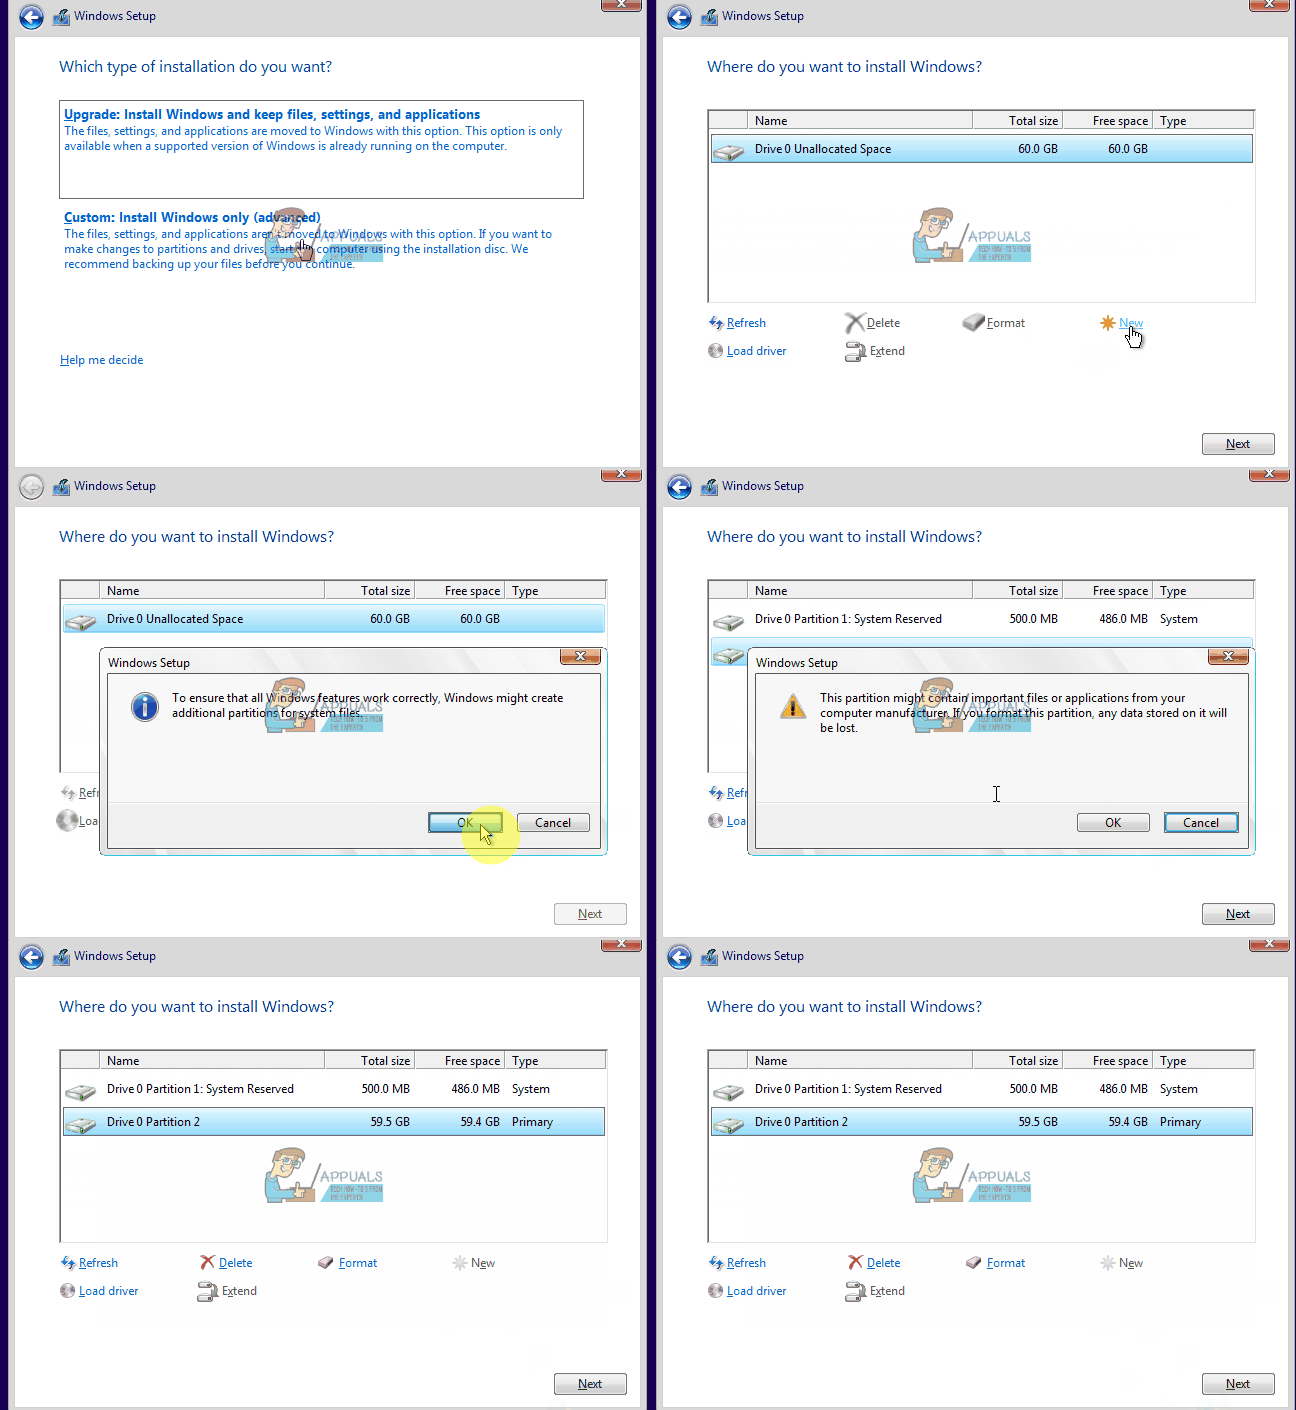
You only need around 20GB of space to install windows 10. We will recommend reducing your installation partition to around 125GB. This will reduces the chances that the space you are copying to is corrupted. You can reduce the disk space by clicking on the “extend” option after choosing to custom install windows 10. Make sure, however, that your hard drive is healthy and not damaged in any way.
If you are doing a clean install, make sure that you format the partition you are installing into. This will iron out the bad sectors and records. To format your partition, choose to install a customized Windows 10, click on the “format” button and accept to format.
Retry the installation.
Method 3: Download a new Windows 10 ISO image file
There is a possibility that the image file you downloaded has a corrupt file that would not be decoded or be copied. It is entirely possible that the file is missing from the USB drive or the disk especially if you downloaded the file via image creation.
You will need to download the files again, create your USB installation drive and then retry the installation. To download Windows 10 .ISO file, go to the Microsoft page here. You will also get instructions on how to download and use the media creation tool to create a bootable USB drive. While installing, make sure to uncheck the Recommended Windows settings and check if that works.
Method 4: Try writing the image onto another USB drive
In the event that your USB drive is corrupt or has an unreadable section, then the buffer technology will detect this error and throw the 0x8007025D error on your screen.
You will therefore need another USB drive for this method. Create the installation files into the new drive and retry the installation. Creating the installation drive from another computer might help resolve the issue.
If you were using USB 3.0 earlier, you could try using a USB 2.0 port since it uses a different technology from USB 3.0 to read the data.
Here is our guide on how to use Rufus to create a bootable Windows 10 USB media device. If you wish to use the Microsoft Media Creation Tool to create your drive, follow the instructions here.
Method 5: Run a memory diagnostic on your RAM and replace a bad RAM stick
If all the above methods have failed, then we are down to the most expensive method here and this is probably the problem with your PC. However, this has solved the error for most of the installations. It seems that the Windows 10 setup would rather not install Windows on your device if it finds a bad RAM, than crashing all the time after installation.
If you have two RAM sticks, each of at least 1GB, you can try removing either and trying the installation (swap if the first one returns an error). You can also check for RAM errors using the memory diagnostics tool in BIOS. To run a memory diagnosis simply:
- Immediately on booting your PC. press f2, or f8, or f10 key (depending on your computer) repeatedly, to enter the BIOS setup window.
- Use the Left Arrow and Right Arrow keys to select Diagnostics.
- Use the Down Arrow and Up Arrow keys to select the Memory Test, and then press the enter key to begin the test. Make note of the errors
If it persists or you find error in your RAM, replace your RAM and retry your installation.
Note:
We also received reports from several users that reverting the BIOS to default configurations along with changing the RAM stick solved the problem for them instantly. If all the above methods don’t work, you can try this and see if this fixes the problem.
Windows 7 install error «Windows cannot install required files. Make sure all files required for installation are available, and restart the installation. Error code: 0x80070522»
I am trying to install Windows 7 over Windows XP and I keep getting this error numerous times:
«Windows cannot install required files. Make sure all files required for installation are available, and restart the installation. Error code: 0x80070522»
Boot from CD also didn’t work.
Thank you for your help.
Installation might stop if the system cannot copy files. Here are some possible causes and solutions for this problem:
Your Windows installation disc is scratched, smudged, or dirty. Clean the disc with a soft cloth, insert it in the CD or DVD drive, and then begin the Windows installation again. If your installation disc is damaged, you might need to replace it. For more information, go to How to replace lost, broken, or missing Microsoft software or hardware on the Microsoft website.
Your CD or DVD drive is not working properly, or the disc might be vibrating too much for the laser to accurately read the data. For more information about this problem, consult your hardware documentation, or contact the CD or DVD drive manufacturer.
If your computer has multiple CD or DVD drives, your computer might be trying to locate files on the wrong drive. If your computer has a feature to disable CD or DVD drives that are not being used, disable the drives that you aren’t using. Otherwise, try inserting the disc into a different drive, and then start the installation again.
This is usually caused by hardware or software that is incompatible with Windows 7. If you have this problem, follow these steps:
Wait about 10 minutes to see if the installation continues. Watch the hard disk indicator (often a small light on your computer that blinks when your hard disk is running) to see if there is any activity. If your hard disk appears to be working, the installation should be in progress. If your hard disk does not appear to be working, go to step 2.
Uninstall all antivirus software, and then restart your computer. Don’t forget to enable antivirus software after you install Windows.
If the installation fails again, there might be a hardware incompatibility problem. Go to the Windows 7 Upgrade Advisor on the Microsoft website to see if your computer can run Windows 7.
If you have compatible hardware and your computer still stops responding, disable any unnecessary hardware. Remove universal serial bus (USB) devices; remove or disable network adapters, sound cards, and serial cards; and then restart the installation.
If the computer still stops responding during installation, contact your computer manufacturer or retailer.
Windows cannot copy files required for installation. Make sure all files required for installation are available, and restart the installation. Error code: 0x80070570
original title: Error code: 0x80070570
So, I received my launch party pack today. Went to install Windows 7 Ultimate 32 bit. Went to it’s first reboot and I realized I had a display problem. My montior is connected via HDMI and the display was out of range, so I couldn’t tell what the computer was doing or if it was asking for input. Tried switching to VGA and it didn’t display, so I had to do a system reset. Of course, Win7 install failed. Got back into Vista Ultimate and attempted to reupgrade. Went through the T&C, compatibility check, and a few seconds after it started to copy files (still at 0%) I received the error:
Windows cannot copy files required for installation. The files may be corrupt or missing. Make sure all files required for installation are available, and restart the installation. Error code: 0x80070570
I did a disk cleanup and got rid of temp files and installation files with no success. When I searched the web for a solution, the only common one I found was to wipe a 100mb partition, which I don’t have. I remembered from installs eons ago, there might have been something in add/remove programs. No dice.
Where do I go from here? I do not want to do a clean install. I attempted to contact the Windows 7 Launch Party support line and the mailbox is full.
116 people found this reply helpful
Was this reply helpful?
Sorry this didn’t help.
Great! Thanks for your feedback.
How satisfied are you with this reply?
Thanks for your feedback, it helps us improve the site.
How satisfied are you with this reply?
Thanks for your feedback.
For the person who asked the question, yes it was. It’s not the only answer.
Does this mean the CD is corrupted? I just wasted $200 f***ing $$$ for nothing.
If the DVD is bad you can return it, or replace it.
i tried Rob_Z suggestion and it didn’t work.
Try these other possible solutions. And calm down.
This is common for a Dell computer, but can happen on non Dell computers. It appears that the built-in SATA drivers aren’t recognized during the Windows 7 extraction portion of setup (when your BIOS is set with RAID Autodetect/AHCI). This can work for Dell PC and a non Dell computer:
Note: you should install the latest BIOS update from Dell’s support.dell.com website first, or your manufacturers website for a non-Dell computer.
1. Boot into the BIOS (for Dell press F2 while the Dell splash screen is showing, other computers may use a different button).
2. Go to Drives > SATA Operation. (will be different for a non-Dell)
3. Change from «RAID Autodetect / AHCI» to «RAID Autodetect / ATA» (or something similar)
4. Press escape, choose Save / Exit.
Play it safe, shut down your PC and disconnect all USB devices (except the keyboard/mouse) before trying to reinstall.
This can also sometimes be caused by bad RAM, you can use the memory test feature on the Windows 7 DVD.
This error might also occur if the hardware is not compatible, you may check if your computer meets the hardware requirements for Windows 7 from the two links below:
If the above doesn’t work run chkdsk in Windows Recovery Environment [RE] which might help to fix the issue. You can access Windows RE using the Windows 7 installation disc or a system repair disc you created earlier. To use this method, you need to restart (boot) your computer using the disc.
1. Insert the disc.
2. Restart your computer using the computer’s power button.
3. If prompted, press any key to start Windows from the installation disc.
• If your computer isn’t configured to start from a CD or DVD, check the information that came with your computer. You may need to change your computer’s BIOS settings. For more information, see BIOS: frequently asked questions.
4. Choose your language settings, and then click Next.
5. If you are using the Windows installation disc, click Repair your computer.
6. Select the Windows installation you want to repair, and then click Next.
7. On the System Recovery Options menu, click command prompt to open it.
8. In the command prompt window, type the following command and press enter Chkdsk /F /R
9. Press Y when you are prompted to check the disk the next time that the system restarts.
Note: During the restart process, Windows checks the disk for errors, and then Windows starts. Now run the check disk in command prompt, follow the steps below:


