- Solved: Cannot Run CHKDSK Write Protected on Windows 10/8/7
- CHKDSK error: volume is write protected
- Possible causes for write protected
- Quick fixes to remove write protected for CHKDSK in Windows 10/8/7
- Fix CHKDSK write protected disk in CMD
- Remove write protection in Diskpart
- Modify WriteProtected key in Registry Editor
- Remove write protected by completely formatting
- Run disk checking with third party tools
- со вчерашнего дня не могу запустить ноутбук (
- Fixed: Windows Cannot Run Disk Checking on This Volume in Windows 10
- The error: Windows cannot run disk checking on this volume because it is write-protected
- Why Windows cannot run disk checking on this volume in Windows 10?
- 5 ways to fix Windows cannot run disk checking on this volume in Windows 10
- вњ” Remove write protection in CMD
- вњ” Set the write protection switch to unlock position
- вњ” Edit Windows Registry Key
- вњ” Clear readonly attribute via Diskpart
- вњ”Check the drive for file system errors
- вњ” Format the write-protected partition via third party software
- Conclusion
Solved: Cannot Run CHKDSK Write Protected on Windows 10/8/7
Windows says it cannot run CHKDSK because the volume is write protected? Come and learn how to remove write protected on hard drive for CHKDSK in Windows 10/8/7.
![]()
By Teresa  / Last Updated February 26, 2020
CHKDSK error: volume is write protected
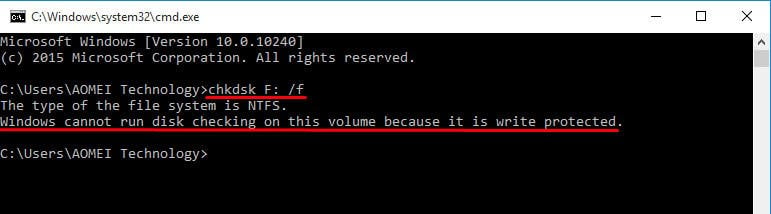
“I get a prompt says Windows detected a hard disk error after my Windows 10 startup this morning. I guess it would be the problem of my newly attached external backup drive, so I decided to check hard drive for errors after some Google. However, after I typed chkdsk F: /f in CMD, only to find that the drive was write-protected. It says: The type of the file system is NTFS. Windows cannot run disk checking on this volume because it is write protected. I don’t remember to set up write protection. What should I do to remove write protection on my external hard drive and run CHKDSK on write protected drive successfully?”
Did you come across similar issues? Write protection problem exists on not only external hard drive, but also USB flash drive, SD card, USB hard drive, and even internal hard disk in Windows 7/8/10. When you run CHKDSK and get write-protected message, you did not give rise to the issue but discover it. Other behaviors like creating new folder and modifying existing data will trigger the write protection error as well. Then, how do you get hard drive write-protected?
Possible causes for write protected
Generally speaking, write-protected status can be understood as read only. That is to say, you can read files on write protected drive but you cannot add new files or make changes for existing data. Following are possible reasons that account for why your drive get write protected.
There is a write protection tab on your hard drive. Usually, it is produced by manufacturer. Check your hard drive or disk enclosure. If yes, switch it to the Off side.
The partition file system is corrupted or damaged due to virus infection or other unknown reasons. A bad file system may cause the data cannot be accessed.
The attribute of selected drive is set as ReadOnly. The attribute may be modified unwittingly.
After knowing why you can’t run CHKDSK on write protected drive, let’s learn how to remove the write protection with different solutions.
Quick fixes to remove write protected for CHKDSK in Windows 10/8/7
To clear the write protection and perform CHKDSK, you may need different solutions under different situations. Some workable fixes are illustrated below.
Fix CHKDSK write protected disk in CMD
According the support of Microsoft, when you encounter the CHKDSK /f volume is write protected issue, you can try another command in CMD: chkdsk / f / r / x. For example, chkdsk F: /f /r /x and press Enter. You can replace F with another drive letter.
However, some users report that that command does not resolve their problem. The write protection error still prompts.

If you have faced such situation, it is suggested to try other methods showing in the next part.
Remove write protection in Diskpart
This method applies to the drive that has been set as readonly. It will clear readonly attributes.
1. Type diskpart in CMD and hit Enter. Click on Yes in the pop up confirming dialogue.
2. In Diskpart, type following commands in sequence and each of them comes with an Enter.
select volume n (where n is the write-protected drive, here is 6)
attributes disk clear readonly
![]()
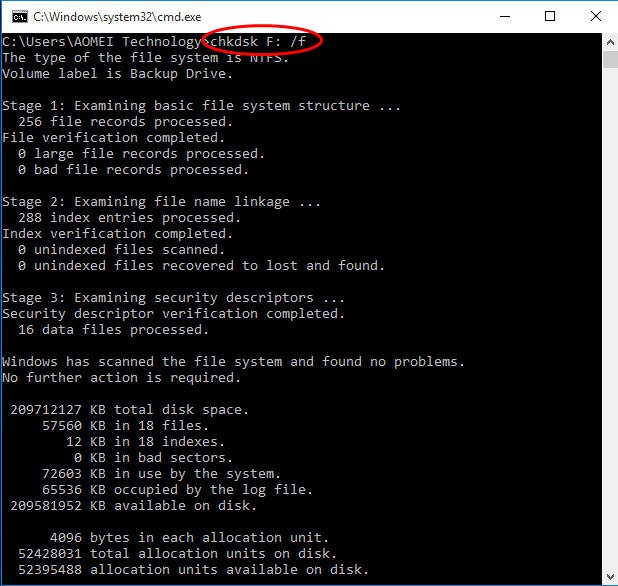
3. Go back to CMD and type CHKDSK F: /f, you’ll find the disk checking runs smoothly.
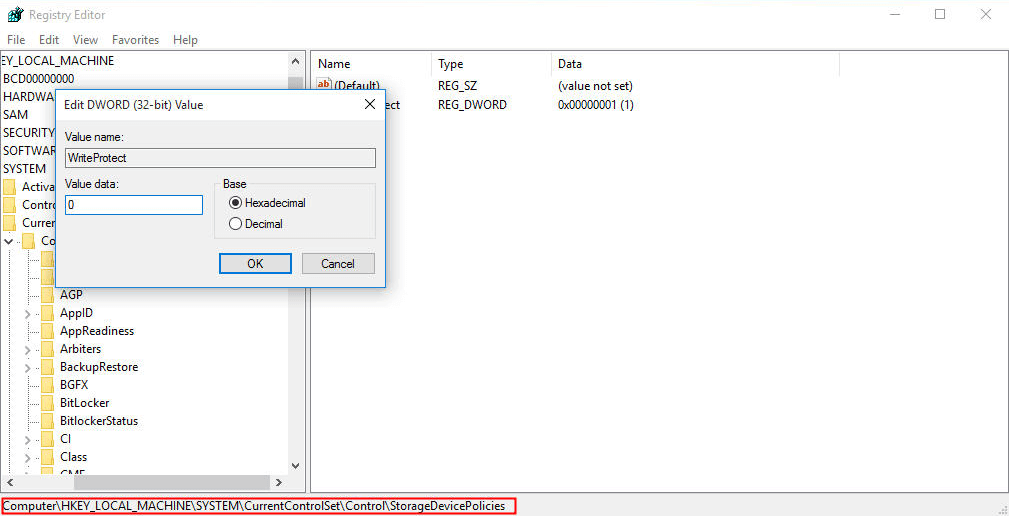
Modify WriteProtected key in Registry Editor
Another way to clear readonly of a drive is to modify registry. Typeregedit in Run and navigate to this path:
Right click the WriteProtected key and select Modify. Change the value from 1 to 0.
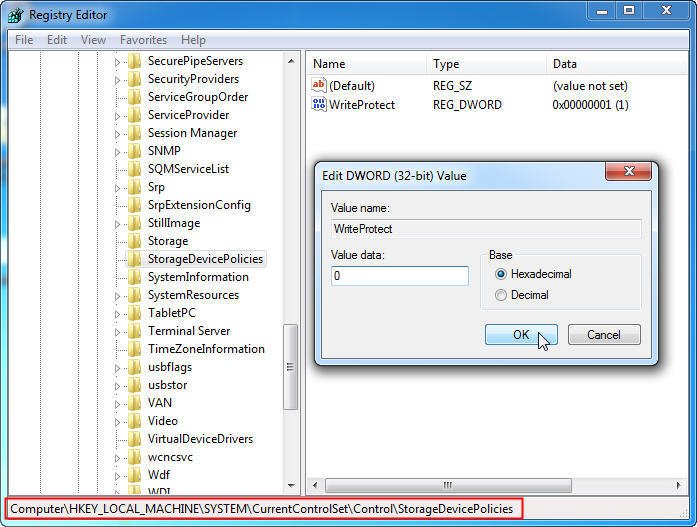
Tips: If you cannot find the StorageDevicePolicies, you can right click Control folder and then New > Key. Name it with WriteProtected and open it.
Remove write protected by completely formatting
If the write protection in CHKDSK is caused by corrupted or damaged file system, you need to format it thoroughly. When format the drive with Device Manager or Diskpart, you may receive format write protected error.
Fortunately, you can format the write protected drive with AOMEI Partition Assistant Standard. It is free hard drive partition manager that will help you better manage internal/external/USB hard drive, USB flash drive, SD card, Pen drive, etc. To solve the CHKDSK write protected trouble in Windows 10, free download and have a try.
Important: formatting will cause data loss. Think twice before you leap.
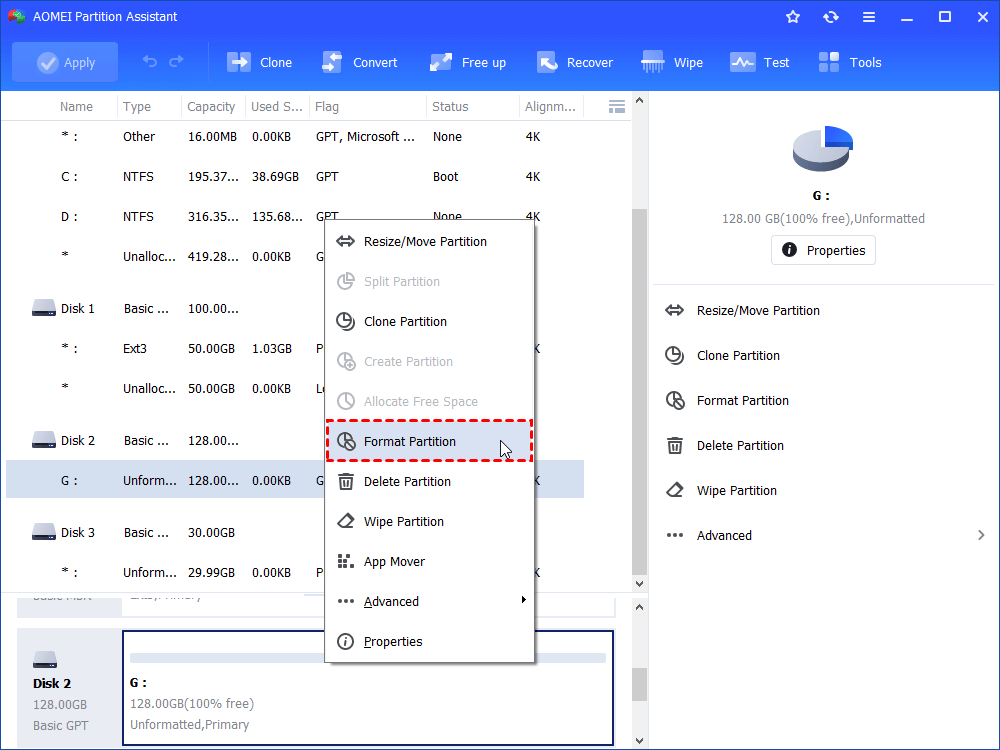
1. Install and run AOMEI Partition Assistant. Right click the write protected partition and select Format Partition.
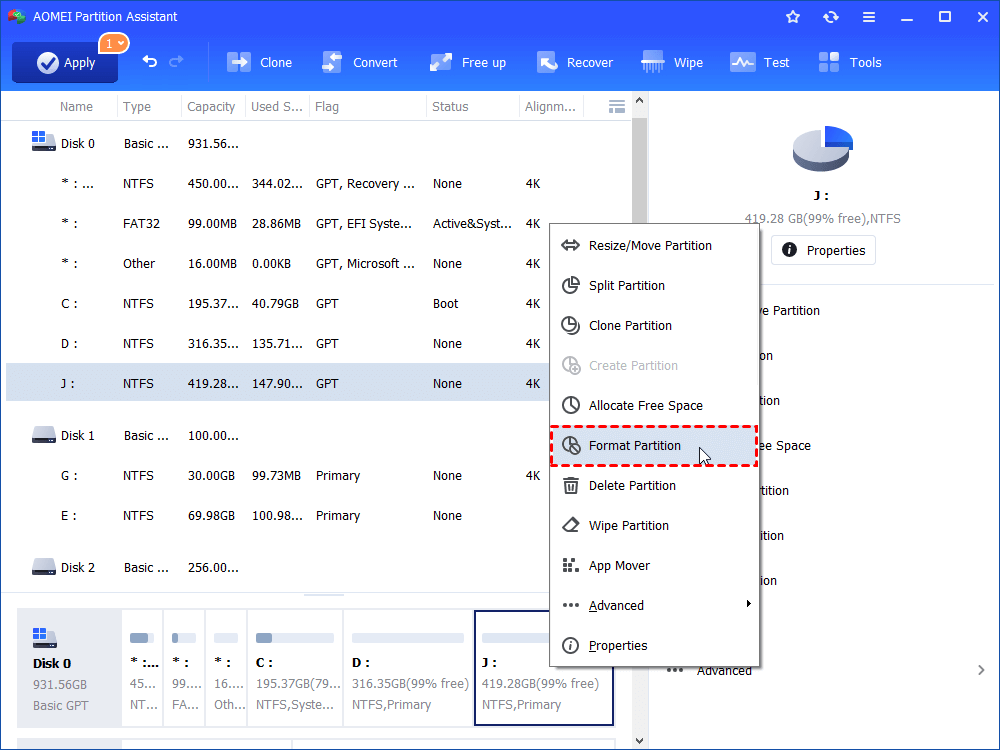
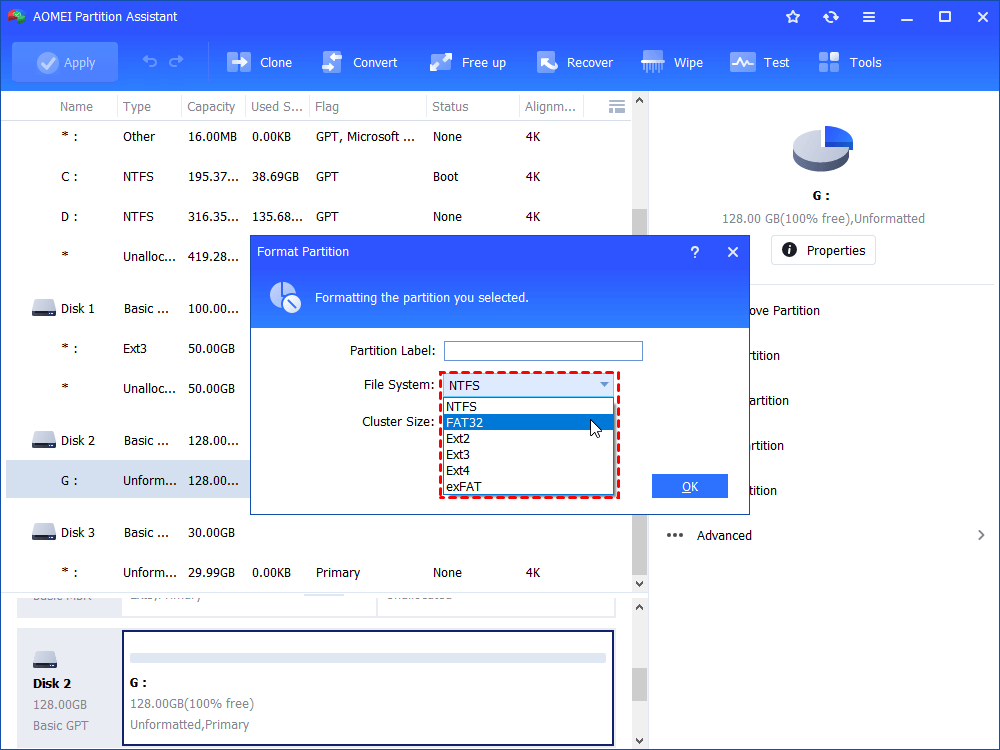
2. Edit partition label, select file system and change cluster size if you wish to in the pop up window.
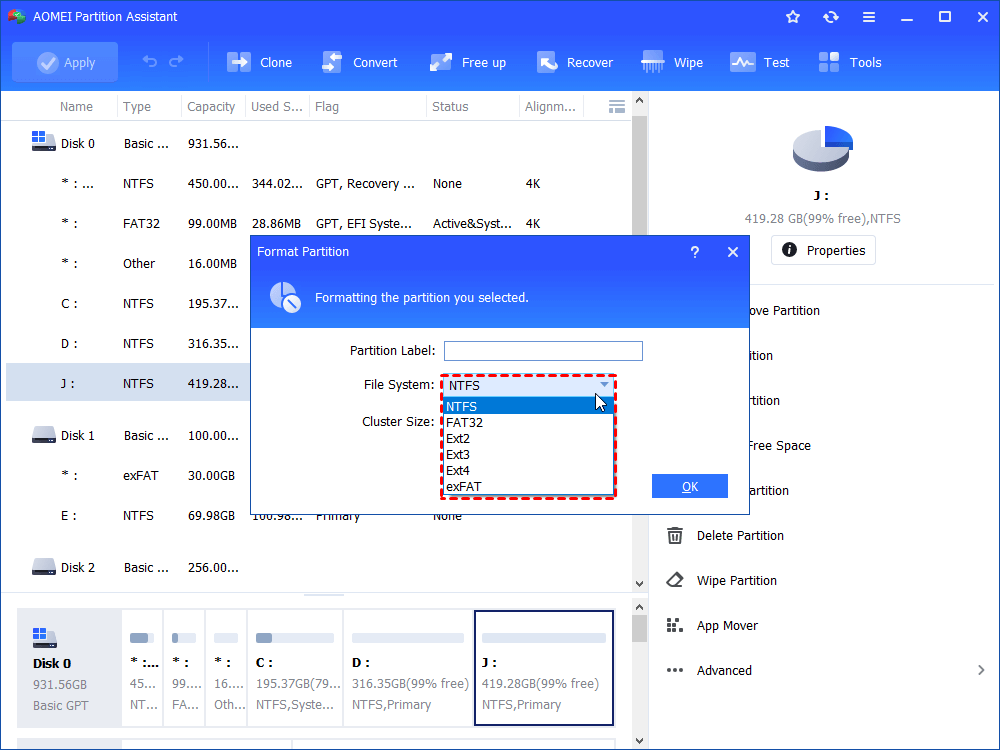
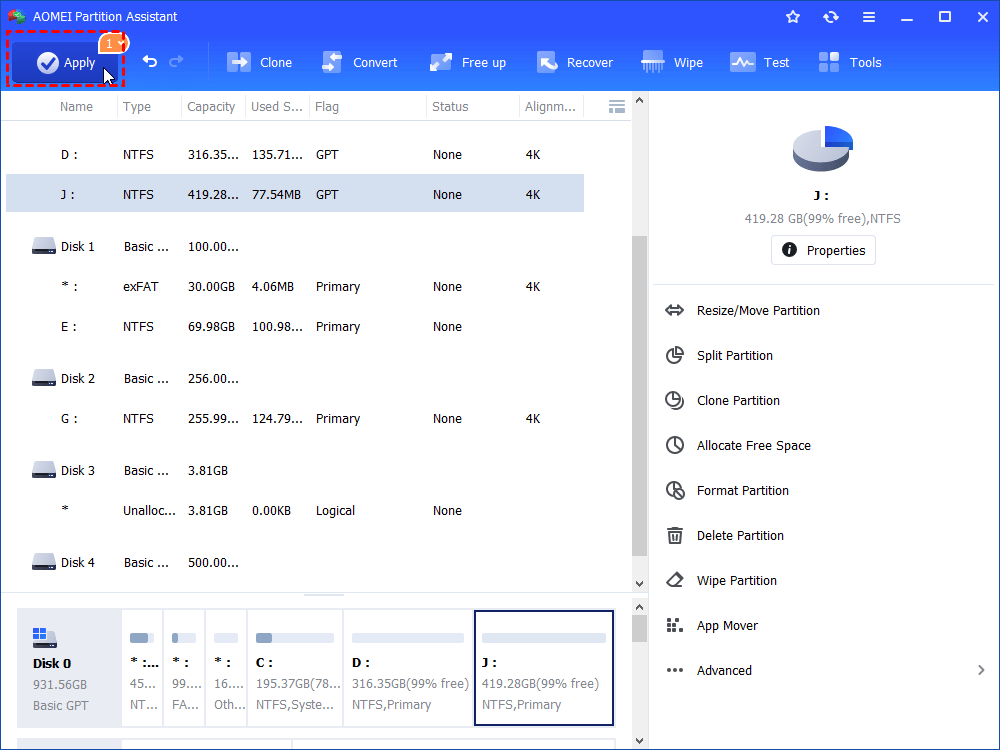
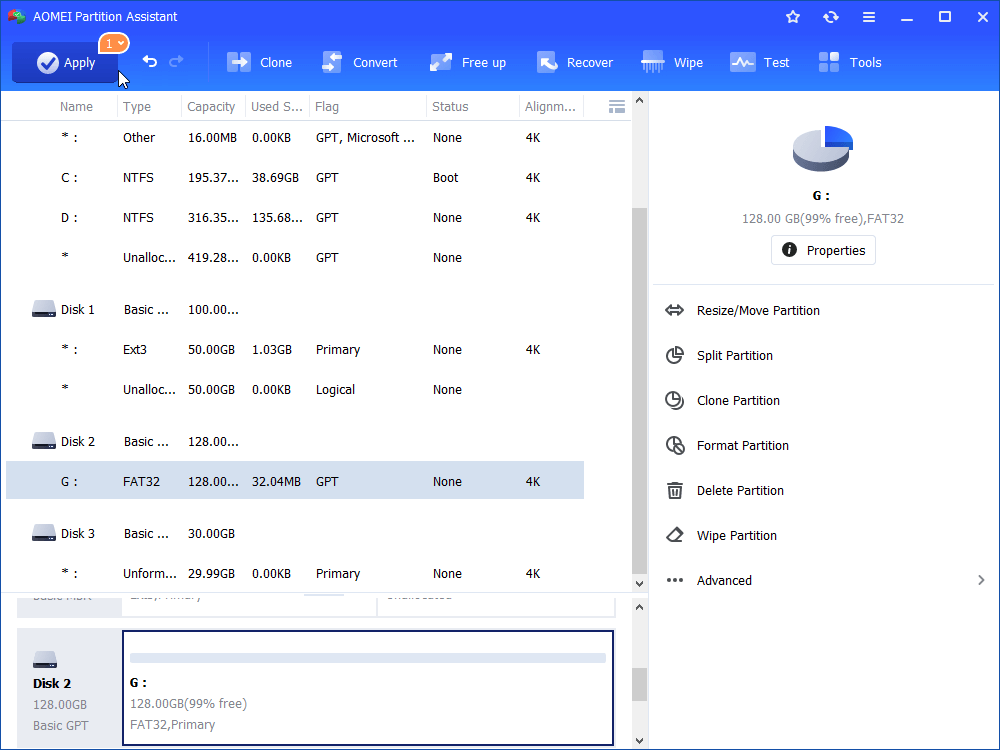
3. Click Apply and then Proceed after your confirmation.
Tips: Except for formatting the partition, you can Wipe Partition if there is no important data stored on that drive.
Run disk checking with third party tools
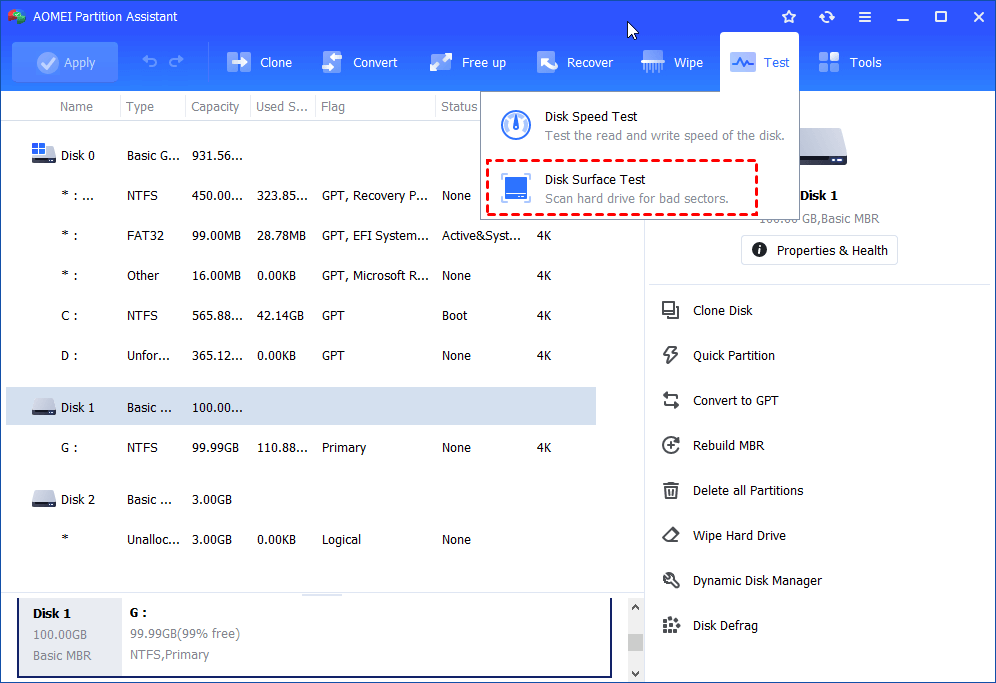
To solve “unable to CHKDSK write protected” error, you can run disk checking with another tool. Aforementioned AOMEI Partition Assistant supports performing not only partition checking but disk checking. Let’s get to know these two features. In the first place, start AOMEI Partition Assistant.
1. For partition error checking, right click the drive and go Advanced >Check Partition.

2. For disk bad sector checking, right click the disk and select Surface Test.
Tips: covered methods also apply to “CHKDSK write protected USB”, “CHKDSK NTFS write protected”, and “unable to install Windows because the partition is write protected” issues.
со вчерашнего дня не могу запустить ноутбук (
Вычислять дату вчерашнего дня
Добрый день. Есть большой объем логов, которые пишутся с именами в формате 20130724.log Очень.
Как получить число вчерашнего дня?
Подскажите, пожалуйста, самый простой способ.
Со вчерашнего дня часто no boot device
Здравствуйте, недавно почистил компьютер, и стал виснуть видовс перезагружал компьютер и показывает.
Разработать процедуру, определяющую дату вчерашнего дня
Разработать процедуру, определяющую дату вчерашнего дня.Чтобы при вводе получилось из 01 01 2000-31.
Добавлено через 5 минут
Заказываю контрольные, курсовые, дипломные и любые другие студенческие работы здесь или здесь.
Со вчерашнего дня svchosts стал есть 50% CPU
Со вчерашнего дня svchosts стал есть 50% CPU. Открыл диспетчер задач, там виден этот svchost, когда.
 Имя папки с названием месяца вчерашнего дня
Здрасьте. Суть такова: есть архиватор БД, который умеет архивировать данные за завершённые сутки в.
Как можно вывести дату «вчерашнего дня»?
Привет всем. Нужно архивировать «вчерашние» бекапы, а как их выбрать еще не знаю.
Не могу подключиться по RDP после вчерашнего юбилейного обновления
Я вчера вечером установил «юбилейное» обновление windows 10, теперь не погу подключиться к.
Не могу запустить сервер через python manage.py runserver. Не могу понять в чем проблема. Кто может подсказать?
сделал миграцию но все равно не помогает. Не могу открыть сервер в браузере (venv).
Fixed: Windows Cannot Run Disk Checking on This Volume in Windows 10
Receive Windows cannot run disk checking on this volume because it is write protected in Windows 10 while running CHKDSK.exe? Read this post to realize why it occurs and how to fix it.

By Bryce / Last Updated March 30, 2021
The error: Windows cannot run disk checking on this volume because it is write-protected
CHKDSK is a powerful Windows built-in Windows tool, which can assist you in checking disk integrity, file system errors, and bad sectors so on. It is common that you choose to run disk checking when you trapped in poor situations. For example, you are unable to open SD card even it is detected. However, when you run CHKDSK for SD card, external hard drive partition, etc.in Windows 10/8.1/8/7, you may encounter the following error:
The type of the file system is NTFS.
Windows cannot run disk checking on this volume because it is write-protected.

Why Windows cannot run disk checking on this volume in Windows 10?
As the error implies, it occurs as the partition is write-protected. When a volume is write-protected, that is to say it is in read-only status. And you are only allowed to read the data on the disk; you are not permitted to edit the contents of the drive which includes editing the files or removing them. To settle out thee error, we need to figure out why the volume becomes write-protected.
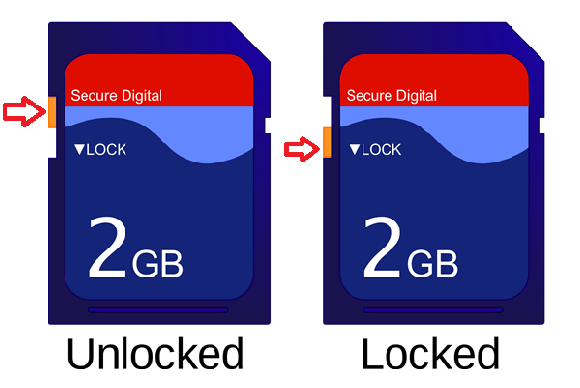
►Some USB flash drives or SD card reader own physical switch; if the switch is “ON”, your drive will be write-protected.
►The drive on which you need to run CHKDSK has been set as “readonly” in attribute.
в–єThe Value in Windows Registry Key is been set incorrectly.
в–єThe file system of the drive is corrupted or damaged for some unknown reason.
в–єThe selected drive is infected by virus.
5 ways to fix Windows cannot run disk checking on this volume in Windows 10
Since Windows cannot run disk checking on this volume because it is write-protected error occurs as the volume is in read-only status, you can fix the error via removing write protection from the volume. Five effective ways are listed below.
вњ” Remove write protection in CMD
When you can’t run” chkdsk n: /f” due to write protection, you can type “chkdsk n: / f/r/x” (“n” is the drive letter of the partition on which you need to run this CHDKSK command.) and hit “Enter” to solve this problem. This command can fix errors, locate bad sectors on the disk and unmount disk.
Note: If your system has been set with write protection on removable device, this command will be invalid and the error “Windows cannot run disk checking on this volume…” will still appear.

вњ” Set the write protection switch to unlock position
When your drive is with a physical write protection switch you can check whether it is in lock position. If it is, you should adjust it to unlock position. Then, you are able to run disk checking without the error message above. If your drive is without such physical switch or the switch is on “OFF” side, you can overlook this solution.
вњ” Edit Windows Registry Key
If you are in such case, you can open Registry to edit check whether the value data of StoragDevciePolicies WriteProtect. The steps are as follows:
1. Press “Windows + R” at the same time and type “regedit”. Then, press “Enter” key.
2. Navigate to the path below:
PS: If there is no “StorageDevicePokicies” under “Control”, right click “Control”, go to “New”>“Key” and Name the Key with StorageDevicePolicies. Then, right click white space at the right-hand pane and choose “New”>“DWORD (32-bit)” and name it with WriteProtect.
3. Double click WriteProtect, and set the “Value data” to 0.
4. Close Registry Editor.
вњ” Clear readonly attribute via Diskpart
If your drive has been set as readonly in Diskpart, you will be unable to run CHDDSK on the drive in Windows 10 as well. In such case, do as the detailed steps given below to clear readonly attribute:
1. Press “Windows + R” input “diskpart” and hit “Enter” key.
2. Type the command lines below in order and every command shall be accompanied with hitting “Enter” key:
“list disk” > “select disk h” , where “h” is the number of the write-protected volume > “attributes disk clear readonly”.
![]()
3. Type “exit” when you are prompted that Disk attributes cleared successfully.
Then, you can try to run CHKDSK again to see whether the error disappears.
вњ”Check the drive for file system errors
To fix this error, you can also scan this drive for file system errors.В Below is how to do it in detail:
1. Double click on «This PC»В icon to open the File Explorer.
2. Right-click the faulty drive and select «Properties».
3. Navigate to the «Tools» tab and click on «Check».

вњ” Format the write-protected partition via third party software
If the solutions described are invalid, you can format your write-protected drive via third-party software – AOMEI Partition Assistant Standard. Free download it and follow the step-by-step tutorial presented below:
PS: Be cautious to format because this operation will delete all data on the partition. Well, the deleted data can be retrieved by some file recovery software.
1. Install AOMEI Partition Assistant Standard and run it. Locate the write-protected partition, right-click it and select “Format Partition.”
2. Here you can determine the partition’s Partition Label, File System and Cluster Size.
3. After reviewing this operation, you can click “Apply”>“Proceed” to execute it.
Notes:вњЋ. AOMEI Partition Assistant Standard is suitable for Windows 10/8.1/8/7, XP and Vista. If you are using Windows Server 2019, 2016, 2012 (R2), or 2008 (R2), you can use AOMEI Partition Assistant Server. It is available to wipe partition or delete partition as well via AOMEI Partition Assistant Standard.
Conclusion
It is unnecessary to try all solutions listed above one by one. Consider the most possible reason for this error and take responding solution to settle “Windows cannot run disk checking in Windows 10 because of write protection” issue.


