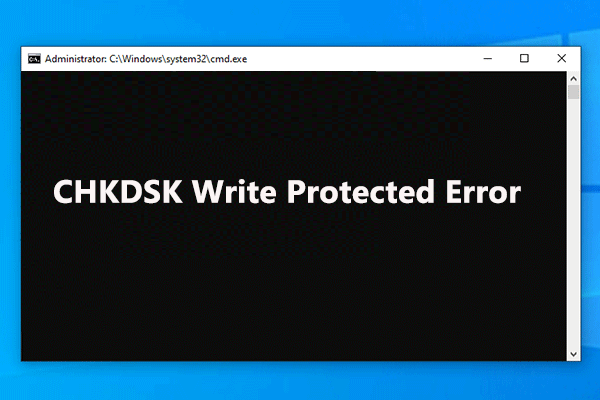
- Fixed: Windows Cannot Run Disk Checking on This Volume in Windows 10
- The error: Windows cannot run disk checking on this volume because it is write-protected
- Why Windows cannot run disk checking on this volume in Windows 10?
- 5 ways to fix Windows cannot run disk checking on this volume in Windows 10
- вњ” Remove write protection in CMD
- вњ” Set the write protection switch to unlock position
- вњ” Edit Windows Registry Key
- вњ” Clear readonly attribute via Diskpart
- вњ”Check the drive for file system errors
- вњ” Format the write-protected partition via third party software
- Conclusion
- Исправлено: Windows не может запустить проверку диска на этом томе, поскольку он защищен от записи
- Почему Windows не может запустить проверку диска на этом томе из-за ошибки защиты от записи?
- Решение 1. Разрешите CHKDSK в командной строке
- Решение 2. Измените атрибут через реестр
- Решение 3. Использование DiskPart
- Решение 4. Сканирование диска на наличие повреждений
- 5 Solutions to CHKDSK Write Protected Error on Windows 10/8/7 [Partition Magic]
- Summary :
- Quick Navigation :
- What Causes CHKDSK Write Protected?
- Solution 1. Run CHKDSK
- Solution 2. Modify the Attribute via Registry
- Solution 3. Remove Write Protection in Diskpart
- Solution 4. Format Partition
- Format Partition with Disk Management
- Format Partition with Third-party Partition Manager
- Solution 5. Check and Fix Hard Drive Error with CHKDSK Alternative
- Check File System with MiniTool Partition Wizard
- Disk Error Checking
- Bottom Line
Fixed: Windows Cannot Run Disk Checking on This Volume in Windows 10
Receive Windows cannot run disk checking on this volume because it is write protected in Windows 10 while running CHKDSK.exe? Read this post to realize why it occurs and how to fix it.

By Bryce  / Last Updated March 30, 2021
The error: Windows cannot run disk checking on this volume because it is write-protected
CHKDSK is a powerful Windows built-in Windows tool, which can assist you in checking disk integrity, file system errors, and bad sectors so on. It is common that you choose to run disk checking when you trapped in poor situations. For example, you are unable to open SD card even it is detected. However, when you run CHKDSK for SD card, external hard drive partition, etc.in Windows 10/8.1/8/7, you may encounter the following error:
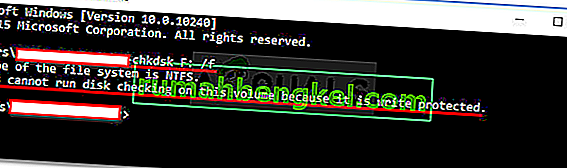
The type of the file system is NTFS.
Windows cannot run disk checking on this volume because it is write-protected.

Why Windows cannot run disk checking on this volume in Windows 10?
As the error implies, it occurs as the partition is write-protected. When a volume is write-protected, that is to say it is in read-only status. And you are only allowed to read the data on the disk; you are not permitted to edit the contents of the drive which includes editing the files or removing them. To settle out thee error, we need to figure out why the volume becomes write-protected.
►Some USB flash drives or SD card reader own physical switch; if the switch is “ON”, your drive will be write-protected.
►The drive on which you need to run CHKDSK has been set as “readonly” in attribute.
в–єThe Value in Windows Registry Key is been set incorrectly.
в–єThe file system of the drive is corrupted or damaged for some unknown reason.
в–єThe selected drive is infected by virus.
5 ways to fix Windows cannot run disk checking on this volume in Windows 10
Since Windows cannot run disk checking on this volume because it is write-protected error occurs as the volume is in read-only status, you can fix the error via removing write protection from the volume. Five effective ways are listed below.
вњ” Remove write protection in CMD
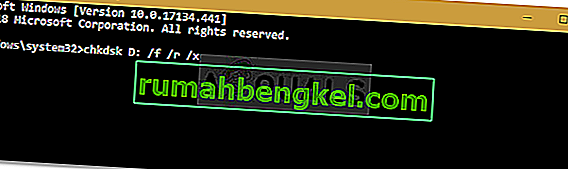
When you can’t run” chkdsk n: /f” due to write protection, you can type “chkdsk n: / f/r/x” (“n” is the drive letter of the partition on which you need to run this CHDKSK command.) and hit “Enter” to solve this problem. This command can fix errors, locate bad sectors on the disk and unmount disk.
Note: If your system has been set with write protection on removable device, this command will be invalid and the error “Windows cannot run disk checking on this volume…” will still appear.

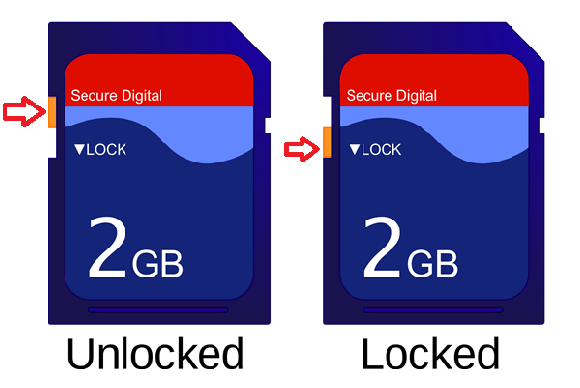
вњ” Set the write protection switch to unlock position
When your drive is with a physical write protection switch you can check whether it is in lock position. If it is, you should adjust it to unlock position. Then, you are able to run disk checking without the error message above. If your drive is without such physical switch or the switch is on “OFF” side, you can overlook this solution.
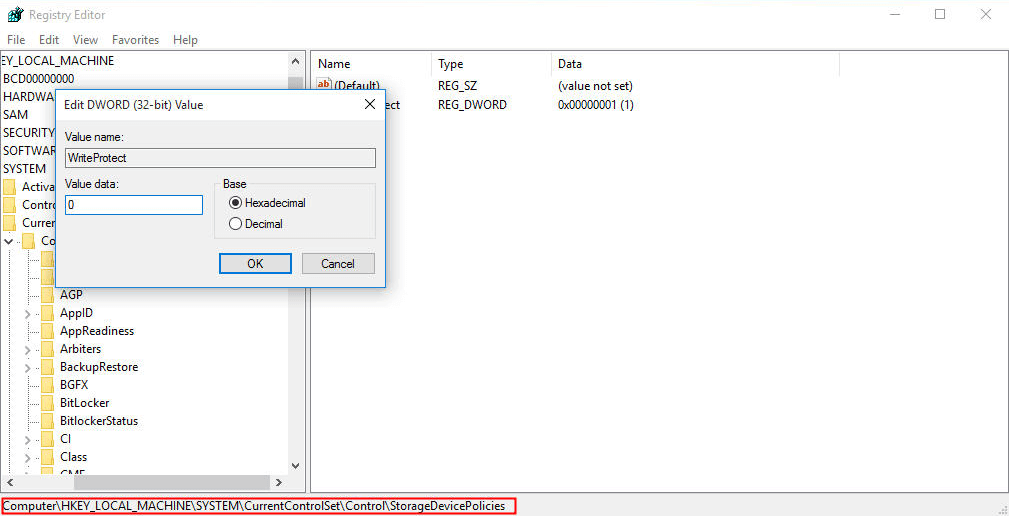
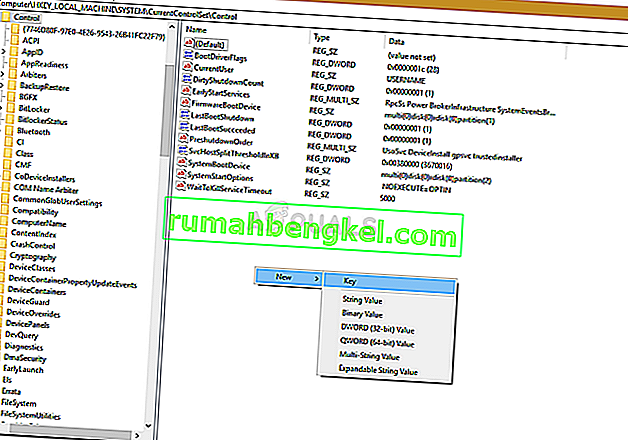
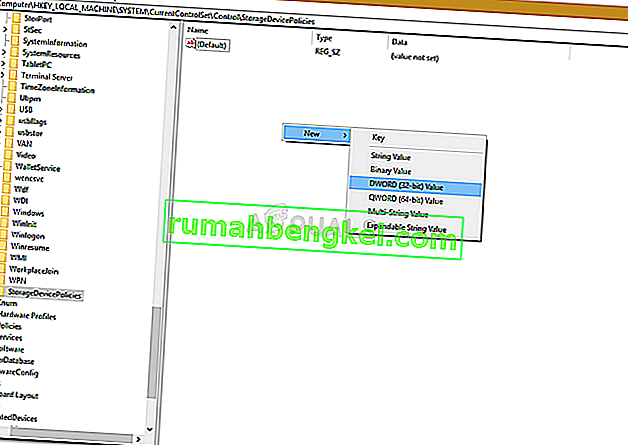
вњ” Edit Windows Registry Key
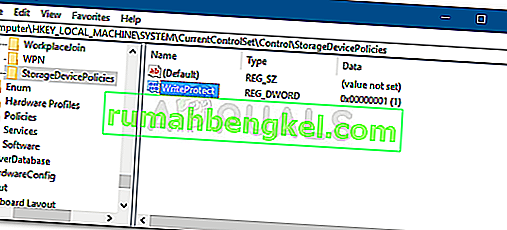
If you are in such case, you can open Registry to edit check whether the value data of StoragDevciePolicies WriteProtect. The steps are as follows:
1. Press “Windows + R” at the same time and type “regedit”. Then, press “Enter” key.
2. Navigate to the path below:
PS: If there is no “StorageDevicePokicies” under “Control”, right click “Control”, go to “New”>“Key” and Name the Key with StorageDevicePolicies. Then, right click white space at the right-hand pane and choose “New”>“DWORD (32-bit)” and name it with WriteProtect.
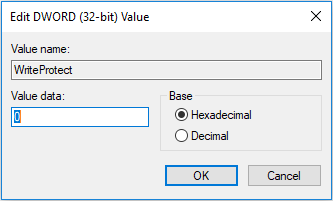
3. Double click WriteProtect, and set the “Value data” to 0.
4. Close Registry Editor.
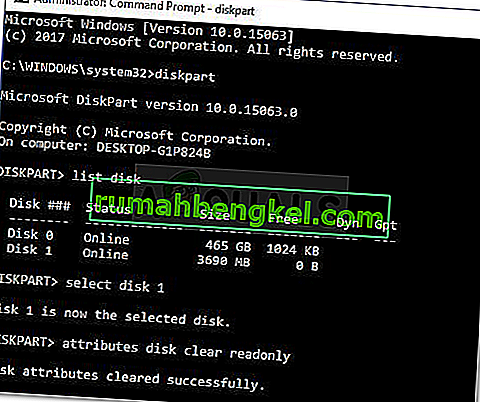
вњ” Clear readonly attribute via Diskpart
If your drive has been set as readonly in Diskpart, you will be unable to run CHDDSK on the drive in Windows 10 as well. In such case, do as the detailed steps given below to clear readonly attribute:
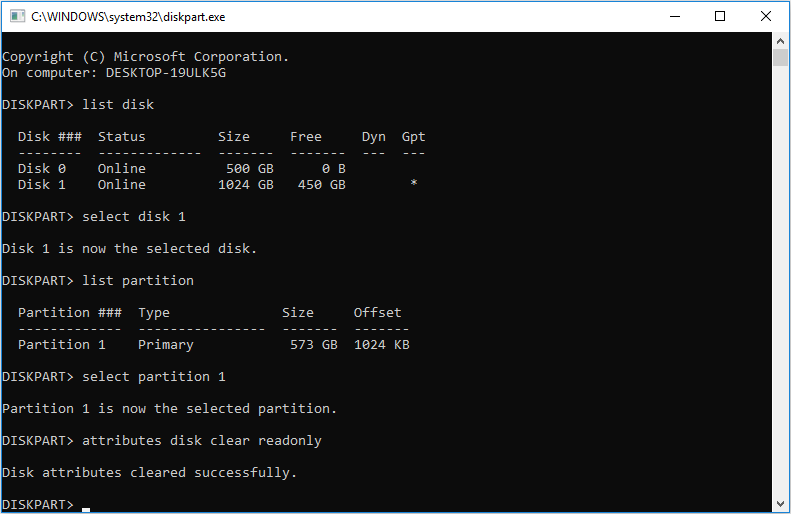
1. Press “Windows + R” input “diskpart” and hit “Enter” key.
2. Type the command lines below in order and every command shall be accompanied with hitting “Enter” key:
“list disk” > “select disk h” , where “h” is the number of the write-protected volume > “attributes disk clear readonly”.
![]()
3. Type “exit” when you are prompted that Disk attributes cleared successfully.
Then, you can try to run CHKDSK again to see whether the error disappears.
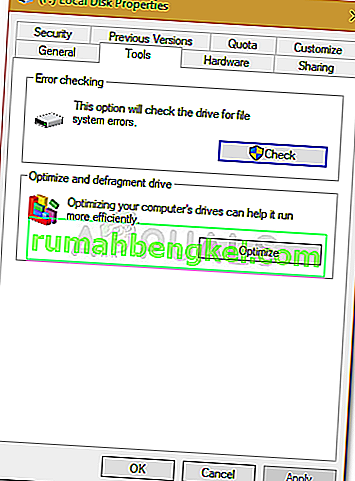
вњ”Check the drive for file system errors
To fix this error, you can also scan this drive for file system errors.В Below is how to do it in detail:
1. Double click on «This PC»В icon to open the File Explorer.
2. Right-click the faulty drive and select «Properties».
3. Navigate to the «Tools» tab and click on «Check».

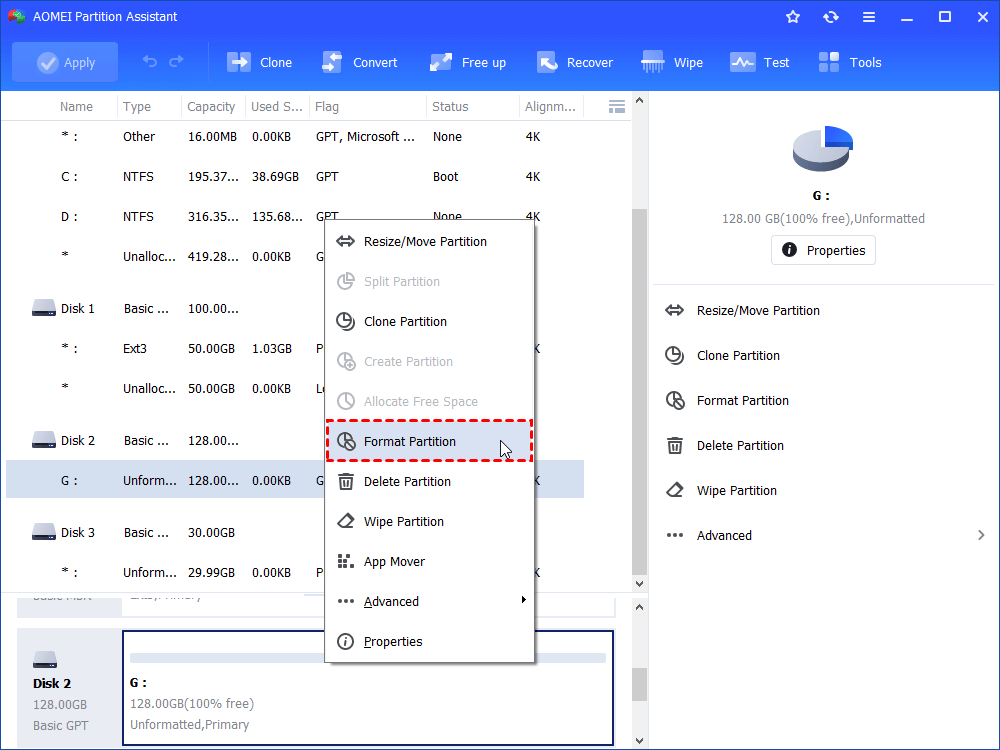
вњ” Format the write-protected partition via third party software
If the solutions described are invalid, you can format your write-protected drive via third-party software – AOMEI Partition Assistant Standard. Free download it and follow the step-by-step tutorial presented below:
PS: Be cautious to format because this operation will delete all data on the partition. Well, the deleted data can be retrieved by some file recovery software.
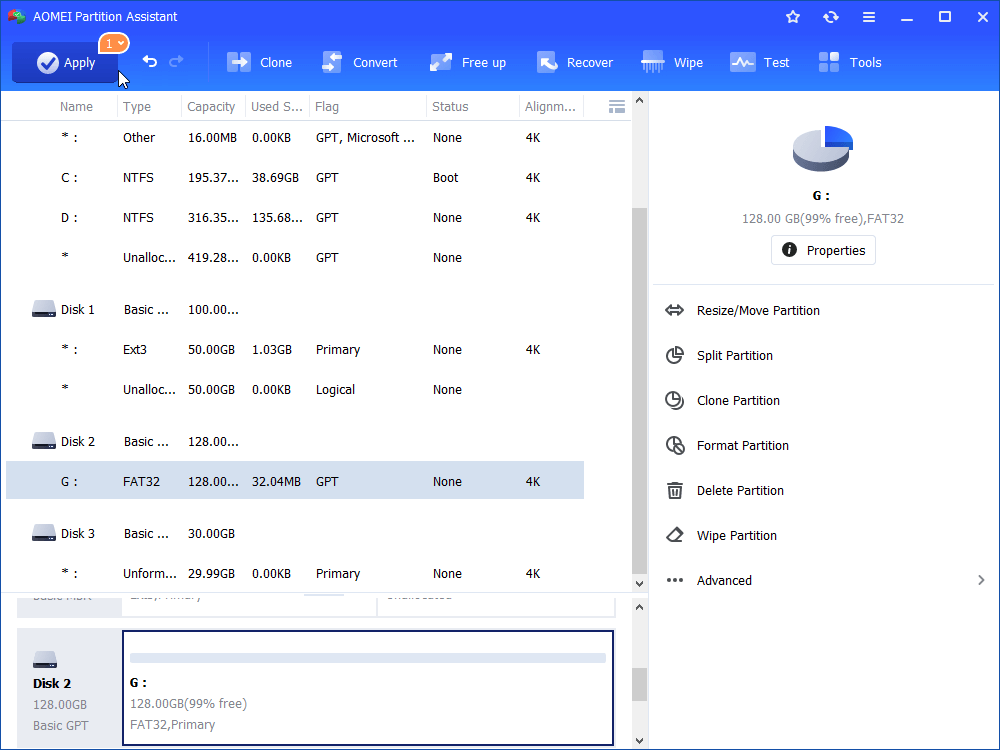
1. Install AOMEI Partition Assistant Standard and run it. Locate the write-protected partition, right-click it and select “Format Partition.”
2. Here you can determine the partition’s Partition Label, File System and Cluster Size.
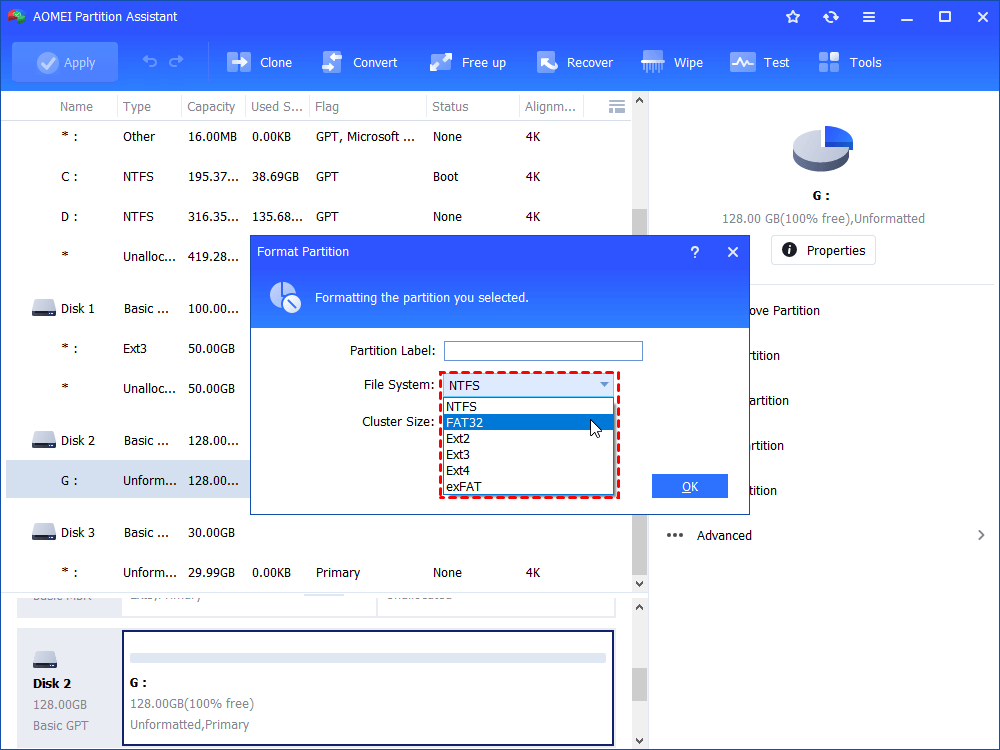
3. After reviewing this operation, you can click “Apply”>“Proceed” to execute it.
Notes:вњЋ. AOMEI Partition Assistant Standard is suitable for Windows 10/8.1/8/7, XP and Vista. If you are using Windows Server 2019, 2016, 2012 (R2), or 2008 (R2), you can use AOMEI Partition Assistant Server. It is available to wipe partition or delete partition as well via AOMEI Partition Assistant Standard.
Conclusion
It is unnecessary to try all solutions listed above one by one. Consider the most possible reason for this error and take responding solution to settle “Windows cannot run disk checking in Windows 10 because of write protection” issue.
Исправлено: Windows не может запустить проверку диска на этом томе, поскольку он защищен от записи
Ошибка « Windows не может запустить проверку диска на этом томе, поскольку он защищен от записи » возникает, когда ваш том / диск поврежден или относится к категории «Только для чтения». CHKDSK — это утилита командной строки в Windows, которая позволяет вам искать поврежденные секторы в вашем томе и проверять целостность системных файлов, хранящихся на вашем диске. Иногда при запуске утилиты может появиться сообщение об ошибке, указывающее на то, что диск поврежден или защищен от записи.
Если один из ваших дисков защищен от записи, это означает, что вы не сможете редактировать содержимое диска, включая редактирование файлов или их удаление. Проще говоря, защита от записи означает, что том предназначен только для чтения. Ярким примером может служить защита от записи USB-накопителей, которая время от времени возникает у всех, и в этом случае вы не можете скопировать содержимое USB-накопителя на компьютер или наоборот.
Почему Windows не может запустить проверку диска на этом томе из-за ошибки защиты от записи?
Не будет ошибкой сказать, что все время от времени сталкиваются с этой ошибкой, которая обычно вызвана —
- Защита от записи на вашем диске . Если ваш диск предназначен только для чтения, ошибка естественным образом появится из-за ограниченных разрешений.
- Поврежденный привод . Иногда, если ваш диск поврежден или поврежден из-за хранимого на нем плохого системного файла, это может привести к появлению ошибки.
Вы можете применить указанные ниже решения, чтобы решить вашу проблему.
Решение 1. Разрешите CHKDSK в командной строке
Чтобы начать с чего-то простого, были сообщения о том, что ошибка была устранена с помощью другой команды chkdsk. Об этом посоветовала сама служба поддержки Microsoft, поэтому попробовать однозначно стоит. Что вам нужно сделать:
- Откройте командную строку с повышенными привилегиями, нажав Winkey + X и выбрав Командная строка (администратор) из списка.
- Когда он откроется, введите следующее:

3. Где D: неисправный привод, замените его соответствующим образом.
Параметры означают следующее:
Параметр / f ищет на вашем диске любые ошибки и пытается их исправить.
Параметр / r просканирует ваш диск на наличие плохих секторов и устранит их.
Параметр / x отключает ваш диск, что означает, что если ваш диск используется, его больше не будет, пока поиск не будет завершен.
Важно отметить, что некоторые пользователи сообщали, что их проблема не устранена даже после попытки, и в этом случае вам придется следовать другим решениям, упомянутым ниже.
Решение 2. Измените атрибут через реестр
Если решение, предоставленное Microsoft, не работает для вас, вы можете попробовать снять защиту от записи с помощью реестра Windows. Реестр Windows может вызвать определенные критические проблемы, поэтому внимательно следите за действиями. Вот что надо делать:
- Нажмите Winkey + R, чтобы открыть Выполнить.
- Введите regedit .
- Как только откроется реестр Windows, вставьте в адресную / адресную строку следующее:
4. Здесь дважды щелкните кнопку « WriteProtect » и измените значение с 1 на 0.
Если вы не можете найти папку StorageDevicePolicies в вашем реестре Windows, вот вам альтернативный способ:
- Вставьте следующий путь в адресную строку:
2. На средней панели щелкните правой кнопкой мыши и выберите « Создать»> «Ключ» .
3. Будет создана новая папка, назовите ее StorageDevicePolicies . Убедитесь, что вы не ввели имя неправильно.
4. После этого выделите вновь созданную папку, щелкните правой кнопкой мыши среднюю панель и выберите значение DWORD (32-разрядное) .
5. Назовите его WriteProtect и установите значение 0 .
Решение 3. Использование DiskPart
DiskPart — это утилита командной строки, которую вы можете использовать для создания разделов на вашем диске. Его также можно использовать для изменения атрибутов диска, что мы и собираемся здесь сделать. Вот как им пользоваться:
- Откройте меню «Пуск», введите diskpart и откройте его.
- После загрузки утилиты введите:
3. Будут перечислены тома на вашем жестком диске, теперь введите следующее:
4. Вам нужно будет заменить # на алфавит вашего диска.
5. После этого введите следующее:
6. Дождитесь его завершения.
Решение 4. Сканирование диска на наличие повреждений
Последнее, что вы можете сделать, чтобы исправить эту ошибку, — это просканировать свой диск на наличие поврежденных файлов, что является одной из причин проблемы. Вот как это сделать:
- Откройте « Этот компьютер ».
- Щелкните неисправный диск правой кнопкой мыши и выберите « Свойства» .
- Перейдите на вкладку Инструменты .
- Оказавшись там, нажмите кнопку « Проверить ».
- Если вам будет предложено диалоговое окно UAC, выберите Да.
- Дождитесь завершения сканирования.
5 Solutions to CHKDSK Write Protected Error on Windows 10/8/7 [Partition Magic]
By Irene | Follow | Last Updated February 01, 2021
Summary :
When your run CHKDSK, you may encounter the CHKDSK write protected error. It gives you the error message “Windows cannot run disk checking on this volume because it is write protected.” How to fix it? This article will show you 6 solutions.
Quick Navigation :
CHKDSK is a command-line utility for Windows users to check and fix hard drive errors. However, when you run CHKDSK, it might prompt you with the error message “Windows cannot run disk checking on this volume because it is write protected.”
As you can see from the following screenshot, you are unable to run CHKDSK in CMD with the error message.
What does this error mean? What causes the Windows cannot run CHKDSK write protected error? How to fix the CHKDSK write protected error?
Don’t worry that too much. You will find all the information you need in this article.
Before I show you the methods to fix Windows cannot run disk checking on this volume Windows 10 issue, it is necessary to learn the reasons for the CHKDSK write protected error.
What Causes CHKDSK Write Protected?
Here are two main reasons for the CHKDSK write protected error.
If your drive is attributed to Read-only, the CHKDSK write protected error will occur due to restrictions on permissions.
2. The drive is damaged or corrupted.
Sometimes a partition’s file system can be corrupted due to many reasons like virus attack or other unknown reasons. In this case, you are unable to access the drive and run CHKDSK.
When it happens, you can try the following 5 solutions to get rid of the CHKDSK write protected error.
Solution 1. Run CHKDSK
Step 1. Open an elevated Command Prompt.
- Input cmd in the Windows 10 Cortana search box.
- Right-click the best match and choose Run as administrator.
Step 2. Run CHKDSK commands
- Type chkdsk *: /f /r /x (* represents the partition you want to check)
- Then hit Enter key.
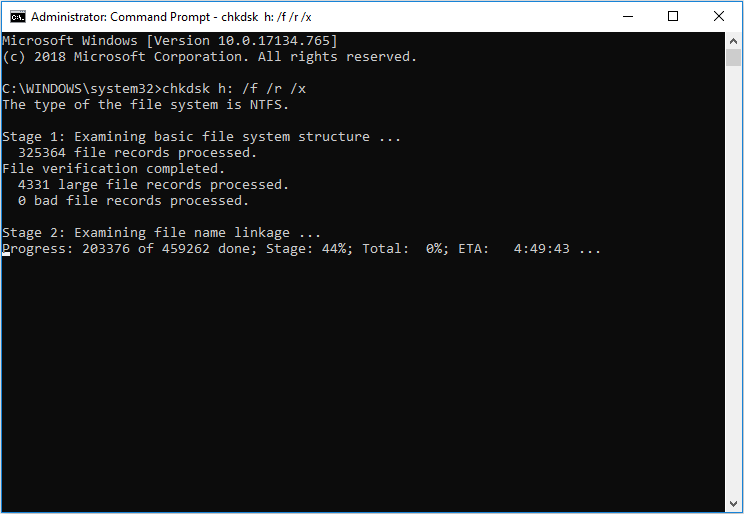
The different parameters have different meaning:
- /f — Find any drive errors and try to fix them.
- /r — Locate bad sectors on the drive and try to recover any and all readable information from them.
- /x — Force the volume you’re about to check to be dismounted.
After running the command, you can check if you can access your drive and run CHKDSK as normal. If this method doesn’t work, you can try the next method.
Solution 2. Modify the Attribute via Registry
You can remove the write protection by modifying the attribute via Registry.
Step 1. Open Windows Registry Editor.
- Press Windows key + R key to open the Run box. Then input regedit and hit Enter.
- Input regedit in the Windows Cortana search box and click the best match.
Step 2. Modify the WriteProtected key.
- Locate to HKEY_LOCAL_MACHINE\SYSTEM\CurrentControlSet\Control\StorageDevicePolicies.
- Double-click the ‘WriteProtect’ key and change the value from 1 to 0.
Then you can run CHKDSK in cmd again to see if the error disappears.
Solution 3. Remove Write Protection in Diskpart
If the CHKDSK write protected error is caused by the drive attributed to Read-only, you can use this method to remove write protection in Diskpart. This method will clear readonly attributes. Here are detailed steps and screenshot.
Step 1. Type diskpart in CMD and hit Enter. Click on Yes in the pop up confirming dialogue.
Step 2. In Diskpart, type the following commands one by one and hit Enter after each.
- list disk
- select disk * (* represents the disk which has the write-protected partition)
- list partition
- select partition* (* represents the write-protected partition)
- attributes disk clear readonly
- exit
Then you can back to CMD to check if the CHKDSK can run smoothly.
Solution 4. Format Partition
One effective way to remove write protection CHKDSK is to format the partition. If none of the above fixes has resolved your issue, you can format the partition to get rid of the Windows cannot run disk checking on this volume Windows 10 error.
You can format the partition with Windows Disk Management or download MiniTool Partition Wizard Free Edition to format partition. Here I will show you both methods.
Format Partition with Disk Management
Disk Management is a Windows built-in disk partitioning utility. It has some basic features for users to manage their disks and partitions, such as create partition, delete partition, format partition, change drive letter, convert disk to dynamic and so on.
To format partition with Disk Management, you can follow the steps as below.
Step 1. Open Disk Management.
You can follow the two ways to open Disk Management in Windows 10.
- Right-click the Windows Start menu and choose Disk Management.
- Press Win + R key to open Run box and then input diskmgmt.msc and hit Enter.
Step 2. Format the drive.
1. Choose the target partition.
2. Right-click it to select Format….
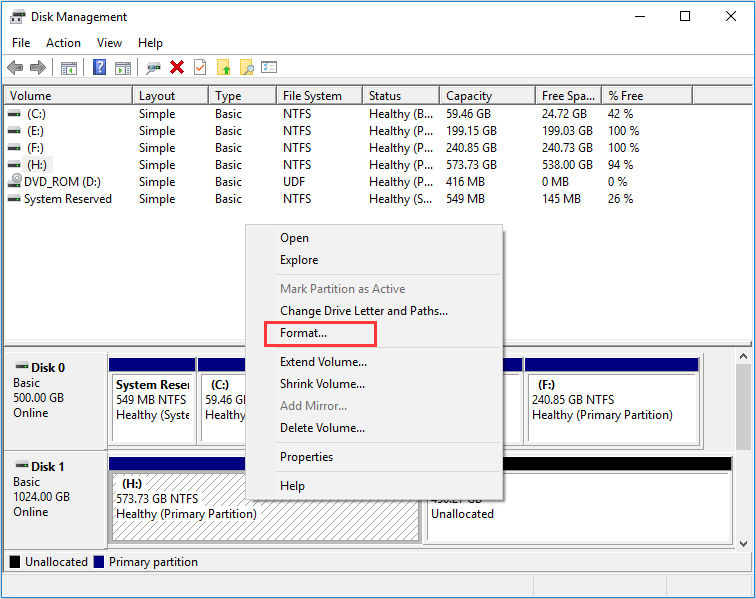
3. Set volume label, file system and allocation unit size and then click OK.
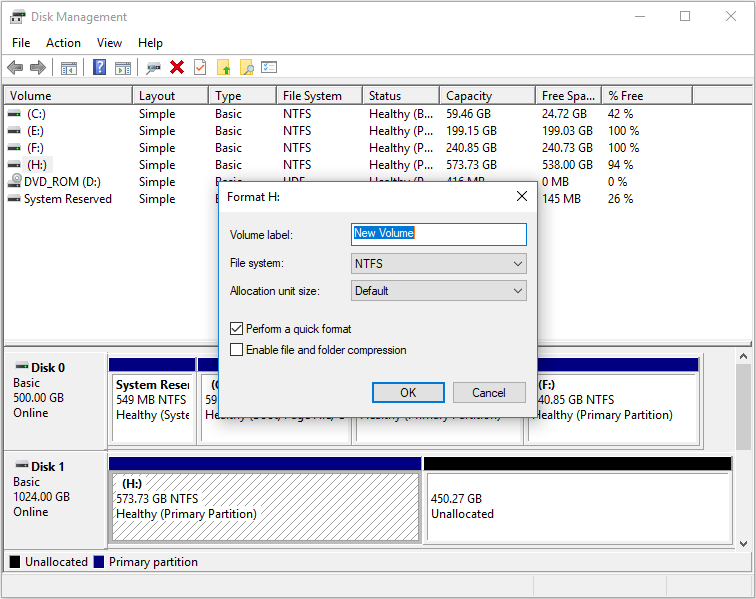
Tip: Make sure the option Perform a quick format is checked on the pop-up window, or the lost data may be unrecoverable.
4. Read the warning and click OK to continue.
This is how to format partition with Disk Management. Next, I will show you how to format partition with a third-party partition manager.
Format Partition with Third-party Partition Manager
You can format partition with a professional partition manager as it provides users with many advanced features to manage hard drives. In this case, MiniTool Partition Wizard Free Edition is a good choice.
MiniTool Partition Wizard Free Edition is a free and prominent partition manager, which enable users to perform many advanced operations like resize partition, extend partition, split partition, check file system, convert MBR to GPT without data loss, convert FAT32 to NTFS, etc.
The free partition manager is trusted by tens of millions of people. So you can utilize this software to format partition at ease. Download one by clicking the following button and start formatting your drive now.
Step 1. Launch MiniTool Partition Wizard Free Edition.
- Install the partition manager on your computer.
- Launch it to get the main interface.
Step 2. Format the Partition.
1. Choose the target partition on the main interface.
2. Select Format Partition from the left action panel.
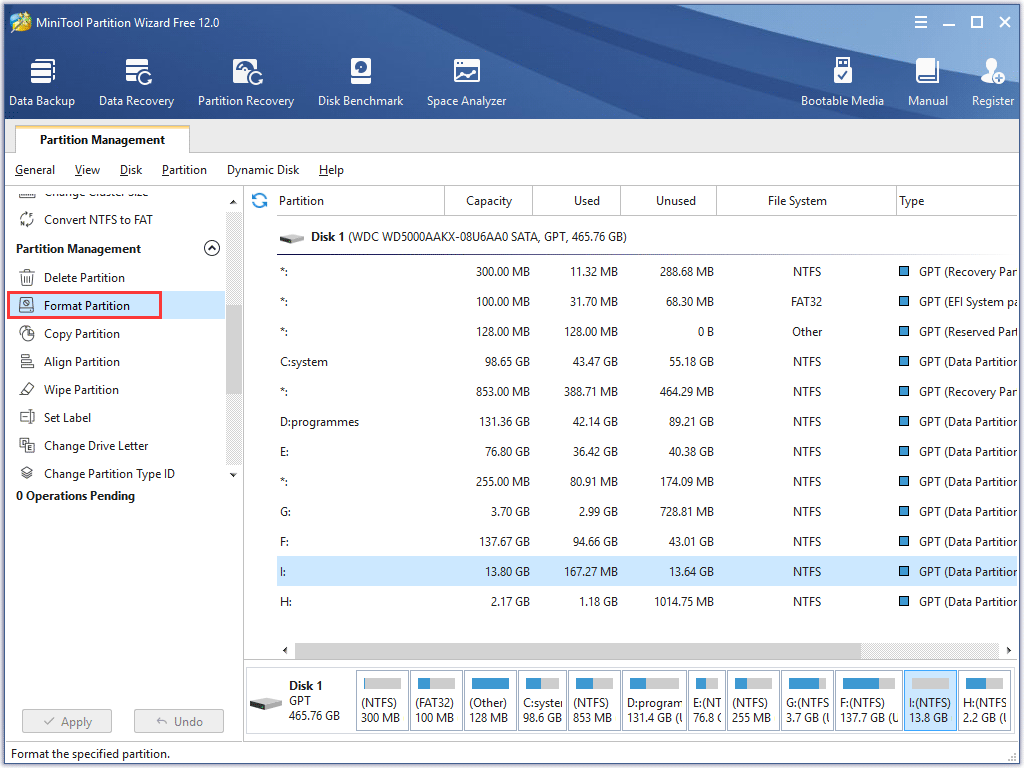
3. Set partition label, file system and cluster size and click OK.
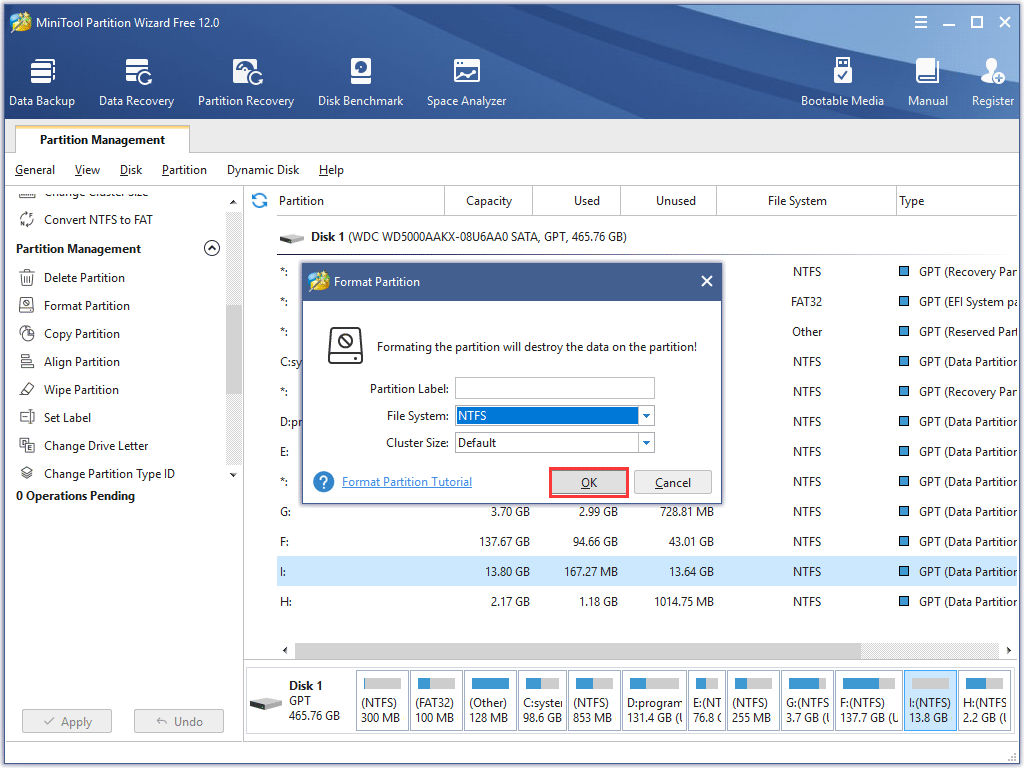
Step 3. Apply the change.
1. Click the Apply button on the upper left corner to apply the change.

Kindly Reminder:
Formatting will delete all the files on the partition. To recover data from formatted partition, you can try using MiniTool Partition Wizard Pro Ultimate, which enables you to recover data from formatted partition, deleted partition, raw partition, etc.
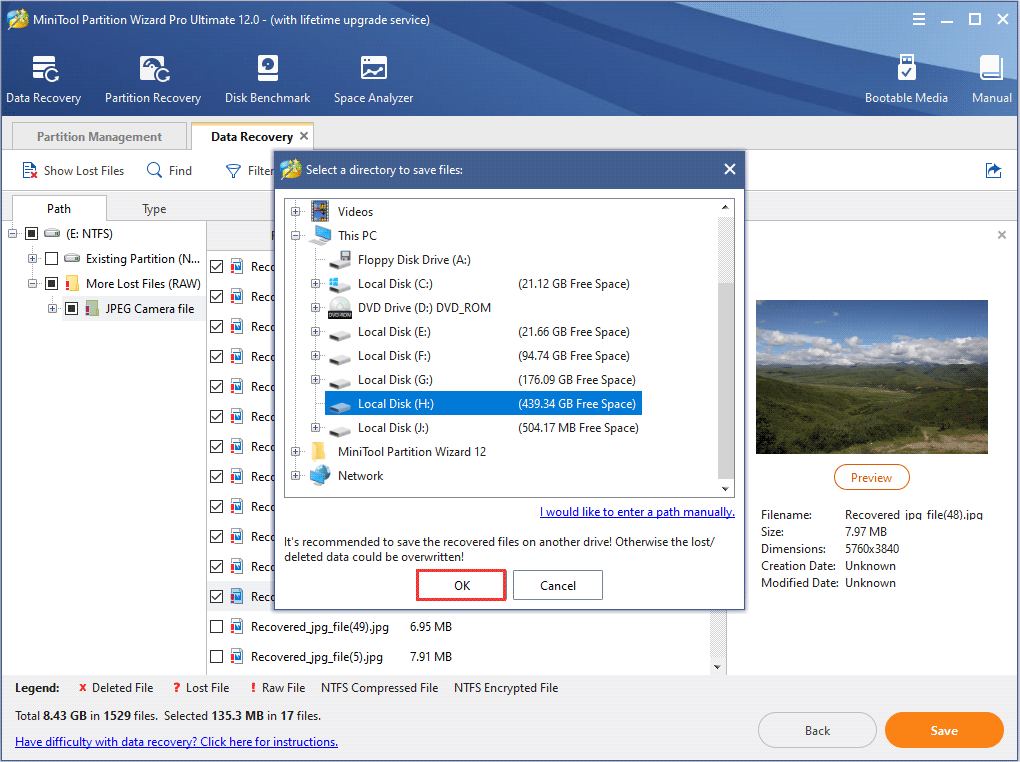
You can get the data recovery software by clicking the following button. And install it on your computer.
If the data is less than 1GB, you can choose use the MiniTool Partition Wizard Free Edition, which allows users to recover 1 GB data for free.
Just right click the partition and choose Data recovery to recover data from your formatted partition now.
Solution 5. Check and Fix Hard Drive Error with CHKDSK Alternative
If you cannot run CHKDSK in CMD with the error “Windows cannot run disk checking on this volume because it is write protected.”, you can try using the CHKDSK alternatives. Next, I will introduce you two CHKDSK alternatives for Windows users and show you how to utilize them one by one.
Check File System with MiniTool Partition Wizard
Check file system is another way to fix the Windows cannot run chkdsk write protected issue with MiniTool Partition Wizard Free Edition. It is a CHKDSK alternative, which can help you check and fix hard drive file system errors.
If you encounter the CHKDSK write protected error in CMD, you can also try using the Check File System feature in MiniTool Partition Wizard Free Edition.
If you have downloaded MiniTool Partition Wizard Free Edition to format partition in the above part, you can launch it directly. If not, you can click the following button to download one for free.
Step 1. Launch MiniTool Partition Wizard Free Edition.
- Install the partition manager on your computer.
- Launch it to get the main interface.
Step 2. Check and fix file system error.
1. Select the target partition on the main interface.
2. Choose Check File System from the left action panel.

3. Select check & fix file system error and click Start.
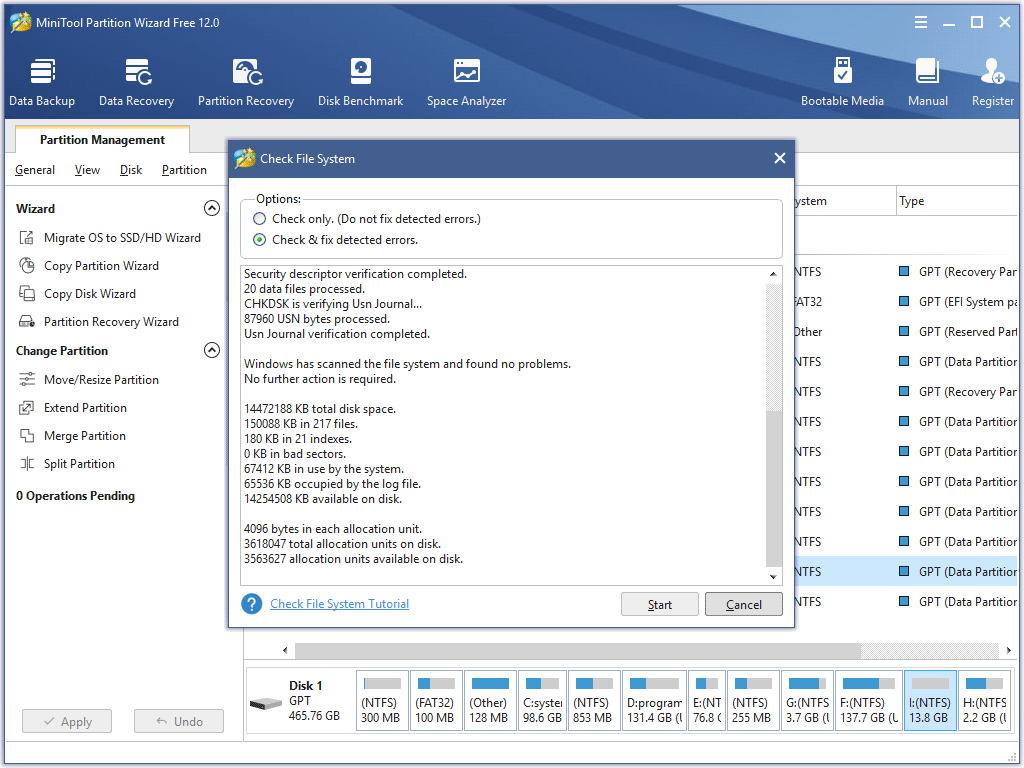
Then the CHKDSK Alternative will check and fix hard drive errors automatically. When it is finished, you can close the program.
Disk Error Checking
Disk error checking is another CHKDSK alternative, which can help you check the drive for file system error. You can try it when the CHKDSK write protected error appears in CMD.
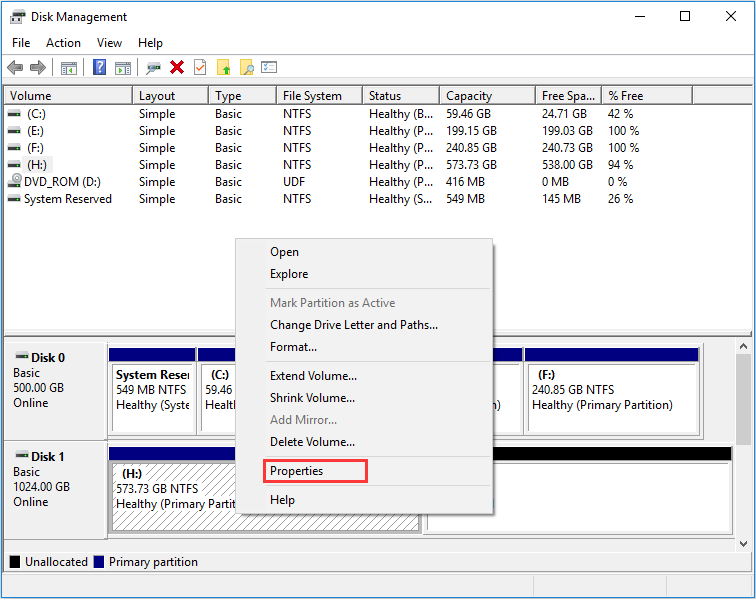
Step 1. Access the drive Properties.
- Right-click Windows Start menu and choose Disk Management.
- Right-click the partition that you encounter CHKDSK write protected error.
- Then choose Properties from the pop-up window.
Step 2. Check the drive.
1. Select the Tools tab.
2. Click the Check option.
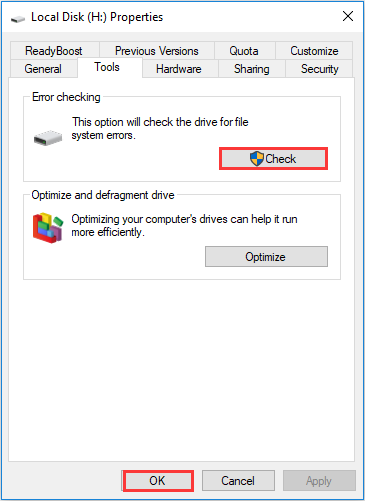
3. If no errors are found, you can still choose to check the drive if you want to. Click on Scan drive.
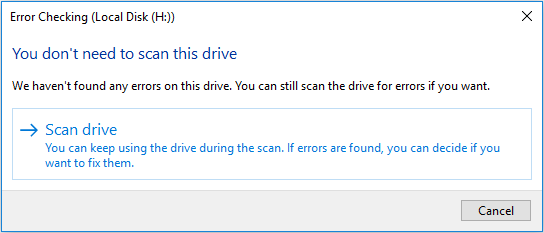
If there are file system errors found on the drive, Windows will ask for a restart to fix the errors automatically.
If you come across the error message “Windows cannot run disk checking on this volume because it is write protected.”, you can try the above methods to fix it immediately.
Bottom Line
After trying the above solutions, have you fixed the CHKDSK Windows 10 cannot run write protected issue? If you cannot run CHKDSK write protected, the above fixes are worth trying. Hope this post can help you.
If you have any question about how to remove the error that Windows cannot run chkdsk write protected or you have better solutions, please share it with us. You can leave a message in the following comment zone and we will reply as soon as possible. If you need any help when using MiniTool software, you can contact us via [email protected] .


