- Start your PC in safe mode in Windows 10
- Запуск службы Windows Installer в безопасном режиме
- How to Fix a Computer That Won’t Start in Safe Mode
- Does it stop at Startup Settings or Advanced Boot Options?
- What to Know
- Reasons Why Your PC Won’t Start in Safe Mode
- How to Fix a Computer That Always Stops at Startup Settings or Advanced Boot Options
- Tips & More Information
Start your PC in safe mode in Windows 10
Safe mode starts Windows in a basic state, using a limited set of files and drivers. If a problem doesn’t happen in safe mode, this means that default settings and basic device drivers aren’t causing the issue. Observing Windows in safe mode enables you to narrow down the source of a problem, and can help you troubleshoot problems on your PC.
There are two versions of safe mode: Safe Mode and Safe Mode with Networking. Safe Mode with Networking adds the network drivers and services you’ll need to access the Internet and other computers on your network.
Select from the following sections to find out how to start your PC in safe mode from Settings, from the sign-in screen, or from a black or blank screen.
Press Windows logo key + I on your keyboard to open Settings. If that doesn’t work, select the Start button, then select Settings .
Under Advanced startup, select Restart now.
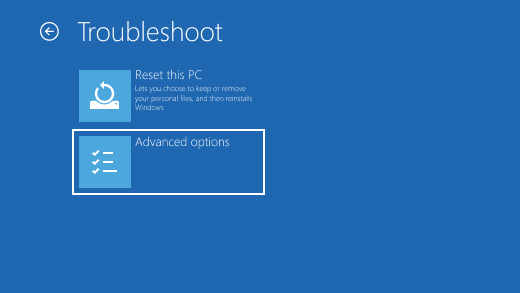
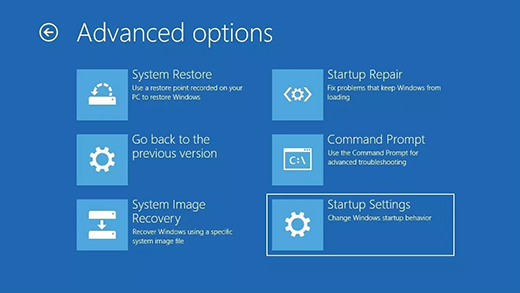
After your PC restarts to the Choose an option screen, select Troubleshoot > Advanced options > Startup Settings > Restart. You may be asked to enter your BitLocker recovery key.


After your PC restarts, you’ll see a list of options. Select 4 or press F4 to start your PC in Safe Mode. Or if you’ll need to use the Internet, select 5 or press F5 for Safe Mode with Networking.
When you can’t open Settings to get into safe mode, restart your device from the Windows sign-in screen.
On the Windows sign-in screen, press and hold the Shift key while you select the Power > Restart .
After your PC restarts to the Choose an option screen, select Troubleshoot > Advanced options > Startup Settings > Restart. You may be asked to enter your BitLocker recovery key.
After your PC restarts, you’ll see a list of options. Select 4 or F4 to start your PC in safe mode. Or if you’ll need to use the Internet, select 5 or F5 for Safe Mode with Networking.
Note: If you’ve encrypted your device, you’ll need your BitLocker key to start in safe mode.
Before you enter safe mode, you need to enter the Windows Recovery Environment (winRE). To do this, you will repeatedly turn your device off, then on:
Hold down the power button for 10 seconds to turn off your device.
Press the power button again to turn on your device.
On the first sign that Windows has started (for example, some devices show the manufacturer’s logo when restarting) hold down the power button for 10 seconds to turn off your device.
Press the power button again to turn on your device.
When Windows restarts, hold down the power button for 10 seconds to turn off your device.
Press the power button again to turn on your device.
Allow your device to fully restart. You will enter winRE.
Now that you are in winRE, you will follow these steps to take you to safe mode:
On the Choose an option screen, select Troubleshoot > Advanced options > Startup Settings > Restart.
After your device restarts, you’ll see a list of options. Select option 5 from the list or press F5 for Safe Mode with Networking.
If you need more info on a black or blank screen error, see Troubleshoot black or blank screen errors.
Notes: If you need to exit safe mode, simply restart your device, or:
Press the Windows logo key + R.
Type msconfig in the Open box and then select OK.
Select the Boot tab.
Under Boot options, clear the Safe boot checkbox.
Запуск службы Windows Installer в безопасном режиме
Безопасный режим (Safe Mode) в системах Windows является одним из базовых инструментов, позволяющих восстановить работоспособность системы. Одним из существенных недостатков безопасного режима – невозможность установки / деинсталляции программ из msi-пакетов. Это ограничение вызвано тем, что разработчики посчитали службу Windows Installer (установщик Window) потенциально небезопасной, и решили отменить старт этой службы при загрузке системы в безопасном режиме. Что в некоторых случаях крайне неудобно.
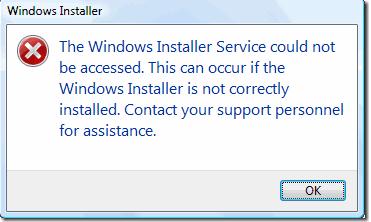
Большинство современных приложений для свой корректной установки / удаления пользуются услугами службы Windows Installer, и если она недоступна, их установка или удаление невозможно. Допустим, что для восстановления работоспособности системы, необходимо в безопасном режиме удалить некое приложение, мешающее нормальной загрузке системы (например, антивирус). При попытке запустить стандартный деинсталятор с целью удалить приложение, система сообщает:
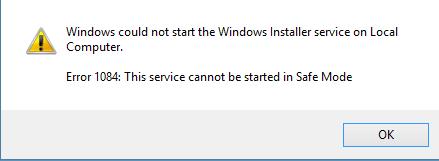
Вручную запустить службу Windows Installer в Safe Mode также не получится (Services -> Windows Installer -> Start):
Windows could not start the Windows Installer service on Local Computer. Error 1084: This service cannot be started in Safe Mode
Однако существует небольшой трюк, позволяющий запустить службу Windows Installer в безопасном режиме и корректно деинсталлировать ПО.
Чтобы включить службу Windows installer в Safe Mode:
- Откройте редактор реестра и перейдите в раздел HKEY_LOCAL_MACHINE\SYSTEM\CurrentControlSet\Control\SafeBoot\Minimal (если система запущена в обычном Safe Mode) или раздел HKEY_LOCAL_MACHINE\SYSTEM\CurrentControlSet\Control\SafeBoot\Network (если используется безопасный режим с поддержкой командной строки)
- Создайте новый раздел с именем MSIServer
- В новом разделе автоматически появится новый параметр с именем Default. Задайте ему значение Service.


После запуска службы MSIServer возможно непосредственно в безопасном режиме удалять/устанавливать любое приложение с msi-установщиком.
How to Fix a Computer That Won’t Start in Safe Mode
Does it stop at Startup Settings or Advanced Boot Options?
:max_bytes(150000):strip_icc()/tim-fisher-5820c8345f9b581c0b5a63cf.jpg)
:max_bytes(150000):strip_icc()/ryanperiansquare-de5f69cde760457facb17deac949263e-180a645bf10845498a859fbbcda36d46.jpg)
What to Know
- Follow this guide if you’re «looped» back to the Startup Settings or ABO screen every time you try Safe Mode or other startup methods.
- Be sure to first try every other startup method you have available to you if you haven’t already.
- If none of them work, likely solutions include a Windows repair, a System Restore, or repairing protected Windows files.
The Startup Settings (Windows 10 & 8) and Advanced Boot Options menus (Windows 7, Vista, & XP) help you start Windows in specially configured ways to circumvent whatever problem prevents Windows from starting normally.
However, what if every option you try fails, and when your computer restarts, you’re right back at one of those screens?
Reasons Why Your PC Won’t Start in Safe Mode
This Startup Settings loop or Advanced Boot Options loop, depending on your version of Windows, is a common way in which Windows won’t start. This is the troubleshooting guide to follow if you’re returned right back to the Startup Settings or ABO Screen on every attempt to enter Safe Mode, Last Known Good Configuration, and other startup methods.
:max_bytes(150000):strip_icc()/startup-settings-windows-8-56a6f90f3df78cf7729134e1.png)
If you can’t even get to this menu, you get all the way to the Windows login screen, or you see any kind of error message, see How to Troubleshoot a Computer That Won’t Turn On for a better way to fix your specific problem.
How to Fix a Computer That Always Stops at Startup Settings or Advanced Boot Options
This procedure could take anywhere from minutes to hours depending on why Windows won’t start in Safe Mode or one of the other Windows diagnostics modes.
Here’s what to do:
Try to start Windows in every startup method available. You may have already done this, but if not, know that each startup method available from the Startup Settings or Advanced Boot Options menu is there because it helps avoid one or more specific problems that prevent Windows from loading:
:max_bytes(150000):strip_icc()/Enablesafemode-5c7601cfc9e77c0001fd591a.jpg)
Try the option to start Windows normally as well — you never know.
See the tips at the bottom of the page for help if Windows does actually start in one of the three modes above.
Repair your Windows installation. The most common reason for Windows to continuously return you to the Startup Settings or Advanced Boot Options menu is because one or more important Windows files are damaged or missing. Repairing Windows replaces these important files without removing or changing anything else on your computer.
:max_bytes(150000):strip_icc()/advanced-options-windows-10-56a6fb083df78cf7729140d4.png)
In Windows 10, 8, 7 & Vista this is called a Startup Repair. Windows XP refers to it as a Repair Installation.
The Windows XP Repair Installation is more complicated and has more drawbacks than the Startup Repair available in later Windows operating systems. So, if you’re an XP user, you may want to wait until you’ve tried these other steps first.
Perform a System Restore from Advanced Startup Options or System Recovery Options, depending on your version of Windows, to undo recent changes.
:max_bytes(150000):strip_icc()/systemrestore-5c76024d46e0fb00018bd727.jpg)
Windows could be returning to the Startup Settings or Advanced Boot Options menu because of damage to a driver, important file, or part of the registry. A System Restore will return all of those things to the state they were in at a time when your computer worked fine, which could solve your problem entirely.
Windows 10 & 8: System Restore is available outside of Windows 10 & 8 from the Advanced Startup Options menu. See How to Access Advanced Startup Options in Windows 10 or 8 for help.
Windows 7 & Vista: System Restore is available from outside of Windows 7 & Vista via System Recovery Options and is most easily available when booting from your Windows installation disc. If you’re using Windows 7, System Recovery Options is also available right here from the Advanced Boot Options menu as the Repair Your Computer option. This may not work, however, depending on what’s causing your overall problem, so you may have to boot to the install disc after all.
Another Option for Windows 10, 8, or 7: If you don’t have your Windows 10, 8, or 7 installation disc or flash drive but you do have access to another computer with one of those versions of Windows installed, like another in the house or a friend’s, you can create repair media from there that you can use to complete this step on your broken computer. See How to Create a Windows 7 System Repair Disc or How to Create a Windows 10 or 8 Recovery Drive for tutorials.
Windows XP & Me Users: This troubleshooting option is not applicable to you. System Restore was made available from a bootable disc starting with the release of Windows Vista.
Use the System File Checker command to repair protected Windows files. A damaged operating system related file could be preventing you from getting past the Startup Settings or Advanced Boot Options menu, and the sfc command could fix the problem.
Since you can’t access Windows right now, you’ll need to execute this command from the Command Prompt available from Advanced Startup Options (Windows 10 & 8) or System Recovery Options (Windows 7 & Vista). See the notes above about accessing these diagnostic areas.
Windows XP & Me Users: Again, this troubleshooting option is not available to you. System File Checker is only available from within Windows in your operating system.
Chances are that if the Windows repair you tried in Step 2 didn’t work then this won’t either, but it’s worth a shot considering the hardware-focused troubleshooting up next.
Clear the CMOS. Clearing the BIOS memory on your motherboard will return the BIOS settings to their factory default levels. A BIOS misconfiguration could be the reason that Windows won’t even start in Safe Mode.
If clearing the CMOS does fix your Windows startup problem, make sure any changes you make in BIOS are completed one at a time so if the problem returns, you’ll know which change caused the problem.
Replace the CMOS battery if your computer is more than three years old or if it’s been off for an extended amount of time.
CMOS batteries are inexpensive and one that is no longer keeping a charge can cause all sorts of strange behavior during the Windows startup process.
Reseat everything you can get your hands on. Reseating will reestablish the various connections inside your computer and could clear up the glitch that’s causing Windows to get stuck at the Advanced Boot Options or Startup Settings screen.
Try reseating the following hardware and then see if Windows will start properly:
Unplug and reattach your keyboard, mouse, and other external devices as well.
Test the RAM. If one of your computer’s RAM modules fails completely, your computer won’t even turn on. Most of the time, however, memory fails slowly and will work up to a point.
If your system memory is failing, Windows may be unable to start in any mode.
Replace the memory in your computer if the memory test shows any kind of problem.
Steps 9 and 10 both involve more difficult and destructive solutions to Windows getting stuck at the Startup Settings or Advanced Boot Options menu. It may be that one of the below solutions is necessary to fix your problem but if you haven’t been diligent in your troubleshooting up to this point, you can’t know for sure that one of the easier solutions above isn’t the right one.
Test the hard drive. A physical problem with your hard drive is certainly a reason why Windows might not start as it should. A hard drive that can’t read and write information properly certainly can’t load an operating system properly — even Safe Mode.
Replace your hard drive if your tests show an error. After replacing the hard drive, you’ll need to perform a new installation of Windows.
If your hard drive passes your test, the hard drive is physically fine, so the cause of your problem must be with Windows, in which case the next step will solve the problem.
Perform a Clean Install of Windows. This type of installation erases the drive Windows is installed on and then install the operating system again from scratch.
Tips & More Information
If Windows will start in one or more of the Safe Mode options but that’s it, continue on with the troubleshooting steps on this page, which will be a bit easier to complete thanks to your access to Safe Mode.
If Windows starts after enabling Last Known Good Configuration then some change made after the last time your computer started correctly caused this problem and the error may return if the same changes are made. If you can avoid causing the same problem again then there’s nothing more to do and everything should be fine.
If Windows starts with low-resolution video enabled then there’s a very good chance that your computer’s video card is glitchy:
First, try to adjust the screen resolution to something more comfortable and see if the problem simply goes away. If not, try this troubleshooting:
Borrow a working monitor from another computer and try it in place of yours.
Test your computer’s memory and replace the memory if tests show any problem.
Replace the video card or add a video card if your video is integrated into the motherboard.


