- Fix: Windows could not Update the Computer’s Boot Configuration
- What Causes the “Windows could not update the computer’s boot configuration” Error?
- Solution 1: Repair the Boot Manager in Command Prompt
- Solution 2: Disable UEFI in BIOS
- Solution 3: Use the Clean Option in DiskPart
- «Windows could not update the computer’s boot configuration. Installation cannot proceed.»
- Windows cannot update boot configuration
- Re: «Windows could not update the computer’s boot configuration. Installation cannot proceed&qu
- Re: «Windows could not update the computer’s boot configuration. Installation cannot proceed&am
- Re: «Windows could not update the computer’s boot configuration. Installation cannot proceed&am
- Re: «Windows could not update the computer’s boot configuration. Installation cannot proceed&am
- Re: «Windows could not update the computer’s boot configuration. Installation cannot proceed&am
- Re: «Windows could not update the computer’s boot configuration. Installation cannot proceed&am
- Windows cannot update boot configuration
- Asked by:
- Question
- All replies
Fix: Windows could not Update the Computer’s Boot Configuration
This error occurs when users try to update their Windows installation from an older version of Windows or when performing an in-place update using the Windows Media Creator on a USB or a DVD. It’s quite a common error which appears during Windows Setup and it annoys the hell out of users.
 Windows could not update the computer’s boot configuration
There have been registered quite a few useful methods which can help you resolve the problem and continue through the setup normally. Follow the solutions we have prepared below carefully!
What Causes the “Windows could not update the computer’s boot configuration” Error?
The error is often associated with the broken Boot manager utility which handles how your computer boots and what to load with priority. This can be solved by resetting it completely.
In other cases, it’s UEFI which prevents the Windows setup from loading properly so you should disable secure boot in BIOS.
Finally, the problem may be with your partition. If you are performing a clean install, please make sure you try to clean it with diskpart.
Solution 1: Repair the Boot Manager in Command Prompt
The Boot Manager is used to manage how your system boots, the boot priority, and how it handles Windows installation media when you insert it during startup. It can be reset and repaired easily if you simply restart into Advanced Startup and run several useful commands, which will be presented below.
- If your computer’s system is down, you will have to use the installation media used to install windows for this processInsert the installation drive you own or which you have just created and boot your computer. The following steps are different from one operating system to another so follow them accordingly:
- WINDOWS XP, VISTA, 7: Windows Setup should open prompting you to enter the preferred language and time and date settings. Enter them correctly and choose the Repair your computer option at the bottom of the window. Keep the initial radio button selected when prompted with Use recovery tools or Restore your computer and click on the Next option. Choose Startup Repair (the first option) when prompted with the Choose a recovery tool selection.
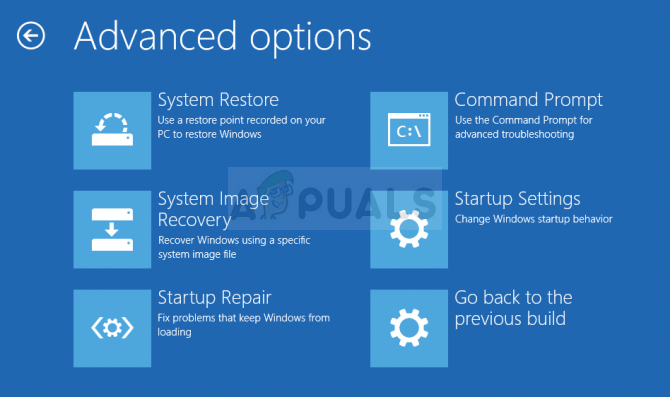
- WINDOWS 8, 8.1, 10: You will see a Choose your keyboard layout window so choose the one you want to use. The Choose an option screen will appear so navigate to Troubleshoot >> Advanced Options >> Command Prompt
 Command Prompt in Advanced options
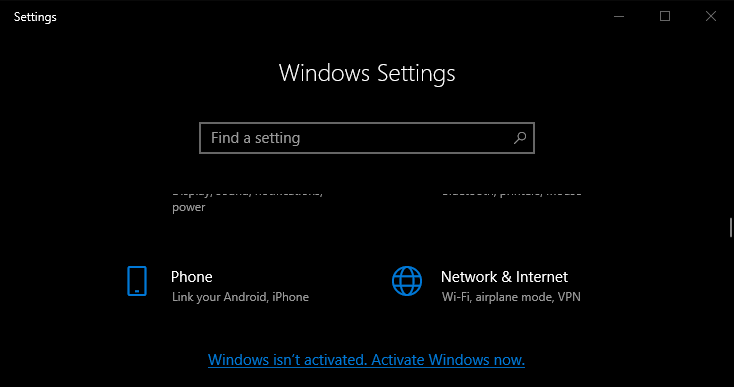
- If you are not having problems with the system, you can use the Windows UI to access this screen. If you are using Windows 10 on your PC, there is another way to access Safe Mode on your computer. Use the Windows Key + I key combination in order to open Settings or click the Start menu and click the gear key at the bottom left part.
- Click on Update & security >> Recovery and click the Restart Now option under the Advanced startup section. Your PC will proceed to restart and you will be prompted with the Advanced options button
 Advanced options via Settings
- Click to open the Command Prompt from the Advanced options screen.
Command Prompt in Advanced options
- Command Prompt should now open with administrator privileges. Type in the command displayed below and make sure you hit Enter afterwards.
- Close Command Prompt afterwards and choose the Restart option. Check to see if the problem is gone.
Solution 2: Disable UEFI in BIOS
There are several options you might want to change in your BIOS settings in order to enable the Windows Setup to install properly. The first option is called Secure Boot which uses UEFI. This prevents the proper installation. Besides that you should enable Legacy Support or Legacy Boot and set it to enabled.
- Turn on your computer and immediately press the BIOS Setup key on your keyboard several times in a row, about once every second, until the Computer Setup Utility or BIOS settings opens. This key will be indicated on your screen as Press _ to run Setup.
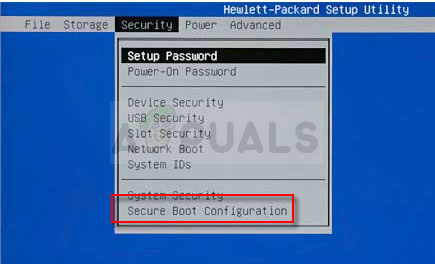
- Use the right arrow key to switch to the Security menu when the BIOS settings window opens, use the down arrow key to select the Secure Boot Configuration from the menu, and press Enter. These options are sometimes location under System Configuration or the Security tab
 Secure Boot Configuration
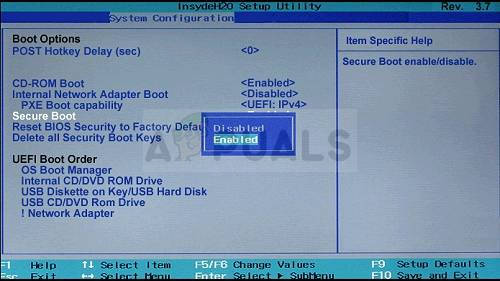
- Before you can use this option, a warning will appear. Press F10 to continue to the Secure Boot Configuration menu. Use the down arrow key to select Secure Boot and use the right arrow key to modify this setting to Disable.
- Use the down arrow key to select Legacy Support, and then use the right arrow key to switch it to Enable.
 Disable Secure Boot
- Under the Legacy Boot Order settings, select your USB CD/DVD ROM Drive option and use proper keys (explained at the bottom of the screen to add this option to the top of the boot order to ensure you boot from the USB or DVD.
- Press F10 to save the changes. Use the left arrow key to navigate to the File menu, use the down arrow key to switch to Save Changes and Exit, then press Enter to select Yes.
- The Computer Setup Utility will now shut down and the computer should restart. When the computer has restarted, keep following the steps below to solve the VAC authentication error.
Solution 3: Use the Clean Option in DiskPart
This method is a sort of a last resort for users who are performing a clean installation. This consists of cleaning the partition where you tend to install Windows. This is only recommended for clean installs, meaning you should backup the data from the partition. This should be enough to solve the problem but be careful to select the proper partition based on its number.
- Open Command Prompt using the steps provided in Solution 1.
- At this command prompt window, type in simply “diskpart” in a new line and click the Enter key in order to run this command.
- This will change the Command Prompt window to enable you to run various Diskpart commands. The first one you will run is the one which will enable you to see the complete list of all available disks.
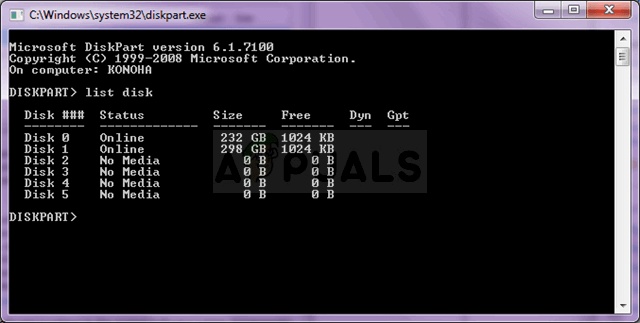 > list disk» width=»640″ height=»323″ srcset=»https://cdn.appuals.com/wp-content/uploads/2018/11/1-9.png 640w, https://cdn.appuals.com/wp-content/uploads/2018/11/1-9-150×76.png 150w, https://cdn.appuals.com/wp-content/uploads/2018/11/1-9-300×151.png 300w» sizes=»(max-width: 640px) 100vw, 640px» style=»display:none;visibility:hidden;»/> DISKPART >> list disk
- Make sure you choose your disk carefully, depending on which number is assigned to it in the list of volumes. Let’s say that its number is 1. Now run the following command in order to select disk.
- A message should appear saying something like “Partition 1 is the selected volume”.
Note: If you are unsure about which partition to select, the best way to do so is to check the actual size!
- In order to clean this volume, all you need to do is to type in the command displayed below, click the Enter key afterwards, and stay patient for the process to complete. This will also create an empty primary partition and add it to the top and the last command will exit Command Prompt.
- Exit Command Prompt, restart your computer, run the Windows Setup again and check to see if the Windows could not update the computer’s boot configuration error still appears.
«Windows could not update the computer’s boot configuration. Installation cannot proceed.»
I have tried upgrading from Windows Vista to Windows 7 several times but I get an error message during the install:
«Windows could not update the computer’s boot configuration. Installation cannot proceed.»
This happens when I upgrade from within Vista or even when I format and install clean on my system.
Can anyone help?
This error can occur if your computer is using an Intel 82801ER SATA RAID chipset (ICH5R).
The driver on the Windows 7 install media does not support this controller. Usually a driver update should result in resolution; however, the latest version of the Intel driver which supports this chipset (version 5.5) is only supported on earlier versions of Windows prior to Windows Vista.
This means that the ICH5 chipset (82801EB or 82801ER) is not supported and the Windows 7 install or upgrade will fail regardless of which driver version is currently installed for it.
For further information on the chipset please visit the Intel web site and click on the links below:
To verify if the error you receive corresponds to this particular problem please look at the setupact.log file found in this location:
Note: Generally, is drive C: on the computer; however, this drive may be any supported drive that Windows 7 detects.
If you examine the contents of the file, you should see a line similar to the one below:
[0x060216] IBS CallBack_MungeBootIni: Failed to modify boot entries GLE = 87
Windows cannot update boot configuration
I am trying to perform a clean install of Windows 8.1 via USB on my ThinkStation D30. The file copying and installation stages seem to complete fine:

I have tried several USBs. I have also used command prompt to clean the SSD and convert to GPT.
I have read that the security settings in the BIOS may be interfering with the install, so I have tried a USB boot in legacy mode, however this does not work (black screen with a repeatedly flashing dash). It only boots in UEFI mode.
Any ideas — I’m tearing my hair out!
![]()
Re: «Windows could not update the computer’s boot configuration. Installation cannot proceed&qu
Welcome to the forum
Are you in UEFI mode and have OS Optimized Defaults enabled in the BIOS? It’s an option on the last tab. This will enable Secure Boot and could be why your installation is failing.
![]()
Re: «Windows could not update the computer’s boot configuration. Installation cannot proceed&am
I have been using the Auto mode, then manually selecting «UEFI» when choosing the USB to boot from (for some reason it won’t boot using Legacy mode). It seems I do not have an OS Optimized option — see images below:

![]()
Re: «Windows could not update the computer’s boot configuration. Installation cannot proceed&am
Can you select «Load Optimal Defaults» on the last page? That’s what you want. I forgot that the 30-series didn’t call it «Load OS Optimized Defaults» as the current systems do now.
![]()
Re: «Windows could not update the computer’s boot configuration. Installation cannot proceed&am
Oh OK. Yeah, I’ve already tried that. Didn’t change anything unfortunately 🙁
![]()
Re: «Windows could not update the computer’s boot configuration. Installation cannot proceed&am
It was pointed out to me that you have a base program D30 (as in revision 1.0) and that UEFI isn’t fully supported on your system. I completely forgot about the UEFI transition during that model’s release.
You said you tried to boot using Legacy mode as well and that failed? Have you tried setting it to Legacy then pressing ‘F9’ to load defaults? You’ll lose a few settings but this should clear it up and allow you to use Legacy instead of UEFI.

Re: «Windows could not update the computer’s boot configuration. Installation cannot proceed&am
Erik’s hitting on a good point. Base program D30 didn’t fully support UEFI. Based on the images you provided, I’m guessing your system is likely a 4223, 4228, or 4229 machine type. This is why the setting for «OS Optimized Defaults» is not showing in the Exit tab in BIOS setup. Note that «OS Optimized Defaults» and «Load Optimal Defaults» are two completely different settings. OS Optimized Defaults is the one we normally use to put the system into full UEFI mode and change necessary settings for WHQL complaince on win8/10. This doesn’t apply in your case since the setting is not listed, so just FYI for others that might read the thread.
You should be able to load win8.1 in legacy mode however. Since you’re attempting to load the OS via USB key, I would question the format/boot method of the key as being the problem. It almost sounds like the system is attempting to load the image in GPT mode and failing (GPT mode is not supported, so you’ll have to make sure it formats as MBR). As an alternative, you could try downloading the win8.1 image and running it from a DVD, making sure that you select the legacy CD option from the F12 menu when booting the disc.
Also, what are the details about your intended boot drive (HDD? SSD? capacity?). If it’s over 2TB, you could also be running into the 2TB limitation for MBR installations.
Windows cannot update boot configuration
This forum has migrated to Microsoft Q&A. Visit Microsoft Q&A to post new questions.
Asked by:
![]()
Question
![]()
![]()
I have a Toshiba Z930-14G which gets previously a pre installed version of Windows 8.1.
I decide to installed a fresh copy of Windows 10 Home edition
For that I delete all partition from disk and run a CLEAN command from Diskpart tool
During the last stage of Windows installation I get an error message stating that Windows could not update boot configuration
How to solve this issue ?
Why it cannot install boot file has it is a fresh install
Thnaks for help
Your knowledge is enhanced by that of others.
All replies
![]()
![]()
See if this fix helps you:
Hope this helps, Good luck 🙂
Microsoft MVP (Windows and Devices for IT)
Windows Insider MVP
![]()
![]()
I noticed the error message, please refer to the following article and see if it helps.
Windows could not update the computer’s boot configuration. Installation cannot proceed
In addition, for Toshiba issue, I’m afraid your best bet is contacting manufacturer for further help.
Please Note: Since the websites are not hosted by Microsoft, the links may change without notice. Microsoft does not guarantee the accuracy of this information.


