- How to Change a Computer Name in Windows
- Windows 10, 8, and 7 have a few rules, but are simple to rename
- What to Know
- How to Change the Computer Name in Windows 10
- How to Change the Computer Name in Windows 8
- How to Change Your Computer’s Name in Windows 7
- Rename Your Windows 10 Computer the Right Way
- Password Recovery
- 3 ways to change the computer name in Windows (all versions)
- How to change the computer name in Windows 10, using the Settings app
- How to change the computer name in any versions of Windows, using the Control Panel
- How to change the computer name in Windows 8.1, using the PC Settings app
- What is your new computer name?
- How to change your computer’s name in Windows 10
How to Change a Computer Name in Windows
Windows 10, 8, and 7 have a few rules, but are simple to rename
:max_bytes(150000):strip_icc()/JonMartindale-212236-455c6b37c6484d348179beac08f76d86.jpg)
What to Know
- Windows 10: Go to Settings >System >About >Rename this PC > input the new name >Next.
- Windows 8 and 7: Go to System and Security in the Control Panel >System >Change settings >Change > input new name >OK.
- In all cases, you need to restart the PC to complete the process.
This article covers how to change the computer name in Windows 10, 8, and 7 with tips on renaming it appropriately.
How to Change the Computer Name in Windows 10
Microsoft’s Windows 10 operating system streamlines the process for many important functions, including name changes. Only administrators can change the name of a Windows PC, so make sure you’re logged in as such before changing your computer’s name. If you can’t, you’ll need to talk to your network administrator.
If you recently upgraded to Windows 10, you may not need to worry about changing your computer’s name as it will have carried over from your previous install.
Open the Windows 10 Settings menu by pressing the Windows key+I. Alternatively, search for Settings in the Windows 10 search bar and select the corresponding entry.
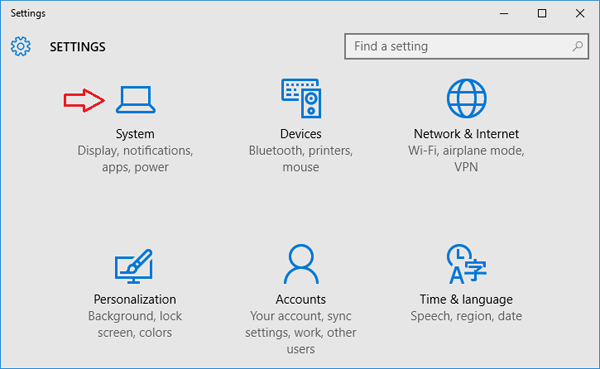
Select System in the Windows Settings screen.
:max_bytes(150000):strip_icc()/001-how-to-change-computer-name-windows-4589201-d0b7e998bb154542ac4937d3100de906.jpg)
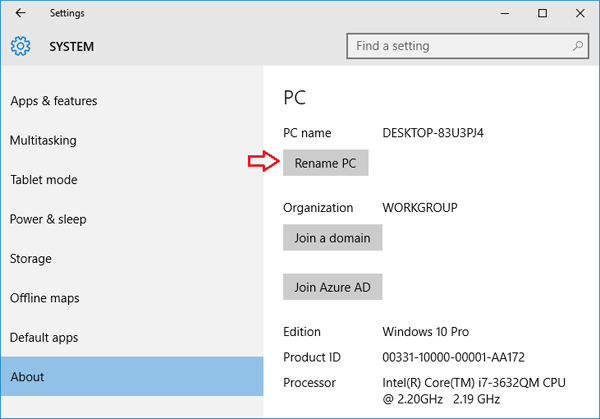
Select About from the left menu panel. You may have to scroll down to find it.
:max_bytes(150000):strip_icc()/002-how-to-change-computer-name-windows-4589201-99c40a2e9f764bd2948fc053446cf854.jpg)
Select Rename this PC and input a new name for your Windows 10 computer. Select Next.
:max_bytes(150000):strip_icc()/003-how-to-change-computer-name-windows-4589201-9d0dbdbecd5a4ea28408f45e2b51a536.jpg)
Restart the PC for the name change to take effect.
How to Change the Computer Name in Windows 8
Changing your PC’s name in Windows 8 is slightly different from changing it in Windows 10.
From the Start screen, begin typing Control Panel.
Select Control Panel.
Select System and Security > System.
Under the Computer name, domain and workgroup settings heading, select Change settings.
If prompted, agree to the administrative approval and then select Change.
Input your computer’s new name and select OK.
Restart your system for the change to take effect. You can do so straight away or wait until your next system shut down.
How to Change Your Computer’s Name in Windows 7
Changing your PC’s name in Windows 7 is much the same as in Windows 8, but the method of accessing the Control Panel is a little easier.
Type Control Panel into the Windows search bar and select the corresponding result.
Select System and Security > System.
Under the Computer name, domain and workgroup settings heading, select Change settings.
If prompted, agree to the administrative approval, then select Change.
Input your computer’s new name and select OK.
Restart your PC when prompted or do so later for the name change to take effect.
Rename Your Windows 10 Computer the Right Way
There are rules for naming a computer. Use these tips to make sure your awesome name doesn’t cause an easily avoided problem.
- Don’t use spaces: Older systems can misinterpret them.
- Don’t use lowercase letters: Some versions of Windows support lowercase names and some networks mandate uppercase, so it’s best to stick with that.
- Don’t use special characters: Percent signs, ampersands, and slashes can cause headaches for some networks.
- Keep it short: Keep a name to under 15 characters so as not to complicate things.
- Keep it unique: Make sure the name you choose is unique. Duplicates on a network are confusing.
If you’re naming your home PC or are on a small network, a heavily personalized name is OK. If you’re renaming several systems on an expansive network, pick a naming convention that makes sense for the entire network and apply it to each connected system.
Password Recovery
How can I change the name of my Windows 10 computer from Command Prompt? Whatever the reason you want to rename your computer, here’s our step-by-step tutorial on how to change computer name in Windows 10, from Control Panel, PC Settings and Command Prompt.
Method 1: Change Computer Name from Control Panel
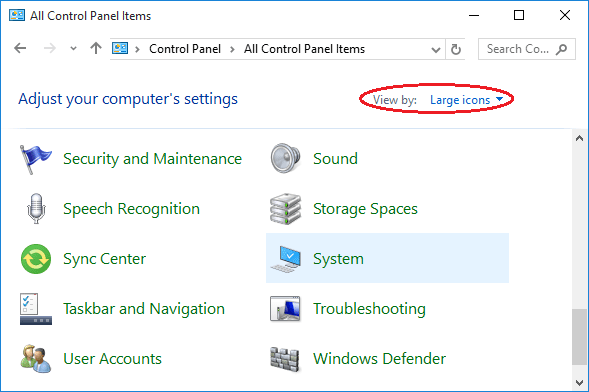
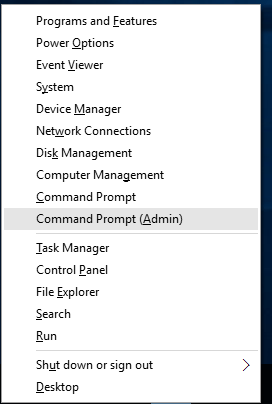
- To begin, you have to open the Control Panel. Simply press the Windows key + X to open the Quick Access menu and click “Control Panel“.

Set the View by option to Large icons. Click on System.
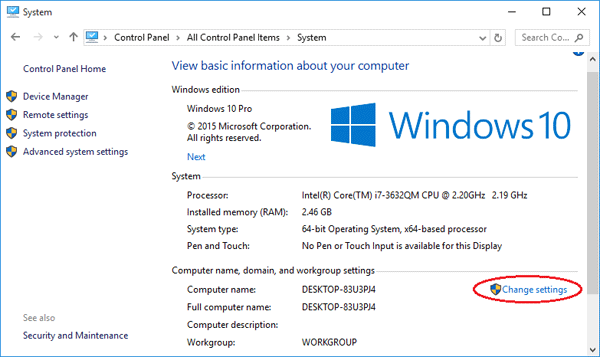
Scroll down to the “Computer name, domain, and workgroup settings” section, click on Change settings.
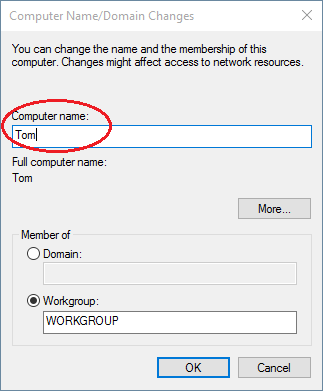
The System Properties screen will open with the “Computer Name” tab already selected. Click on the Change… button.

Now type the new name you want in the “Computer name” box and click OK.
Method 2: Change Computer Name from PC Settings
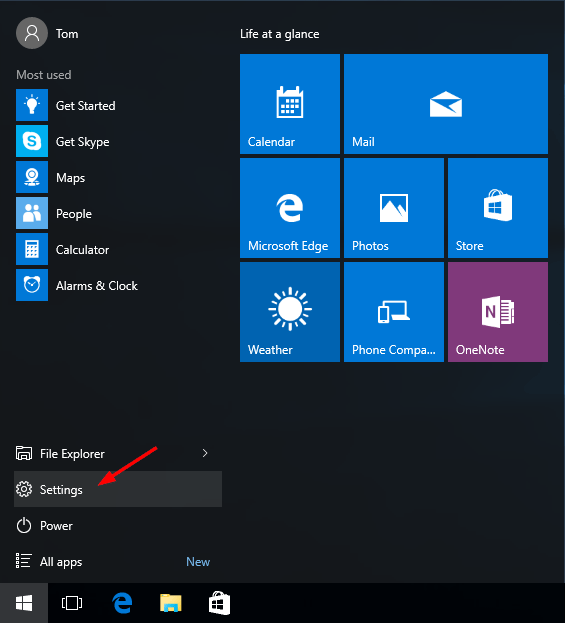
- Click on Start to access the Start Menu. Select Settings.
When the PC Settings app opens, click on System.
Go to the About section and then click on “Rename PC“.
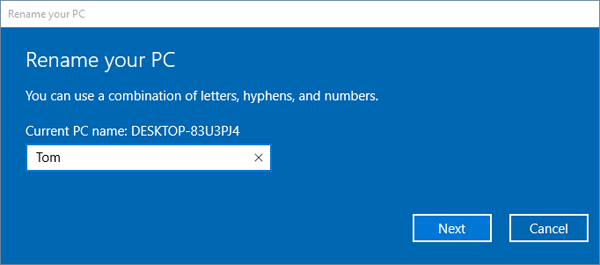
Type the new name you want to use and click on Next.
Method 3: Change Computer Name from Command Prompt
Looking for a way to change Windows 10 host name via command line? Here’s how to rename Windows 10 computer name from Command Prompt (cmd):
- Press the Windows key + X to open the Quick Access menu. Click on Command Prompt (Admin).
In the Command Prompt, you can use the WMIC computersystem command to change your computer name easily, assuming you know the current computer name.
WMIC computersystem where caption=’current_pc_name’ rename new_pc_name
Replace current_pc_name with your current computer name, and new_pc_name with your desired new computer name.
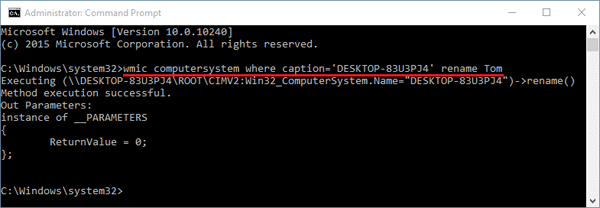
This method works on Windows 10, 8, 7, Vista, XP and Windows Server 2012/2008/2003. This command can also be used from a batch file to rename any Windows computer, including domain-joined machines.
Besides changing the name of a local computer, you can also use WMIC command to rename a remote computer on the same network. For example, if want to rename a remote PC named Jon-Laptop to Jon-Tech and you know the login credentials, then type this command in the Command Prompt:
WMIC /node:«Jon-Laptop» /user:Admin /password:password123 computersystem call rename «Jon-Tech«
The value following /node: indicates the name of the remote computer on the LAN. The value following /user: must be an admin account on the remote computer.
3 ways to change the computer name in Windows (all versions)
When Windows is installed, it automatically assigns a name for your computer, that is used for all kinds of background processes and services. At times, you may need to change the name of your computer, for various reasons. For example, if you have to manage all your family computers, you need to give a specific name to each, so that you can tell them apart. Or, when you link many Windows 10 PCs with your mobile devices, the same issue applies. Here are three ways to change the computer name, in any version of Windows:
NOTE: This guide covers Windows 10, Windows 7, and Windows 8.1. If you do not know the version of Windows that you have, read this tutorial: What version of Windows do I have installed?
How to change the computer name in Windows 10, using the Settings app
If you are using Windows 10, open the Settings app. Then, click or tap System, and then choose About, on the left side column. Then, look to the right and scroll until you see your device specifications, and click or tap “Rename this PC.”
A new window opens, and you can see the current PC name. In the only text field that is available, type the new computer name that you want to use, and press Next.
You are informed that you need a restart to change the name of your PC. Choose “Restart now” or “Restart later,” depending on what you want.
After your Windows 10 system is restarted, the computer name is changed.
How to change the computer name in any versions of Windows, using the Control Panel
No matter what version of Windows you have, you can always use the Control Panel .
Open it, and go to System and Security, and then to System. Look for the existing computer name, and on its left, click or tap the “Change settings” link.
The System Properties window opens. In the Computer Name tab, click or tap the Change button.
Now you see the existing computer name. Type the new one that you want to use, in the Computer name field. You then notice that the OK button is no longer grayed out. Click on it.
You are informed that you must restart your computer to apply these changes. Press OK.
Close the System Properties window.
You are asked to choose whether you want to restart now or later. Make the choice you prefer. If you restart now, make sure that all your apps and files are closed, so that you do not lose your work.
After your Windows computer is restarted, the computer name is changed.
How to change the computer name in Windows 8.1, using the PC Settings app
If you are using Windows 8.1, open the PC Settings app. Then, click or tap PC and devices, and then choose PC info, on the left side. Then, look on the right and click or tap “Rename PC.”
Type the new computer name that you want to use and click or tap Next.
You are informed that, after you restart your Windows 8.1 system, the name will change to what you typed. Choose whether to restart now or later.
After Windows 8.1 restarts, the computer is renamed.
What is your new computer name?
The procedures that we shared should work well on any computer or device with Windows. If you have any issues, do not hesitate to comment below. Also, we are curious to know what is the computer name that you have chosen.
How to change your computer’s name in Windows 10
Want to make your PC more recognizable on your network? Follow these steps to rename it.

There are plenty of reasons to change your computer’s name — especially if you bought it directly from a manufacturer and it’s named something generic like «windows-user-pc» or «TUF000445811EE». If you want to connect computers through a homegroup, or just be able to recognize which computers are on your network, changing your computer’s name to something more descriptive is definitely helpful.
Or maybe you just want to name your computer something cool — add a personal touch. I name all my computers after figures from Greek mythology. I also name my cars.
Before Windows 10, changing your computer’s name was complicated. Well, not so much complicated as hidden inside the Control Panel in the System Properties windows. While you can still change your computer’s name in System Properties (we’ll show you how), Windows 10 has made it much simpler by putting it in the new Settings menu.
Here’s the easy way to change your computer’s name:
1. Open Settings and go to System > About.
Sarah Jacobsson Purewal/CNET
2. In the About menu, you should see the name of your computer next to PC name and a button that says Rename PC. Click this button.
Sarah Jacobsson Purewal/CNET
3. Type the new name for your computer. You can use letters, numbers and hyphens — no spaces. Then click Next.
Sarah Jacobsson Purewal/CNET
4. A window will pop up asking if you want to restart your computer now or later. If you want to change to the new name immediately, click Restart now to restart your computer. If you don’t want to restart your computer right this second, click Restart later. Your computer’s name will be updated the next time you restart it.
If you’d rather change your computer’s name in the Control Panel, or if you’re running an older version of Windows, here’s how to do that:
1. Right-click on the Start button and click Control Panel.
Sarah Jacobsson Purewal/CNET
2. Navigate to System and either click Advanced system settings in the left-hand menu or click Change settings under Computer name, domain, and workgroup settings. This will open the System Properties window.
Sarah Jacobsson Purewal/CNET
3. In the System Properties window, click the Computer Name tab. You’ll see the message, «To rename this computer, click Change.» Click Change.
Sarah Jacobsson Purewal/CNET
4. Type the new name for your computer and click OK. A window will pop up telling you that you must restart your computer before the changes can be applied. Click OK. This will not restart your computer.
Sarah Jacobsson Purewal/CNET
5. A new window will pop up asking if you would like to restart your computer now or later. Click Restart Now to restart your computer immediately. If you’re not ready to restart, click Restart Later to do it later, at your leisure.


