- Freely and Easily Change Partition Size in Windows 10
- Why change partition size in Windows 10?
- How to resize partition in Windows 10 (3 ways)?
- Change partition size within Disk Management
- Resize partition via Diskpart
- Change partition size via a free yet powerful tool
- Conclusion
- How to: Change a Partition Size in Windows 7 without Losing Data (Step-by-Step)
- Need to change partition size in Windows 7
- How do I extend or shrink partition size in Windows 7?
- вњ” Resize partition in Windows 7 Disk Management
- вњ” Change partition size in Windows 7 with 3rd party free partition manager
- How to resize Windows 10 partition without losing data
- Why disk partition can be re-sized?
- Windows 10 partition resizing tools
- How to resize partition in Windows 10 using Disk Management:
- To shrink a volume:
- To extend a volume:
- Resize Window 10 volume with free partition software
Freely and Easily Change Partition Size in Windows 10
You can easily change partition size in Windows 10 via Disk Management, Diskpart utility or a free and easy-to-use partition manger – AOMEI Partition Assistant Standard.

By AOMEI  / Last Updated October 16, 2019
Why change partition size in Windows 10?
As times goes, you might be unsatisfied with the current size of the hard drive partition and want to resize partition in Windows 10 under different situations:
A partition like Partition C (system drive) is allocated with small capacity and it is almost running out of space. To avoid the possible follow-up issues, you may want to extend the partition.
A partition is too large. It is possible that there is only one partition on your large hard drive. To manage data better, it’s wise to shrink the partition and create new partition with the unallocated space.
Whatever the reasons, you can find out a proper way to resize your partition in Windows 10 in the following content.
How to resize partition in Windows 10 (3 ways)?
Pick up one method about changing hard drive partition size in Windows 10 based on the specific condition.
Change partition size within Disk Management
Disk Management is a built-in tool in Windows 10, which is able to shrink/extend/create/delete/format partition. With this tool, you should shrink partition to gain unallocated space or extend the partition with contiguous unallocated space.
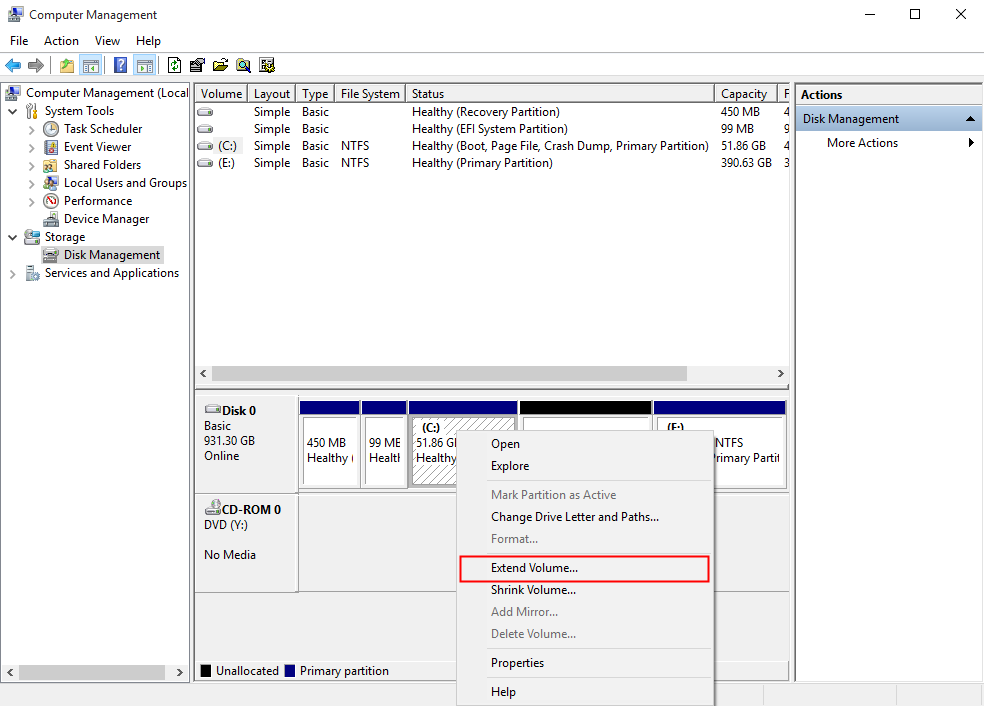
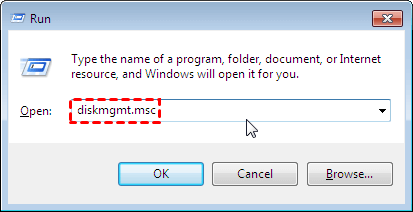
1. Press Windows + R, input “diskmgmt.msc” and hit Enter key to open Disk Management.
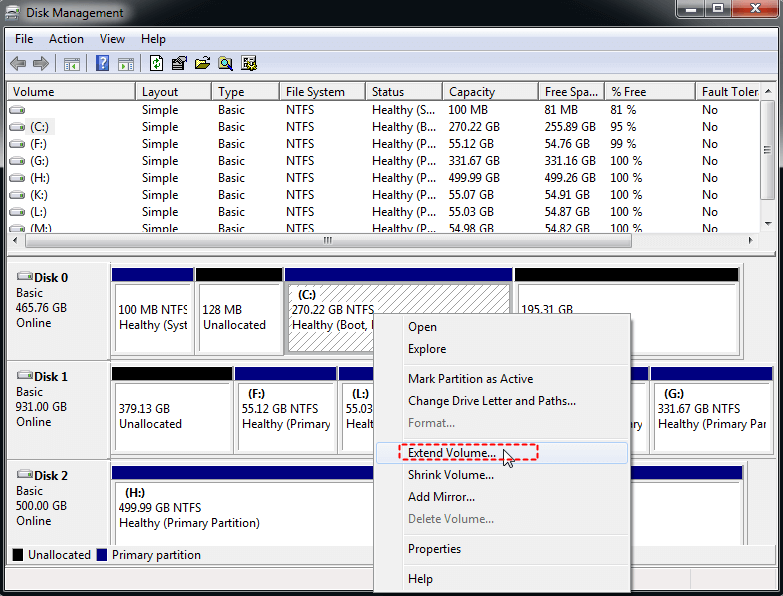
2. In Disk Management, right click the partition that you want to extend or shrink.
3. In the pop-up menu, choose Extend Volume or Shrink Volume and follow the wizard to complete the operation.
Notices:
Extend Volume will be greyed out if there is no adjacent unallocated space behind the partition that you want to extend.
You might be unable to shrink C drive out of unmovable files, even when it has free space.
Resize partition via Diskpart
It is also available to increase or decrease partition capacity via Diskpart utility. Here are detailed steps:
1. Press Windows + R simultaneously, input “diskpart” and click OK.
2. Type” list disk” and hit Enter.
3. Input “select disk n” and press Enter key. (n is the number that holds the partition that you want to resize.)
4. Run “list partition” command.
5. Run “select partition m” command. (m refers to the number of the disk that you need to extend or shrink.
To extend the partition, input “extend size = x” and press Enter (x is the size in MB that you want to add to the partition).
To shrink partition in Windows 10, input “shrink desired=x” and hit Enter (y is the size in MB that you want to shrink the partition by).
Note: To extend partition, please ensure that there exists a contiguous unallocated space behind the partition that going to be extended; otherwise, you can’t extend the partition.
Change partition size via a free yet powerful tool
When it is not available to get an unallocated space behind the partition that you are going to extend, it is time to employ a trusted and full-featured partition manager – AOMEI Partition Assistant Standard, specially designed for Windows system. It can work under Windows 10/8.1/8/7, XP and Vista.
It allows you to extend partition with non-adjacent unallocated space without data loss via Merge Partitions function and enables you to shrink partition beyond its half size. Free download it and have a look at how it works.
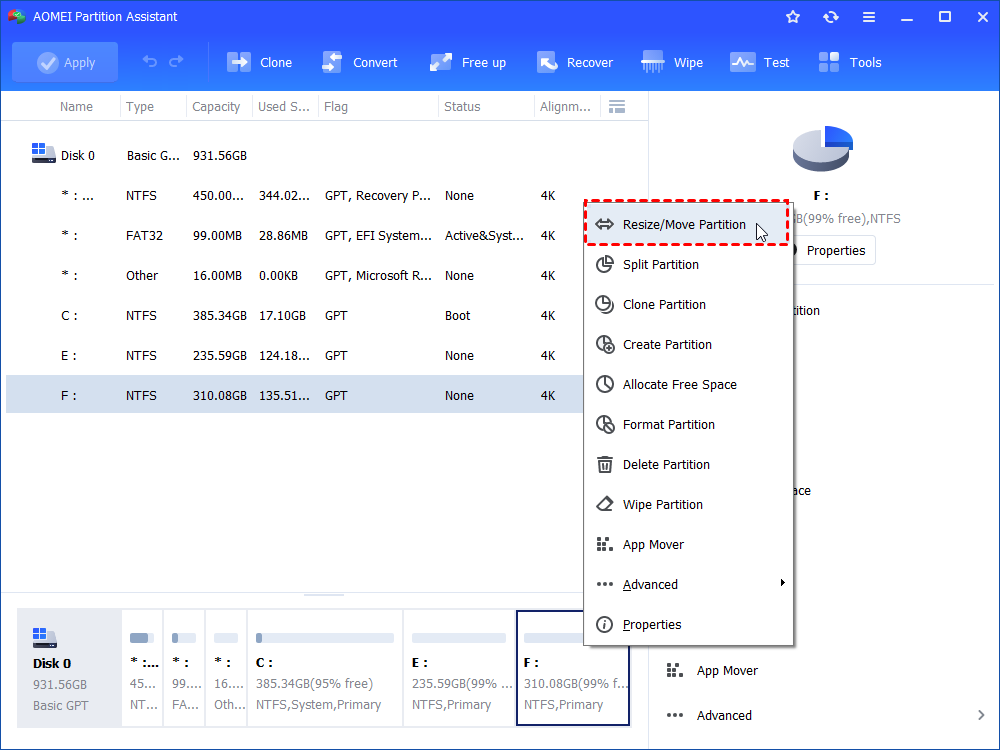
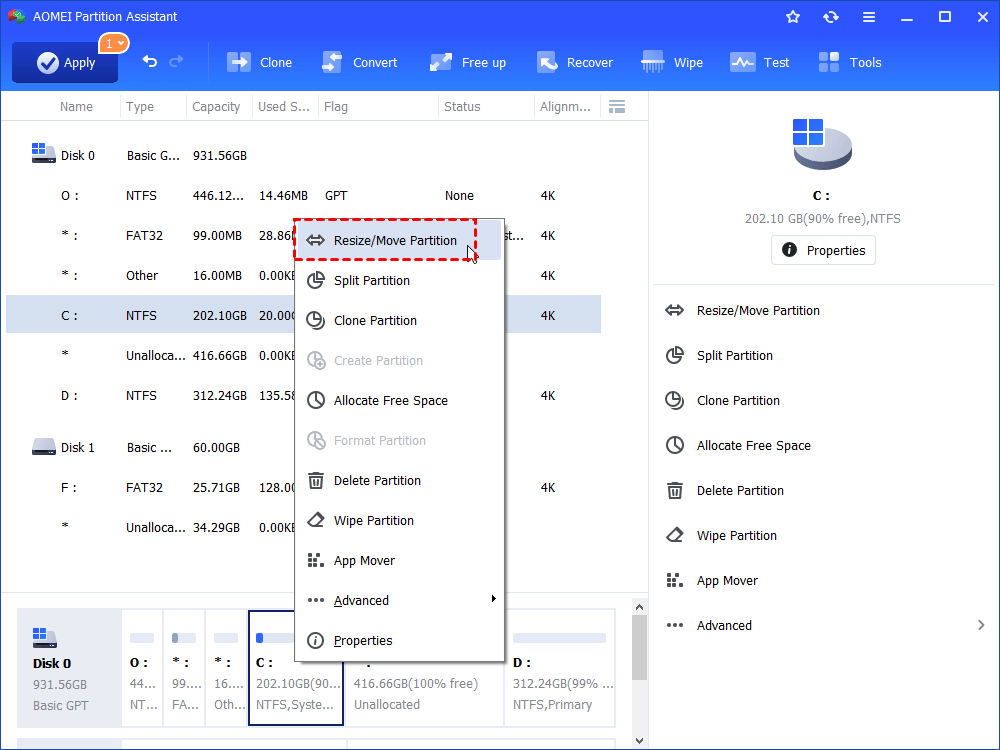
Step 1. Install and run the software. Right click the partition (here is D drive)that you want to shrink and choose Resize Partition.
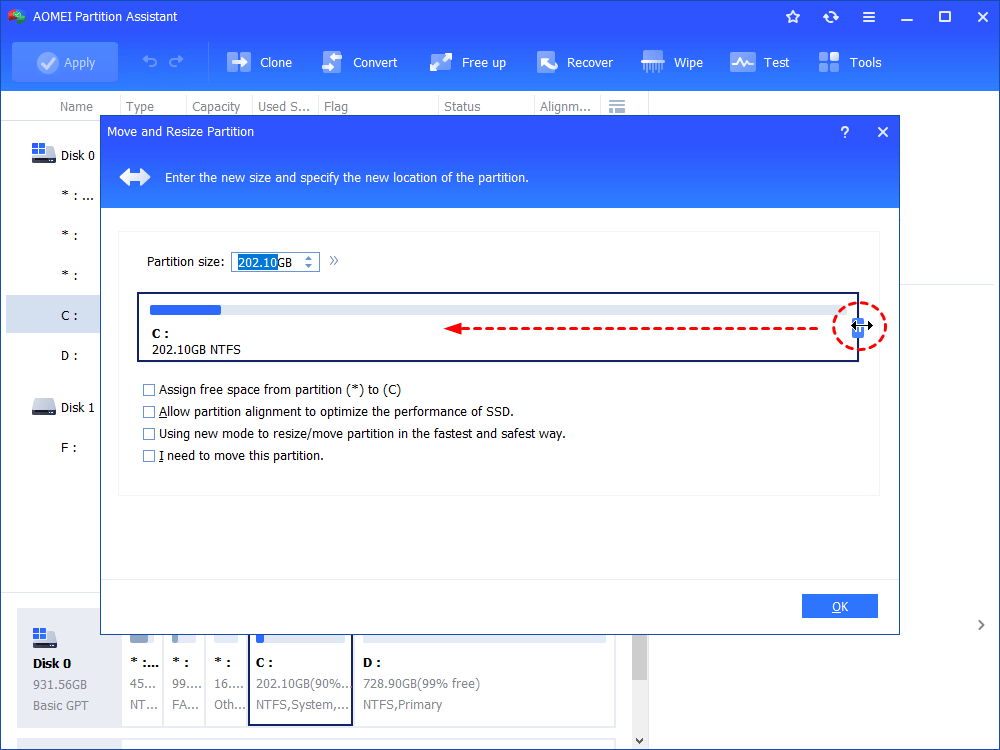
Step 2. In the pop-up window, drag leftward to shrink the partition. Then, click OK.

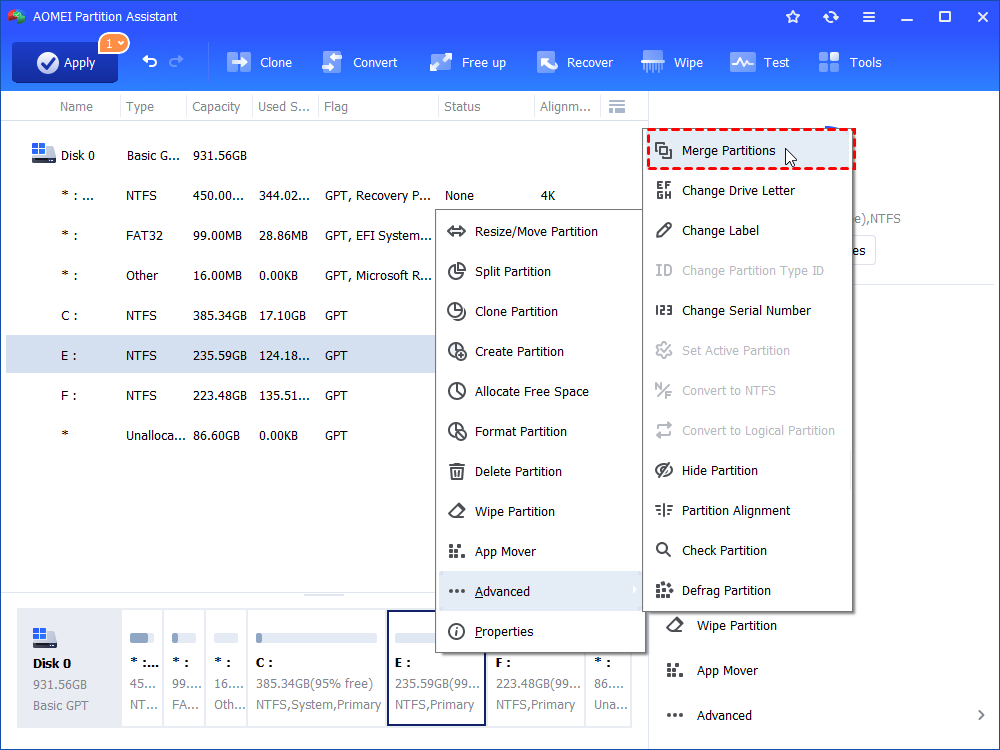
Step 3. Then, there will be an unallocated space on the hard drive. To extend C drive, right click it and choose Merge Partitions.
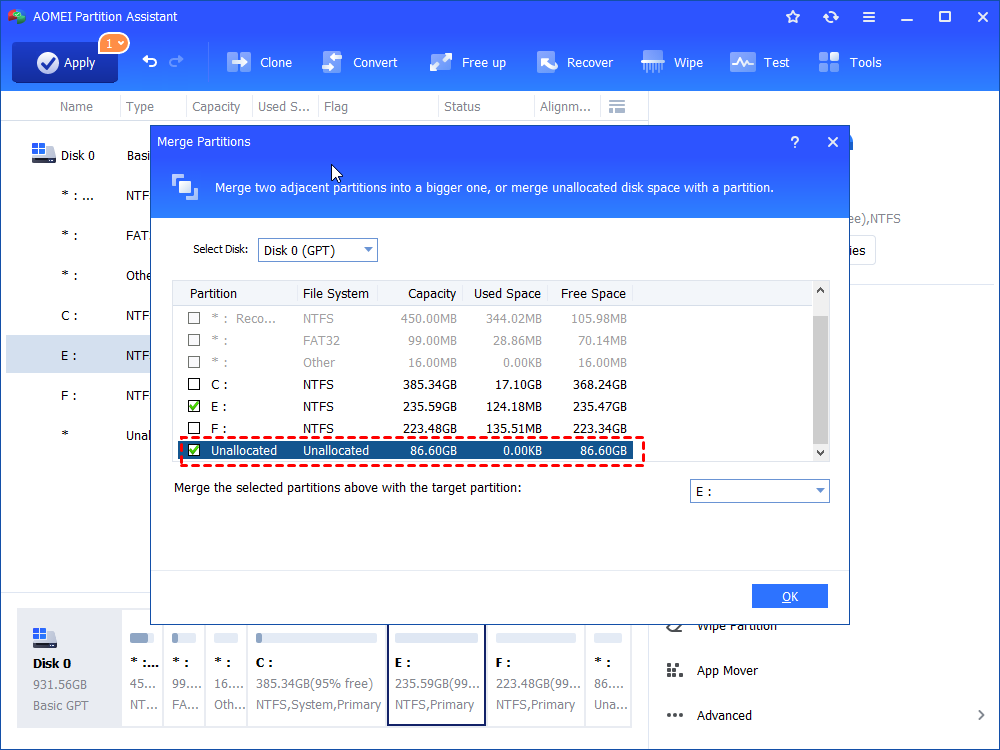
Step 4. Tick C drive and Unallocated. Then, click OK.
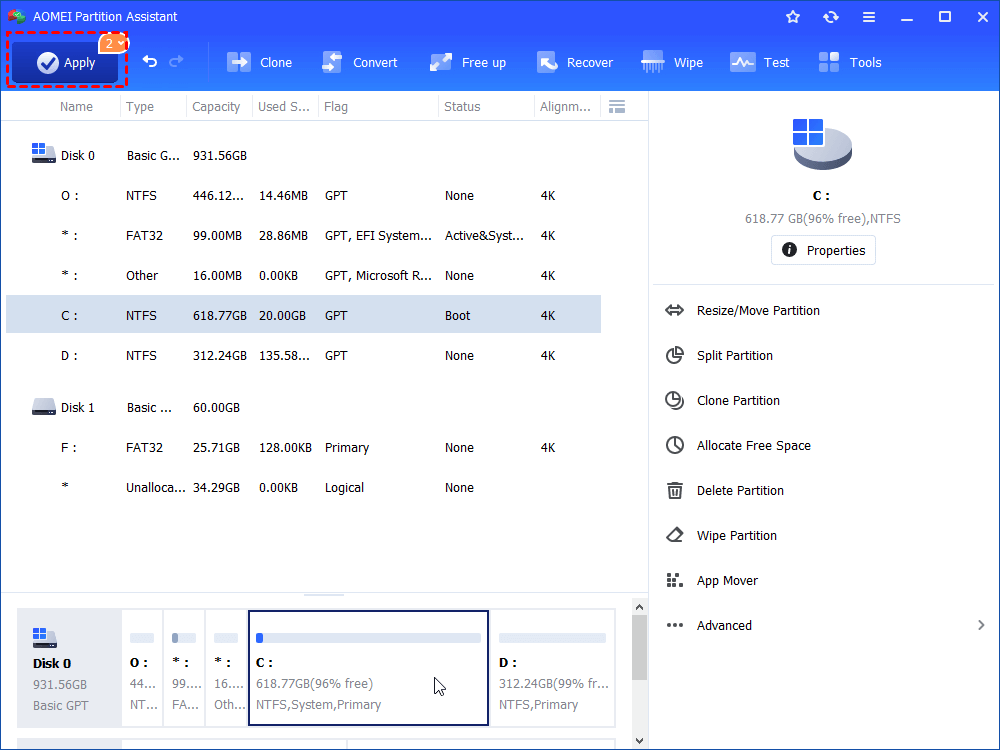
Step 5. Back to the main interface, click Apply and Proceed to execute operation.

PS.:
If the hard drive has unallocated space, you can skip Step 1 and Step 2.
You can upgrade AOMEI Partition Assistant Standard to Professional version and you can use more functions, such as allocating free space, quick partition, partition recovery, etc.
Conclusion
It’s easy to change partition size in Windows 10 and you can choose a proper way from what aforementioned. If your current hard disk is too small, it is not practical to fix partition full issue completely. You can choose to replace your current small disk with a larger one.
How to: Change a Partition Size in Windows 7 without Losing Data (Step-by-Step)
To change a partition size is to extend or shrink a partition. This article shows how to resize a partition without data loss easily and quickly in Windows 7/8/8.1/10.

By Bryce / Last Updated November 30, 2020
Need to change partition size in Windows 7
The capacity of partition(s) on a hard disk drive is not always allocated reasonably at the beginning, thus it’s necessary to adjust a partition size in Windows 7 in many occasions. For an example, after a period of time, you may find that certain partition, like partition C has been full and keep receiving the warning, “Low Disk Space». To take another example, your hard disk originally has one partition: Partition C. To manage files and data conveniently, you need to get more partitions on the disk.
In the first condition, you can extend partition C; in the second situation, you to shrink the partition to get unallocated space and you can create new partition on it. In a nutshell, resizing partition is important during disk usage.
How do I extend or shrink partition size in Windows 7?
Having realized the necessity of changing partition size in Windows, it’s time to learn how to change partition size in Windows 7 effectively and easily. Here are offered two useful utilities that can help you resize partition size: Windows built-in tool: Disk Management and third party free partition manager, AOMEI Partition Assistant Standard.
вњЌ Tip: How to choose between the two utilities:
в–є If there is contiguous unallocated space behind the partition that you want to extend, choose Disk Management. If the unallocated space is not contiguously behind the partition, employ AOMEI Partition Assistant Standard.
в–є If the partition that you want to shrink is NTFS file system, you can use Disk Management. If you want to shrink FAT/FAT32 file system or want shrink partition without the limitation of unmovable files, turn to AOMEI Partition Assistant Standard.
вњ” Resize partition in Windows 7 Disk Management
Firstly, you need to access Disk Management interface by pressing Windows + R simultaneously, inputting diskmgmt.msc, and hitting Enter.
Then, refer to the tutorials about how to increase partition size or decrease partition size.
в—† Extend partition in Windows 7 with Disk Management
1. Right-click the partition going to be extended (here is system partition: C drive), and choose Extend Volume .
2. You’ll be in Extend Volume Wizard interface, click Next.
3. Specify how much free space you want to add into C drive and then click Next.
4. Click Finish and wait a few seconds for the operation to complete.
Notes:
If there is no adjacent unallocated space behind the partition that’ll be enlarged, the option Extend Volume will be greyed out.
To get contiguous space behind the partition that you plan to extend, you can delete the contiguous partition behind it to get qualified unallocated space. However, this will cause data loss.
в—† Shrink partition in Windows 7 via Disk Management
1. Right-click the partition that you intend to shrink, select Shrink Volume.
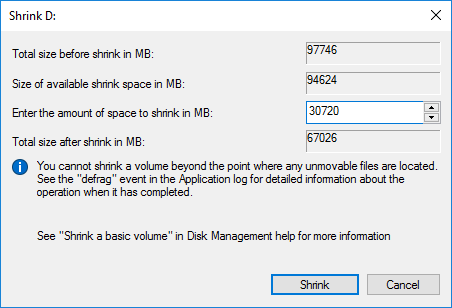
2. In the small pop-up window, type the amount of space to shrink in MB and then click Shrink.
3. After the partition is shrunk, you’ll find there is a new unallocated space behind the partition. You can create new partition with the unallocated space.
вњ” Change partition size in Windows 7 with 3rd party free partition manager
AOMEI Partition Assistant Standard, a free and great partition manager, enables you to change the capacity of a partition flexibly and quickly.
It is featured with Move Partition function, allowing you to change the location of partition and make the unallocated space behind the partition that would be enlarged. Then, you can increase a partition size without deleting partition. It can shrink a partition without the restriction of unmovable files, which is fairly helpful if you encounter the situation that Disk Management is unable to shrink partition even when the partition has free space.
Now, free download this great partition manager and check out the following steps about how to increase or decrease a partition size in Windows 7 without losing data.
в—† Enlarge partition size in Windows 7 without data loss
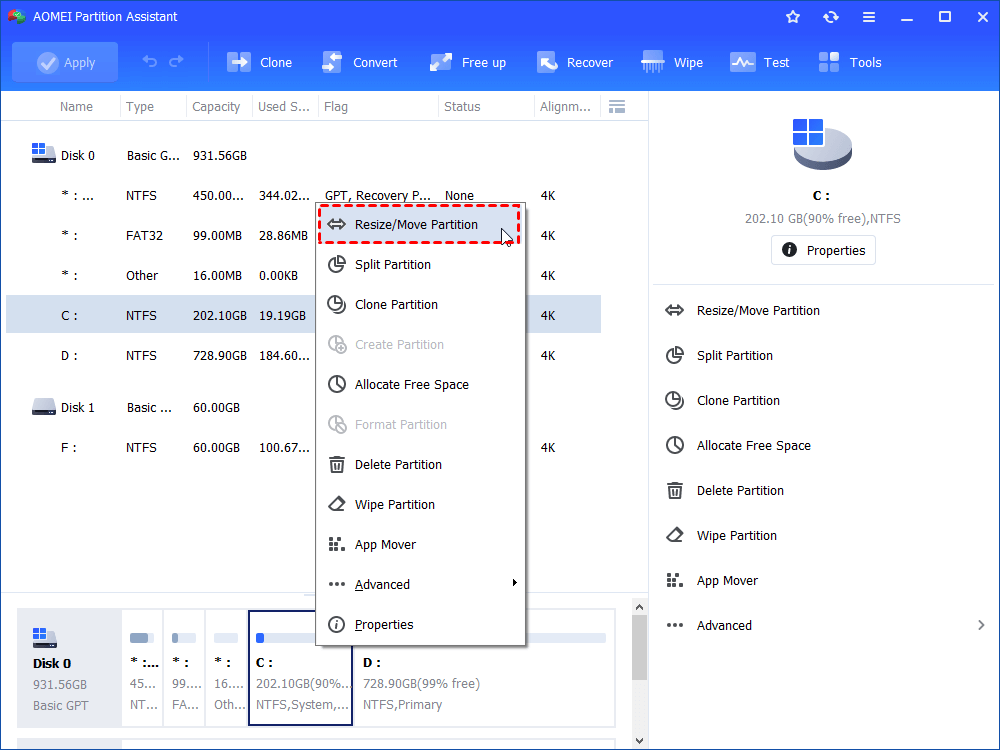
Step 1. Install and run the software. In the main interface, confirm the partition that you need to move, right-click it and choose Resize/Move Partition.
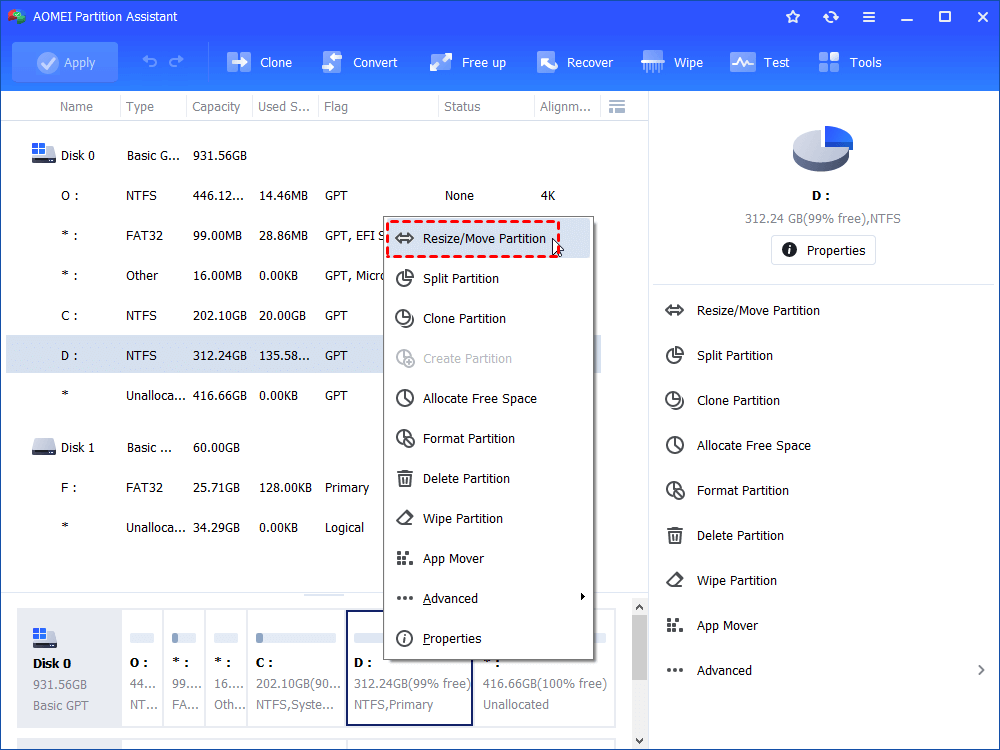
(Here we need to extend C drive and the partition that’ll be moved is Partition D, which is located between Partition C and the unallocated space.)
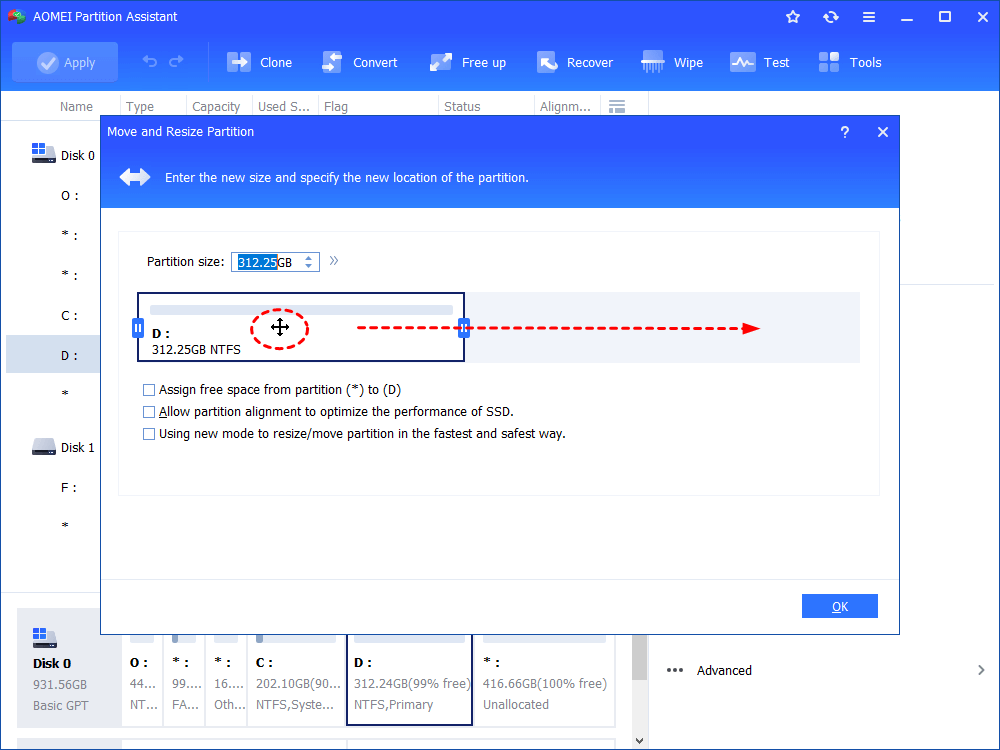
Step 2. Drag the selected partition to the very right end and click OK.
Step 3. You can preview that the unallocated space is adjacent to C drive. You can right-click C drive and choose Resize/Move Partition.
Step 4. Drag C drive rightward to enlarge it with the unallocated space and click OK.
Step 5. Returning to the home interface automatically. You can preview that C drive would be extended. Click Apply to commit the pending operations.
в—† Reduce partition size in Windows 7 beyond limit
Step 1. Install and launch AOMEI Partition Assistant. Right-click the partition that you need to shrink and choose Resize Partition.
Step 2. Drag the double-headed arrow leftward to shrink it.
Step 3. Click Apply to execute operation.
Notes:
This software is compatible with Windows 7/8/8.1/10. Apart from changing partition in Windows 7 without losing data, you can use it to resize partition in Windows 8/8.1/10.
It’s available to enjoy more advanced functions, like quick partition, migrating OS to GPT SSD, etc, if you upgrade it to Professional edition.
How to resize Windows 10 partition without losing data
by John, Updated on: March 1, 2021
This article introduces how to resize partition in Windows 10 (32 & 64 bit) without losing data or reinstalling OS/programs. Resize volume with Windows 10 Disk Management and free partition editor.
C drive out of space is common issue in Windows 10 computers, no matter you use desktop or laptop, SSD, mechanical disk or even RAID arrays. The fast way to solve this problem is resizing partitions to increase C drive free space, but to many computer users, it is not an easy task to resize Windows 10 partitions. In technical forums, many people ask similar questions such as: «is it possible to re-size disk partition without reinstalling OS, my c drive is full but there is plenty in D«, «Is it safe to resize my Windows 10 drives, will it cause data damage?«
In this article I’ll explain why disk partitions can be resized, and how to resize partition in Windows 10 with built-in Disk Management tool and free partition editor software.
Why disk partition can be re-sized?
A partition (also called as drive or volume) is just part of entire hard disk and there could be many partitions in a disk. Many people use partition C for Operating System, create separate partitions for programs and personal files. Before saving files to a partition, it must be formatted with a file system. The common file system in Windows computer is FAT32 and NTFS. Take MBR style disk as example:
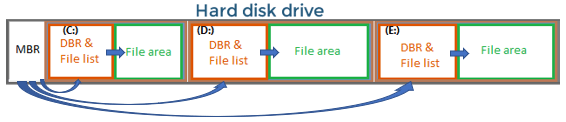
- Operating System read the parameters in MBR (master boot record) and then it knows how many partitions in this disk, and the start/end position of each partition.
- From DBR of each partition, Operating System gets the list of all files in this partition including name, create date, type and many other parameters of each file.
- From the parameters, Operating System can locate the data area.
To change a file, Operating System simply modify the data area and then update the associated parameters in DBR.
To resize partition in Windows 10 computer, it is much easier if it doesn’t require moving files of this partition. In this case, the partition tool just modify the parameters of start and end position of this volume. But if file moving is required, it is much more complicated, besides updating partition position, the partition tool also move location and update parameters of all file in this volume, so it cost much longer time if there are large amount of files.
Windows 10 partition resizing tools
There are two kinds of tools to resize volume in Windows 10: built-in Diskpart command or GUI Disk Management and 3rd-party partition manager software.
Some people like to use Windows native tools thinking they have best compatibility, but it’s not true. I’ve encountered the issue at least 3 times that Disk Management destroyed my drives when shrinking partition. Be careful when there are many partitions including Logical drive on a disk.
Third party software is much more powerful and it’s much easier to resize partition for Windows 10/8/7 computers. However, few partitioning software are safe enough. Therefore, before resizing partition, you’d better make a backup and run the safest program. Otherwise, your system and partitions may be damaged.
Better than other tools, NIUBI Partition Editor has unique 1 Second Rollback, Virtual Mode and Cancel-at-well technologies to protect system and data. In addition, it has Hot-Resize technology to help resize disk partition without rebooting and advanced file-moving algorithm to help resize partition 30% to 300% faster.
How to resize partition in Windows 10 using Disk Management:
Windows 10 Disk Management has no «resize volume» function, partition resizing is realized by Shrink Volume and Extend Volume. Note: only NTFS partition is supported. FAT32 and EFI partition can’t be resized by this native tool.
To shrink a volume:
- Press Windows and X on keyboard and select Disk Management from the list.
- Right click the partition and select Shrink Volume.
- In the pop-up window, enter the amount of space and then click Shrink to execute.
To extend a volume:
- Right click this drive in Disk Management and select Extend Volume.
- Simply click Next in the pop-up Extend Volume Wizard window.
- Confirm the operation and click Finish to proceed.
To extend partition in Windows 10 Disk Management, your disk partition layout must meet the requirements:
- There must be adjacent Unallocated space on the right of this drive.
- If there’s no such space, you must delete the right partition to get contiguous Unallocated space.
- On MBR style disk, Free space deleted from Logical drive cannot be added to any Primary partition, even if it is right adjacent.
Windows 10 has another native tool — Diskpart to help change partition size. Diskpart is a command line tool, although it works in different way, it has same limitations with Disk Management. Learn how to extend partition with diskpart.
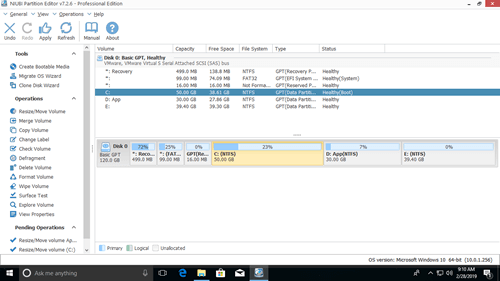
If you want to extend C drive by shrinking D or any other partition, it is impossible with Disk Management or diskpart command. Because, Shrink Volume can only shrink a partition (such as D:) towards left and make Unallocated space on the right side, but to extend C drive with either native tool, Unallocated space must be on the left side of D. This is the reason why Extend Volume is disabled for C drive after shrinking D.
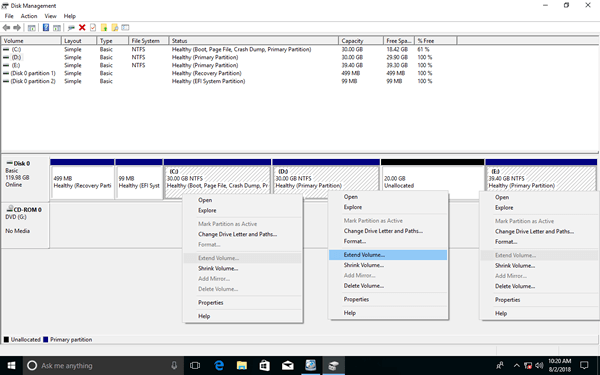
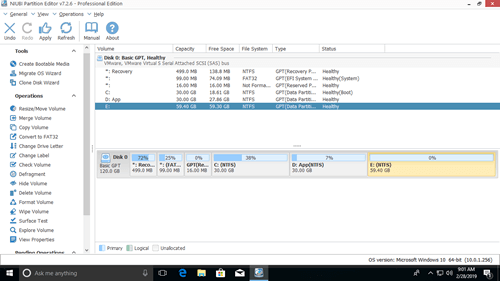
As you see in the screenshot, Extend Volume is also disabled for E drive, because Unallocated space is on its left side.
Resize Window 10 volume with free partition software
To resize partition in Windows 10 without losing data, NIUBI Partition Editor is better choice. Both NTFS and FAT32 partition can be resized. Unallocated space can be generated on either left or right when shrinking partition. This space can be combined to any contiguous and non adjacent partitions on the same disk.
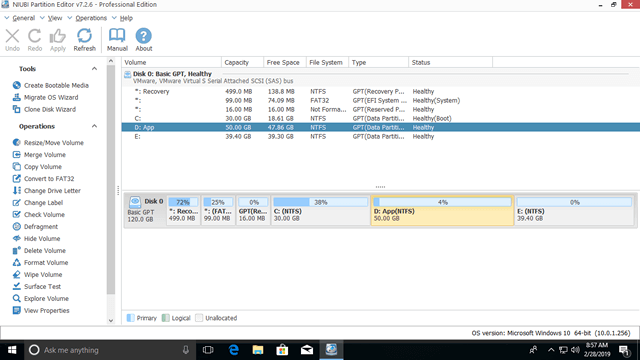
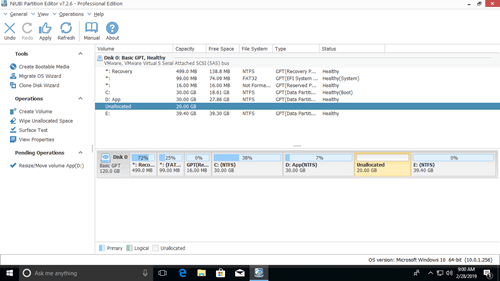
Download this program, you’ll see all storage devices with partitions structure and other information on the right, available operations to the selected disk or partition are listed on the left and by right clicking.
How to resize partition in Windows 10/8/7 laptop/desktop with NIUBI:
Right click a partition (here is D:) and select «Resize/Move Volume«, you have two options in the pop-up window.
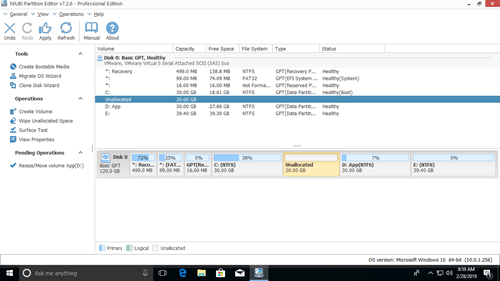
Option 1: If you drag left border towards right in the pop-up window,
Then partition D is resized and 20GB Unallocated space is made on the left.
Option 2: If you drag right border towards left in the pop-up window,
Then Unallocated space will be made on the right side of D drive.
If you want to extend C drive partition, follow Option 1 above to make Unallocated space on the left side of D. Then right click C: drive and select «Resize/Move Volume» again, drag right border rightwards to combine this Unallocated space.
Then two pending operations are created on bottom left, you need to click Apply on top left to take effect.
If you want to extend partition E, follow Option 2 above to make Unallocated space on the right of D drive. Then right click E: and select «Resize/Move Volume» again, drag left border leftwards to combine the Unallocated space.
If you want to shrink E to extend non adjacent partition C, follow the steps below:
- Shrink drive E: and make Unallocated space on the left side.
- Move Unallocated space from right side of drive D: to the left.
- Add Unallocated space to C drive.
To move Unallocated space from right to the left, right click drive D: and select «Resize/Move Volume», drag the middle towards right in the pop-up window:
Watch the video guide how to resize volume in Windows 10 (32/64 bit):
Besides resizing partition for Windows 10 laptop and desktop, it helps you move, merge, copy, convert, defrag, wipe, hide partition, scan bad sectors and much more. There’s free edition for Windows 10/8/7/Vista/XP home computer users. Except 1-Second Rollback technology and bootable media builder, it is the same with paid Professional edition.


