Display Options: How to change DPI Scaling Level for displays in Windows 10.
This article will show you how to change DPI Scaling Level for displays in Windows 10.
Dots per inch (DPI) is the physical measurement of the number of individual dots that can be placed in a line within the span of 1 inch. DPI setting controls the size of the text, apps and icons.
A lower DPI setting will make them appear smaller and a higher setting will make them appear bigger. By default Windows has setting of 96 DPI.
CHANGE DPI SCALING LEVEL FOR DISPLAYS REGISTRY SETTING
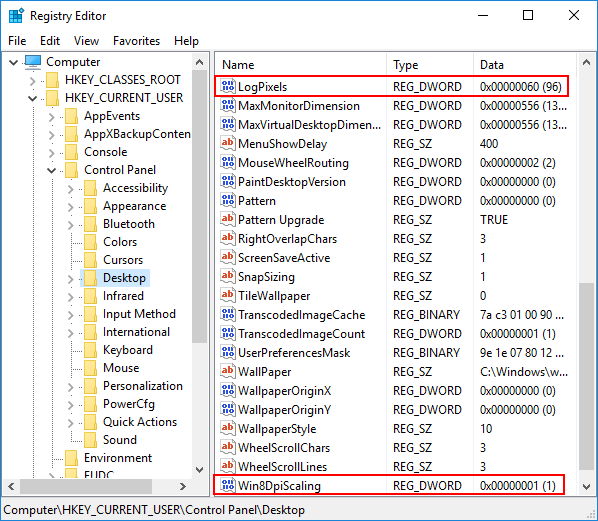
- Open Registry Editorby pressing Windows + R key combination, type in regeditand press Enter.
- If prompted by UAC, press Yesto continue.
- Go to HKEY_CURRENT_USER\Control Panel\Desktop
- In right-side pane, look for a Win8DpiScalingand set the value to 1 and close Registry Editor.
- Restart your computer.

CHANGE DPI SCALING LEVEL FOR DISPLAYS IN SETTINGS APP
- Open Registry Editorand make the changes as described above.
- Open Settingsand click on the System
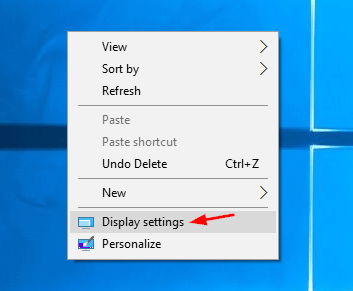
- Alternatively, right click on an empty area on your desktop and select Display.
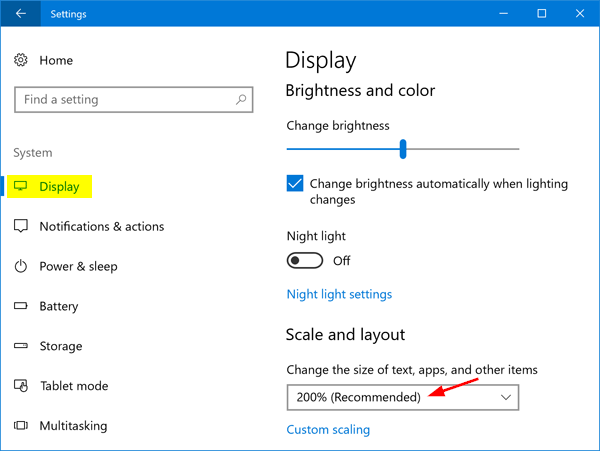
- In System, settings screen click on Displayoption from left side.
- Under Change the size of text, apps, and other items: 100% (Recommended), move the slider left or right to the DPI percentage you want to set for that display.

CHANGE DPI SCALING LEVEL FOR DISPLAYS IN CONTROL PANEL
- Open Registry Editorand make the changes as described above in first step.
- Open the Control Panel (icons view)and select Display.
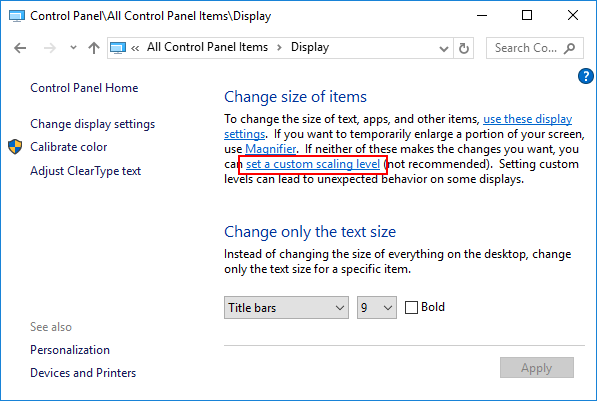
- Under Change size of items, click on the set a custom scaling level

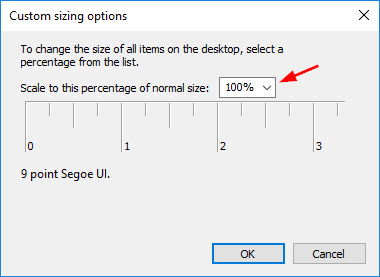
- Drag the ruler left or right to the scaling percentage you want.
- Alternatively, select the scaling percentage you want in the drop down menu.
- Click on Applyand then Sign out now.
[SOLVED] How can I get ‘Change high DPI settings’ to work?
Go ahead and read my problem statement, but look at my second post to see the solution.
Applications (a game in this case) have Property sheets.
«Properties» > _/Compatibility\_ > —Settings— > [Change high DPI settings] opens a secondary dialog with the following controls:
Program DPI
[_] Use this setting.
[I signed in to Windows]
[I open this program]
High DPI scaling override
[_] Override high DPI.
[Application]
[System]
[System (Enhanced)]
I’ve tried all 12 combinations. They appear to do nothing.
I think these Property settings are meant to control graphic scaling, useful for high DPI systems. My laptop has a 3840×2160 display.
Can anyone tell me how to get ‘Change high DPI settings’ to work?
Replies (2)
What games or software are you trying to use this option with ? What is not working when you use the option ?
— I haven’t used an UHD monitor but with my 1080 & 1440p monitors this setting is generally only needed with older games
that use low resolutions that are native to 4:3 aspect ratio such as 1024×768.
When this option is not enabled these games display low and to the right. Enabling it centres them properly.
— An interesting glitch in this system is Win10 often sets this option automatically when you run games that don’t need it,
but manages to miss many (most ? ) games that do.
— I have also found it useful with some display Windows such as the profiling software for my Logitech peripherals, but
rather than use the default Application option, I need to use the System option.
In this case I used this setting to make the Window larger and easier to read on the 1440p monitor.
— I have never enabled the ‘new’ Program DPI option that came with the 1803 update.
— If you also need to make Desktop icons, etc larger you can use the Advanced Scaling Settings in Display .
With my 1440p monitor I am using 130%, but you may need up to 150%. Don’t start too high as the size ramps up fairly quickly.
(Note that the percentage that shows in the main Display Window is not the same as what you set in Advanced Scaling Settings)
— I also use the small program below to fine tune my font sizes.
— This article concerns connecting an external display but may still have something that applies to your machine ? .
[EDIT: Regarding post below.
«That should be totally unneeded. Windows scales text and pictures just fine based on the single, percent setting.»
— Whatever suits you, but I don’t find Windows defaults suitable for my needs, and thought you may find the tool useful.
However, next month the 1809 version update will be out, and ( Due to popular demand ) MS are adding a font size slider to the Display settings.
Still not as flexible as the 3rd party tool though.
«Here’s where you need to listen up»
— No, I don’t need to listen up. Where did I even mention Intel HD in my post ? I am fully aware of the differences between
Intel HD and Nvidia gpu’s, and no I would not . «You may ask: «Why not use the Intel GPU for everything?». ]
Was this reply helpful?
Sorry this didn’t help.
Great! Thanks for your feedback.
How satisfied are you with this reply?
Thanks for your feedback, it helps us improve the site.
How satisfied are you with this reply?
Thanks for your feedback.
Hi, and thanks for replying. First, I solved the problem. The problem turns out to be caused by a combination of poor function integration/poor computer architecture by Microsoft, and poor documentation/missing documentation by Intel. Broadly, the problem is created by NMP (not my problem) on the part of Microsoft, Intel, and NVIDIA.
. I haven’t used an UHD monitor but . I have never enabled the ‘new’ Program DPI option that came with the 1803 update .
Well, you may need to do this in the future, so listen up!
. What is not working when you use the option ? .
My laptop has 2 GPUs (graphics processor units): an Intel HD 530 & an NVIDIA GTX 980M. The game is running on the NVIDIA. The native game resolution seems to be 1280×720 (that’s 16:9 aspect) — it’s hard to tell, but I think that’s native. At fullscreen, the game is centered but not scaled up to 3840×2160. As a result of not being scaled up, the mouse pointer is too small to see and as a result of that, the game is unplayable.
I can enlarge the game image to 3840×2160 within the game, and it does fill the screen, but the mouse pointer remains its original size and so, is too small to see, especially against a «busy» background — also, the mouse pointer has about 50% transparency, so that contributes to the problem.
The best solution is to run the game at 1280×720 and have Windows scale it (and the mouse pointer) up to 3840×2160.
The Windows ‘Change high DPI settings’ settings have absolutely no effect, so I couldn’t hack trial solutions.
. With my 1440p monitor I am using 130%, but you may need up to 150%. Don’t start too high as the size ramps up fairly quickly. .
For a 3840×2160 display, Windows recommends 250%. I’m using 200%. Windows is fine. It’s game scaling that’s the problem. It’s the game scaling problem that’s caused by NMP.
. I also use the small program below to fine tune my font sizes.
That should be totally unneeded. Windows scales text and pictures just fine based on the single, percent setting.
. This article concerns connecting an external display but may still have something that applies to your machine ? .
Here’s where you need to listen up. The integrated display (such as in a laptop) and external displays are handled completely differently. It turns out, the Intel GPU handles the integrated display, even for applications and games that run on the NVIDIA GPU, while the NVIDIA GPU handles the external display. The Intel GPU scales one while the NVIDIA GPU scales the other — that’s poor computer architecture.
You may ask: «Why not use the Intel GPU for everything?» The Intel GPU has 5 (or maybe 8) graphic cores. The NVIDIA GPU has 1536 graphic cores and a much higher clock.
Here’s the payoff: Regardless of which GPU renders the window or game images, it’s the Intel GPU that scales them and displays them on the integrated display (that is, that displays the graphic memory). But the Intel functions are very poorly documented, they are not intuitive (because the rendering is being done the NVIDIA), and Intel provides no support except for it’s NUC computer.
Why would I look at the Intel setup when the game (and almost everything else) is running on the NVIDIA? That, I now know, is a rhetorical question.
Intel provides these settings:
- Maintain Display Scaling
- Maintain Aspect Ratio
- Scale Full Screen
- Center Image
The help: «Select the screen scaling from the list.» DUH?! That’s it. No other help. No Intel support. Call them. They’ll tell you to go away.
PS: Those Intel settings? They’re radio buttons. You can select ONLY one. Which one should you select? Well. Experiment.
PPS: I’ve thought of an appropriate computer-architecture scenario: Windows is using the NVIDIA GPU as a graphics coprocessor, but it’s then using the Intel GPU as the integrated display driver hardware. I suppose a Windows developer would say, «Of course. What else would work?» And I suppose that’s right, but no one is documenting how this all works. They are all into NMP. Just read the Microsoft documentation. It’s all about multiple displays. This (scaling) is much more than a multiple-display problem.
Password Recovery
A lower DPI will make screen elements (for example, icons, fonts and windows) appear smaller and a higher setting will make them appear bigger. By default Windows has system-wide scaling setting of 96 DPI. In this tutorial we’ll show you 3 ways to change Windows 10 DPI settings to the scaling level you want.
Method 1: Change Windows 10 DPI Settings from Settings
- Right-click an empty area on your desktop, and then select Display settings from the context menu.
The Settings app will open the Display tab. In the right pane, click on the drop-down menu to “Change the size of text, apps, and other items” and select the DPI percentage you want to set for your display.
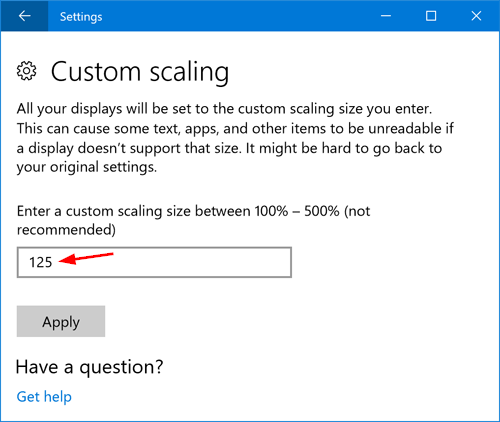
Just underneath that you’ll see a link labelled “Custom scaling“. If you don’t like the default scale levels, you can click that link to set a custom scaling percent from 100 to 500.
Method 2: Change Windows 10 DPI Settings from Control Panel
- Open the Control Panel in Large icons view. Click Display.
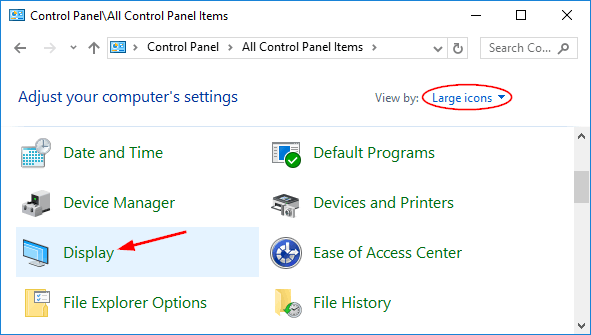
Under Change size of items, click on the set a custom scaling level link.
This brings up the familiar old Custom sizing options dialog. From there, you can select the scaling percentage you want from the drop-down menu, or drag the ruler left or right to the scaling percentage that suits your monitor.
Method 2: Change Windows 10 DPI Settings Using Registry Editor
- Press the Windows key + R to open the Run box. Type regedit and hit Enter to access Registry Editor.

HKEY_CURRENT_USER\Control Panel\Desktop