- Как изменить тип сети с общедоступной на частную в Windows 10 / Server 2016/2012 R2?
- Типы (профили) сети в Windows
- Как присваивается профиль для сети в Windows 10?
- Как в Windows 10 изменить профиль сетевого подключения?
- Изменить профиль сети с Public на Private в Windows 10 через PowerShell
- Изменить тип сети в Windows 10 через редактор реестра
- Сменить профиль сети через политику безопасности
- Make a Wi-Fi network public or private in Windows 10
- Change from Public to Private Network in Windows 7, 8 and 10
- Windows 10
- Windows 8.1
- Windows 8
- Windows 7
- Manually Force a Network Location
Как изменить тип сети с общедоступной на частную в Windows 10 / Server 2016/2012 R2?
В этой статье мы рассмотрим понятие профиля сети в Windows, рассмотрим какие типы профилей сети бывают, для чего используются и как изменить назначенный профиль сети с “общедоступной” на “частную” или наоборот в Windows 10/Windows Server 2019/2016. Это бывает нужно, если сеть неправильно определяется как общественная (Public Network), когда должен быть определена как частная (Private).
Сетевые профили Windows являются частью брандмауэра Windows и позволяют применять различные правила брандмауэра в зависимости от типа сети, к которой подключен компьютер. В зависимости от примененного профиля для вашего сетевого подключения, другие компьютеры могут видеть или не видеть ваш компьютер в сети (настройки сетевого обнаружения), использовать расшаренные папки и сетевые принтеры.
Типы (профили) сети в Windows
Профили сети появились еще в Vista/Windows Server 2008. В Windows 10 (Windows Server 2016) сетевому интерфейсу (будь то Ethernet или Wi-Fi) можно присвоить один из трех сетевых профилей.
- Частная или домашняя сеть (Private) – профиль для доверенной сети (домашняя или рабочая сеть в офисе). В такой сети компьютер будет доступен для обнаружения другими устройствами, на нем можно использовать службы общего доступа к сетевым файлам и принтерам;
- Общедоступная (общественная) сеть (Public) – профиль для недоверенной сети (кафе, публичная Wi-Fi сеть в метро, аэропорту). Вы не доверяете другим устройствам в такой сети, ваш компьютер будет скрыт для других устройств, нельзя получить удаленный доступ к опубликованным у вас сетевым папкам и принтерам;
- Доменная сеть (Domain) – сетевой профиль для компьютеров, состоящих в домене Active Directory. Применяется автоматически после добавления Windows в домен. Для этого профиля вы можете применять доменные политики брандмауэра.
Как уже говрилось ранее, на основании профиля сети, примененного к сетевому интерфейсу, к нему применяются разные правила брандмауэра Windows.
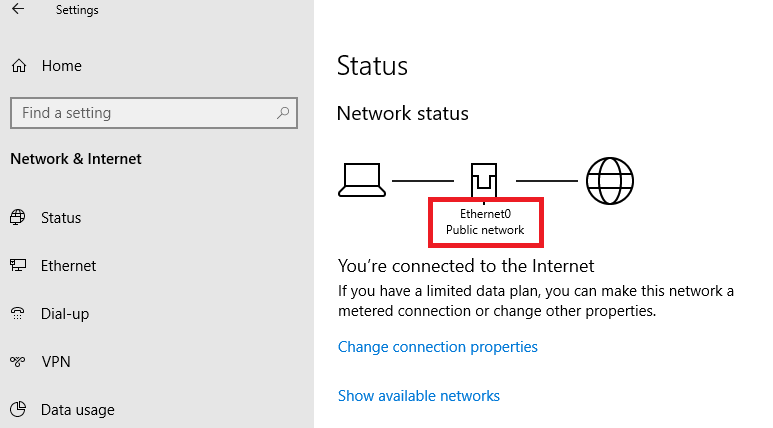
В Windows 10 вы можете проверить текущий профиль, который назначен сетевому подключению в меню Settings -> Network and Internet. На моем скриншоте видно, что сетевому интерфейсу Ethernet0 присвоен профиль Public.
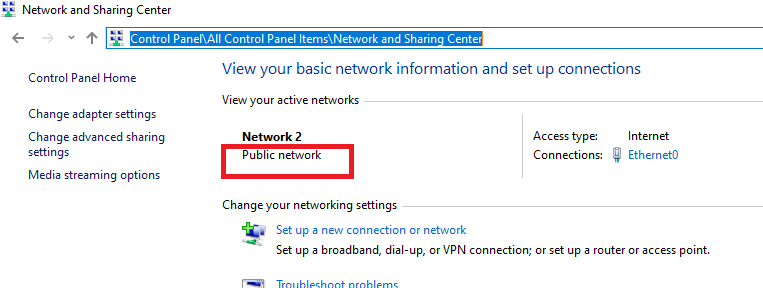
В классической панели управления тип сети для активных сетевых подключения отображается здесь: Control Panel\All Control Panel Items\Network and Sharing Center.
Но изменить тип назначенного профиля сети из классической панели управления нельзя. Например, в Windows Server 2012 R2/ Windows 8.1 изменить профиль сети можно только через PowerShell, реестр или локальную политику безопасности.
Как присваивается профиль для сети в Windows 10?
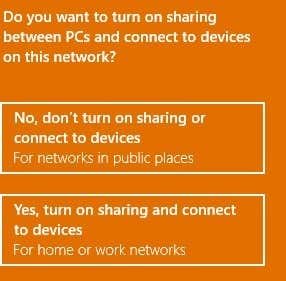
Профиль сети в Windows 10 выбирается пользователем при первом подключении к новой сети. Появляется запрос:
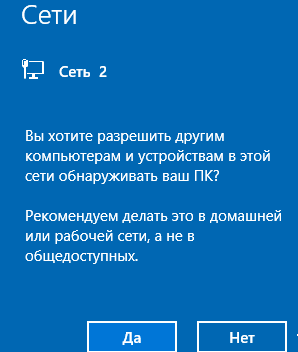
Если выбрать “Да”, сети присваивается профиль Private (домашняя), если “Нет” – public (общедоступная). При следующем подключении к этой же самой LAN или WiFi сети автоматически назначается выбранный ранее профиль.
В Windows 10 вы можете сбросить все настройки и профили для всех сохраненных сетей, выбрав Параметры -> Сеть и Интернет -> Состояние -> Сброс сети. Перезагрузите компьютер.
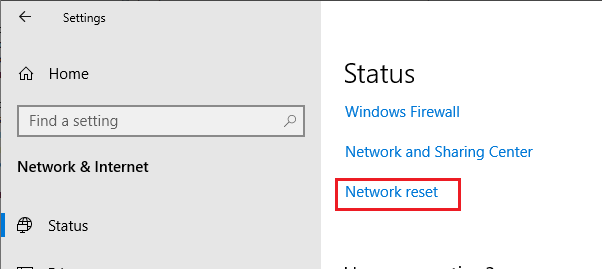
Теперь при подключении к сети опять появится запрос о включении сетевого обнаружения.
Как в Windows 10 изменить профиль сетевого подключения?
Вы можете изменить тип сети из графического интерфейса Windows 10. Если вы используете новую панель Параметры, перейдите в раздел «Сеть и Интернет» -> «Состояние» -> «Изменить свойства подключения» (Change connection properties).
Здесь можно переключить применяемый сетевой профиль с Public на Private и наоборот.
Из классической Панели Управления Windows 10 изменить тип сетевого профиля интерфейса нельзя.
Также вы не можете сменить профиль на компьютере в домене, для сетевого подключения к домену всегда будет использоваться профиль Domain.
Изменить профиль сети с Public на Private в Windows 10 через PowerShell
В Windows 10 / Windows Server 2016/2019 вы можете управлять профилями сетевых подключений из PowerShell. Запустите консоль PowerShell с правами администартора.
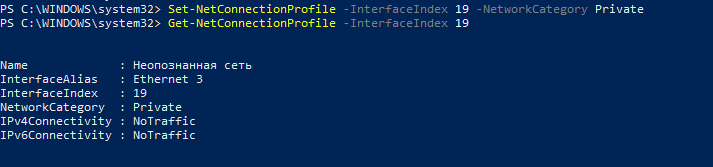
Теперь с помощью командлета Get-NetConnectionProfile получим список сетевых интерфейсов и применённые к ним профили сети.
В моем примере на компьютере имеется 4 сетевых подключения, с разными типами профилей сети (NetworkCategory: Public, Private и DomainAuthenticated.

Попробуем изменить профиль сети для одного сетевого подключения. В этом случае нас интересует индекс, назначенный данной сетевой карте. В этом примере InterfaceIndex = 19.
Зная индекс сетевого интерфейса, можно изменить тип сети на Private:
Set-NetConnectionProfile -InterfaceIndex 19 -NetworkCategory Private
Проверим, что профиль сети изменился:
Get-NetConnectionProfile -InterfaceIndex 19
Новые правила брандмауэра будут применены к интерфейсу в соответствии с назначенным профилем без перезагрузки.
Также вы можете изменить профиль сети сразу для всех сетевых адаптеров компьютера:
Get-NetConnectionProfile | Set-NetConnectionProfile -NetworkCategory Private
Изменить тип сети в Windows 10 через редактор реестра
Вы можете изменить тип сети через редактора реестра. Для этого нужно запустить regedit.exe и перейти в раздел HKEY_LOCAL_MACHINE\SOFTWARE\Microsoft\Windows NT\CurrentVersion\NetworkList\Profiles, в котором хранятся профили всех сетевых подключений.
Найти нужный профиль сети можно по имени в Центре управления сетями. Имя сети указано в ключе реестра ProfileName. Тип сети задается в параметре Category. Доступны следующие значения этого ключа:
- 0 — Общественная сеть (Public Network)
- 1 — Частная сеть (Private Network)
- 2 — Доменная сеть (Domain Network)

Измените значение ключа на нужный и перезагрузите компьютер.
Сменить профиль сети через политику безопасности
Еще один способ смены типа сети — редактор локальной политики безопасности (Local Security Policy).
Make a Wi-Fi network public or private in Windows 10
When you first connect to a Wi-Fi network, you can set it as public or private—depending on the network and what you want to do:
Private network. Use this for networks you trust, such as a network at home or work. When a network is set to private, your PC is discoverable to other devices on the network, and you can use your PC for file and printer sharing.
Public network. Use this for networks you connect to when you’re out and about, such as a Wi-Fi network at a coffee shop. Your PC will be hidden from other devices on the network, and you can’t use your PC for file and printer sharing.
After you connect to a network the first time, you can change it to public or private at any time.
On the right side of the taskbar, select the Wi-Fi network icon.
Select the Wi-Fi network you want to connect to, then select Connect.
Type the network password, and then select Next.
When asked if you want your PC to be discoverable to other devices on the network, do one of the following:
To set it as a private network where your PC will be discoverable to other devices on the network, choose Yes.
To set it as a public network where your PC won’t be discoverable to other devices on the network, choose No.
On the right side of the taskbar, select the Wi-Fi network icon.
Under the name of the Wi-Fi network that you’re connected to, select Properties.
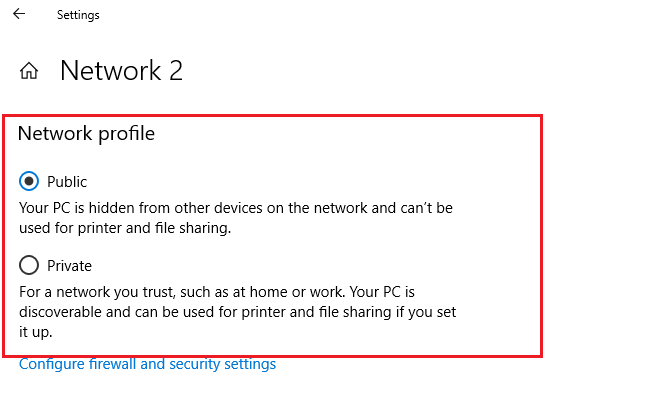
Under Network profile, select Public or Private.
Note: To use these steps to set a network to public or private, your PC must be running Windows 10 Version 1709 or later. To see which version of Windows 10 your device is currently running, select Start , then select Settings > System > About .
Change from Public to Private Network in Windows 7, 8 and 10
Make some tweaks to ensure you are not sharing too much (or too little)
In Windows, when you connect to a wireless network, it will either register it as a Public network or a Private network. Private networks are basically home and work whereas public networks are anywhere else, which you don’t trust.
Sometimes Windows detects a private network as a public one and vice versa. You can manually make some changes to ensure that you are not accidentally sharing either too much on a public network or blocking all sharing on a private network.
In this article, I walk you through the steps for Windows 10, Windows 8.1, Windows 8 and Windows 7.
Windows 10
In Windows 10, go ahead and click on the Ethernet or wireless icon in the system tray of your taskbar. The Ethernet icon is like a little computer and the wireless icon is, well, pretty well-known. Once you do that, click on the Network & Internet Settings link.

This will bring you to the PC settings dialog with the Status tab selected. If you are connected to a WiFi network, click on WiFi in the left-hand pane, otherwise click on Ethernet.
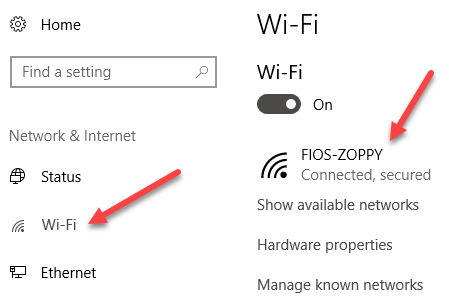

Go ahead and click on the name of the WiFi network or Ethernet network that has the Connected status. When you click on the network, you will now be able to select Public or Private.

For WiFi networks, you’ll also have the option to connect automatically when in range of the WiFi network.
Windows 8.1
In Windows 8.1, to change the network profile, we have to go into the PC Settings screen. To do that, open the Charms bar and click on Change PC Settings at the bottom.

Now click on Network and you’ll see the list of connections, i.e Ethernet, Wireless, etc.

Now all you have to do is turn on the Find devices and content option. It’s automatically turned off for public networks, so when you turn it on, it changes the network to a private network.

Windows 8
For Windows 8, follow the following procedure. First, right-click on the network icon in the Windows 8 system tray and click on Open Network and Sharing Center.

Here you will see the network you are connected to and what type of network Windows 8 has identified it as.
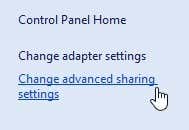
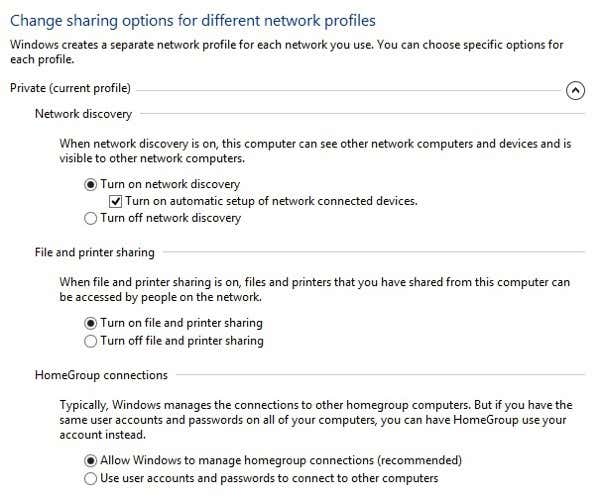
As you can see above, my network is considered a Private network, which is correct since I’m at home and connected via Ethernet. If this is incorrect, there are a couple of things you can do. First, you can click on Change advanced sharing settings in the left-hand pane.
Click on Private and then make sure you have these options enabled:
– Turn on network discovery
– Turn on file and printer sharing
– Allow Windows to manage homegroup connections
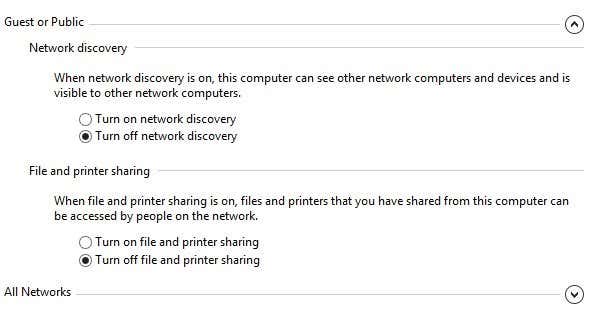
Then collapse Private and expand Guest or Public and make sure you have these options set:
– Turn off network discovery
– Turn off file and printer sharing
Once you have done this, you then need to go to the Windows 8 desktop and open the Charms bar. Click on Settings and then click on the Network icon.
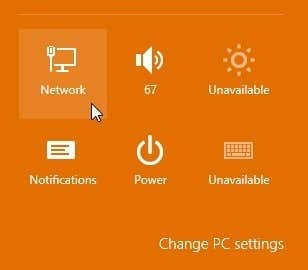
You’ll see Network and then Connected. Go ahead and right-click on that and choose Turn sharing on or off.

Now choose Yes if you want your network to be treated like a private network and No if you want it to be treated like a public network. Note that the label Private or Public may remain the same in Network and Sharing Center, but once you choose the sharing settings manually, the network will have the appropriate settings applied.
Windows 7
In Windows 7, the process is a bit different. You still have to click on the network icon in your taskbar, but this time click on the Open Network & Sharing Center link.
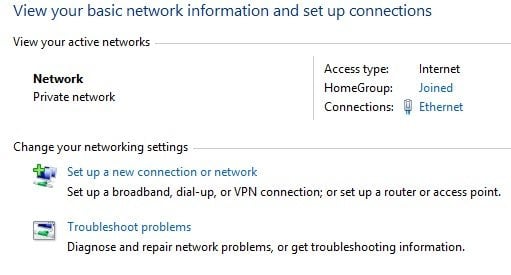
Here, you will see an overview of your network connection. Under View your active networks, you’ll see the name of the Ethernet or WiFi network and it should have a link underneath called Home network, Work network or Public network.
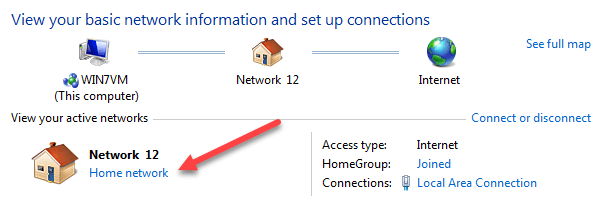
Click on that link and you’ll be able to change between the three different network types.
There is also an option in Windows 7 to treat all future networks as public networks automatically, though I don’t think most people would find that useful.
Manually Force a Network Location
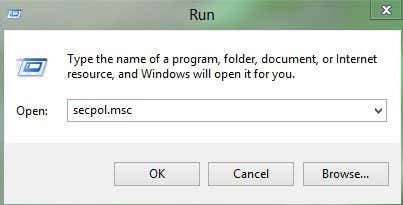
As a last resort, if you can’t change the network location using the methods above, you can manually change the network location using a tool called secpol.msc. This will not work on the Home, Student or Starter editions of Windows. In Windows, press the Windows Key + R, which will bring up the Run dialog box. Type in secpol.msc into the run dialog box.
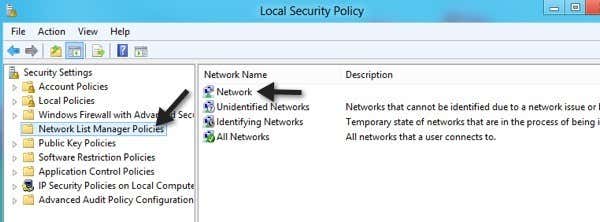
Then click on Network List Manager Policies at the left and on the right-hand side you should see a couple of items with descriptions and then something called Network, which is the current network you are connected to. It may also be called something else, but it doesn’t have a description. If you are connected to a WiFi network, it will be the name of your WiFi network.
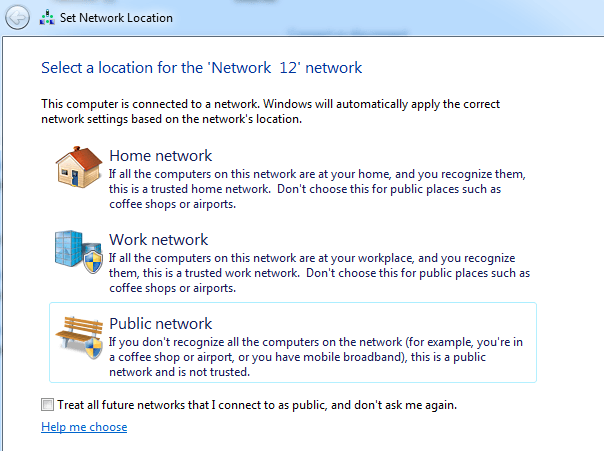
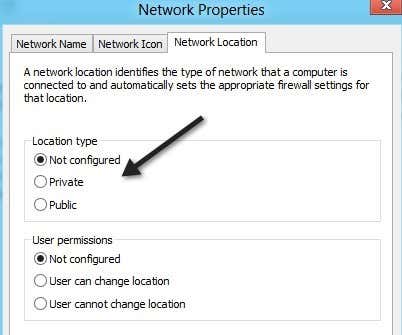
Double-click on it and click on the Network Location tab. Here you can manually change the network location from Private to Public and vice versa.
That’s about it! Not the easiest thing in the world, but it’s Microsoft! If you are having problems with changing network locations in Windows, post a comment here and we’ll help. Enjoy!
Founder of Online Tech Tips and managing editor. He began blogging in 2007 and quit his job in 2010 to blog full-time. He has over 15 years of industry experience in IT and holds several technical certifications. Read Aseem’s Full Bio


