- How to Change File Type in Windows 10
- Showing file extensions and changing the file format
- How to Change File Extensions in Windows 10 Correctly [Partition Manager]
- Summary :
- Quick Navigation :
- What Is File Extension
- How to Change File Extension in Windows 10
- ABOUT THE AUTHOR
- Show and change file extensions in Windows 10
- How to show file extensions and change file extensions in Windows 10?
- Batch change file extensions in Windows 10
- How to change a File Extension in Windows
How to Change File Type in Windows 10
With our increasing use of computers in our daily life, it may get necessary even for a simple user to change the file type of a file from one format to another. Each file format has their own properties. For example a ‘.txt’ file will probably get opened by the text editor while an ‘html’ file will get launched in your default browser.
 File format analogy
Even though the contents inside the files might be the same, the file type matters a lot. The process of changing file type is quite simple and straightforward. However, there are some cases whereby changing the file type, the file becomes unusable. Hence it is recommended that you know exactly what you’re doing and also make an additional copy of the file.
Showing file extensions and changing the file format
By default, Windows doesn’t have the file format displayed alongside every file. For example, if a file is a text file, its name wouldn’t display ‘ap puals.txt’. Instead, it will only display ‘appuals’. First, we will enable the file extensions and then through basic rename, we will change the file extension. You can also choose to rename files in bulk if there are a lot of files that you need to change the type for.
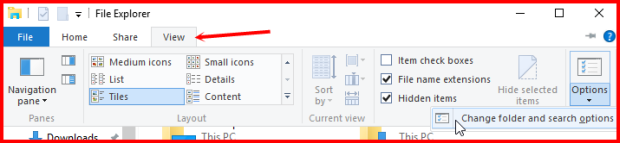
- Press Windows + E, click View from the top-most ribbon. Now click Options and select the option Change folder and search options.
 Change folder and search options – Windows Explorer
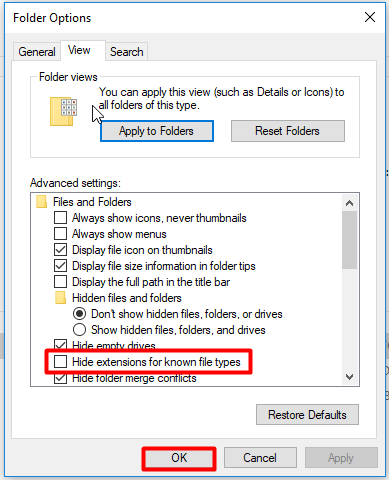
- Now uncheck the option Hide extensions for known file types. Now all the files will have their file extensions displayed alongside their names.
 Enabling File Extensions – Windows Explorer
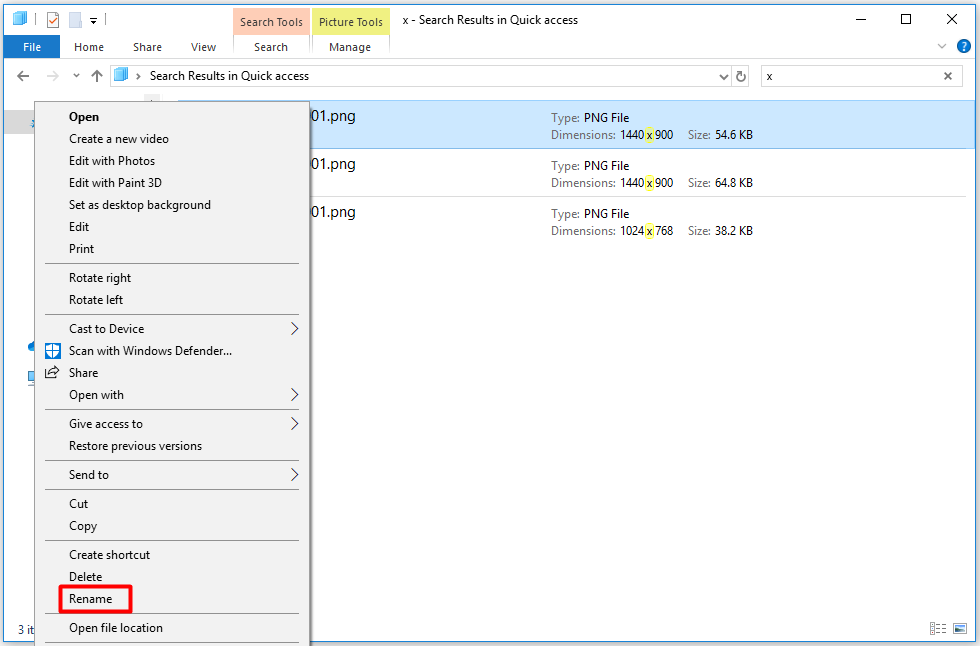
- Now navigate to the file for which you want to change the file format. Right-click on it and select Rename.
- Now change the file’s extension to the extension of the type which you want to change into. In this example, we change a ‘text’ file to a ‘python’ file. The extensions for a text file are ‘txt’ and for python ‘py’.
 Process of changing a file type
Here is a list of common file extensions used in the world of computing. We have listed them according to their type.
How to Change File Extensions in Windows 10 Correctly [Partition Manager]
By Amy | Follow | Last Updated December 03, 2020
Summary :

When you transfer pictures or documents, you notice that there is a letter code at the end of files. In fact, the code is a file extension tell Windows what kind of file type the file belongs to. While in this post, MiniTool will tell you how to change file extension Windows 10.
Quick Navigation :
What Is File Extension
A file extension or known as filename extension is a suffix at the end of a computer file. In Windows PCs, file extensions are used by operating systems to recognize what applications are related to what file types.
The file extension is a three-letter code appearing at the end of the file name. If you have opened documents or checked pictures, you may notice these letters. For example, if a file is named as awesome.doc, .doc is the file extension, which indicates that this file is created with Microsoft Word.
There are many kinds of file extensions, so only a small part of frequently used file extensions will be listed here.
- DOC/DOCX: A Microsoft Word document. DOC is the original extension that is used for Word documents, but Microsoft changed the format when Word 2007 debuted. Now, Word documents are based on the XML format, and thus “X” is added at the end of the extension.
- XLS/XLSX: – A Microsoft Excel spreadsheet.
- PNG:Portable Network Graphics — a lossless image file format.
- HTM/HTML:The HyperText Markup Language format is used for creating web pages online.
- PDF:The Portable Document Format, developed by Adobe, is used to maintain the format in distributed documents.
- EXE:An executable file format used for programs you can run.
To change file extension Windows 10, you need to know how to show file extensions in Windows 10. All the file extensions are hidden by default. However, sometimes you may need to check your file extensions for certain purposes. The following is the method to change file extension in Windows 10.
How to Change File Extension in Windows 10
If you want to change file extension after seeing the full file name, you should be cautious about it. Do not change file extensions unless you have enough reasons, because changing file extensions may lead to trouble.
If a file extension in Windows is deleted, Windows won’t know how to deal with the file.
When you change a file extension, for instance, after renaming the file “coolpic.jpg” as “coolpic.txt”, Windows will try to open the file with the application that is related to the new file extension. However, you will just receive an error message or open a useless document.
How to change file extension in Windows 10? To change file extensions correctly, follow the steps given in below.
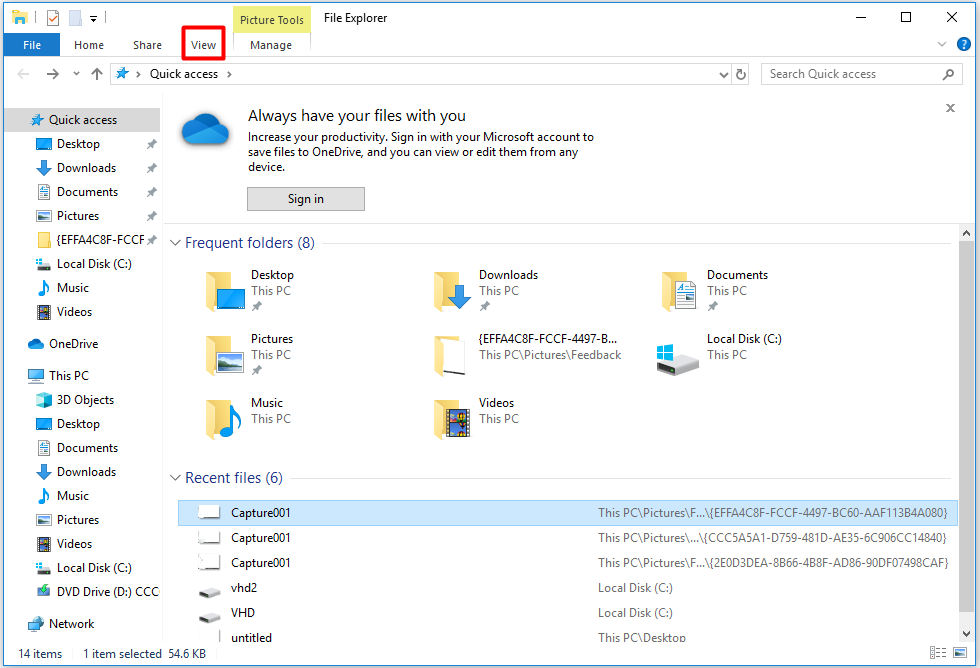
Step 1: After opening File Explorer, click the View option to view ribbon menu.
Step 2: Then check the File name extensions option to enable file extensions to be displayed in Windows 10.
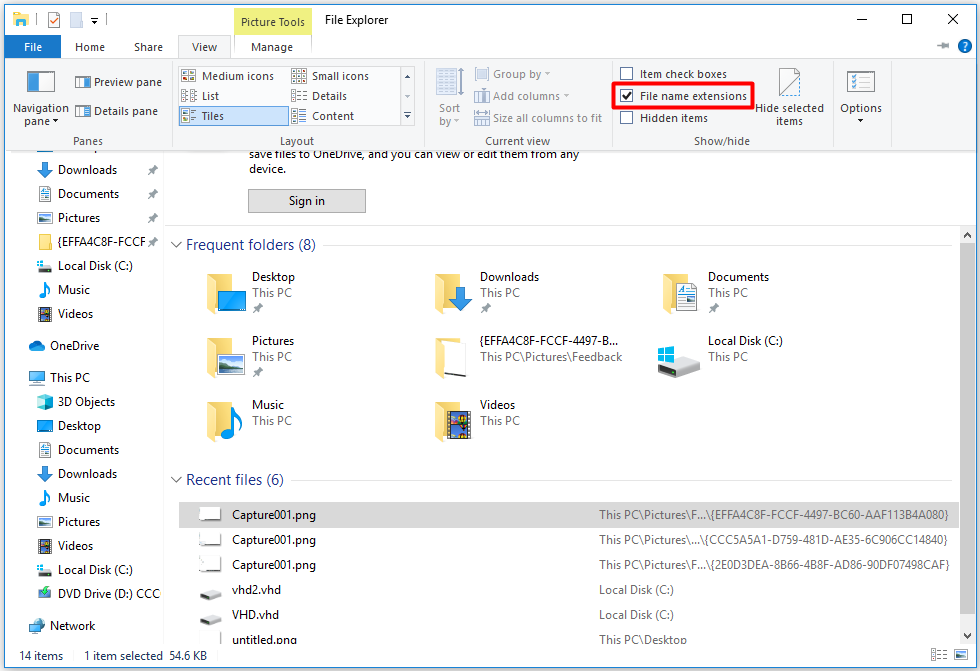
Alternatively, you can also click Options on the uppper right corner to disable the Hide extensions for known file types option from File Explorer Options in Windows 10 by unchecking the option.
Step 3: Find the file that you would like to change through the search window. When you find the file, right click it. Select the rename option from the menu, and then type the new file extension.
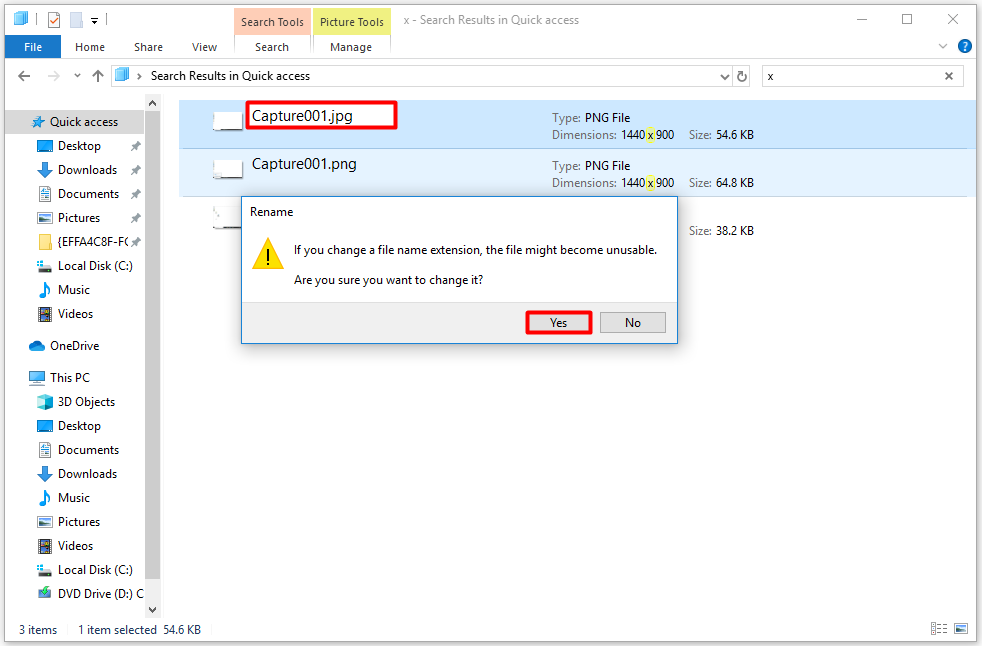
Step 4: Then there will pop up a warning window on the page. If you confirm to change it, click Yes to finish the operation.
Have you ever come across file explorer not responding Windows 10 issue when you try to use file explorer? If you do, try the following top 9 ways now to fix it!
This is all the steps to change file extensions on Windows 10. If you change file extensions on Windows 7/8, you can read this post by clicking here.
ABOUT THE AUTHOR

Position: Columnist
Having writing articles about computer tech for a long time, I am rather experienced especially on the aspect of computer optimization, PC enhancement, as well as tech terms explanation. The habit of looking through tech forums makes me a great computer issues collector. And then, many articles related to these issues are released, which benefit plenty of users. Professional, effective, and innovative are always the pursuit of an editing worker.
Show and change file extensions in Windows 10
Do you have trouble change file extensions on Windows computer? In an earlier post, we discussed how to convert Samsung voice recording files from 3GA to MP3 format, a couple of readers wrote to us saying “how can you rename a file (the extension) because I can’t see file extensions, I can only rename the ‘normal’ name.” It is true with most Android phones, you can only rename file on mobile but can’t edit file extensions unless you have installed the file explorer, see how to change file extensions on Samsung and Android phones. Today, we will be using Windows 10 in the demo to show you how to display file extensions and change file extension in Windows 10. File extensions of known file types are hidden on Windows 10 PC by default. Only those file types that are not associated with some software installed in your computer display file extensions after file names. This seems to be easier to use for average users. However this could be confusing as well. Many Windows 10 users are confused as file extensions can be found in some files not another. In this guide, we will show you quick ways to turn off “Hide extensions for known file types” feature of File Explorer in Windows 10 so you will not see some files have extensions, other files do not and this allows you to change file extensions in Windows 10.
How to show file extensions and change file extensions in Windows 10?
In order to edit file extensions in Windows 10, you need to change the File Explorer settings to display file extensions first. Open File Explorer in Windows 10 or any folder on your computer hard drive, then switch to the View tab in upper menu to view ribbon menu. Click to check the box before File name extensions option to enable file extension display in Windows 10. Now you can see those hidden file extensions in Windows explorer, including those common file types and file extensions like .exe, .doc, .docx, .xlsx, .jpg, .png, .mp3, mp4, .wmv, etc. 
To show file extensions in Windows 10, you can also click the Options button as shown in the upper right corner, then disable the “Hide extensions for known file types” in windows 10 from File Explorer Options as shown below.

Now you can go to change a file name extension within Windows File Explorer. Simply double click a file name then edit file extensions as you like on Windows 10 PC. Alternatively you can right click on the file you like to edit, then choose Rename from the context menu on right click to start changing file extension for the selected file in Windows 10.
Batch change file extensions in Windows 10
Have you ever wanted to change a group of files file extensions in Windows 10? For example, you want to change 100 audio files with .amr extension to .mp3. You do not have to change file extensions one by one. You can make use of the Windows Command Prompt to batch change file extensions on Windows 10 PC.
Firstly create a new folder on your computer. For example, we can create a folder named ‘test’ on hard drive D. Put all those .amr files to this new folder. Then open the Command Prompt in Windows 10. You can right click on the Windows logo at the bottom-left corner of the screen, then choose Command Prompt to open Command Prompt in Windows 10 or simply type CMD in the search box at the bottom-left corner to find and open Command Prompt in Windows 10.

Secondly we need to change path to the created folder in Command Prompt. By default it opens the user folder. Type “d:” without the quotes and press Enter to change to another disk. Type “cd test” and hit Enter to change the current working directory to the “test” folder where all the files you want to change file extensions are saved.
Finally type “ren *.* *.xxx” and hit Enter to change all files’ extension to .xxx. For example, if you want to change them to mp3 files, use the command “ren *.* *.mp3”.
Windows 10 has been released for some time. We have found many new features in this latest Windows OS such as the Edge browser, new Start menu, etc. We also noticed some features have been removed, such as the DVD playback support, now you need to manually download a free DVD Player for Windows 10.
Update May 2018: this article was originally published in Sep 2015 and has since been updated. in this update, we added the new method to batch change file extensions for multiple files in Windows 10.
How to change a File Extension in Windows

This article outlines how to change a file extension in Windows. For example, you might want to rename a TURF file called MCALL_0110_4865_6500_2074._ip to MCALL_0110_4865_6500_2074.zip
These instructions are for Windows 7 but the same basic process applies to most versions of Windows.
By default, Windows hides file extensions. In order to change them, you must first unhide file extension to make them visible so they can me changed. Then you can change it.
If you can already see file extensions on your computer, skip to Step 2
How to show file extensions in Windows 7
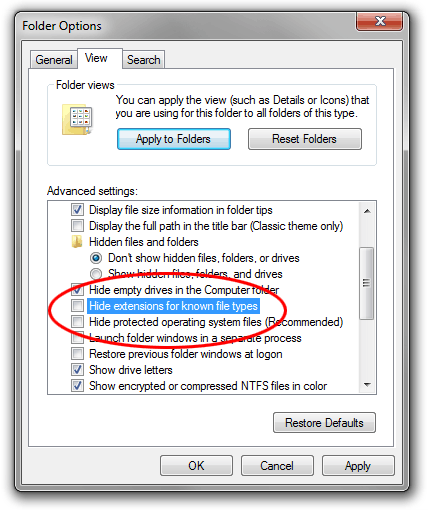
Step 1: If you can’t see the file extension, Open Windows Explorer and click on the Organize button towards the top left. Then choose Folder and Search Options, then click the View tab. Uncheck the box titled «Hide extensions for known file types» like so:
Click OK. Now you should be able to see the file extension.
How to show file extensions in Windows 8
Step 1: It’s simple to turn file extensions on and off in Windows 8. Simply open a File Explorer window (the new name for Windows Explorer) and click the View tab.

Now check the box next to File name extensions. If the box is check, extensions will be shown. If unchecked, they won’t. This is the opposite way the tickbox works in Windows 7 and Vista.
How to show file extensions in Windows 10
Step 1: Open the File Explorer by clicking on the Windows Start button and selecting the File Explorer icon as shown below.
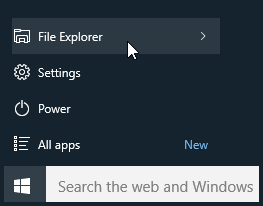
Click the View tab in File Explorer and then click the Options button (or click the drop down menu and click Change folder and search options) as shown below.
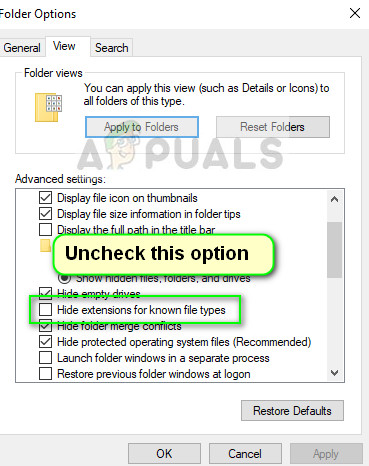
The Folder Options dialog box is displayed. Click the View tab at the top of Folder Options as shown below
To view file extensions, uncheck the Hide extensions for known file types option.

Click OK when done.
Step 2: Right-click the file name and select Rename (or left-click and hold down the button for one second). Enter the new extension like so:

After entering the new extension hit the Enter (return) key. Windows will give you a warning that the file may not work properly. This is quite safe—remember that you can restore the original extension if anything goes wrong.
It’s also possible that you might get another message telling you that the file is «read-only». In this case either say yes to turning off read-only or right-click the file, select Properties and uncheck the Read-only box.
If you do not have permission to change the file extension, you may have to log in as Administrator. Another option is to make a copy of the file, rename the copy and then delete the original.


