- How to change Lock screen timeout before display turn off on Windows 10
- How to change the time when the display turns off when your PC is locked
- How to change the Lock screen timeout using Command Prompt
- More Windows 10 resources
- Halo: MCC’s live service elements make it better, not worse
- Microsoft’s Surface Duo is not ‘failing up’
- Here’s what you can do if Windows 10 update KB5001330 is causing issues
- These are the best PC sticks when you’re on the move
- Personalize your lock screen
- Prevent users from changing Lock Screen in Windows 10
- Prevent users from changing Lock Screen in Windows
- Prevent users from changing Start Screen in Windows 8.1/8
- Can’t change lock screen image in windows 10
- Replies (92)
How to change Lock screen timeout before display turn off on Windows 10
On Windows 10, similar to Windows 8.1, the operating system features a Lock screen before you sign in to your account. The new experience showcases date and time, quick status for apps you choose, and more importantly a background image, which typically, users opt to display personal pictures or those from Windows Spotlight.
While the Lock screen provides useful information and beautiful pictures, you probably noticed that your computer’s display turns off after 60 seconds when you lock your Windows 10 account. This happens even if you change the power options to never turn off the monitor or never put the computer to sleep.
The reason is that by design, the operating system includes a function that detects when the device is locked and waits for 60 seconds. After the time expires, the computer screen goes black. This is a function, which for a mysterious reason, users can’t customize in Control Panel or the Settings app. However, you can modify the Registry to enable a new option in the power settings to change the time to anything you want.
In this Windows 10 guide, we’ll walk you through the steps to tweak the Registry (or Command Prompt) to customize the operating system should way until turning the display off, which will give you more time to see the background, status, and interact with Cortana on the Lock screen.
How to change the time when the display turns off when your PC is locked
Important: Before diving into this guide, it’s worth noting that editing the registry can be dangerous, and it can cause irreversible damage to your system if you don’t do it correctly. It’s highly recommended to make a full backup of your PC before proceeding. You’ve been warned!
- Use the Windows key + R keyboard shortcut to open the Run command, type regedit, and click OK to open the registry.
Browse the following path:
Click OK.

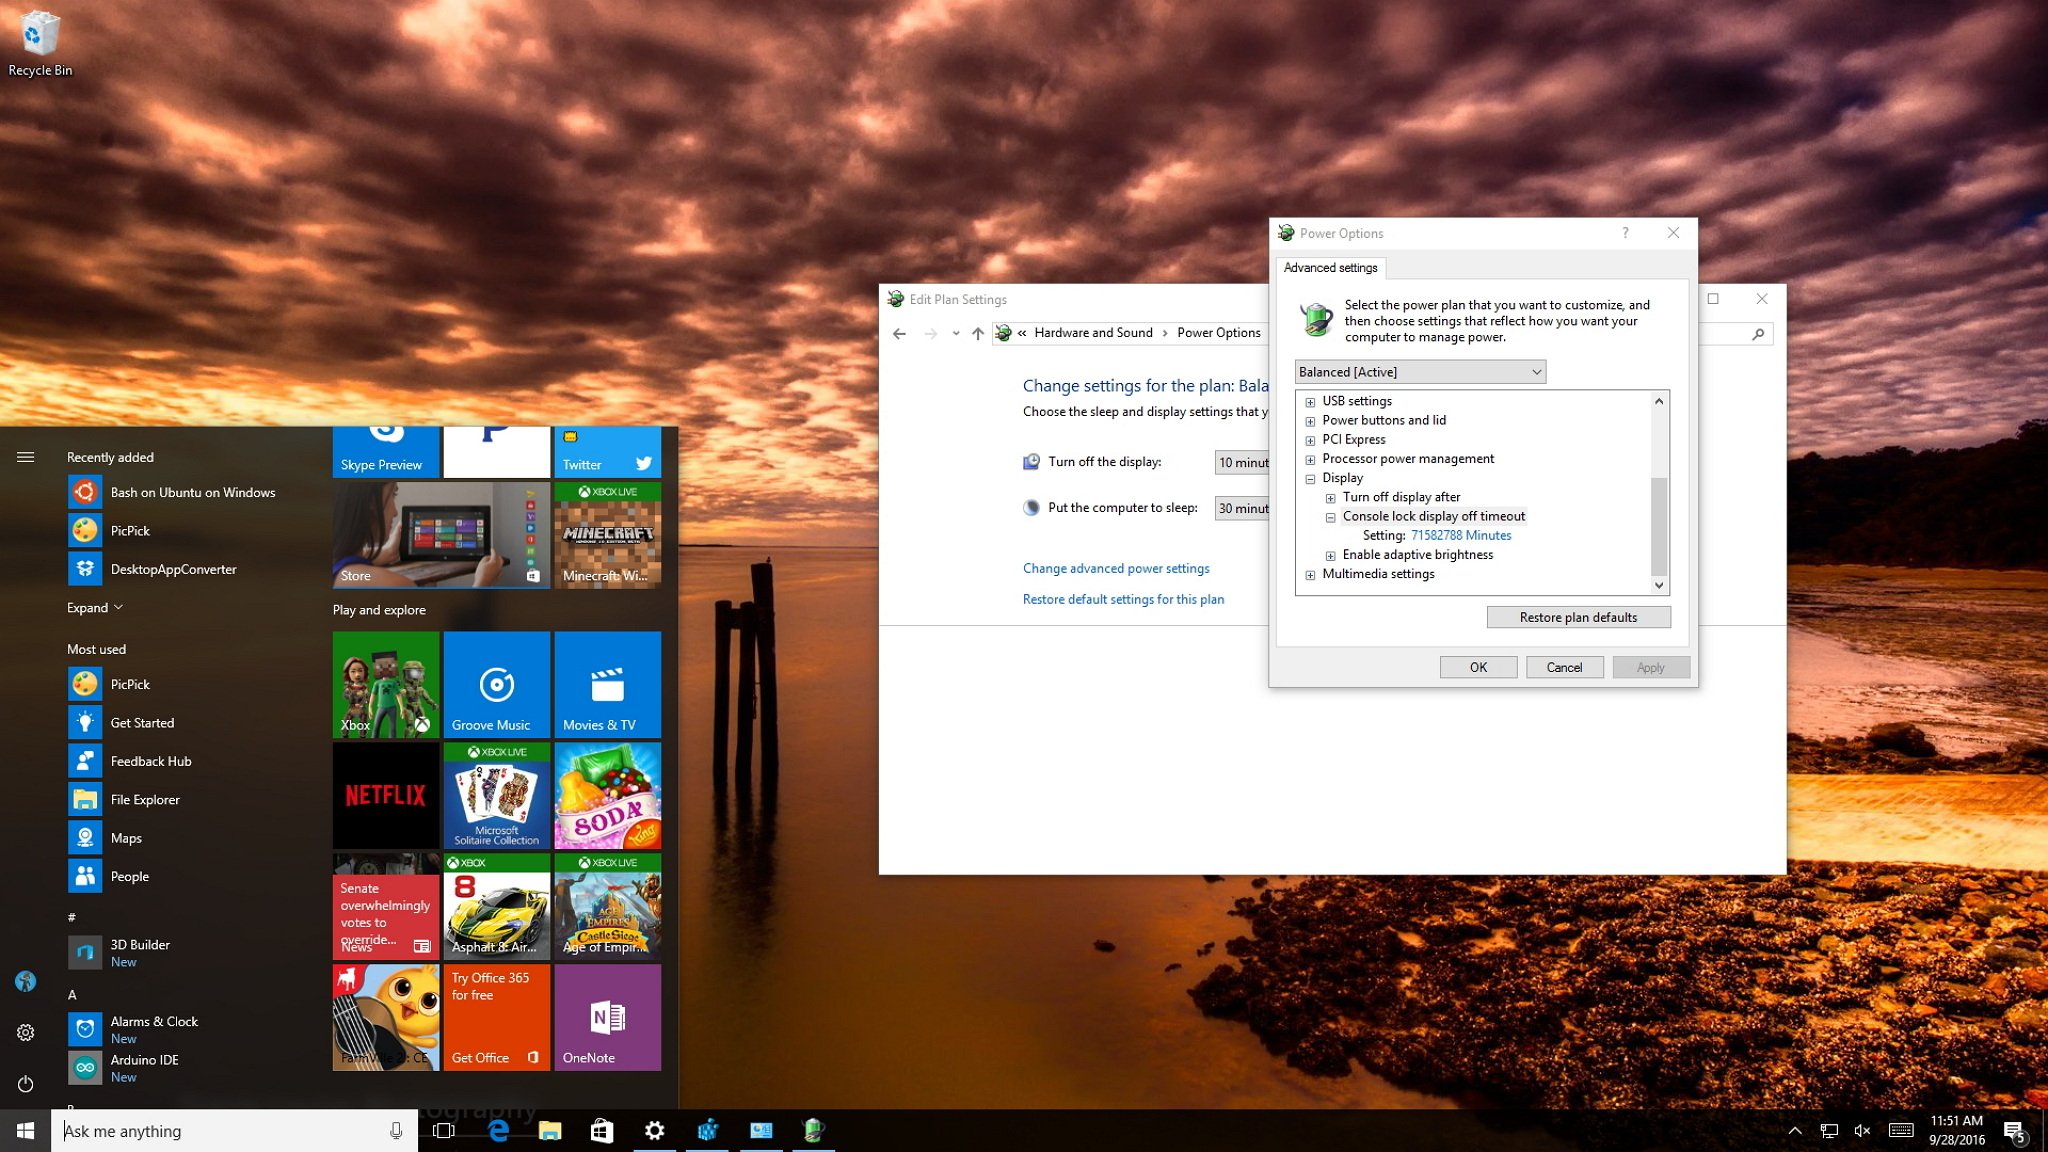
These steps only enabled the option on Windows 10 called «Console lock display off timeout.» Now the only thing left to do is to customize this option to any time you want. To do this, use these instructions:
- Use the Windows key + X keyboard shortcut to open the Power User menu and select Power Options.
Click the Change plan settings link for the selected plan.

Click the Change advanced power settings link.
Click OK to complete the task.
![]()
Once you complete the steps, you can test the new settings by locking your computer (Windows key + L keyboard shortcut), and now the screen shouldn’t turn off until the time you set expires.
At any time, you can revert the changes by following the previous steps, but this time, on step 4 change the registry value key from 2 to 1.
How to change the Lock screen timeout using Command Prompt
The beauty of Windows is that you can configure the same feature in a number of ways. Alternatively, you can use the PowerCfg.exe utility to change you display timeout setting when your computer is locked. When it’s connected to AC power or when your device is running on battery (DC power).
To change the Lock screen timeout using Command Prompt, do the following:
- Use the Windows key + X keyboard shortcut to open the Power User menu and select Command Prompt (admin).
Type the following command and press Enter:
powercfg.exe /SETACVALUEINDEX SCHEME_CURRENT SUB_VIDEO VIDEOCONLOCK 60
Important: You must change «60» in the command-line with the timeout time you want to use, in seconds. For example, if you want the screen to turned on for 5 minutes, then you need to use 300 at the end of the command.
Type the following command and press Enter:
powercfg.exe /SETACTIVE SCHEME_CURRENT

The command mentioned in step 2 will work when your computer is using AC power. You must replace /SETACVALUEINDEX for /SETDCVALUEINDEX if you want to change the timeout setting on your laptop or tablet running on battery.
It’s worth noting that while changing the Registry settings is an advanced task, during my test, I have found that sometimes using the command lines may settings may not work as expected, but it’s an alternative.
On the other hand, changing the Registry worked perfectly, and after making the tweak, I can simply go to the Power Options settings in Control Panel and adjust the Lock screen timeout without having to use any commands.
More Windows 10 resources
For more help articles, coverage, and answers on Windows 10, you can visit the following resources:
![]()
Halo: MCC’s live service elements make it better, not worse
Halo: The Master Chief Collection is more popular than ever, but some fans don’t agree with the live service approach 343 Industries has taken with it. Here’s why those elements are, at the end of the day, great for the game and for Halo overall.
![]()
Microsoft’s Surface Duo is not ‘failing up’
Microsoft announced this week that it was expanding Surface Duo availability to nine new commercial markets. While Surface Duo is undoubtedly a work in progress, this is not a sign of a disaster. It’s also doesn’t mean that Surface Duo is selling a ton either. Instead, the reason for the expansion is a lot more straightforward.
![]()
Here’s what you can do if Windows 10 update KB5001330 is causing issues
In this guide, we’ll show you the steps to get rid of the update KB5001330 to fix profile, gaming, and BSoD problems with the Windows 10 October 2020 Update and May 2020 Update.
![]()
These are the best PC sticks when you’re on the move
Instant computer — just add a screen. That’s the general idea behind the ultra-portable PC, but it can be hard to know which one you want. Relax, we have you covered!
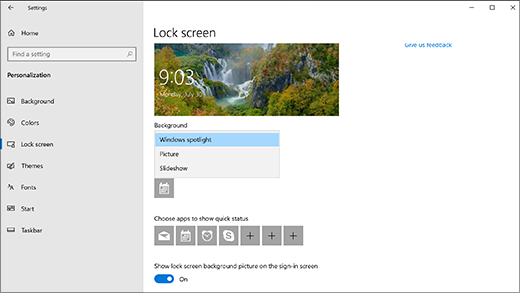
Personalize your lock screen
To tweak your lock screen to your liking, select the Start button, then select Settings > Personalization > Lock screen . Try changing the background to a favorite photo or slide show, or choose any combination of detailed and quick status notifications to show you upcoming calendar events, social network updates, and other app and system notifications.
Select Windows spotlight for beautiful photography to show up automatically on your lock screen. Windows Spotlight updates daily with images from around the globe, and it also shows tips and tricks for getting the most out of Windows.
If Windows spotlight isn’t working as expected, here are some things you can try:
If you don’t see the option to change the background to Windows spotlight at Settings > Personalization > Lock screen , it could be because that setting is managed by your organization. Check with your system administrator for more info.
Keep in mind Windows spotlight won’t appear after restarting or shutting down your device—an account with spotlight turned on needs to be signed in to Windows first. To test if Windows spotlight is working correctly, press Windows logo key + L to lock your device. The Windows spotlight image should appear on the lock screen.
If you don’t see the Windows spotlight image when you’re signing in, select the Start button, then select Settings > Personalization > Lock screen . Then make sure Show lock screen picture on the sign-in screen is turned on.
Prevent users from changing Lock Screen in Windows 10
In Windows 8, Lock Screen is one leading new features introduced. By default, Windows 10/8 comes with the capabilities to change Lock Screen image. Sometimes it may be possible for a multi users PC, that someone put up the image which you hate most. So what can be done to prevent users from changing the lock screen or the Start Screen? This article will show you how to prevent users from changing Lock Screen or Start Screen background image in Windows 8 using Registry and Group Policy Editor.
Prevent users from changing Lock Screen in Windows
In this article, I’ll tell you how you can set a constant image for Lock Screen so that others will be unable to make modifications to it.
NOTE : These settings will work only in Windows 10/8 Enterprise, Windows 10/8 and Windows Server Editions. It will not work as far as Windows 8/10 Pro or Windows 8 RT editions are concerned.
Using Registry Editor
1. Press the Windows Key + R simultaneously and put regedit in Run dialog box.
2. Navigate to the following registry key:
3. In the right pane of this location, create a string named as LockScreenImage if it is not there. Now double-click on it, and put the location of your desired lock screen image as its Value data.
4. That’s it! Close the Registry Editor and reboot to get results.
Using Group Policy Editor
NOTE : This option for using group policy is only available in the Windows 10/8 Pro and Windows 10/8 Enterprise editions.
1. Press Windows Key + R combination and put gpedit.msc in Run dialog box.
2. In the left pane navigate to:
Computer Configuration -> Administrative Templates -> Control Panel -> Personalization
3. Now look in the right pane, you’ll got the policy named Force a specific default lock screen image as shown above.
4. Double click on this policy to get the window shown below.
5. Now you can use following settings:
Allow Lock Screen Background Change = Disabled/Not configured (Default Setting)
Disable Lock Screen Background Change = Enabled
If you choose Enabled, specify the image path without quotes in the box show in the window.
This setting allows you to force a specific default lock screen image by entering the path (location) of the image file. This setting lets you specify the default lock screen image shown when no user is signed in, and also sets the specified image as the default for all users (it replaces the inbox default image).
After making changes click Apply followed by OK.
Here you will also see Prevent changing lock screen image setting. Enable it.
This setting prevents users from changing the background image shown when the machine is locked. By default, users can change the background image shown when the machine is locked. If you enable this setting, the user will not be able to change their lock screen image, and they will instead see the default image
When Force a specific default lock screen image is used in conjunction with the Prevent changing lock screen image setting, you can always force the specified lock screen image to be shown.
Prevent users from changing Start Screen in Windows 8.1/8
In the same Group Policy path, you will see another setting Prevent changing Start Menu background. Enable this setting to prevent users from changing the Start Screen background in Windows 8.
This setting prevents users from changing the look of their start menu background, such as its color or accent. By default, users can change the look of their start menu background, such as its color or accent. If you enable this setting, the user will be assigned the default start menu background and colors and will not be allowed to change them.
To disable changing the Start Screen background, in the same Registry path as shown above, create a new D-WORD (32-bit) value. name it NoChangingStartMenuBackground and give it a value of 1.
Can’t change lock screen image in windows 10
Since upgrading to windows 10 from 8.1 I haven’t been able to change my lock screen backround image to anything other than the default one. When I go to my personalization settings and try to select an image, I don’t even get any choises (see screenshot).
Setting an image as lock screen through the pictures app doesn’t help either, I just get an error message saying that it can’t be set as lock screen. I’ve seen similar posts around but haven’t managed to find a working solution.
Sorry, the screenshots are in Finnish.
Replies (92)
* Please try a lower page number.
* Please enter only numbers.
* Please try a lower page number.
* Please enter only numbers.
![]()
Thank you for posting the query on Microsoft Community.
As per the description I understand that you are unable to change the Lock screen image. We sincerely regret for the inconvenience caused.
Let us follow the below methods and check if it helps:
Method 1: You may follow the steps provided below and check if it helps to resolve the issue.
- Right-tap the lower-left corner on the desktop to open the Quick Access Menu , and open Run CMD .
- Type “ gpedit msc” in the Command Prompt window and hit Enter .
- Find and open the setting named » Prevent changing lock screen image «.
- For your information, it is located in ComputerConfiguration >Administrative Templates >Control Panel >Personalization.
- As the setting’s window opens, choose Not Configured and tap OK .
- The other alternative method is to disable this setting. In other words, select Disabled and click OK in the window above.
- After that try to change the screen image.
For more information please refer the link below.
If the issue persists follow Method 2
Method 2: A clean boot is performed to start Windows by using a minimal set of drivers and startup programs. This helps eliminate software conflicts that occur when you install a program or an update or when you run a program in Windows.
Please refer to the below article on how to perform a clean boot to know “How to reset the computer to start normally after clean boot troubleshooting”
NOTE: A clean boot is performed to start Windows by using a minimal set of drivers and startup programs.
Please let us know if you need further assistance.


