- Измерение производительности и IOPS жестких дисков и СХД в Windows
- Счетчики производительности дисковой подсистемы Windows
- Тестирование IOPS в Windows с помощью DiskSpd
- Как получить IOPS и производительность дисковой подсистемы с помощью PowerShell?
- 12 Tips for 100% Disk Usage on Windows 10 Task Manager (2021) [Partition Magic]
- Summary :
- Quick Navigation :
- Symptoms of 100 Disk Usage Windows 10
- Fix 1: Fix Your StorAHCI.sys Driver
- Fix 2: Change Energy Options from Balanced to High Performance
- Fix 3: Change Settings in Google Chrome and Skype
- Fix 4: Disable Windows Search
- Fix 5: Disable SuperFetch Service
- Fix 6: Disable Antivirus Software
- Fix 7: Uninstall Any Flash Player Update
- Fix 8: Reset Virtual Memory
- Fix 9: Disable Windows Update Service
- Fix 10: Change File Explorer Options
- Fix 11: Perform a Disk Check
- Fix 12: Wipe SSD and Reinstall Windows 10
- Sum up
- ABOUT THE AUTHOR
Измерение производительности и IOPS жестких дисков и СХД в Windows
Одной из основных метрик, позволяющих оценить производительность существующей или проектируемой системы хранения данных является IOPS (Input/Output Operations Per Second — количество операций ввода/вывода). Говоря простым языком, IOPS – этой количество блоков, которое успевает считаться или записаться на носитель или файловую систему в единицу времени. Чем это число больше – тем больше производительность данной дисковой подсистемы (откровенно говоря, само по себе значение IOPS стоит рассматривать в комплексе с другими характеристиками СХД, таким как средняя задержка, пропускная способность и т.п.).
В этой статье мы рассмотрим несколько способов измерения производительности используемой системы хранения данных в IOPS под Windows (локальный жесткий, SSD диск, сетевая папка SMB, CSV том или LUN на СХД в сети SAN).
Счетчики производительности дисковой подсистемы Windows
Вы можете оценить текущий уровень нагрузки на дисковую подсистему с помощью встроенных счетчиков производительности Windows из Performance Monitor. Чтобы собрать данные по этим счетчикам:
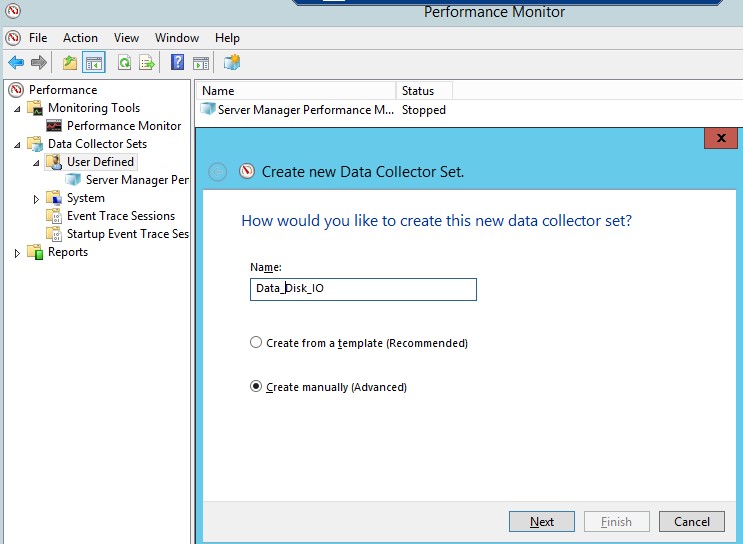
- Запустите Perfmon ;
- Создайте новый набор сборщиков данных (Data Collector Set). Выберите Create manually;

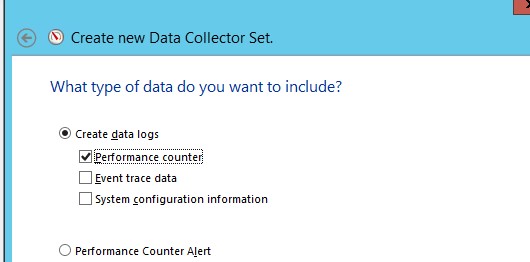
- Выберите опцию Create data logs ->Performance counter; Performance counter;» width=»530″ height=»262″ srcset=»https://winitpro.ru/wp-content/uploads/2016/02/performance-counter.jpg 530w, https://winitpro.ru/wp-content/uploads/2016/02/performance-counter-300×148.jpg 300w» sizes=»(max-width: 530px) 100vw, 530px»/>
- Теперь в свойствах нового набора для сбора данных добавьте следующие счетчики производительности для объекта Physical Disk (можете выбрать счётчики для конкретного диска или для всех доступных локальных дисков):
- Avg. Disk Sec./Transfer
- Avg. Disk Queue Length
- Avg Disk Bytes/Transfer
- Disk Bytes/sec
- Disk Transfers/sec
- Split IO/sec
- Можете изменить другие параметра сбора данных. По умолчанию значения счетчиков собираются каждые 15 секунд.
 Performance counter;» width=»530″ height=»262″ srcset=»https://winitpro.ru/wp-content/uploads/2016/02/performance-counter.jpg 530w, https://winitpro.ru/wp-content/uploads/2016/02/performance-counter-300×148.jpg 300w» sizes=»(max-width: 530px) 100vw, 530px»/>
Как интерпретировать результаты производительности дисков в Perfmon? Для быстрого анализа производительности дисковой подсистемы необходимо посмотреть на значения как минимум следующих 5 счетчиков.
- Disksec/Transfer – время, необходимое для выполнения одной операции записи/чтения на устройство хранения/диск — disk latency. Если задержка более 25 мс (0.25) или выше, значит дисковый массив не успевает выполнять операции. Для высоконагруженных систем значение не должно превышать 10 мс (0.1);
- Disk Transfers/sec – количество операций чтения/записи в секунду (IOPS). Это основной показатель интенсивности обращений к дискам (примерные значения в IOPS для разных типов дисков представлены в конце статьи);
- DiskBytes/Sec– средняя скорость обмена с диском (чтения/записи) за 1 секунду. Максимальные значения зависит от типа диска (150-250 Мб/секунду — для обычного диска и 500-10000 для SSD);
- SplitIO/sec– показатель фрагментации диска, когда операционной системе приходится разделять одну операцию ввода/вывода на несколько операций. Может также говорить о том, приложение запрашивает слишком большие блоки данных, которые немогут быть переданы за одну операцию;
- Avg. DiskQueueLength– длина очереди к диску (количество транзакций ожидающий обработку). Для одиночного диска длина очереди не должна превышать 2. Для RAID массива из 4 дисков длина очереди до 8 будет считаться допустимым значением.
Тестирование IOPS в Windows с помощью DiskSpd
Для генерации нагрузки на дисковую подсистему и измерения ее производительности Microsoft рекомендует использовать утилиту DiskSpd (https://aka.ms/diskspd). Эта консольная утилита, которая в несколько потоков может осуществлять операции I/O с указанным таргетом. Я довольно часто использую эту утилиту чтобы замерить производительность СХД в IOPS и получить максимальную скорость чтения/записи c данного сервера (можно конечно измерить производительность и со стороны СХД, в этом случае diskspd будет использоваться для генерации нагрузки).
Утилита не требует установки, просто скачайте и распакуйте архив на локальный диск. Для x64 битных систем используйте версию diskspd.exe из каталога amd64fre.
Я использую такую команду для тестирования диска:
diskspd.exe –c50G -d300 -r -w40 -t8 -o32 -b64K -Sh -L E:\diskpsdtmp.dat > DiskSpeedResults.txt

- -c50G – размер файла 50 Гб (лучше использовать большой размер файла, чтобы он не поместился в кэш контроллера СХД);
- -d30 0 – продолжительность тестирования в секундах;
- -r – произвольное чтение/запись (если нужно тестировать последовательный доступ, используйте –s);
- -t8 – количество потоков;
- -w40 – соотношение операций записи к операциям чтения 40% / 60%;
- -o32 — длина очереди;
- -b64K — размер блока;
- -Sh — не использовать кэширование;
- -L — измерять задержки (latency) ;
- E:\diskpsdtmp.dat – путь к тестовому файл.
После окончания стресс-теста из полученных таблиц можно получить средние значения производительности.
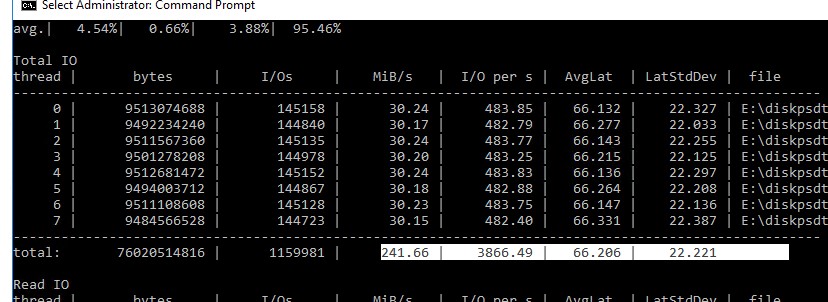
Например, в моем тесте получены следующие общие данные про производительности (Total IO):
- MiB/s — 241 (около 252 Мб/сек, неплохо)
- IOPS — 3866.49 (отлично!)
- Средняя задержка — 66.206 мс (высоковато!)
Можно получить отдельные значения только по операциям чтения (секция Read IO ) или записи (секция Write IO ).
Протестировав с помощью diskspd несколько дисков или LUN на СХД, вы сможете сравнить их или выбрать массив с нужной производительностью под свои задачи.
Как получить IOPS и производительность дисковой подсистемы с помощью PowerShell?
Недавно мне на глаза попался PowerShell скрипт (автор Microsoft MVP, Mikael Nystrom), являющийся по сути надстройкой над утилитой SQLIO.exe (набора тестов для расчета производительности файлового хранилища).
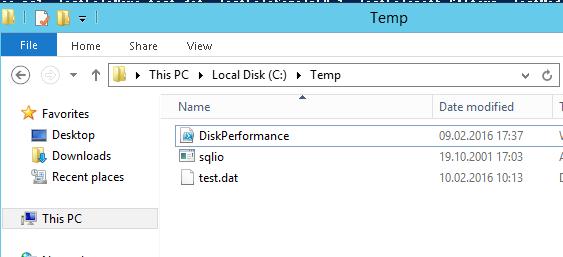
Итак, скачайте архив содержащий 2 файла: SQLIO.exe и DiskPerformance.ps1 (disk-perf-iops.ZIP — 73Кб) и распакуйте архив в произвольный каталог.
Пример запуска PowerShell скрипта для определения IOPS:
.\DiskPerformance.ps1 -TestFileName test.dat –TestFileSizeInGB 1 -TestFilepath C:\temp -TestMode Get-LargeIO -FastMode True -RemoveTestFile True -OutputFormat Out-GridView
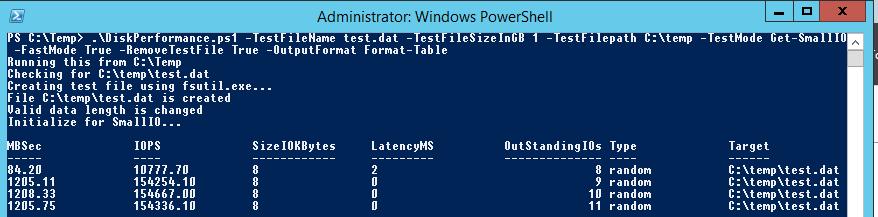
Я использовал в скрипте следующие аргументы:
- -TestFileNametest.dat— имя файла, создаваемого утилитой FSUTIL;
- –TestFileSizeInGB1 —размер файла для тестов. Допустимые варианты 1,5,10,50,100,500,1000 Гб. Размер файла должен быть больше, чем размер кэша системы. Иначе будет измеряться IOPS для данных в кэше, а не на диске;
- -TestFilepathC:\Temp— указывается диск, для которого будет выполняться расчет производительности и каталог на диске, в котором будет создаваться тестовый файл. Допустимо указать UNC путь к сетевой папке;
- —TestModeGet-LargeIO— есть два варианта измерения нагрузки, Get-SmallIO – измеряются IOPS, Get-LargeIO – измеряется скорость передачи данных. Разница между аргументами SmallIO и LargeIO, в размерах блоков при замере скорости 8 Кбайт и 512 Кбайт, и типе доступа Random или Sequential соответственно;
- -FastModeTrue— в режиме Fastmode каждый тест выполняется 10 секунд, иначе 60 сек;
- -RemoveTestFileTrue— удалить тестовый файл по окончании теста;
- -OutputFormatOut-GridView — возможен вывод результатов измерения в консоль PowerShell (Format-Table) или в отдельное окно графической таблицы (Out-Gridview);
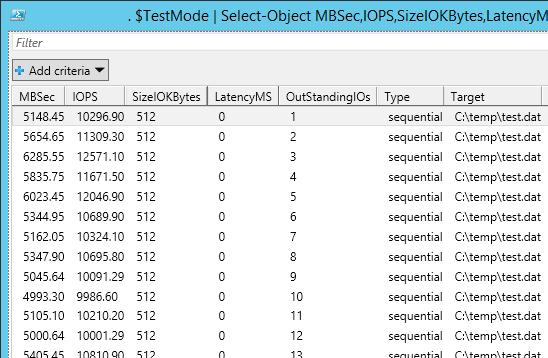
В нашем случае дисковый массив (тестировался виртуальный vmdk диск на VMFS хранилище, расположенном на дисковой полке HP MSA 2040 с доступом через SAN) показал среднее значение IOPS около 15000 и скорости передачи данных (пропускная способность) около 5 Гбит/сек.
В следующей таблице указаны примерные значения IOPS для различных типов дисков:
| Тип | IOPS |
| SSD(SLC) | 6000 |
| SSD(MLC) | 1000 |
| 15K RPM | 175-200 |
| 10K RPM | 125-150 |
| 7.2K RPM | 50-75 |
| RAID5 из 6 дисков с 10000 RPM | 900 |
Ниже приведены ряд рекомендаций по производительности дисков в IOPS для распространенных сервисов:
- MicrosoftExchange2010 – с 5000 пользователей, каждый из которых получает 75 и отправляет 30 писем в день, потребует как минимум 3750 IOPS
- MicrosoftSQL2008 Server – с 3500 SQL транзакциями в секунду (TPS) — 28000 IOPS
- Обычный сервер приложений Windows на 10-100 пользователей — 10-40 IOPS
12 Tips for 100% Disk Usage on Windows 10 Task Manager (2021) [Partition Magic]
By Rodin | Follow | Last Updated January 05, 2021
Summary :
Recently, many users report that their disk utilization reaches 100%, leading to lagging and unresponsive system. Learn how to fix Windows 10 100 percent disk usage problem in this post.
Quick Navigation :
Recently, more and more Windows 10 users report that they have come across 100 disk usage Windows 10 issue and they are seeking for a way to lower disk usage. See a Windows 10 user thread from answers.microsoft.com:
Q: Disk Usage at 100% on Windows 10
When I load into Windows, I could move the mouse, but nothing else was responsive. It took about a minute to open up the start menu when I opened the Task Manager, my disk 1 (C:) is at 100% utilization. Meanwhile, my CPU is at 5% 2.72GHz, and my memory is at 8% 2.6/31.9GB.
Anybody can help? After few restarts sometimes it’s no more 100% sometimes it’s again 100% usage.
Symptoms of 100 Disk Usage Windows 10
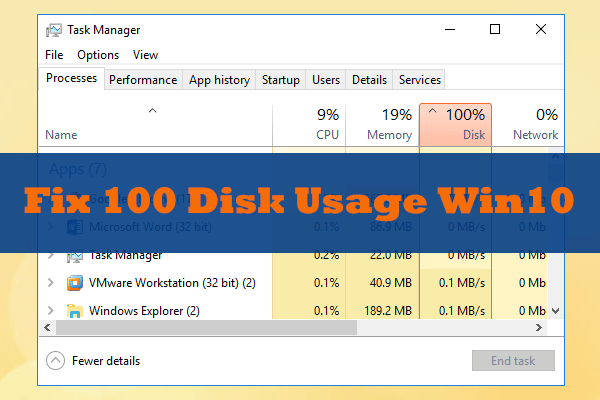
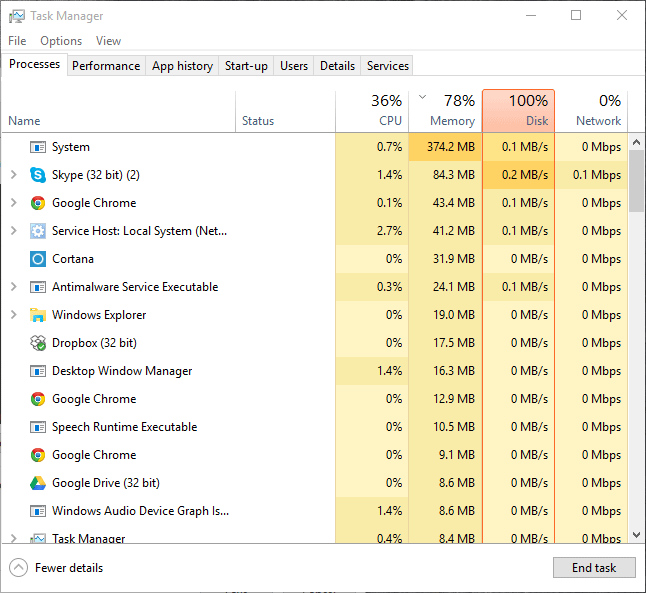
How do you know you have 100 disk usage Windows 10? In the Task Manager, under the Process and Performance tab, the disk utilization reaches 100%, leading to lagging and unresponsive system. The system starts freezing until disk usage reduces from 100%.
This can be observed in the following screenshot:
In addition, the system event log contains numerous events with Event ID 129, which represents resets of the disk controller.
Are you troubled by disk usage 100 Windows 10 and wonder «why is my disk always at 100», «how to lower disk usage»? Next, we will show you the worth-trying 12 ways to address Windows 10 100% disk usage.
Quick Video Guide:
Fix 1: Fix Your StorAHCI.sys Driver
According to Microsoft support, Event ID 129, the resets of the disk controller, can be caused by many factors. One of the known ones is that some Advanced Host Controller Interface PCI-Express (AHCI PCIe) models cause these symptoms in Windows 10 when running with the inbox StorAHCI.sys driver.
Due to a firmware bug, the Solid-state drive (SSD) does not properly complete input/output when Message Signaled Interrupt (MSI) mode is enabled. As a result, the Windows storage stack attempts to reset the device after waiting on unresponsive read/write for a period of time.
So, the first solution to fix 100 percent disk usage Windows 10 here is to disable MSI mode via the registry. Follow the guide below:
First Move: Identify if You Are Running the Inbox AHCI Driver (StorAHCI.sys)
Step 1. Press «Win+R» to call out the Run box, then type «devmgmt.msc» and hit Enter.
Step 2. Under «IDE ATA/ATAPI Controllers», right-click «Standard SATA AHCI Controller» and select «Properties».
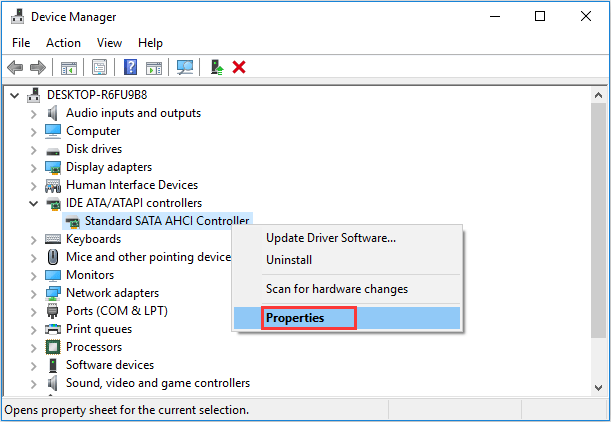
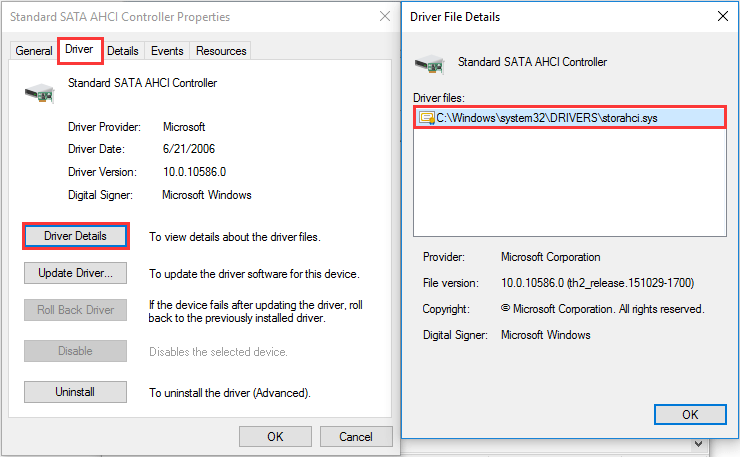
Step 3. Navigate to the «Driver» tab and click «Driver Details». If you see «storahci.sys» in the list, you are running the inbox driver.
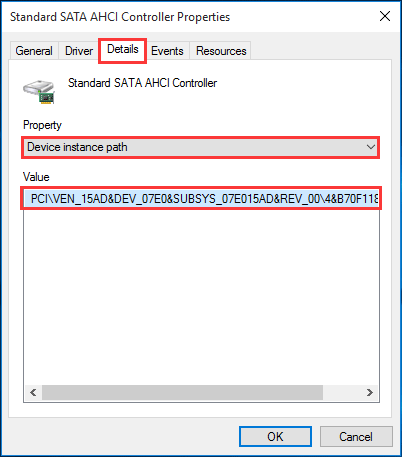
Second Move: Disable MSI for the Controller in the Registry
Step 1. In the same properties window, navigate to the «Details» tab and select «Device instance path» from the Property drop-down menu. Please pay attention to the Value that starts with PCI\VEN, which will be useful in Step 3.
Step 2. Open the registry editor by typing «regedit» in the same Run box.
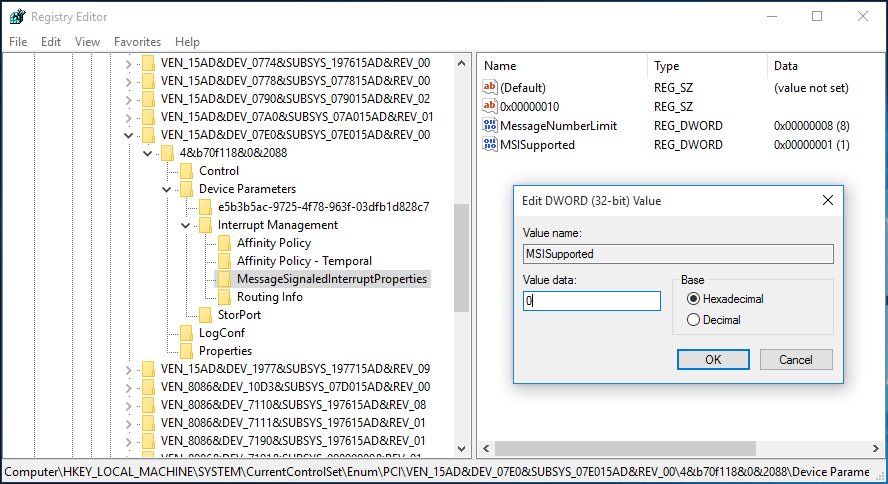
Reboot the machine and see whether this works for resolving disk utilization 100 Windows 10.
Fix 2: Change Energy Options from Balanced to High Performance
According to the feedback provided by the suffers, changing energy options from Balanced to High Performance works well on 100 percent disk usage Windows 10. Please do the followings:
Go to Power Options > Change plan settings > Change advanced power settings, then choose High performance from the drop-down box and make sure all plan settings are on default.
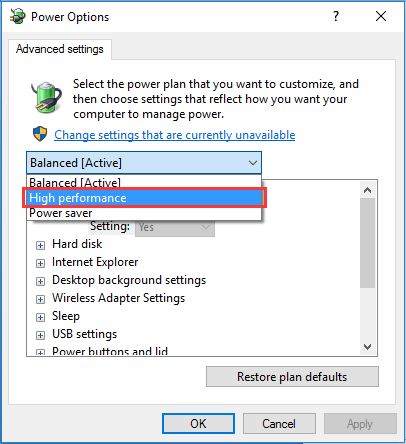
Reboot your computer and check if this helps lower disk usage.
Fix 3: Change Settings in Google Chrome and Skype
A lot of users also recommend changing settings in Google Chrome and Skype. For some unknown reasons, a particular combination of Skype and Google Chrome browser settings can cause the 100% disk utilization problem in Windows 10.
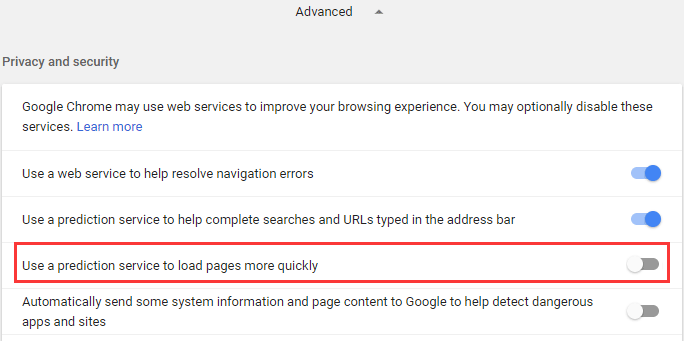
First Move: Change Settings in Google Chrome
Step 1. In Google Chrome, go to «Settings».
Step 2. Scroll down to the bottom of the page and click «Advanced».
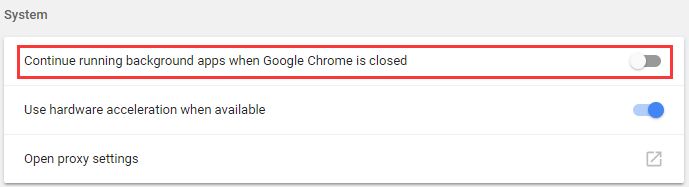
Step 3. In the «Privacy and security» category, make sure the «Use a prediction service to load pages more quickly» is turned off. In addition, ensure that «Continue running background apps when Google Chrome is closed» is disabled in «System» settings.
Second Move: Change Skype Settings
Step 1. Make sure that your Skype is quitted in the Taskbar.
Step 2. Open Windows Explorer and open «C:\Program Files (x86)\Skype\Phone\».
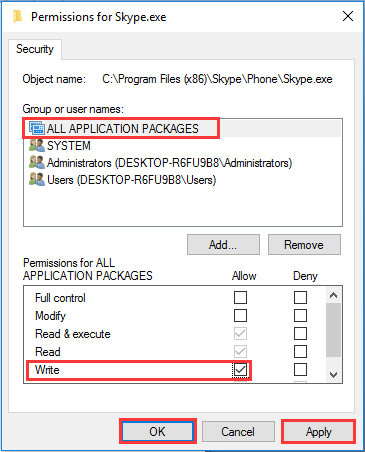
Step 3. Right click «Skype.exe» and choose «Properties» from the context menu. Then open the «Security» tab and select «Edit».
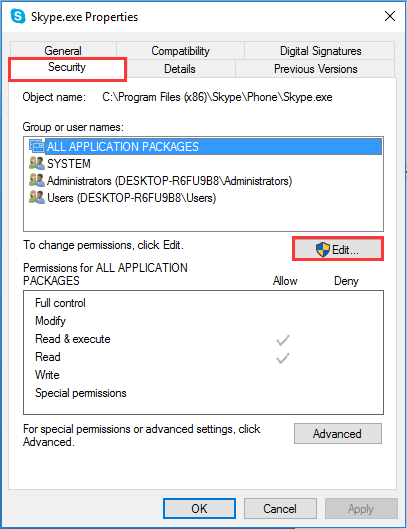
Step 4. Highlight «ALL APPLICATION PACKAGES» and then check the «Write» box. Finally, click «Apply», «OK» and then «OK» again to save changes.
Now check your disk usage in Task Manager to see if this has resolved high disk usage Windows 10. If not, uninstall Skype and update Chrome to V64 and above versions.
Fix 4: Disable Windows Search
Windows Search enables to search files on your PC fast. If you don’t use it at all, you can disable it completely. Disabling Windows Search service will stop the indexing of all files. However, to identify whether this is the cause of your 100% disk utilization problem, we recommend temporarily disabling Windows Search first.
First Move: Temporarily Disable Windows Search
Note that Windows Search will start again when you restart your computer. So, this change has no impact on your computer performance.
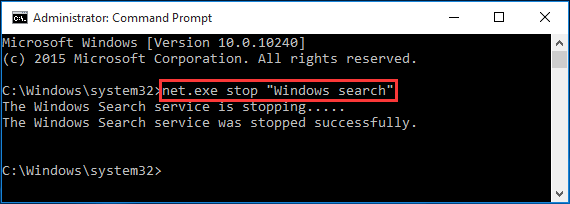
Step 1. Press «Win+X» combination keys and select «Command Prompt (Admin)». Then allow its user account control.
Step 2. In the Command Prompt window, type «net.exe stop “Windows search”» (image attached) and hit the Enter key.
Check if your disk usage and the performance of your computer improve. If YES, you should permanently disable Windows Search as described below.
Second Move: Permanently Disable Windows Search
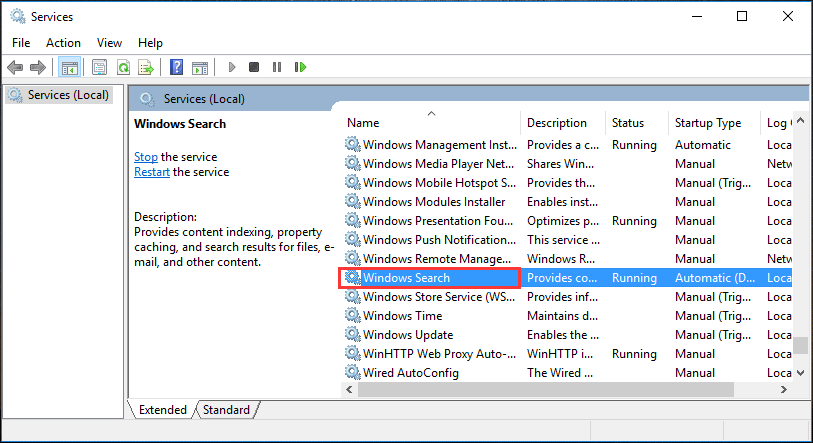
Step 1. Press «Win+R» combination keys to call out the Run box, then type «services.msc» and hit Enter.
Step 2. Locate «Windows Search» and double-click it to enter its «Properties» window.
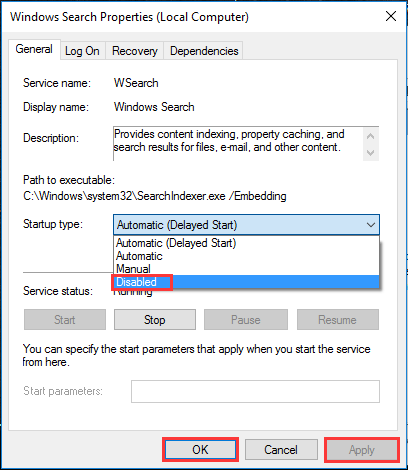
Step 3. Change the Startup type option to «Disabled». Then click «Apply» and «OK» to save your change.
Check whether this works for 100 disk usage Windows 10.
Fix 5: Disable SuperFetch Service
SuperFetch helps to decrease boot time and make must-load programs more efficiently. However, it has been identified as a potential cause of high disk usage Windows 10. Here’s how to stop this service:
Step 1. Press «Win+X» combination keys, then choose «Command Prompt (Admin)» and allow its user account control.
Step 2. In the Command Prompt window, type «net.exe stop superfetch» and hit the Enter key.
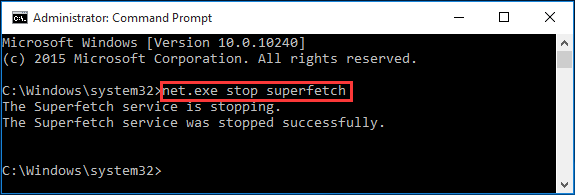
Wait for a few minutes and check if your computer starts performing better.
Fix 6: Disable Antivirus Software
If you’ve installed some antivirus or anti-malware programs on computer, you can temporarily disable them to see if they’re the cause of your 100 percent disk usage problem. If your computer’s disk usage returns to normal, you may need to contact the software vendor to see if they can provide some help.
If no improvement is offered by the vendor, you don’t need to worry too much. Microsoft has its own default anti-malware, Windows Defender. It’s automatically enabled no matter you have other antivirus applications installed or not. So even if you disable the antivirus programs you installed, Windows Defender is always there.
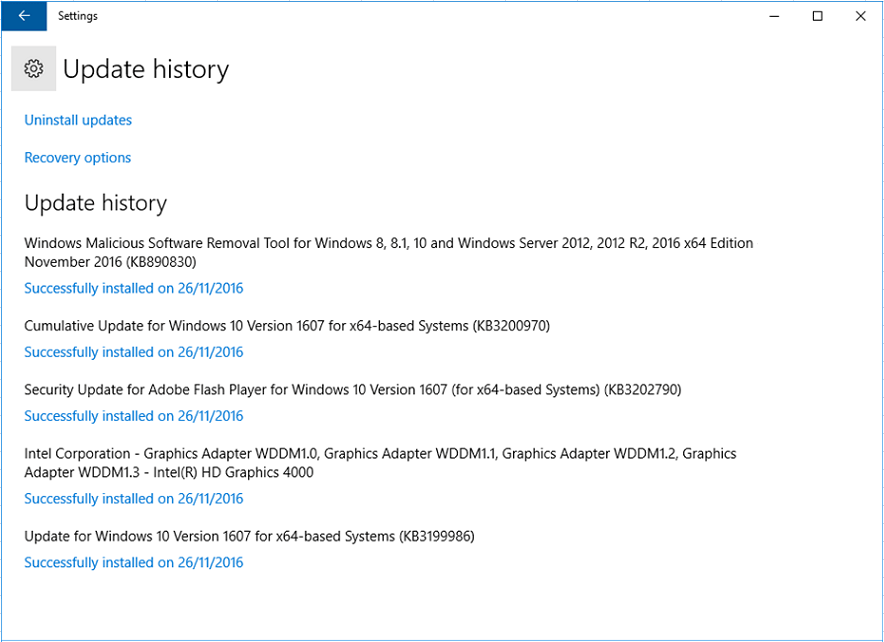
Fix 7: Uninstall Any Flash Player Update
Uninstalling any flash player update is also reported as a good solution that has helped some users get out of disk utilization 100 Windows 10. To do so, go to Settings > Update & Security > Windows Update > Advanced Options > View your update history > Uninstall updates. Then uninstall the flash player update.
Fix 8: Reset Virtual Memory
Virtual memory is a portion of your hard drive and is regarded as an extension of your computer’s physical memory. When the RAM is not enough to perform a task, Windows will temporarily store files in virtual memory, and swap them back to RAM when required.
However, unreasonable virtual memory may lead to Windows 10 high disk usage. Here is how to reset virtual memory:
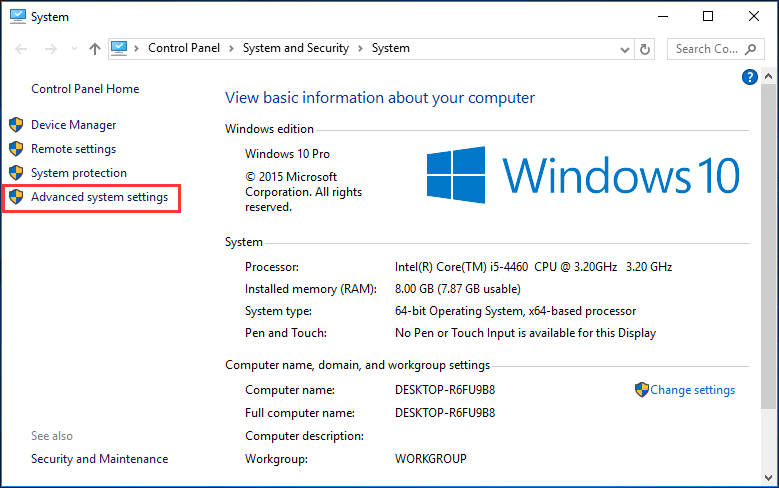
Step 1. Press «Win+Pause/Break» keys to call out «System» information. Then choose «Advanced system settings» on the left panel.
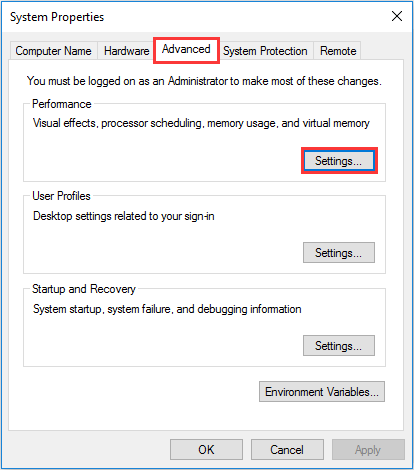
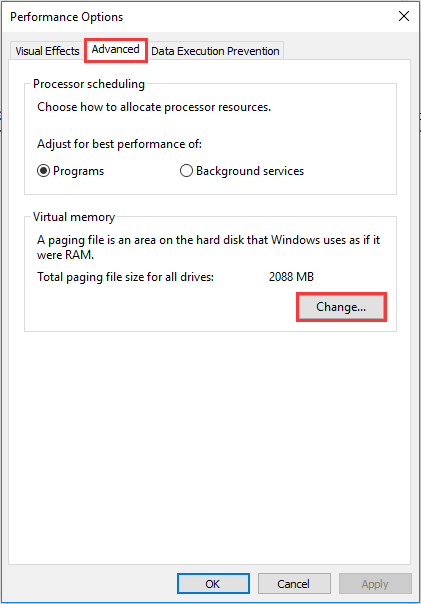
Step 2. Go to the «Advanced» tab, and click «Settings».
Step 3. Go to the «Advanced» tab, and choose «Change…» in the Virtual memory section.
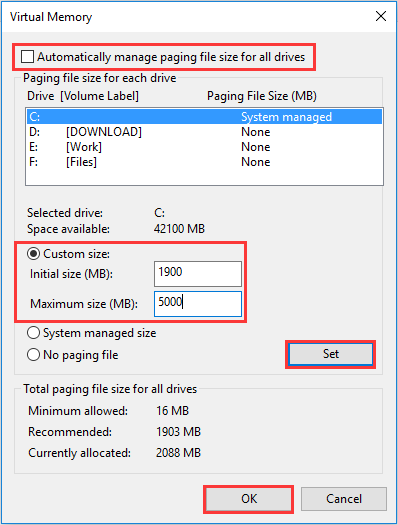
Step 4. Make sure «Automatically manage paging file size for all drives» is NOT checked. Then highlight your system drive and customize the Initial size and Maximum size for your virtual memory. Finally, click «Set», and then «OK» to continue.
- Initial size: this value can vary depending on your computer. If you’re not sure what value to enter, just enter the recommended number.
- Maximum size: it is recommended to set this value 1.5 times the size of your physical RAM. If you PC has a 4GB (4096 MB) RAM, the value should be no more than about 6,144 MB (4096 MB x 1.5).
Step 5. Now it is time to clear all temporary files on your PC. Press «Win+R» keys to call out the Run dialogue, then type «temp» and hit Enter. This will invoke Windows Explorer, with your Temp folder open.
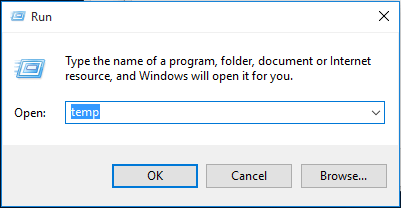
Step 6. Select all the files in the Temp folder and delete them.
Wait a few minutes and see if Windows 10 100 disk usage is fixed.
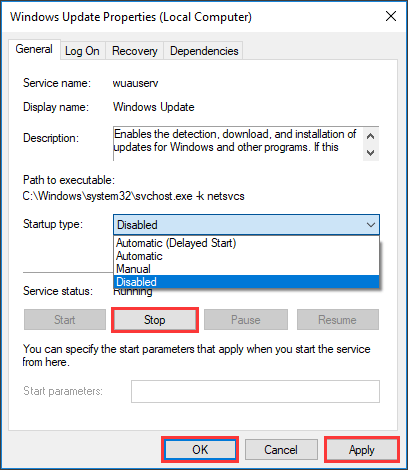
Fix 9: Disable Windows Update Service
Some of our users suggested that Windows Update Service could also bring 100 disk usage Windows 10. You may just have a try to disable it and check later.
Step 1. Run «services.msc» and press «OK».
Step 2. Scroll down to find «Windows Update» and double-click on it.
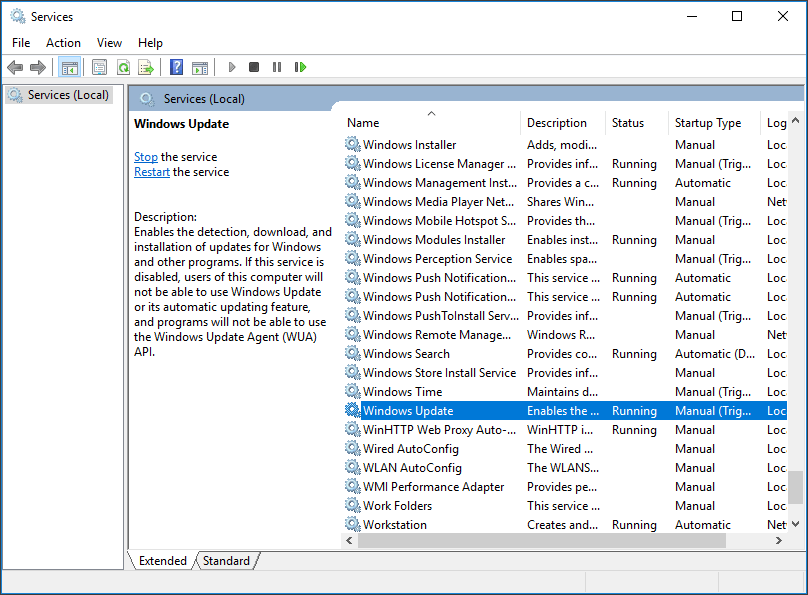
Step 3. In the pop-up window, drop down the Startup type box and choose “Disabled”. Then press “Stop”, “Apply” and “OK” orderly.
Fix 10: Change File Explorer Options
Step 1. Open Windows 10 File Explorer, and then navigate to «View» and click «Options».

Step 2. Switch to the «Search» tab and UNCHECK these two options:
- «Include compressed files (ZIP, CAB…)»
- «Always search file names and contents (this might take several minutes)»
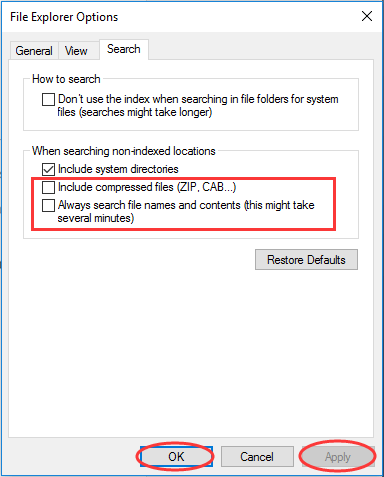
Step 3. Click “Apply” and then “OK”.
Some Other Fixes You May Have a Try:
Since you are here, take a look at the suggestions put forward by users who have successfully overcome the 100% disk utilization problem.
- Remove Adobe Creative Cloud and Photoshop CC. You may have to allow their update before you can uninstall.
- Uninstall disk driver and reboot.
- Disable «Intel Rapid Start Technology» in BIOS.
But if all of these fixes do not help. Continue reading Fix 11 and Fix 12.
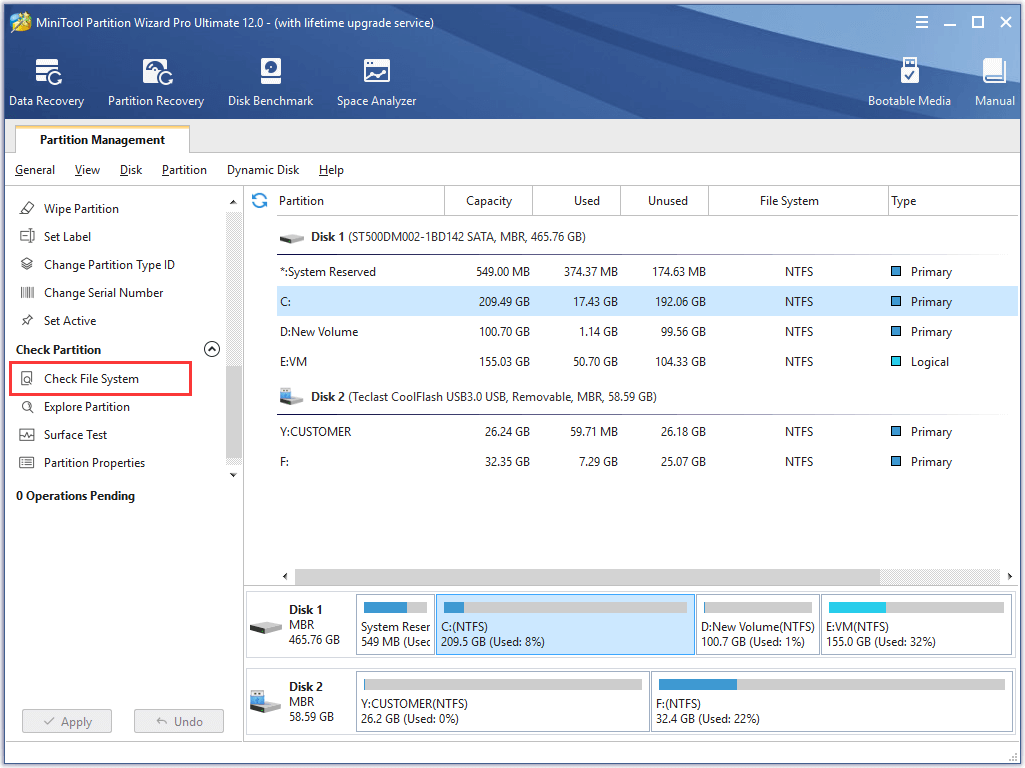
Fix 11: Perform a Disk Check
If the above solutions all do not help, it is necessary having a check of your hard drive. You can do this by using MiniTool Partition Wizard Free which simplifies things within a few clicks. With this tool, you can manage hard drive partitions in all aspects even you are not professional.
Download MiniTool Partition Wizard Free and install it on computer.
Step 1. In the main interface of MiniTool Partition Wizard, select the system partition from the disk map and choose “Check File System” from the action panel.
Step 2. Select “Check & fix detected errors” in the pop-up window. Then click Start to begin.
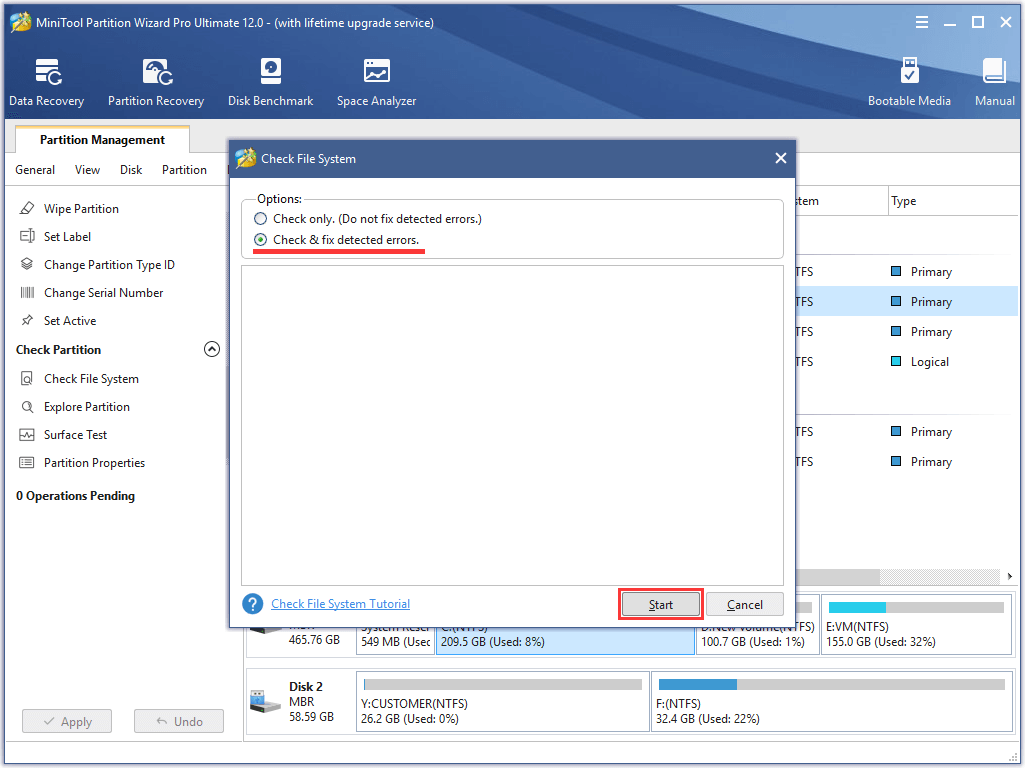
Continue to check and fix errors on the rest drives. If no error is found, you can try the last way.
Fix 12: Wipe SSD and Reinstall Windows 10
The last resort is to totally wipe the hard drive and reinstall Windows 10. You may completely back up the SSD, prepare a Windows 10 installation media, and do a clean install.
First Move: Back up SSD
Back up Windows 10 hard drive is necessary. On the one hand, all important data are safeguarded. On the other hand, if the reinstallation does not help at all, you do have a chance to return to your previous Windows 10 to avoid the troublesome system settings and application installations.
Here you can also use MiniTool Partition Wizard Free to do this job.
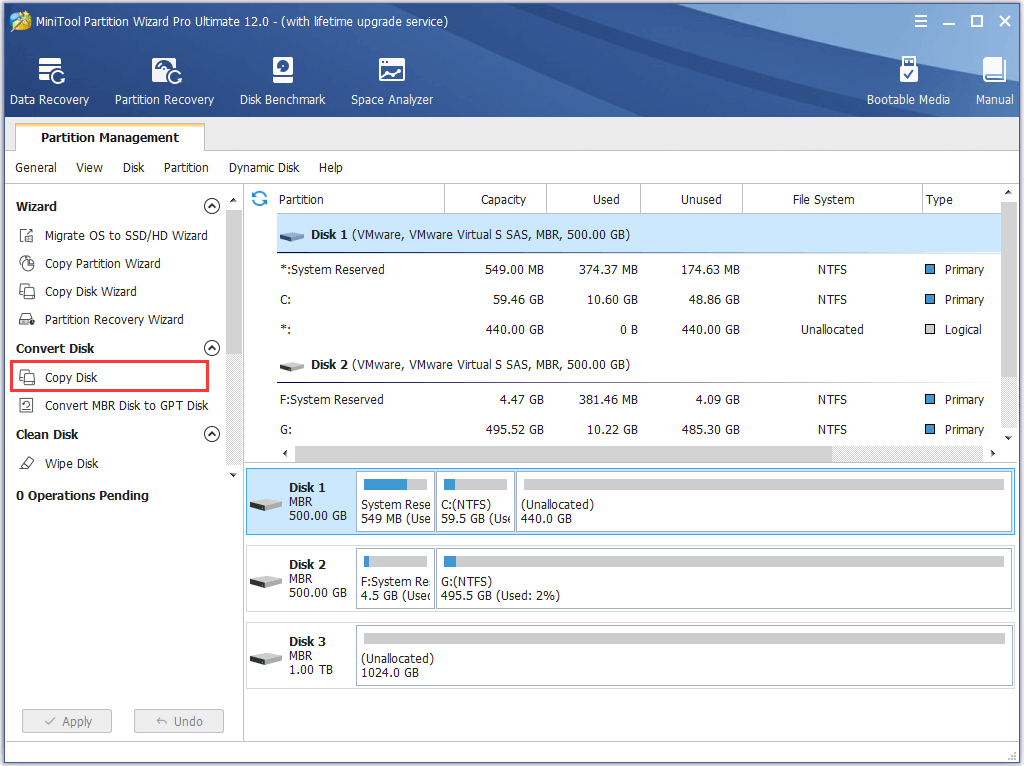
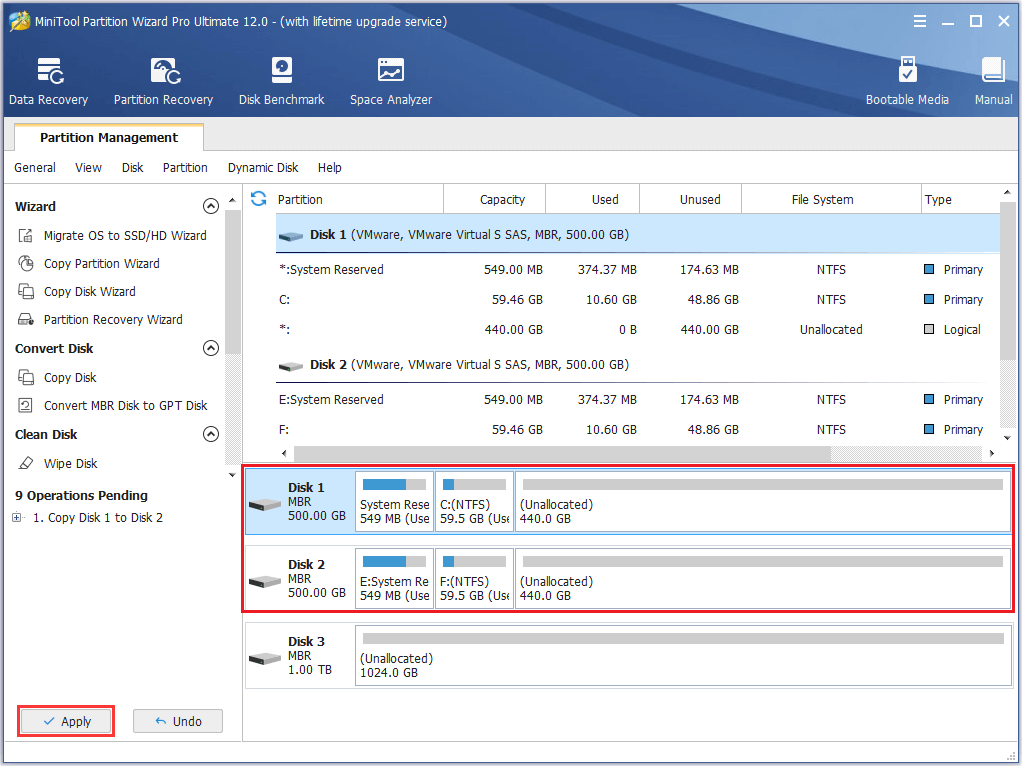
Step 1. After launching and MiniTool Partition Wizard, select the system disk as the source disk and choose “Copy Disk” from the menu.
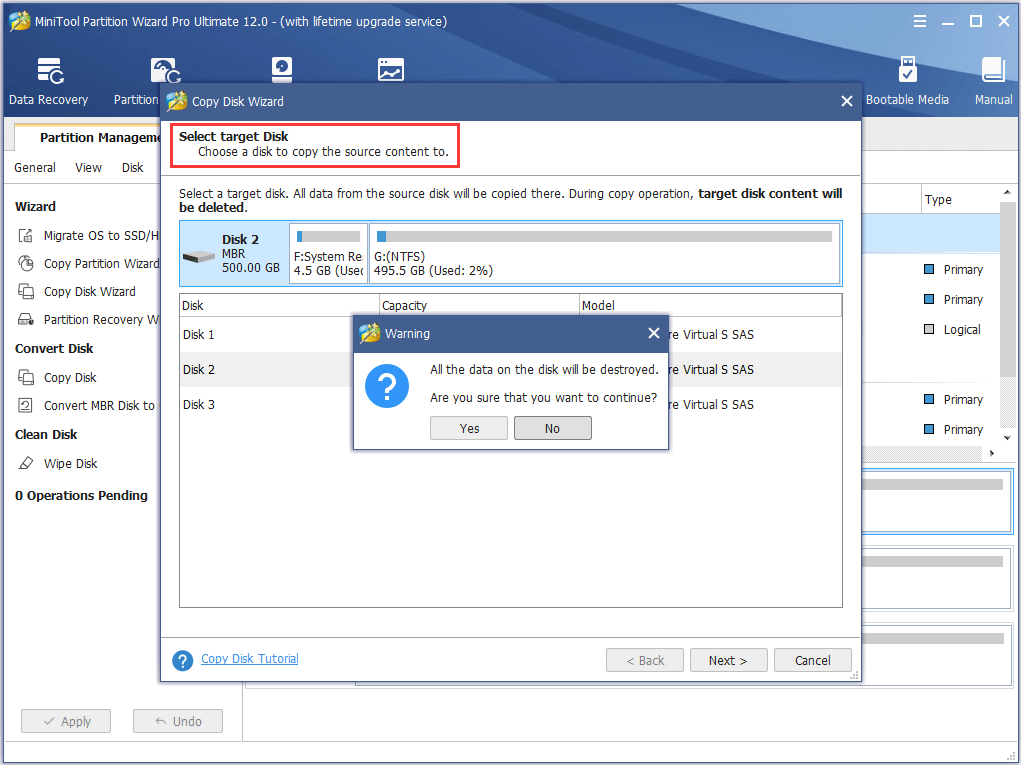
Step 2. Choose a hard disk as the target disk. It is important to know that all data on the target disk will be removed for a successful disk clone.
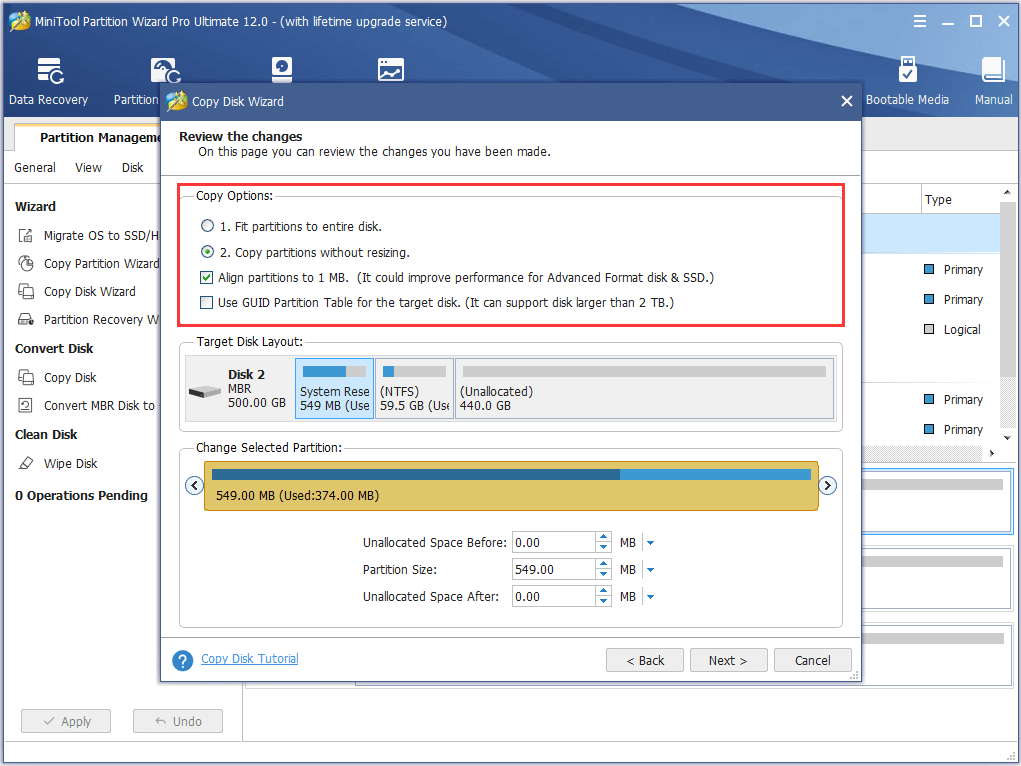
Step 3. Continuing to the next page, you see several copy options are listed here. Select the desired options you want and go on.
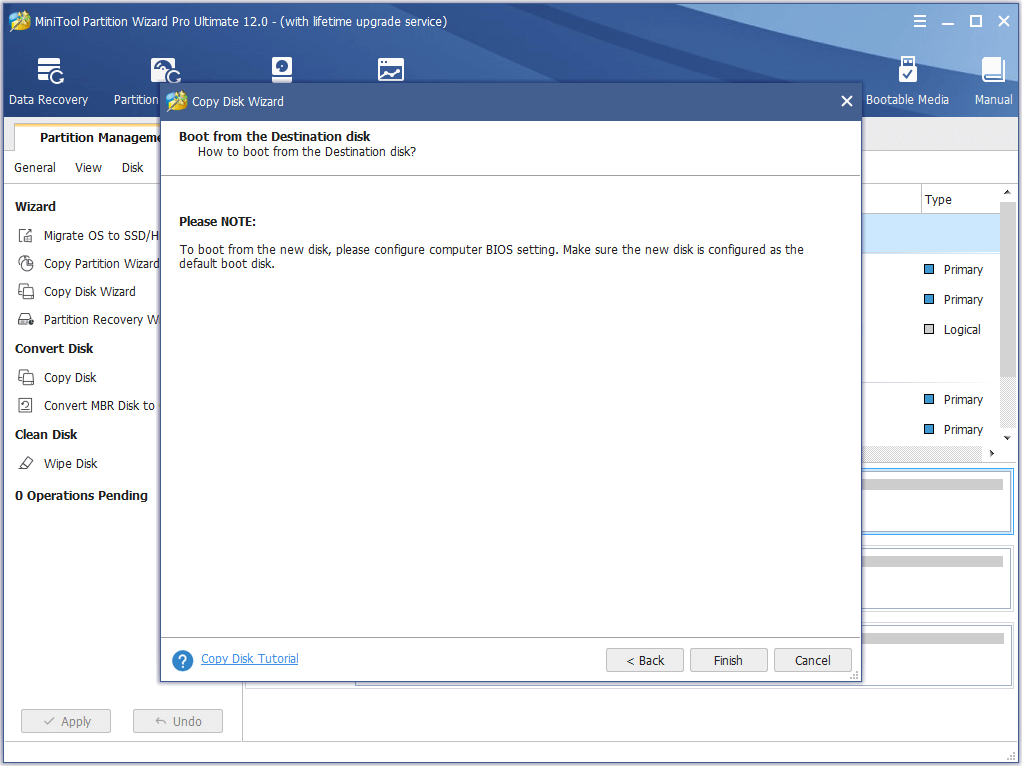
Step 4. When coming across the «how to boot from the new disk» message, read it carefully and click Finish.
Step 5. Finally, click “Apply” to start copying the whole drive.
Second Move: Reinstall Windows 10
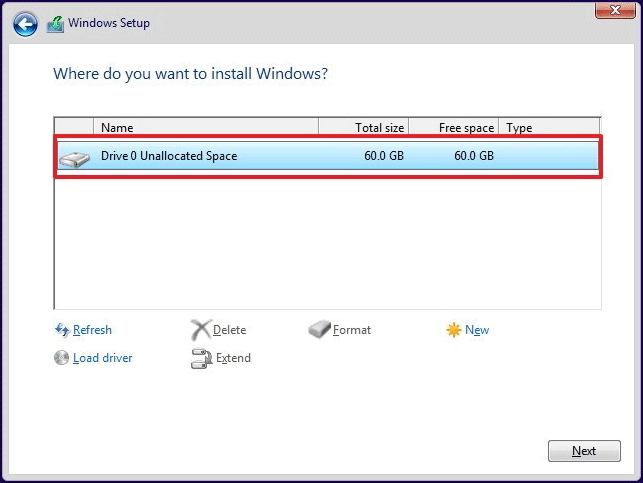
Step 1. Download Windows 10 media creation tool to create a Windows 10 installation media.
Step 2. Connect the installation media you just prepared and follow the installation process to complete. When you see «Where do you want to install Windows», select each partition to do the deletion and then choose the unallocated space to do a clean install.
Now you can check whether Windows 10 high disk usage is reduced. If NOT, replace the hard drive by using the backup copy and check if this drive gives better performance (if so, the original hard drive may be failing).
Sum up
Here comes to the end of this post. Now all solutions to Windows 10 100% disk usage in Task Manager are introduced to lower disk usage. You may try them one by one. Hope they are helpful.
If you have any question or better suggestion, leave it in the following comment section or send email to [email protected] . We read every thread!
ABOUT THE AUTHOR

Position: Columnist
Rodin is an enthusiastic IT writer focusing on Windows trends, disk partition management and data recovery. She loves to write and share her idea about the useful tips and tricks on personal computers’ maintenance.
If you are looking for methods to improve your computer performance, manage hard drives and recover data from different devices, Rodin can provide reliable solutions for data management.


