- Назначение прав пользователя User Rights Assignment
- User Rights Assignment
- 6 Ways to Check If a Windows 10 Account Has Admin Rights
- 1. Check for Administrative Privileges in Settings
- 2. Check Account Type in Local Users and Groups
- 3. Use the Command Prompt to Check Account Type
- 4. Use Computer Management to Check Account Type
- 5. Determine Account Type with Windows PowerShell
- 6. See Windows Account Type Using Control Panel
- Conclusion
- User Rights Assignment
- How to check if a user account is an Administrator in Windows 10
- How to check if you have Admin rights on Windows 10
- 1] Using the Settings app
- 2] Using PowerShell
- 3] Using Control Panel
- 4] using Local Users and Groups
- Related Posts
- You must have Read permissions to view the properties of this object
- You require permission from TrustedInstaller to make changes to this folder
- How to remove deleted User Account from login screen in Windows 10
- [email protected]
Назначение прав пользователя User Rights Assignment
Область применения Applies to
Обзор и ссылки на сведения о параметрах политики безопасности назначения прав пользователей, доступных в Windows. Provides an overview and links to information about the User Rights Assignment security policy settings user rights that are available in Windows. Права пользователя управляют методами, с помощью которых пользователь может войти в систему. User rights govern the methods by which a user can log on to a system. Права пользователей применяются на уровне локального устройства и позволяют пользователям выполнять задачи на устройстве или в домене. User rights are applied at the local device level, and they allow users to perform tasks on a device or in a domain. Права пользователя включают права и разрешения для логотипа. User rights include logon rights and permissions. Управление правами входа в систему, авторизованный для входа на устройство и его возможность входа в систему. Logon rights control who is authorized to log on to a device and how they can log on. Разрешения прав пользователей контролируют доступ к ресурсам компьютера и домена и могут переопределять разрешения, заданные для определенных объектов. User rights permissions control access to computer and domain resources, and they can override permissions that have been set on specific objects. Управление правами пользователей можно выполнять в групповой политике в элементе «Назначение прав пользователя». User rights are managed in Group Policy under the User Rights Assignment item.
С каждым правом пользователя связано постоянное имя и имя групповой политики. Each user right has a constant name and a Group Policy name associated with it. Имена констант используются при ссылке на пользователя в событиях журнала. The constant names are used when referring to the user right in log events. Параметры назначения прав пользователей можно настроить в следующем расположении в консоли управления групповыми политиками (GPMC) в области Конфигурация компьютера\Параметры Windows\Параметры безопасности\Локальные политики\Назначениеправ пользователя или на локальном устройстве с помощью редактора локальных групповых политик (gpedit.msc). You can configure the user rights assignment settings in the following location within the Group Policy Management Console (GPMC) under Computer Configuration\Windows Settings\Security Settings\Local Policies\User Rights Assignment, or on the local device by using the Local Group Policy Editor (gpedit.msc).
Сведения о настройке политик безопасности см. в подстройке «Настройка параметров политики безопасности». For information about setting security policies, see Configure security policy settings.
В следующей таблице ссылки на каждый параметр политики безопасности и предоставляется постоянное имя для каждого из них. The following table links to each security policy setting and provides the constant name for each. Описания параметров содержат справочную информацию, советы и советы по настройке параметра политики, значения по умолчанию, различия между версиями операционной системы, а также соображения по управлению политиками и безопасности. Setting descriptions contain reference information, best practices for configuring the policy setting, default values, differences between operating system versions, and considerations for policy management and security.
User Rights Assignment
Applies to
Provides an overview and links to information about the User Rights Assignment security policy settings user rights that are available in Windows. User rights govern the methods by which a user can log on to a system. User rights are applied at the local device level, and they allow users to perform tasks on a device or in a domain. User rights include logon rights and permissions. Logon rights control who is authorized to log on to a device and how they can log on. User rights permissions control access to computer and domain resources, and they can override permissions that have been set on specific objects. User rights are managed in Group Policy under the User Rights Assignment item.
Each user right has a constant name and a Group Policy name associated with it. The constant names are used when referring to the user right in log events. You can configure the user rights assignment settings in the following location within the Group Policy Management Console (GPMC) under Computer Configuration\Windows Settings\Security Settings\Local Policies\User Rights Assignment, or on the local device by using the Local Group Policy Editor (gpedit.msc).
For information about setting security policies, see Configure security policy settings.
The following table links to each security policy setting and provides the constant name for each. Setting descriptions contain reference information, best practices for configuring the policy setting, default values, differences between operating system versions, and considerations for policy management and security.
6 Ways to Check If a Windows 10 Account Has Admin Rights
By Mitch Bartlett 1 Comment
To perform specific tasks, your account needs to have administrative privileges. That would explain why when you try to follow instructions, things don’t turn out the way you expected them to.
You may have made a mistake following instructions, or maybe your account doesn’t have the administrative privileges it needs to complete the task. The good news is that there are easy ways to check what type of account you have.
1. Check for Administrative Privileges in Settings
To open settings, press the Windows and I keys. Go to account, and below your profile picture, you should see if you have administrative privileges.

2. Check Account Type in Local Users and Groups
The fastest way to open Local Users and Groups is to type lusrmgr.msc in the search bar. If you prefer, you can also right-click on the Windows start menu and click on Computer Management. When the new window appears, click on Local Users and Groups, followed by the Groups option.

Locate the Administrators option and double-click on it. The Administrator Properties window should appear, and when it does, you’ll see what accounts have administrative privileges in the Members box.
3. Use the Command Prompt to Check Account Type
The Command Prompt also offers you a quick way to check if you have a standard user account or not. Open the Command Prompt by using the search bar and type: net user (account name). So the entry would look like this: net user fake123.
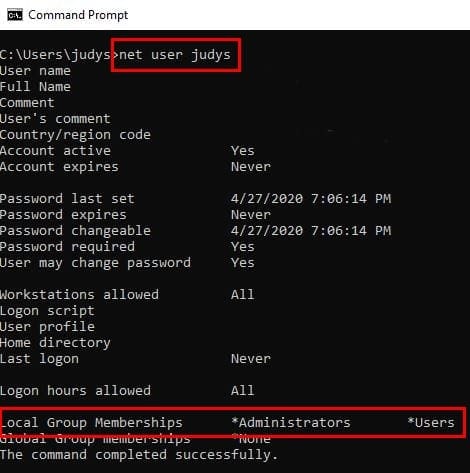
If in the Local Group Memberships section, you only see Users, then you have a standard user account. But, if you see both Administrators and users, then you have Administrative privileges.
4. Use Computer Management to Check Account Type
Look for the Computer Management option in the search bar. If it’s not already expanded, click on the System Tools drop-down menu. Now, click on the Local Users and Groups option. Choose the Users branch and find the account you want to check. Right-click on the account and choose the Properties option.
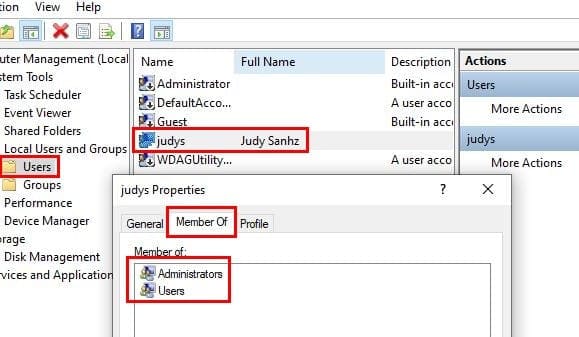
Click on the Member Of tab, and if it says both Administrators and Users, you have administrative privileges. If it only says users, you have a standard account.
5. Determine Account Type with Windows PowerShell
With PowerShell, things are a little different, but it-s still possible to see if you have a local account or not. Open PowerShell by right-clicking on the Windows start menu and choose the one that says, Administrator.
The first command you’ll need to enter is whoami and press enter. The second command to enter is Get- LocalUser -Name You username here | Select Principal Source. Don’t forget to press enter.
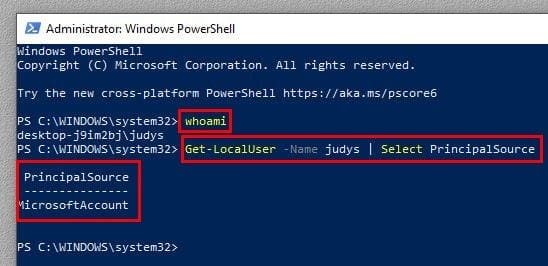
If you only have a local account, it won’t say MicrosoftAccount, it’ll say Local.
6. See Windows Account Type Using Control Panel
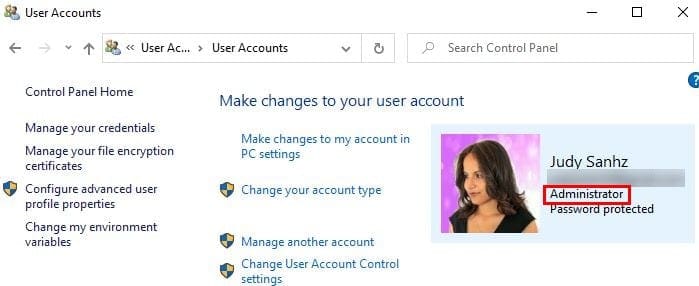
Use the search bar to look for the Control Panel option and press Enter to open it. Once it’s open, go to User Accounts and click on the User Accounts option. You’ll click on the same option twice. To the right of your profile picture and under your email, you’ll see if your account is an Administrator.
Conclusion
Having an administrative account is a must for specific tasks. Now you can check if your account has the clearance to perform those tasks or not. So, is your account an administrative one?
User Rights Assignment
Applies To: Windows Vista, Windows Server 2008, Windows 7, Windows 8.1, Windows Server 2008 R2, Windows Server 2012 R2, Windows Server 2012, Windows 8
This reference topic for the IT professional provides an overview and links to information about the User Rights Assignment security policy settings user rights that are available in the Windows operating system.
User rights govern the methods by which a user can log on to a system. User rights are applied at the local computer level, and they allow users to perform tasks on a computer or in a domain. User rights include logon rights and permissions. Logon rights control who is authorized to log on to a computer and how they can log on. User rights permissions control access to computer and domain resources, and they can override permissions that have been set on specific objects. User rights are managed in Group Policy under the User Rights Assignment item.
Each user right has a constant name and a Group Policy name associated with it. The constant names are used when referring to the user right in log events. You can configure the user rights assignment settings in the following location within the Group Policy Management Console (GPMC) under Computer Configuration\Windows Settings\Security Settings\Local Policies\User Rights Assignment, or on the local computer by using the Local Group Policy Editor (gpedit.msc).
For information about setting security policies, see How to Configure Security Policy Settings.
The following table links to each security policy setting and provides the constant name for each. Setting descriptions contain reference information, best practices for configuring the policy setting, default values, differences between operating system versions, and considerations for policy management and security.
How to check if a user account is an Administrator in Windows 10
There is a Standard, Work & School, Child, Guest, and Administrator account feature in Windows 10 which is pretty good. You can easily create a new user account in Windows 10 and add other accounts anytime. But we need an administrator account to run things that need elevated privileges. In that case, we have to check which account is an administrator. This tutorial will help you easily check your administrator account in Windows 10 so that you can access it and use it.
How to check if you have Admin rights on Windows 10
We have covered four different and built-in ways to find out which account is an administrator account:
- Using Settings app
- Windows PowerShell
- Control Panel
- Local User and Groups.
Let’s check all these options.
1] Using the Settings app
The modern Settings app of Windows 10 lets you access and use numerous options related to Personalization, Devices, System, Update & Security, Cortana, etc. You can also use this app to check if your user account is administrative or not.
For this, open Settings app of Windows 10. The quickest way to open this app is using the hotkey/shortcut key ‘Windows key + I’. After opening the app, click on the Accounts section.
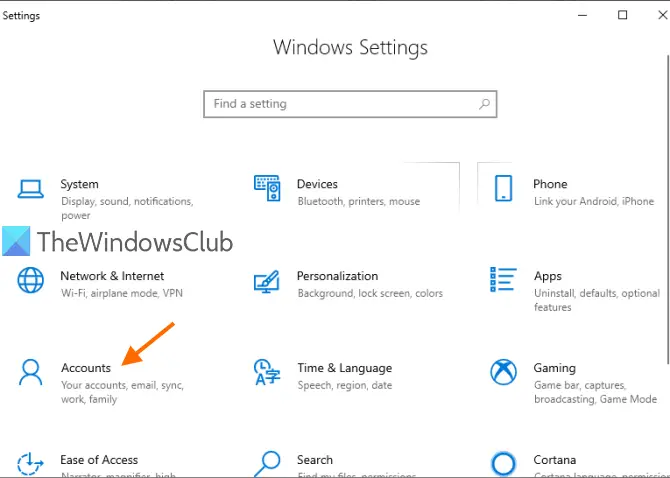
Under Accounts section, you will see Your Info on the right part. There you can easily check if you’re logged in with an administrator account or not.
If the account is not an Administrator, you can log out from that account and log in with another account and repeat the same steps.
2] Using PowerShell
PowerShell is an easier way to find out administrator accounts including the built-in Administrator account of Windows 10. Just a simple command will provide the output.
First of all, open PowerShell using the Search box. Just type powershell and press the Enter key.
Or else, you can use Run Command box (Windows key + R), write powershell, and hit the Enter key.
When PowerShell window is opened, enter and execute the following command:
This will show the list of administrator accounts as highlighted in the image above.
3] Using Control Panel
Type control panel in the Search box and press Enter.
When Control Panel is opened, select User Accounts. After that, again click on the User Accounts option.
Now, on the right-hand part of the Control Panel window, you can see the information related to your account.
It will show if the account is standard or Administrator, local or Microsoft account, and password protected or not.
4] using Local Users and Groups
This option also shows a built-in Administrator account and other Administrator account created by you.
When the window is opened, click on the Groups folder. You will see the list of different accounts and members on the right part. Double-click on the Administrators option.
It will open the Administrators Properties window. There you will see all the administrators’ accounts under the Members section.
The next time whenever you have to check for an administrator account in your Windows 10 PC, hope these options will be helpful.
Related Posts
You must have Read permissions to view the properties of this object
You require permission from TrustedInstaller to make changes to this folder
How to remove deleted User Account from login screen in Windows 10
[email protected]
Laxman enjoys writing about Windows 10 OS and the free software and services that are available for the Windows ecosystem.


