- Start your PC in safe mode in Windows 10
- «Choose an option» blue screen at Windows 10 startup
- My screen only shows the «choose an option» screen.
- Replies (3)
- 9 ways to boot Windows 8 or Windows 8.1 into Safe Mode
- 1. Use Shift + Restart on the Windows 8 sign in screen
- 2. Interrupt the normal boot process of Windows 8 or 8.1, three times in a row
- 3. Use a Windows 8 installation media and the Command Prompt
- 4. Boot from a Windows 8.1 flash USB system recovery drive
- 5. Use a System Recovery CD/DVD to boot into Safe Mode (this method works only in Windows 8, not in Windows 8.1)
- 6. Use the System Configuration tool (msconfig.exe) to enable Safe Mode
- 7. Use “Shift + Restart” on the Windows 8.1 Start screen
- 8. Use the PC Settings to access the Recovery options and start Safe Mode
- 9. Use F8 or Shift + F8 (does not work when using UEFI BIOS and SSD drives)
- Which method do you prefer for booting Windows 8 or 8.1 into Safe Mode?
Start your PC in safe mode in Windows 10
Safe mode starts Windows in a basic state, using a limited set of files and drivers. If a problem doesn’t happen in safe mode, this means that default settings and basic device drivers aren’t causing the issue. Observing Windows in safe mode enables you to narrow down the source of a problem, and can help you troubleshoot problems on your PC.
There are two versions of safe mode: Safe Mode and Safe Mode with Networking. Safe Mode with Networking adds the network drivers and services you’ll need to access the Internet and other computers on your network.
Select from the following sections to find out how to start your PC in safe mode from Settings, from the sign-in screen, or from a black or blank screen.
Press Windows logo key + I on your keyboard to open Settings. If that doesn’t work, select the Start button, then select Settings .
Under Advanced startup, select Restart now.
After your PC restarts to the Choose an option screen, select Troubleshoot > Advanced options > Startup Settings > Restart. You may be asked to enter your BitLocker recovery key.


After your PC restarts, you’ll see a list of options. Select 4 or press F4 to start your PC in Safe Mode. Or if you’ll need to use the Internet, select 5 or press F5 for Safe Mode with Networking.
When you can’t open Settings to get into safe mode, restart your device from the Windows sign-in screen.
On the Windows sign-in screen, press and hold the Shift key while you select the Power > Restart .
After your PC restarts to the Choose an option screen, select Troubleshoot > Advanced options > Startup Settings > Restart. You may be asked to enter your BitLocker recovery key.
After your PC restarts, you’ll see a list of options. Select 4 or F4 to start your PC in safe mode. Or if you’ll need to use the Internet, select 5 or F5 for Safe Mode with Networking.
Note: If you’ve encrypted your device, you’ll need your BitLocker key to start in safe mode.
Before you enter safe mode, you need to enter the Windows Recovery Environment (winRE). To do this, you will repeatedly turn your device off, then on:
Hold down the power button for 10 seconds to turn off your device.
Press the power button again to turn on your device.
On the first sign that Windows has started (for example, some devices show the manufacturer’s logo when restarting) hold down the power button for 10 seconds to turn off your device.
Press the power button again to turn on your device.
When Windows restarts, hold down the power button for 10 seconds to turn off your device.
Press the power button again to turn on your device.
Allow your device to fully restart. You will enter winRE.
Now that you are in winRE, you will follow these steps to take you to safe mode:
On the Choose an option screen, select Troubleshoot > Advanced options > Startup Settings > Restart.
After your device restarts, you’ll see a list of options. Select option 5 from the list or press F5 for Safe Mode with Networking.
If you need more info on a black or blank screen error, see Troubleshoot black or blank screen errors.
Notes: If you need to exit safe mode, simply restart your device, or:
Press the Windows logo key + R.
Type msconfig in the Open box and then select OK.
Select the Boot tab.
Under Boot options, clear the Safe boot checkbox.
«Choose an option» blue screen at Windows 10 startup
I have been struggling with this problem for quite a while and am out of potential solutions. Whenever I boot my Windows 10 (Home, Version 10.0.19041 Build 19041), I run into the below blue screen:
If I press Continue, my desktop just restarts and I boot back into the same exact screen. So what I have been doing is Turn off my PC, then load into Boot Menu (by pressing F11 at computer start up), and manually selecting my SSD which is my boot drive and then my desktop boots completely fine and works exactly as expected.
However, if I don’t manually select my SSD as my boot drive, then I run into the blue screen. This started happening randomly one day and I haven’t been able to figure it out in weeks.
Steps I have taken to try and solve this issue:
1. Run the following commands in command prompt from this link :
Bootrec /fixboot (This one led to a Access denied error. Unsure why since I am the only account as an administrator)
2. Confirm that my C:/ drive, my SSD and not my HDD, is the boot drive
3. Update Windows to the latest version
4. Create an ISO of Windows 10 and perform Startup Repair
5. Reinstall Windows 10 but keep my files and apps
Even after all those steps, I still run into the blue screen at startup and I have to manually select my SSD’s Boot Manager to get to my Windows login screen. Any and all suggestions would be appreciated.
My screen only shows the «choose an option» screen.
I have purchased a new PC, about 4 months ago. My screen only shows the «choose an option» screen. I am unable to do anything else at this point. None of the options available work, as it reverts back to the «choose an option» screen.
Am I only able to do a full system recovery at this point? Please help
Original title; Choose an option?
Replies (3)
![]()
Thank you for posting your query in Microsoft Community.
I understand the inconvenience you are facing. Let me help you in resolving the issue.
I would appreciate if you can provide us the following information to help us understand the issue better.
- What is the build of Windows are you working on?
- You may also provide screen shots describing the problem («Choose an Option») to understand the issue and help you better.
To add screen shot, click on Add image > Browse and select the screen shot > and then click on Upload.
This screen could occur due to many reasons like if Shift key is pressed and if you restart the computer also it could happen if computer is not properly booting.
I suggest you to refer the link below and follow the suggestions provided by Andre Da Costa and check if that helps:
Keep us posted on Windows related queries and we will be happy to assist you further.
14 people found this reply helpful
Was this reply helpful?
Sorry this didn’t help.
Great! Thanks for your feedback.
How satisfied are you with this reply?
Thanks for your feedback, it helps us improve the site.
How satisfied are you with this reply?
Thanks for your feedback.
I am sorry for the delay. This computer is my mother in law’s. I am at her home now and it looks like Windows 8.1.
i have tried rebooting with keyboard and mouse unplugged and get the same result.
86 people found this reply helpful
Was this reply helpful?
Sorry this didn’t help.
Great! Thanks for your feedback.
How satisfied are you with this reply?
Thanks for your feedback, it helps us improve the site.
How satisfied are you with this reply?
Thanks for your feedback.
![]()
Thank you for updating us. Let me help you.
I suggest you to perform an automatic repair and check if it helps.
Step 1: Create ISO for Windows 10
You may also refer to the article mentioned below to for downloading Windows 10 on your computer.
Step 2: Perform an Automatic repair
The Automatic repair can detect and fix the issues that prevent the computer from working normally.
After you have a Windows 10 installation disc/USB, follow these steps:
When your computer starts, wait for the manufacturer logo to check the option for boot menu, it will usually be F12.
The boot menu key might differ with each manufacturer. If you are unable to find the boot menu key, you may refer the user manual.
Restart the computer, when the manufacturer’s logo is displayed, keep pressing the Boot menu option key to enter the boot menu and change the boot option to CD\DVD ROM (in case you create DVD). Select USB in case you create USB.
After you boot your computer using Windows DVD or System Repair Disc, a black screen appears with gray text «Press any key to boot from CD or DVD«. Press any key.
Select the correct time and Keyboard type.
Click Repair your computer in the lower left corner.
Click on Troubleshooting, advanced option and then click Startup Repair.
Step 3
If automatic repair doesn’t help to repair the startup files, you may try to repair them using these commands through Command Prompt under Advance Options.
Refer to the steps:
After you boot your computer using Windows 8 DVD or System Repair Disc, a black screen appears with gray text «Press any key to boot from CD or DVD«. Press any key.
Select the correct time and Keyboard type.
Click Repair your computer in the lower left corner.
Select Troubleshoot from Choose an option screen.
Click Advanced options in Troubleshoot screen.
Click on command Prompt.
Type these following commands and hit enter after each line of command:
Bootrec /fixmbr
Bootrec /fixboot
Bootrec /scanos
Bootrec /rebuildbcd
Check if it resolves the issue.
I hope the information helps. If you need any further assistance, please feel free to contact us again. We will be happy to assist you accordingly.
49 people found this reply helpful
Was this reply helpful?
Sorry this didn’t help.
Great! Thanks for your feedback.
How satisfied are you with this reply?
Thanks for your feedback, it helps us improve the site.
9 ways to boot Windows 8 or Windows 8.1 into Safe Mode
Are you struggling to boot Windows 8 or Windows 8.1 into Safe Mode? Have you tried pressing both F8 and Shift + F8 and they do not work? That is because the boot procedure in Windows 8 is different compared to older versions of Windows such as Windows 7. The boot is so fast that it literally cannot be interrupted by any of your keypresses. Here are nine different ways in which you can boot into Safe Mode, that do not involve any special hacks or manual configuration:
NOTE: If you want to find out all the methods which you can use to boot Windows 8 or Windows 8.1 into Safe Mode, read this entire tutorial. However, we first show you how to boot into Safe Mode when you cannot log into Windows 8.1, and after that, how to boot into Safe Mode when you can still log into Windows 10. If you cannot log into Windows 8.1, read methods 1 to 5. If you can log into Windows 8.1, read methods 6 to 8. The ninth method works only on computers with old hardware.
1. Use Shift + Restart on the Windows 8 sign in screen
This method works in Windows 8.1 even if you cannot log into a user account. On the sign in screen (or in the Settings charm, if you can log in), press and hold the SHIFT key. While keeping it pressed, click or tap the Power button and then Restart.
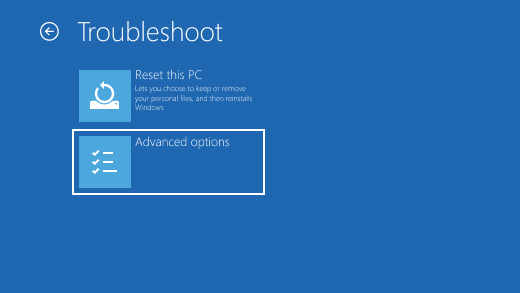
Windows asks you to select an option. Choose Troubleshoot.
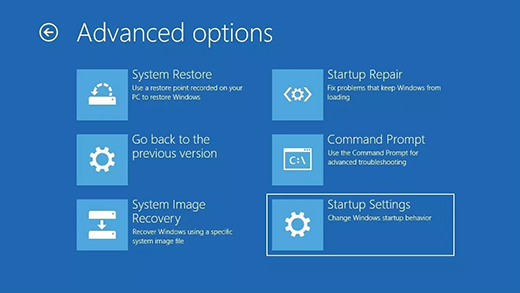
On the Troubleshoot screen, choose Advanced options.
On the Advanced options screen, click or tap Startup Settings.
Windows informs you that it is about to restart so that it can change several boot options. Among other things, it also enables Safe Mode. Click or tap Restart.
After your PC or device reboots, it displays nine different startup settings, including:
- Safe Mode – press the 4 or the F4 key on your keyboard
- Safe Mode with Networking – press the 5 or the F5 key on your keyboard
- Safe Mode with Command Prompt – press the 6 or the F6 key on your keyboard
Windows 8.1 now boots according to the Safe Mode environment that you selected.
2. Interrupt the normal boot process of Windows 8 or 8.1, three times in a row
Another method to boot into Safe Mode is somewhat automatic. When Windows 8 fails to boot three times in a row, it automatically starts its Automatic Repair procedure. If you want to force Windows 8.1 to do so, you can interrupt its normal boot 3 times over. That means that you must stop your PC or device while booting. You can do that by pressing the physical Reset or Power button on your PC or device. If you choose to press the Power button, note that you might have to press it for at least 4 seconds to stop your PC/device. The fourth time your PC or device tries to boot, it should automatically enter into its Automatic Repair mode, and the first thing you see on your screen is a message that says “Preparing Automatic Repair.”
After a while, Windows 8 displays the Automatic Repair screen. On it, click or tap Advanced options.
On the next screen, click or tap Troubleshoot.
The following steps you need to take are the same as in the first method from this guide. Go to “Advanced options -> Startup Settings -> Restart.” Once you get to the Startup Settings screen, press the 4 or the F4 key on your keyboard boot into Safe Mode, press 5 or F5 to enter “Safe Mode with Networking,” or press 6 or F6 to enable “Safe Mode with Command Prompt.”
3. Use a Windows 8 installation media and the Command Prompt
If you can create a Windows 8 or 8.1 bootable media such as a DVD or USB memory stick, or if you already have one around, you can use it to boot your PC or device into Safe Mode. Insert it into your PC or device and boot from it. When the Windows 8 installation wizard starts, select the language and keyboard layout you prefer, and press Next.
On the next screen, click or tap the “Repair your computer” link from bottom-left corner.
On the “Choose an option” screen, click or tap Troubleshoot.
On the Troubleshoot screen, press the Advanced options button.
Click or tap Command Prompt.
The previous action opens Command Prompt as administrator. Inside it, type the following command: bcdedit /set
Close the Command Prompt, and Windows 8 should take you back to the “Choose an option” screen. There, click or tap Continue.
The PC or device reboots and automatically goes into Safe Mode.
IMPORTANT: This method almost always works, but it makes Windows 8.1 go into Safe Mode every time it starts. To disable it and make Windows 8.1 to boot normally again, open Command Prompt and run this command: bcdedit /deletevalue
4. Boot from a Windows 8.1 flash USB system recovery drive
In Windows 8 and Windows 8.1, you can use the Recovery Media Creator to create a system recovery drive on a USB flash drive. You can find detailed instructions in this tutorial: How to create a Recovery Drive on a USB memory stick in Windows 8 & 8.1.
Boot from the USB memory stick. On the first screen, select the keyboard layout you prefer using and, on the “Choose an option” screen, click or tap Troubleshoot. The next steps are the same as the steps we have shown you in the first method from this guide. In short, you have to follow this path: “Advanced options -> Startup Settings -> Restart.” Then press 4 or F4 key on your keyboard to boot to Safe Mode, 5 or F5 to go into “Safe Mode with Networking,” or 6 or F6 to enter “Safe Mode with Command Prompt.”
5. Use a System Recovery CD/DVD to boot into Safe Mode (this method works only in Windows 8, not in Windows 8.1)
In Windows 8, but not in Windows 8.1, you can create a system recovery CD or DVD. Here is the tutorial that shows how it is done: What is a system repair disc and how to create one in Windows.
Once you have that disc created, boot from it. When asked to press any key to load its content, do so. Then, choose your keyboard layout.
Once you have done that, the “Choose an option” screen is shown. From here on, the steps are identical to those we have shown in method 1. Go to “Advanced options -> Startup Settings -> Restart”. Then, press 4 or F4 on your keyboard to boot into Safe Mode, 5 or F5 to get into “Safe Mode with Networking,” or 6 or F6 to enter “Safe Mode with Command Prompt.”
6. Use the System Configuration tool (msconfig.exe) to enable Safe Mode
Maybe one of the easiest methods for booting into Safe Mode is to use the System Configuration tool, also known as msconfig.exe.
On the Start Screen, type msconfig and click or tap on the result bearing the same name. Also, if you want to see other ways to open the System Configuration tool, you can read this article: 8 ways to start System Configuration in Windows (all versions).
In System Configuration, go to the Boot tab and, in the Boot options area, check the box that says “Safe boot.” Then, click or tap OK.
Windows 8 now tells you that you need to reboot your PC. Click or tap on Restart to reboot right now, or click/tap on “Exit without restart” if you want to restart later.
The next time Windows 8.1 boots, it automatically enters Safe Mode.
7. Use “Shift + Restart” on the Windows 8.1 Start screen
Windows 8 or 8.1 also let you enable Safe Mode with just a few click or taps on its Start screen. Head to the Start screen and press and hold the SHIFT key on your keyboard. Then, while still holding SHIFT, click/tap the Power button and then the Restart option.
Windows 8 then takes you to the “Choose an option” screen. On it, click or tap Troubleshoot.
From here on, follow the same steps as the ones from the first method in this guide. That means that you must go to “Advanced options -> Startup Settings -> Restart.” Then, press 4 or F4 on your keyboard to go into Safe Mode, 5 or F5 to go into “Safe Mode with Networking,” or 6 or F6 to enter “Safe Mode with Command Prompt.”
8. Use the PC Settings to access the Recovery options and start Safe Mode
If your Windows 8 or 8.1 PC or device still works and you can log in to it, you can also use the PC Settings to go into Safe Mode. Open the PC Settings and go to “Update and recovery.”
On the left sidebar, click or tap on Recovery and, on the right side of the screen, press the “Restart now” button from the “Advanced startup” section.
Windows 8.1 then shows you the “Choose an option” screen. On it, click or tap Troubleshoot.
Then, must follow the same steps as the ones from the first method in this guide. Go to “Advanced options -> Startup Settings -> Restart”. Then, press 4 or F4 on your keyboard to boot into Safe Mode, 5 or F5 to get into “Safe Mode with Networking,” or 6 or F6 to enter “Safe Mode with Command Prompt.”
9. Use F8 or Shift + F8 (does not work when using UEFI BIOS and SSD drives)
If your PC or device is rather old (has a classic BIOS and does not use an SSD drive), you might also have some luck trying to boot into Safe Mode using the old ways of pressing the F8 or Shift + F8 keys on your keyboard during the boot of your PC.
However, they often do not work because Microsoft changed the way that Windows 8 and 8.1 boot. They tried to make the whole boot process faster than before (in Windows 7 and prior), but that also stopped Windows 8 and 8.1 from being able to record any key presses during startup. You can read more about it in this Microsoft blog post: Designing for PCs that boot faster than ever before.
Which method do you prefer for booting Windows 8 or 8.1 into Safe Mode?
We hope you found this guide useful. If you know other ways in which you can make Windows 8 or Windows 8.1 boot into Safe Mode, do not hesitate to share them in the comments section below. Many readers are going to find them useful.


