- Enabling debug logging for the Netlogon service
- More information
- For Windows Server 2019, Windows Server 2016, Windows Server 2012 R2
- Alternative methods to enable Netlogon logging
- Enable Windows Installer logging
- Windows Installer logging
- Enable Windows Installer logging manually
- Enable Windows Installer logging with Group Policies
- Просмотр и анализ логов RDP подключений в Windows
Enabling debug logging for the Netlogon service
This article describes the steps to enable logging of the Netlogon service in Windows to monitor or troubleshoot authentication, DC locator, account lockout, or other domain communication-related issues.
Original product version: В Windows 10 — all editions, Windows Server 2016, Windows Server 2019, Windows Server 2012 R2
Original KB number: В 109626
More information
This section, method, or task contains steps that tell you how to modify the registry. However, serious problems might occur if you modify the registry incorrectly. Therefore, make sure that you follow these steps carefully. For added protection, back up the registry before you modify it. Then, you can restore the registry if a problem occurs. For more information about how to back up and restore the registry, click the following article number to view the article in the Microsoft Knowledge Base:
322756 How to back up and restore the registry in Windows
The version of Netlogon.dll that has tracing included is installed by default on all currently supported versions of Windows. To enable debug logging, set the debug flag that you want by using Nltest.exe, the registry, or Group Policy. To do it, follow these steps:
For Windows Server 2019, Windows Server 2016, Windows Server 2012 R2
These steps also apply to Windows 10.
To enable Netlogon logging:
Open a Command Prompt window (administrative Command Prompt window for Windows Server 2012 R2 and later versions).
Type the following command, and then press Enter:
It’s typically unnecessary to stop and restart the Netlogon service for Windows Server 2012 R2 or later to enable Netlogon logging. Netlogon-related activity is logged to %windir%\debug\netlogon.log. Verify new writes to this log to determine whether a restart of the Netlogon service is necessary. If you have to restart the service, open a Command Prompt window (administrative Command Prompt window for Windows 10, and Windows Server 2012 R2 and later versions). Then run the following commands:
- In some circumstances, you may have to perform an authentication against the system in order to obtain a new entry in the log to verify that logging is enabled.
- Using the computer name may cause no new test authentication entry to be logged.
To disable Netlogon logging, follow these steps:
Open a Command Prompt window (administrative Command Prompt window for Windows Server 2012 R2 and higher).
Type the following command, and then press Enter:
It’s typically unnecessary to stop and restart the Netlogon service for Windows Server 2012 R2 or later versions to disable Netlogon logging. Netlogon-related activity is logged to %windir%\debug\netlogon.log. Verify that no new information is being written to this log to determine whether a restart of the Netlogon service is necessary. If you have to restart the service, open a Command Prompt window (administrative Command Prompt window for Windows 10, and Windows Server 2012 R2 and later versions). Then run the following commands:
Alternative methods to enable Netlogon logging
In all versions of Windows, you can use the registry method that’s provided in the Enable/Disable logging by using registry method section.
On computers that are running Windows Server 2012 R2 and later versions of the operating system, you can also use the following policy setting to enable verbose Netlogon logging (value is set in bytes):
\Computer Configuration\Administrative Templates\System\Net Logon\Specify log file debug output level
A value of decimal 545325055 is equivalent to 0x2080FFFF (which enables verbose Netlogon logging). This Group Policy setting is specified in bytes.
The Group Policy method can be used to enable Netlogon logging on a larger number of systems more efficiently. We don’t recommend that you enable Netlogon logging in policies that apply to all systems, such as the Default Domain Policy. Instead, consider narrowing the scope to systems that may be causing problems by using one of the following methods:
- Create a new policy by using this Group Policy setting, and then provide the Read and Apply Group Policy rights to a group that contains only the required computer accounts.
- Move computer objects into a different OU, and then apply the policy settings at that OU level.
Enable/Disable logging by using registry method
To enable logging, you may have to obtain a checked build of Netlogon.dll.
Start Registry Editor.
If it exists, delete the Reg_SZ value of the following registry entry, create a REG_DWORD value with the same name, and then add the 2080FFFF hexadecimal value:
HKEY_LOCAL_MACHINE\SYSTEM\CurrentControlSet\Services\Netlogon\Parameters\DBFlag
It’s typically unnecessary to stop and restart the Netlogon service for Windows Server 2012 R2 and later versions to enable Netlogon logging. Netlogon-related activity is logged to %windir%\debug\netlogon.log. Verify the new writes to this log to determine whether a restart of the Netlogon service is necessary. If you have to restart the service, open a Command Prompt window (administrative Command Prompt window for Windows Server 2012 R2/Windows 10 and above). Then run the following commands:
- In some circumstances, you may have to do an authentication against the system to obtain a new entry in the log to verify that logging is enabled.
- Using the computer name may cause no new test authentication entry to be logged.
To disable Netlogon logging, follow these steps:
In Registry Editor, change the data value to 0x0 in the following registry key:
Exit Registry Editor.
It’s typically unnecessary to stop and restart the Netlogon service for Windows Server 2012 R2, Windows 10, or later versions to disable Netlogon logging. Netlogon-related activity is logged to %windir%\debug\netlogon.log. Verify that no new information is being written to this log to determine whether a restart of the Netlogon service is necessary. If you have to restart the service, open a Command Prompt window (administrative Command Prompt window for Windows Server 2012 R2/Windows 10 and later versions of the operating system). Then run the following commands:
Set the maximum log file size for Netlogon logs:
The MaximumLogFileSize registry entry can be used to specify the maximum size of the Netlogon.log file. By default, this registry entry doesn’t exist, and the default maximum size of the Netlogon.log file is 20 MB. When the file reaches 20 MB, it’s renamed to Netlogon.bak, and a new Netlogon.log file is created. This registry entry has the following parameters:
- Path: HKEY_LOCAL_MACHINE\SYSTEM\CurrentControlSet\Services\Netlogon\Parameters
- Value Name: MaximumLogFileSize
- Value Type: REG_DWORD
- Value Data:
Remember that the total disk space that’s used by Netlogon logging is the size that’s specified in the maximum log file size times two (2). It’s required to accommodate space for the Netlogon.log and Netlogon.bak file. For example, a setting of 50 MB can require 100 MB of disk space, which provides 50 MB for Netlogon.log and 50 MB for Netlogon.bak.
As mentioned earlier, on Windows Server 2012 R2 and later versions of the operating system, you can use the following policy setting to configure the log file size (value is set in bytes):
\Computer Configuration\Administrative Templates\System\Net Logon\Maximum Log File Size
For more information, click the following article numbers to view the articles in the Microsoft Knowledge Base:
247811 How domain controllers are located in Windows
Enable Windows Installer logging
Windows includes a registry-activated logging service to help diagnose Windows Installer issues. This article describes how to enable this logging service.
Original product version: В Windows 10 — all editions, Windows Server 2012 R2
Original KB number: В 223300
The registry entry in this article is valid for all Windows operating systems.
Windows Installer logging
Windows Installer can use logging to help assist in troubleshooting issues with installing software packages. This logging is enabled by adding keys and values to the registry. After the entries have been added and enabled, you can retry the problem installation and Windows Installer will track the progress and post it to the Temp folder. The new log’s file name is random. However, the first letters are Msi and the file name has a .log extension. To locate the Temp folder, type the following line at a command prompt:
To enable Windows Installer logging manually, see the following section.
Enable Windows Installer logging manually
This section, method, or task contains steps that tell you how to modify the registry. However, serious problems might occur if you modify the registry incorrectly. Therefore, make sure that you follow these steps carefully. For added protection, back up the registry before you modify it. Then, you can restore the registry if a problem occurs. For more information about how to back up and restore the registry, see How to back up and restore the registry in Windows.
To enable Windows Installer logging yourself, open the registry by using Regedit.exe, and then create the following subkey and keys:
- Path: HKEY_LOCAL_MACHINE\Software\Policies\Microsoft\Windows\Installer
- Type: Reg_SZ
- Value: Logging
- Data: voicewarmupx
The letters in the value field can be in any order. Each letter turns on a different logging mode. Each letter’s actual function is as follows for MSI version 1.1:
- v — Verbose output
- o — Out-of-disk-space messages
- i — Status messages
- c — Initial UI parameters
- e — All error messages
- w — Non-fatal warnings
- a — Start up of actions
- r — Action-specific records
- m — Out-of-memory or fatal exit information
- u — User requests
- p — Terminal properties
- + — Append to existing file
- ! — Flush each line to the log
- x — Extra debugging information. The x flag is available only in Windows Server 2003 and later operating systems, and on the MSI redistributable version 3.0, and on later versions of the MSI redistributable.
- * — Wildcard. Log all information except the v and the x option. To include the v and the x option, specify /l*vx.
This change should be used only for troubleshooting and should not be left on because it will have adverse effects on system performance and disk space. Each time that you use the Add or Remove Programs item in Control Panel, a new Msi*.log file is created. To disable the logging, remove the Logging registry value.
Enable Windows Installer logging with Group Policies
You can enable logging with Group Policies by editing the appropriate OU or Directory Group Policy. Under Group Policy, expand Computer Configuration, expand Administrative Templates, expand Windows Components, and then select Windows Installer.
Double-click Logging, and then click Enabled. In the Logging box, enter the options you want to log. The log file, Msi.log, appears in the Temp folder of the system volume.
For more information about MSI logging, see Windows Help. To do this, search by using the phrase msi logging, and then select Managing options for computers through Group Policy.
The addition of the x flag is available natively in Windows Server 2003 and later operating systems, on the MSI redistributable version 3.0, and on later versions of the MSI redistributable.
Просмотр и анализ логов RDP подключений в Windows
В этой статье мы рассмотрим, особенности аудита / анализа логов RDP подключений в Windows. Как правило, описанные методы могут пригодиться при расследовании различных инцидентов на терминальных / RDS серверах Windows, когда от системного администратора требуется предоставить информацию: какие пользователи входили на RDS сервер, когда авторизовался и завершил сеанс конкретный пользователь, откуда / с какого устройства (имя или IP адрес) подключался RDP-пользователь. Я думаю, эта информация будет полезна как для администраторов корпоративных RDS ферм, так и владельцам RDP серверов в интернете (Windows VPS как оказалось довольно популярны).
Как и другие события, логи RDP подключения в Windows хранятся в журналах событий. Откройте консоль журнала событий (Event Viewer). Есть несколько различных журналов, в которых можно найти информацию, касающуюся RDP подключения.
В журналах Windows содержится большое количество информации, но быстро найти нужное событие бывает довольно сложно. Когда пользователь удаленно подключается к RDS серверу или удаленному столу (RDP) в журналах Windows генерируется много событий. Мы рассмотрим журналы и события на основных этапах RDP подключения, которые могут быть интересны администратору:
- Network Connection
- Authentication
- Logon
- Session Disconnect/Reconnect
- Logoff
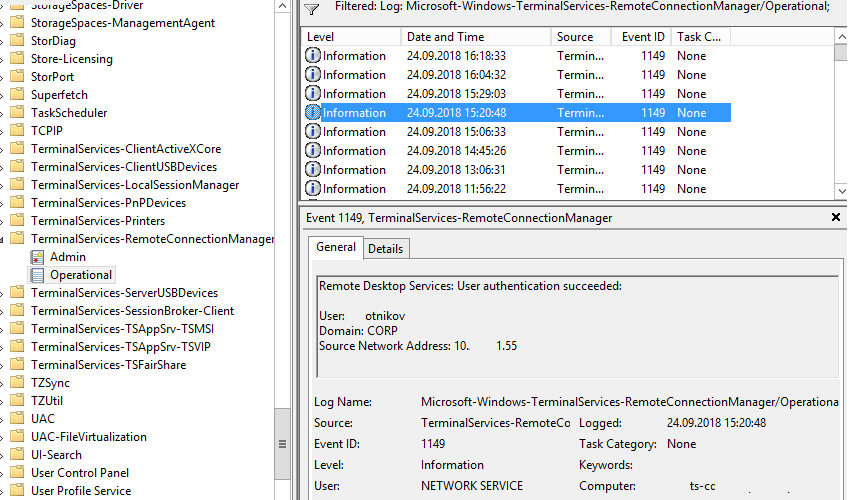
Network Connection: – установление сетевого подключение к серверу от RDP клиента пользователя. Событие с EventID – 1149 (Remote Desktop Services: User authentication succeeded). Наличие этого события не свидетельствует об успешной аутентификации пользователя. Этот журнал находится в разделе Applications and Services Logs -> Microsoft -> Windows -> Terminal-Services-RemoteConnectionManager -> Operational. Включите фильтр по данному событию (ПКМ по журналу-> Filter Current Log -> EventId 1149).

В результате у вас получится список с историей всех сетевых RDP подключений к данному серверу. Как вы видите, в логах указывается имя пользователя, домен (используется NLA аутентификация, при отключенном NLA текст события выглядит иначе) и IP адрес компьютера, с которого осуществляется RDP подключение.
Authentication: – успешная или неуспешная аутентификация пользователя на сервере. Журнал Windows -> Security. Соответственно нас могут интересовать события с EventID – 4624 (успешная аутентификация — An account was successfully logged on) или 4625 (ошибка аутентификации — An account failed to log on). Обратите внимание на значение LogonType в событии. При входе через терминальную службу RDP — LogonType = 10 или 3. Если LogonType = 7, значит выполнено переподключение к уже имеющейся RDP сессии.
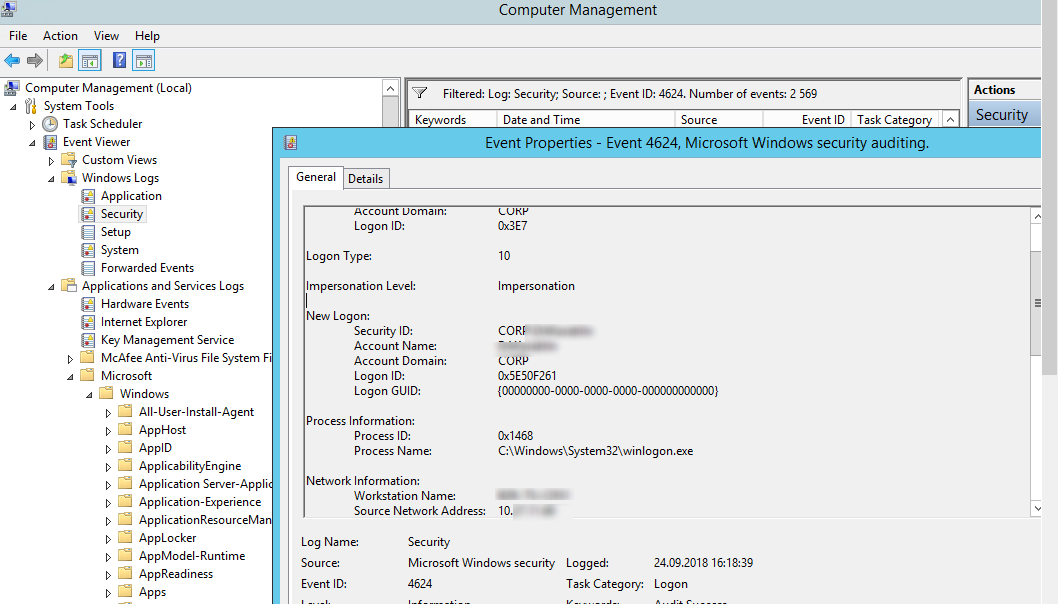
При этом имя пользователя содержится в описании события в поле Account Name, имя компьютера в Workstation Name, а имя пользователя в Source Network Address.
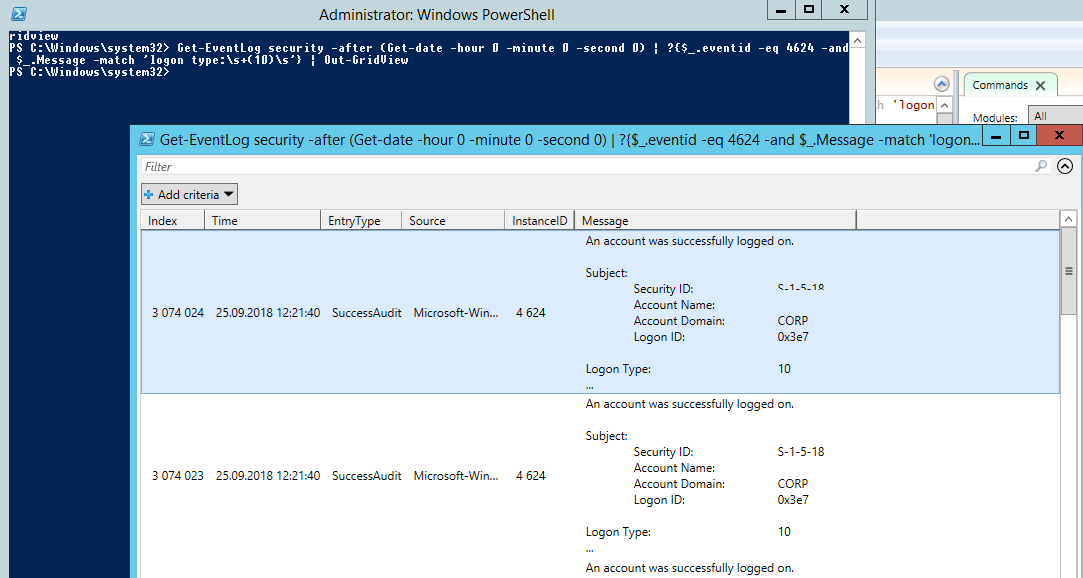
Вы можете получить список событий успешных авторизаций по RDP (событие 4624) с помощью такой команды PowerShell.
Get-EventLog security -after (Get-date -hour 0 -minute 0 -second 0) | ? <$_.eventid -eq 4624 -and $_.Message -match 'logon type:\s+(10)\s'>| Out-GridView
Logon: – RDP вход в систему, событие появляющееся после успешной аутентификации пользователя. Событие с EventID – 21 (Remote Desktop Services: Session logon succeeded). Этот журнал находится в разделе Applications and Services Logs -> Microsoft -> Windows -> TerminalServices-LocalSessionManager -> Operational. Как вы видите здесь можно узнать идентификатор RDP сессии для пользователя — Session ID.
Событие с EventID – 21 (Remote Desktop Services: Shell start notification received) означает успешный запуск оболочки Explorer (появление окна рабочего стола в RDP сессии).
Session Disconnect/Reconnect – события отключения / переподключения к сессии имеют разные коды в зависимости от того, что вызвало отключение пользователя (отключение по неактивности, выбор пункта Disconnect в сессии, завершение RDP сессии другим пользователем или администратором и т.д.). Эти события находятся в разделе журналов Applications and Services Logs -> Microsoft -> Windows -> TerminalServices-LocalSessionManager -> Operational. Рассмотрим RDP события, которые могут быть интересными:
Событие с EventID – 4778 в журнале Windows -> Security (A session was reconnected to a Window Station). Пользователь переподключился к RDP сессии (пользователю выдается новый LogonID).
Событие с EventID 4799 в журнале Windows -> Security (A session was disconnected from a Window Station). Отключение от RDP сеанса.
Logoff: – выход пользователя из системы. При этом в журнале Applications and Services Logs -> Microsoft -> Windows -> TerminalServices-LocalSessionManager -> Operational фиксируется событие с EventID 23 (Remote Desktop Services: Session logoff succeeded).
При этом в журнале Security нужно смотреть событие EventID 4634 (An account was logged off).
Событие Event 9009 (The Desktop Window Manager has exited with code ( ) в журнале System говорит о том, что пользователь инициировал завершение RDP сессии, и окно и графический shell пользователя был завершен.
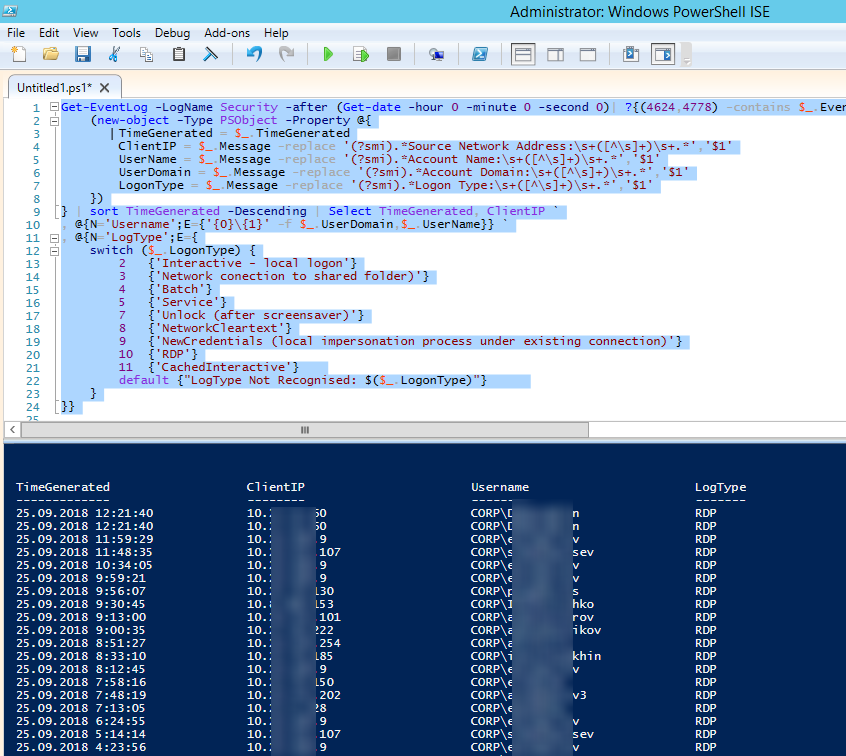
Ниже представлен небольшой PowerShell, который выгружает из журналов терминального RDS сервера историю всех RDP подключений за текущий день. В полученной таблице указано время подключения, IP адрес клиента и имя RDP пользователя (при необходимости вы можете включить в отчет другие типы входов).
Иногда бывает удобно с логами в таблице Excel, в этом случае вы можете выгрузить любой журнал Windows в текстовый файл и импортировать в Excel. Экспорт журнала можно выполнить из консоли Event Viewer (конечно, при условии что логи не очищены) или через командную строку:
WEVTUtil query-events Security > c:\ps\security_log.txt
get-winevent -logname «Microsoft-Windows-TerminalServices-LocalSessionManager/Operational» | Export-Csv c:\ps\rdp-log.txt -Encoding UTF8
Список текущих RDP сессий на сервере можно вывести командой:
Команда возвращает как идентификатор сессии (ID), имя пользователя (USERNAME)и состояние (Active/Disconnect). Эту команду удобна использовать, когда нужно определить ID RDP сессии пользователя при теневом подключении.

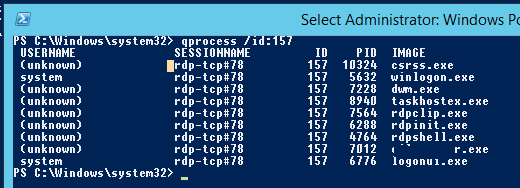
Список запущенных процессов в конкретной RDP сессии (указывается ID сессии):
На RDP-клиенте логи не такие информационные, основное чем часто пользуются информация об истории RDP подключений в реестре.


