- Show seconds in the system clock in Windows 7 / 8 / 10
- How to Synchronize the Clock in Windows 10 with Internet or Atomic Time
- Synchronize the Clock with an Internet Time Server in Internet Time Settings
- Synchronize Clock with an Internet Time Server Using the Command Line
- Third-Party Tools That Automatically Sync Your PC’s Clock with the Internet or Atomic Time
- Dimension 4
- Atomic Clock Sync
- Have Your Computer Keep Accurate Time
- Часы с секундами в трее Windows 10
- Отзывы (2)
Show seconds in the system clock in Windows 7 / 8 / 10
The system clock in Windows 7 / 8 / 8.1 / 10 only shows you hours and minutes for the current time. You already know how to show date and weekday in the clock by resizing your taskbar (how much depends on whether you are using the standard, large icons, or using small icons). In this tutorial, I’ll show you two ways of showing the seconds! Both works whether you are using the standard AM/PM time format, or switched to show military time (24-hour format).
Windows doesn’t support showing seconds in the clock without third-party software. As a personal preference, I avoid to install third-party utilities that mess with the operating system configuration, unless absolutely necessary. So, just a final tip before we proceed: if you click on the system clock, an analog clock will show up in the calendar popup, and it has a seconds hand. If that’s enough to cover your needs, you can stop right here — otherwise, read on!
A utility called Taskbar Tweaker lets you access to all kinds of hidden settings. It works in Windows 7 and later, and it’s a free download (freeware program). This app is well reviewed, but always make sure to have an up-to-date antivirus before downloading any software. You can download / install MSE for free, or download and install Bitdefender (also free, with a better record than MSE).
Download and install Taskbar Tweaker on your PC, and launch it once you are done. The entire interface consists of options that change the taskbar’s default behavior. Look in the lower right corner: checking the «Display seconds on the tray clock» checkbox adds to digits to the clock, next to hours and minutes.
Bonus Tip: depending on your needs and the programs you are using, you may not even need to use the system clock (you can even work with the Windows clock hidden!). It’s worth exploring the apps you use most often. My every day text editor, TextPad, has an option of showing the time within its own interface — if I work full screen (Windows’ clock is hidden), no problem!
How to Synchronize the Clock in Windows 10 with Internet or Atomic Time


The clock on your Windows PC doesn’t just tell you the time. Windows uses the clock to record when you create or modify files.
Typically, the Windows clock synchronizes with internet time once a week, if it’s connected to the internet. You can also manually force the clock to synchronize with internet time whenever you want.
Today we’ll show you how to sync your PC’s clock with internet time in Windows’ settings and using the command line. We’ll also show you a couple of third-party tools that help you automate syncing your clock with internet or atomic time.
Synchronize the Clock with an Internet Time Server in Internet Time Settings
The easiest way to synchronize your clock is to use Windows 10’s settings.
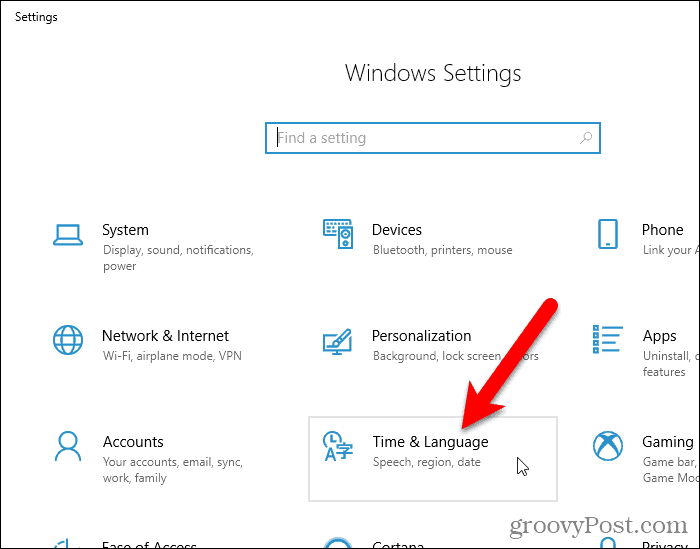
Open the Start menu and click Settings.
Then, click Time & Language on the Settings dialog box.
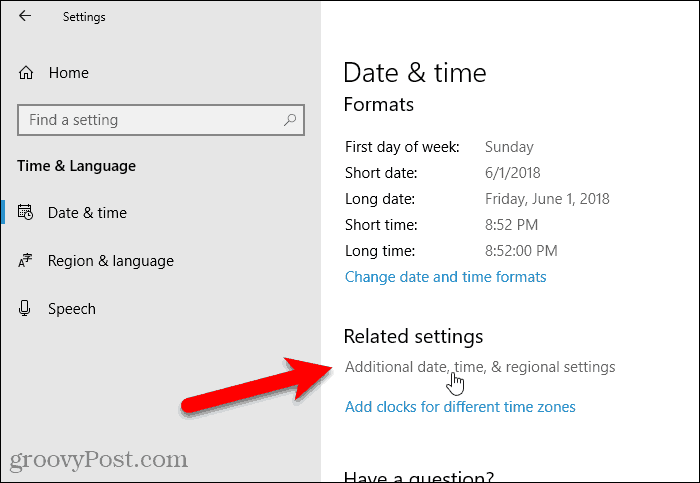
Scroll down to the Related settings section and click Additional date, time, & regional settings.
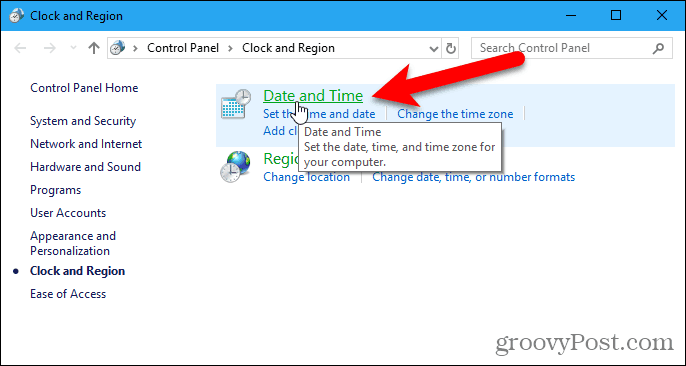
The Clock and Region screen in the Control Panel displays. Click Date and Time.
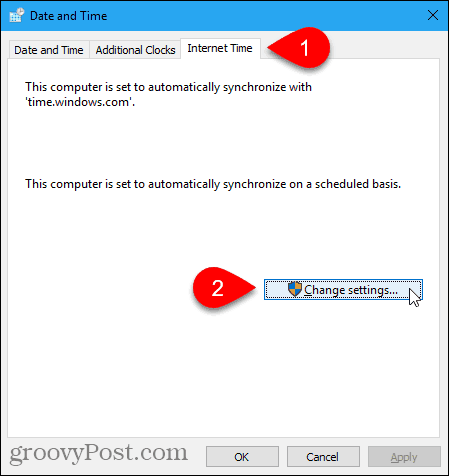
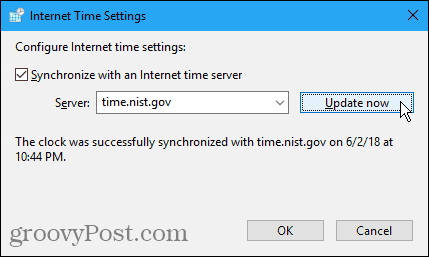
Click the Internet Time tab on the Date and Time dialog box. Then, click Change settings.
On the Internet Time Settings dialog box, check the Synchronize with an Internet time server box.
Then, select a Server from the drop-down list. If you don’t see a server you want to use, you can type the name of an Internet time server. You can find links to lists of time servers on Microsoft’s site.
Click Update now.
If you get an error, keep trying to sync. You may have to select a different server, sync, and then select the server you want and try syncing again.
A message displays on the Internet Time Settings dialog box when the clock is successfully synced.
If your PC’s time or date is off by too much, you may get an error when trying to sync. If that’s the case, you can go back to the Date and Time dialog box, click the Date and Time tab and set the time and date to close to the current time and date. Then, click Change settings on the Internet Time tab and try syncing the clock again on the Internet Time Settings dialog box.
Synchronize Clock with an Internet Time Server Using the Command Line
If you prefer using the command line, you can use the Command Prompt to synchronize your PC’s clock to Internet time.
You must open the Command Prompt as administrator. So search for “command prompt” using Cortana or Search next to the Start menu.
Right-click on Command Prompt under Best match and select Run as administrator.
If the User Account Control dialog box displays, click Yes to give permission and continue.

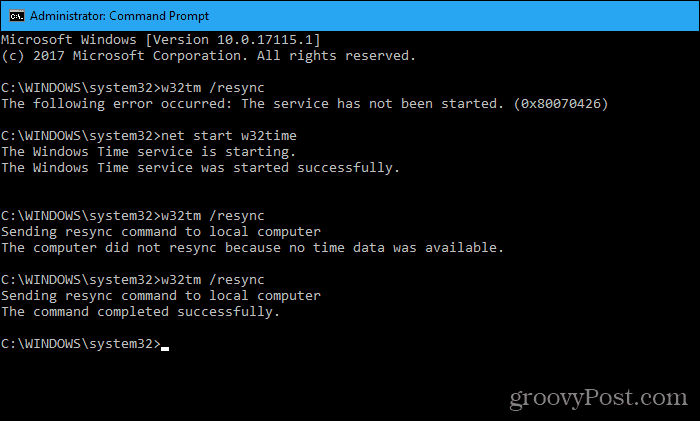
Type the following command at the prompt and press Enter.
You may see an error saying the service has not been started. To correct this error, run the following command.
Then, run the previous command again to try to sync the clock. At this point, you might see an error saying the computer did not resync because no time data was available. Keep trying the “w32tm /resync” command until you see that the command completed successfully.
To get help about using the command or to read about additional options you can use with the command, run the following command.
Third-Party Tools That Automatically Sync Your PC’s Clock with the Internet or Atomic Time
Here are a couple of third-party tools that provide additional options and allow you to automatically sync your PC’s clock with internet time or atomic time.
Dimension 4
Dimension 4 is a popular time correction program for Windows that’s free for personal use. The program comes with a large list of time servers to choose from. You can also have Dimension 4 load at Windows startup, sync your PC’s clock once, and then automatically exit the program.
Once you’ve downloaded and installed Dimension 4, open the Start menu and run the program. You won’t see an icon on the desktop for Dimension 4.
You might see the User Account Control dialog box several times while setting up Dimension 4. Click Yes when prompted each time to allow the program to configure itself.
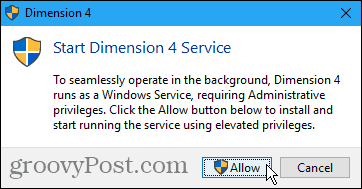
You must stop the Windows Time Service so Dimension 4 can run its own service. Click Allow on the following dialog box.

Click Allow again to start the Dimension 4 service.
On the main Dimension 4 dialog box, click Settings.

We’re going to set up Dimension 4 to load when Windows starts up, sync the clock, and then exit the program.
At the top of the dialog box, is a list of servers you can choose from.
In the How Often section, check the Load Dimension 4 at startup and Once loaded, wait until online boxes. Then, select Synchronize once, then exit.
Uncheck the Maximum correction box in the Correction section. If you don’t uncheck this box, this won’t work. This setting only updates the time if the time on the computer is within the specified time range.
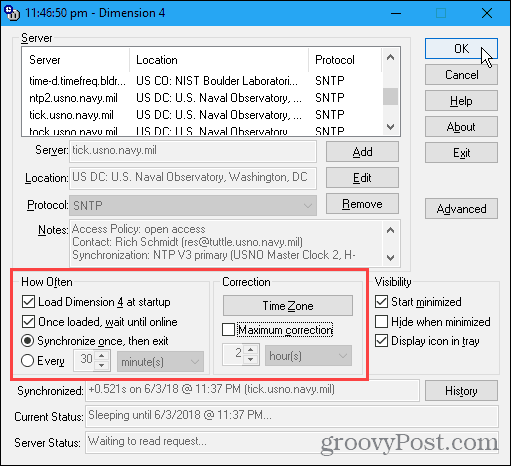
By default, Dimension 4 automatically uses a different server every time it syncs. If you’ve selected a specific server, and you want to use that same server every time, click Advanced on the right side of the main Dimensions 4 window.
In the Server selection section on the Advanced Settings dialog box, select Use the selected server. Change any other settings you want to adjust and click OK.
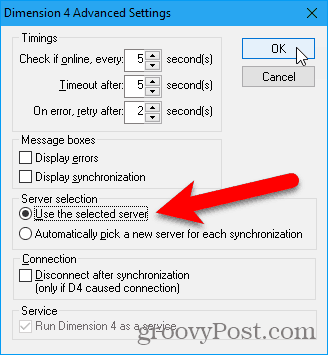
Now, every time you start Windows, your PC’s clock will sync with the server you selected or the one Dimension 4 selects each time it syncs.
Atomic Clock Sync
Atomic clocks are considered the most precise clocks. The free tool, Atomic Clock Sync, offers an easy way to sync your PC’s clock with atomic time on a regular interval.
This program allows you to automatically sync your PC’s time with the atomic time servers maintained by the National Institute of Standards and Technology (NIST) in the United States. These servers are considered the most accurate and correct atomic time servers.
Download Atomic Clock Sync and double-click the .exe file to run the program. No installation needed.
If the User Account Control dialog box displays, click Yes to give permission and continue.
The Current Settings tab shows the current date and time settings in Windows. For the time synchronization to work properly, you must have the correct time zone selected on your computer and have the correct Daylight Savings Time rules set.
If you need to adjust the date and time settings, click Change on the Current Settings tab.
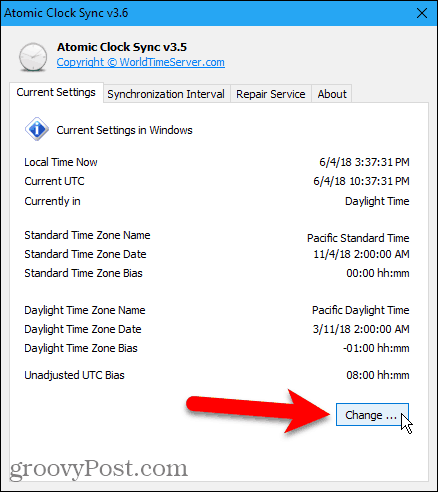
Use the Date and Time dialog box to Change date and time or Change time zone, as necessary.

To specify how often your PC’s clock synchronizes, click the Synchronization Interval tab.
The default interval is 604,800 seconds, which is one week. Use the drop-down list to choose the type of interval (seconds, minutes, hours, or days). Enter a number for that interval in the box to the left of the drop-down list. Then, click Apply.
For example, we changed the interval to one day.
You can also manually sync the clock by clicking Sync Now.

If you’re having problems syncing your clock, click the Repair Service tab and go through the numbered button steps to try to fix the problem.
The program also provides a link to a step-by-step troubleshooting guide, in case you’re still having problems.

Have Your Computer Keep Accurate Time
Do you have clocks that sync to atomic time around your house? What about a watch that syncs to atomic time or a smartwatch? Now you can include your computer in your collections of devices that keep accurate time.
Часы с секундами в трее Windows 10

Если у вас имеется потребность в том, чтоб хоть иногда знать точное время до секунд, тогда предлагаем вам узнать, как можно расположить часы с секундами в трее Windows 10 таким образом, чтоб они имели практически прежний размер, но при этом, показывали время с точностью до секунд. Понятное дело, что использование данного способа настройки часов потребует от вас немного времени и сил, но согласитесь, что это в разы лучше, по сравнению с тем, что вы могли установить стороннее приложение, которое отображает время, но при этом, пусть и не сильно, но потребляет системные ресурсы.
1. Используем команду «regedit» в окне «Выполнить», что позволит произвести открытие редактора реестра и развернуть у него колонку слева следующим образом:
2. Используя контекстное меню, смело создавайте новый 32-битный параметр типа DWORD, который непременно должен получить название «ShowSecondsInSystemClock»:

Обратите внимание, что в качестве значения вновь созданного параметра, необходимо использовать «1»:

3. Завершающим этапом ваших действий, будет перезагрузка операционной системы, после чего, вы собственно и увидите часы с секундами в трее Windows 10.


И в конце, хотелось бы отметить, что если вам при каких-то обстоятельствах больше не потребуются часы с секундами, просто измените значение с «1» на «0» или же удалите созданный параметр с именем «ShowSecondsInSystemClock», а после этого, произведите перезагрузку операционной системы, чтоб все встало на круги своя.
Отзывы (2)
Кирилл 06.05.2017, 23:38
Торгую на рынке Форекс и часто бывает так,что очень нужны часы с секундами,а загружать стороннюю ерунду не хотелось! Спасибо большое за подробное разъяснение! Теперь торговля пойдёт ещё лучше! ))


