- How to change color modes on the Windows 10 May 2019 Update
- Color schemes in Windows Terminal
- Switching to a different color scheme
- Creating your own color scheme
- How to Change Color Scheme in Windows 10 Automatically
- Use ColorTool to change Command Prompt color scheme & download more color schemes
- Change Windows Console color scheme
- Microsoft’s ColorTool
- Modify default Color scheme of CMD
- Download color schemes for Command Prompt from GitHub
- Изменение цветовой схемы панели администрирования и панели запуска Change the Color Scheme of the Dashboard and Launchpad
- Создание XML-файла Create the xml file
- Установка XML-файла To install the .xml file
- Области панелей мониторинга и панели запуска, которые можно изменить Dashboard and Launchpad areas that can be changed
How to change color modes on the Windows 10 May 2019 Update
Although on Windows 10, the ability to change the color mode to customize the desktop and app experience has been around for a long time, it’s not until the release of the May 2019 Update (version 1903) that you see a more consistent experience and more options.
For instance, in previous versions, you’re able to use a light mode, but it’s was limited and inconsistent as the Start menu, taskbar, Action Center, and other visuals didn’t use light colors. Also, before the October 2018 Update, a dark mode was available, but again it’s wasn’t consistent as legacy features like File Explorer and Windows Console didn’t include a dark color scheme.
Starting with the first semi-annual feature update for 2019, the Settings app introduces new options that allow you to enable a true light mode that expands the light color scheme across all visual elements. If you select the dark mode, you’ll notice that it’s more consistent, and the colors now expand to the Windows Console. In addition, there’s even a new custom mode, which allows you to set the default colors for Windows 10 and apps individually.
In this Windows 10 guide, we’ll walk you through the steps to customize your desktop experience with the new color settings available with the May 2019 Update.
Color schemes in Windows Terminal
Windows Terminal lets you define your own color schemes, either by using the built-in preset schemes, or by creating your own scheme from scratch. To change schemes, you’ll need to edit the settings.json file in an editor such as Visual Studio Code.
Switching to a different color scheme
Launch Windows Terminal and then select the small downward-facing arrow in the title bar. This will open a pull-down menu that lists the available profiles on your system (for example, Windows PowerShell and Command Prompt) and some other options. Select Settings, and the settings.json file will open in your default text editor.
This file is where you can define various options per window or per profile. To demonstrate, let’s change the color scheme for the Command Prompt profile.
Look down the JSON file until you find the section that includes:
Change it to read:
Notice the extra comma in the hidden line. Once you save this file, Windows Terminal will update any open window. Open a Command Prompt tab if you haven’t already, and you’ll immediately see that the colors have changed.
Creating your own color scheme
The «Tango Light» scheme is included as a default option, but you can create your own scheme from scratch or by copying an existing scheme.
Color schemes can be defined in the schemes array of your settings.json file. They are written in the following format:
Every setting, aside from name , accepts a color as a string in hex format: «#rgb» or «#rrggbb» . The cursorColor and selectionBackground settings are optional.
How to Change Color Scheme in Windows 10 Automatically
If you’re new to Windows 10, things might not look just the way you want them and you have no idea how to make those little changes. Changing your color scheme for your theme can be one of those things.
If you’re using a theme with several wallpapers and these wallpapers really vary in their colors, it might be a good idea to set your color scheme to change automatically based on your background. In general it’s a good idea to set your PC to automatically pick the color scheme for you theme.
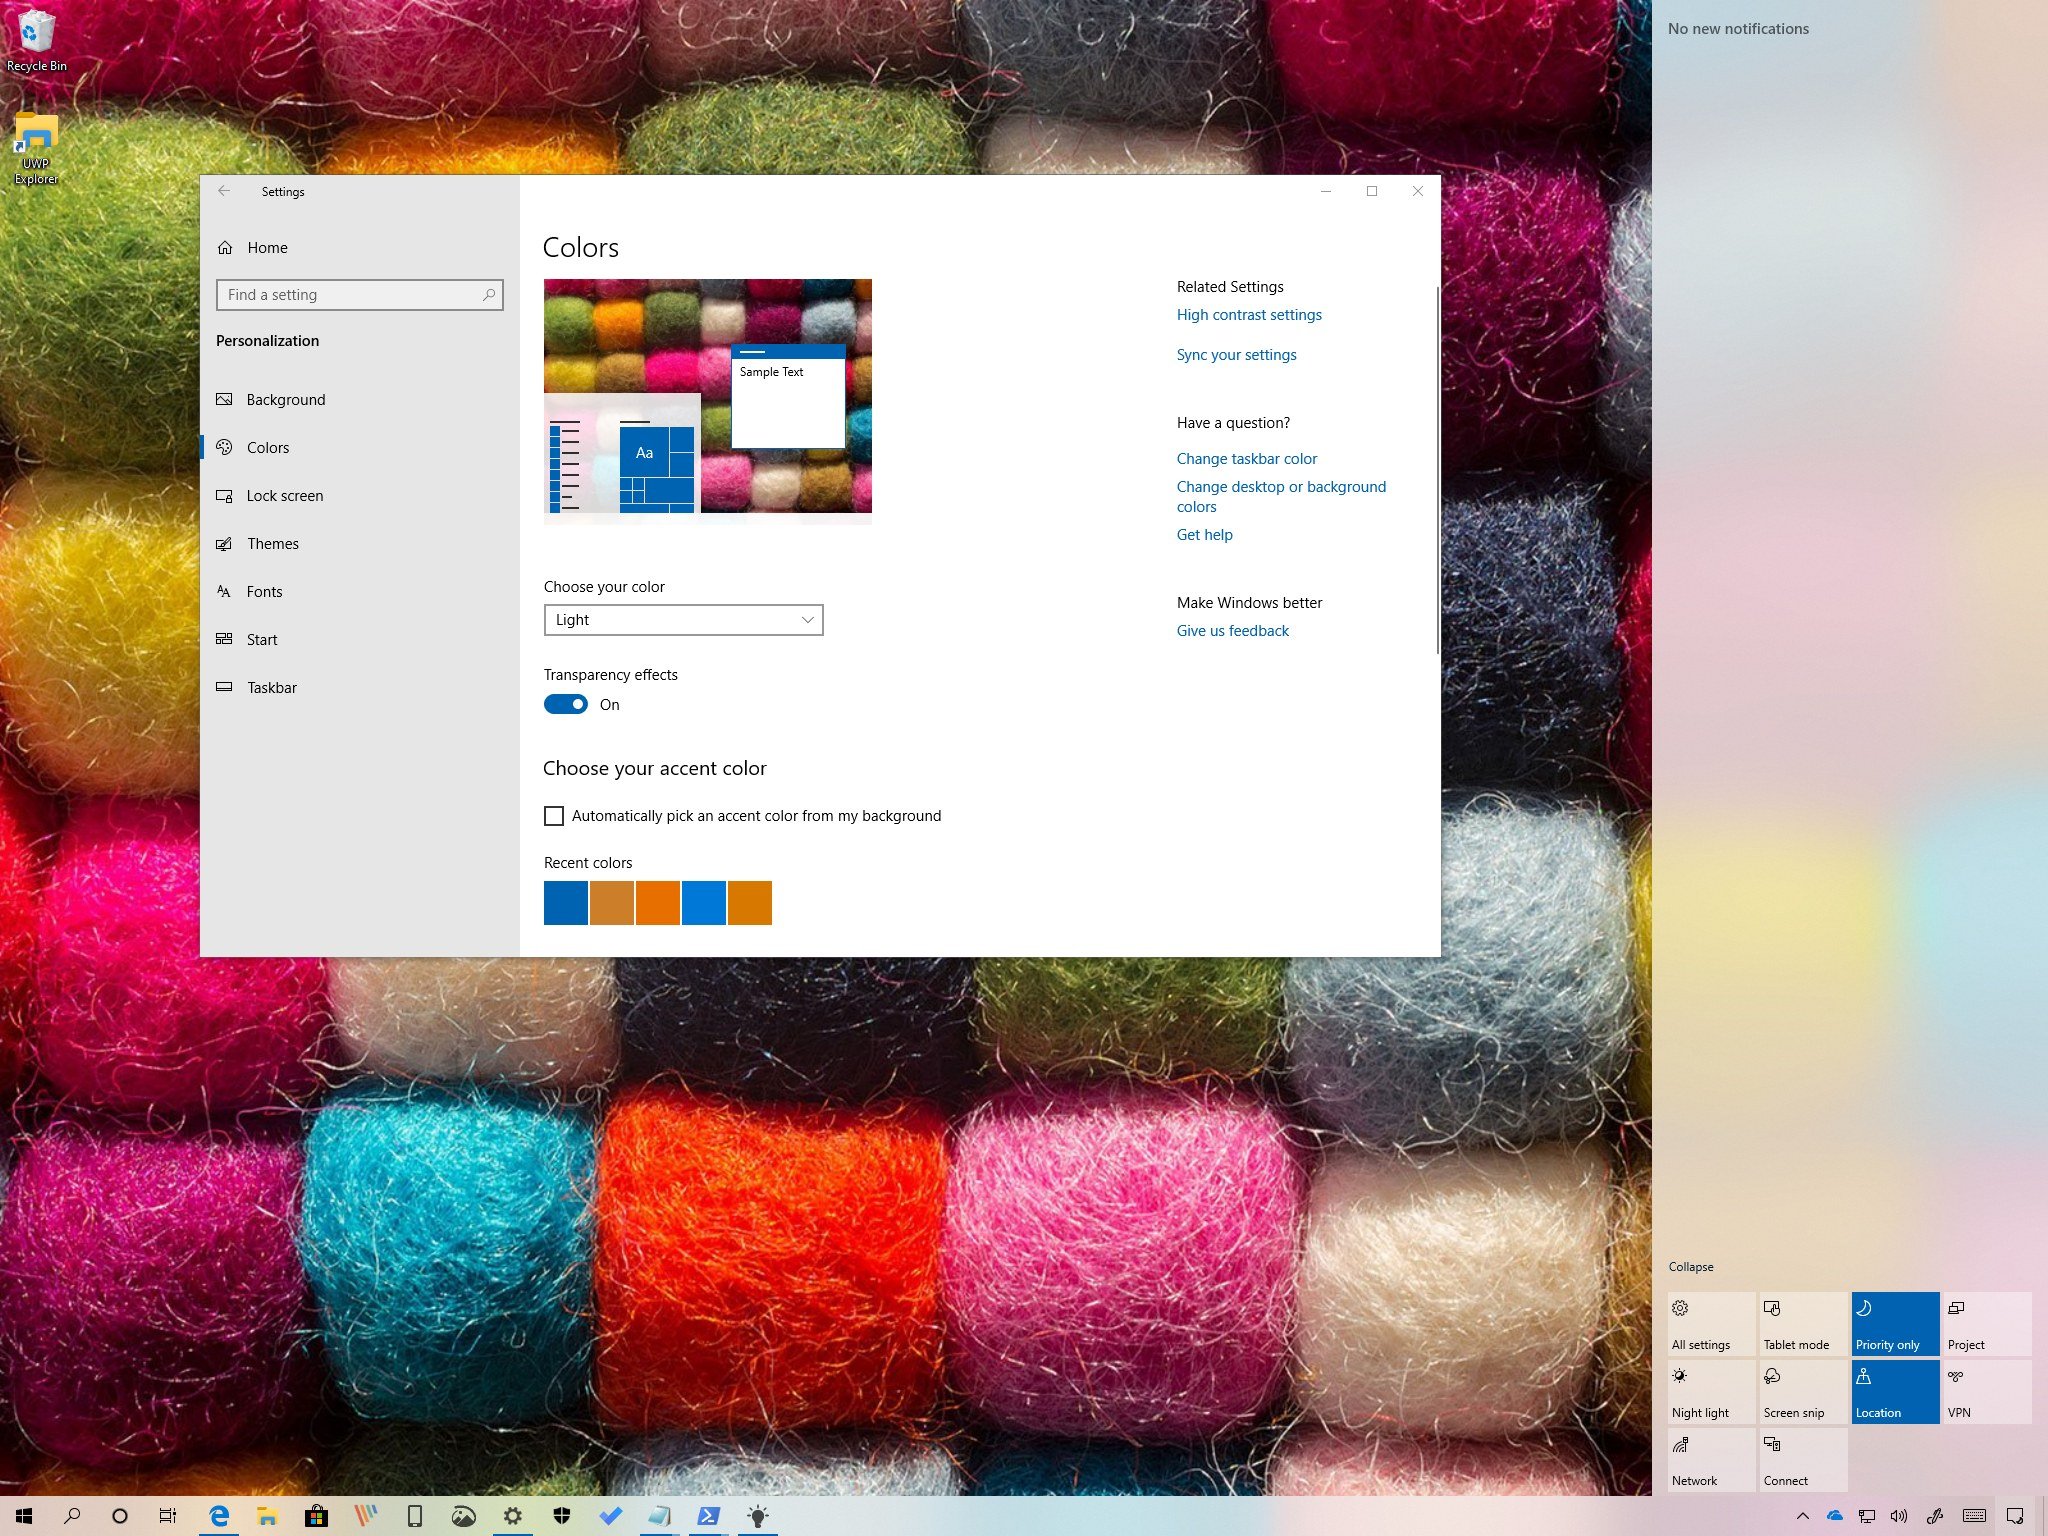
To do this, right click on your desktop and click Personalize.

This should open up your Personalization window. Next choose ‘Colors‘ from the menu on the left. You should be presented with 3 options that deal with the color schemes for your theme such as the color of the taskbar, windows etc.

As seen above, you can toggle On/Off the option to pick the accent color from the background automatically. Set this to On to automatically change your entire color scheme based on your wallpaper.
This can be very useful for any theme pack that you download from Theme Raider or anywhere else. You also have two more options that affect the appearance of the start menu and task bars. One to set if the task bar and start menu change in color as well and other to control their transparency.
Here’s a quick look at how the color is automatically selected based on the wallpaper.

As you can see the accent colors are picked automatically to compliment your background and applied universally across your PC. The colors will automatically change when the background changes on your PC.
Use ColorTool to change Command Prompt color scheme & download more color schemes
Microsoft came up with the bundle of new features with its Windows 10 Fall Creators Update. Along with several improvements seen in its latest version of Windows, it also paved the way for the easy customization of the Windows Console or Command Prompt. In its latest update, Microsoft created a new color scheme for the Windows Console to give a contemporary look. In this post, we will see how to how to change Windows Console color scheme in Windows 10 using Microsoft’s ColorTool & download more color schemes for CMD from Github.
Change Windows Console color scheme
While the design and layout play a key role in improving the legibility of text, the default color values were changed for the legible-ness in the latest high contract monitors. While this feature is seen only if you are running a clean installation of Windows 10, you can still get the new color scheme in your existing Windows system by simply downloading the official tool released by Microsoft. This tool allows for easy customization of your Command Prompt window. The following steps will guide you to install the new color schemes and customize the command prompt with the new color scheme.
Microsoft’s ColorTool
Download the open source tool by Microsoft called Color Tool from GitHub repository and extract the contents of the colortool .zip file to a directory on your system.
Type Command Prompt in the Start menu and right-click on the result. Run CMD as administrator.
Type the following command to navigate to the folder containing color tool executable files and tap Enter:
Type the following command to change the current windows color scheme and press Enter to change the color scheme of Windows console:
The scheme-name colors are available in the “Schemes folder” inside “colortool” folder. In the above command, the scheme-name can be the name of the color scheme you choose.
Campbell.ini, campbell-legacy.ini, cmd-legacy.ini, deuternopia.itermcolors, OneHalfDark.itermcolors, OneHalfLight.itermcolors, solarized_dark.itermcolors and solarized_light.itermcolors are the eight color schemes available in the current release.
Right-click on the Command Prompt’s title bar and select Properties to open up the Properties window.
In the Properties window, click on OK button to apply the changes.
Restart the command prompt to see the results.
Modify default Color scheme of CMD
If you wish to change the command prompt’s default color scheme, type the following command and continue with the last three steps detailed above.
Run the following command to change both default color scheme and current window color scheme. Press Enter and once again follow the last three steps detailed above:
Once done with all the steps above you now have the modern Windows Console with the new color scheme. If at any time you wish to get back to your default color setting, you can do so by simply applying Campbell scheme or use the command cmd-campbell scheme to go back to the default color.
Download color schemes for Command Prompt from GitHub
What if you aren’t happy with the only few color schemes packed in the colortool? We have a solution if you wish to experiment with many other colors. There is an open project in GitHub repository called iTerm2 color schemes which are recommended by Microsoft. It offers more than 100 color schemes.
Follow the process outlined below if you want to experiment with these color schemes for your Command Prompt
Go to GitHub repository and download iTerm2-Color-Schemes and extract all the files from iTerm2-Color-Schemes.zip.
Open the schemes folder and copy all the files inside a folder. Next, inside the colortool folder, open the schemes folder and paste the files into the Scheme folder under ColorTool
Now you will be able to apply colors available from these ample of new color schemes.
Upon deciding the color for your Command Prompt, simply follow the steps above to change the color schemes of Command Prompt.
Date: December 9, 2017 Tags: CMD, Customize
Изменение цветовой схемы панели администрирования и панели запуска Change the Color Scheme of the Dashboard and Launchpad
Область применения: Windows Server 2016 Essentials, Windows Server 2012 R2 Essentials, Windows Server 2012 Essentials Applies To: Windows Server 2016 Essentials, Windows Server 2012 R2 Essentials, Windows Server 2012 Essentials
Цветовую схему панели администрирования и панели запуска можно изменить. Для этого необходимо задать требуемые цвета в XML-файле, установить этот файл в папку на сервере и указать имя файла в записи реестра. You can change the color scheme of the Dashboard and the Launchpad by defining the colors that you want to use in an XML formatted file, installing the .xml file in a folder on the server, and by specifying the .xml file name in a registry entry.
Создание XML-файла Create the xml file
В следующем примере показано возможное содержимое XML-файла. The following example shows the possible contents of the .xml file:
XML-элементы необходимо указывать в том же порядке, что и в предыдущем примере. The xml elements must be specified in the order listed in the previous example.
Все значения атрибута HexValue являются примерами шестнадцатеричных значений цветов. All values of the HexValue attribute are examples of hexadecimal values for colors. Можно ввести шестнадцатеричное значение любого цвета, который требуется использовать. You can enter any hexadecimal color value that you want to use.
Используя Блокнот или Visual Studio 2010, создайте XML-файл, содержащий теги для областей, которые требуется настроить. Use Notepad or Visual Studio 2010 to create the .xml file that contains the tags for the areas that you want to customize. Можно задать любое имя файла, но он должен иметь расширение XML. The file can be given any name, but it must have a .xml extension. Описание областей, которые можно настраивать на панели администрирования и панели запуска, см в соответствующем разделе. For a description of the areas that can be customized on the Dashboard and Launchpad, see Dashboard and Launchpad areas that can be changed.
Установка XML-файла To install the .xml file
На сервере переместите указатель мыши в правый верхний угол экрана и нажмите кнопку Поиск. On the server, move your mouse to the upper right corner of the screen, and click Search.
В поле поиска введите regedit, затем щелкните приложение Regedit. In the Search box, type regedit, and then click the Regedit application.
В левой области последовательно разверните узлы HKEY_LOCAL_MACHINE, SOFTWARE, Microsoft и Windows Server. In the left pane, expand HKEY_LOCAL_MACHINE, expand SOFTWARE, expand Microsoft, expand Windows Server. Если раздел OEM не существует, необходимо создать его, выполнив следующие действия. If the OEM key does not exist, you must complete the following steps to create it:
Щелкните правой кнопкой мыши узел Windows Server, выберите команду Создать и щелкните пункт Раздел. Right-click Windows Server, point to New, and then click Key.
В качестве имени раздела введите OEM. Type OEM for the name of the key.
Щелкните правой кнопкой мыши раздел OEM, выберите команду Создать и щелкните пункт Строковый параметр. Right-click OEM, point to New, and then click String Value.
Введите CustomColorScheme в качестве имени строки и нажмите клавишу Ввод. Enter CustomColorScheme as the name of the string, and then press Enter.
Щелкните правой кнопкой мыши CustomColorScheme в правой панели, а затем выберите опцию Изменить. Right-click CustomColorScheme in the right pane, and then click Modify.
Введите имя файла, а затем нажмите кнопку ОК. Enter the name of the file, and then click OK.
Скопируйте файл в папку %programFiles%\Windows Server\Bin\OEM. Copy the file to %programFiles%\Windows Server\Bin\OEM. Если каталог OEM не существует, создайте его. If the OEM directory does not exist, create it.
Области панелей мониторинга и панели запуска, которые можно изменить Dashboard and Launchpad areas that can be changed
В этом разделе приведены примеры областей панели администрирования и панели запуска, которые можно настраивать. This section includes examples of Dashboard and Launchpad areas that can be customized.


