- Использование режима совместимости в играх и приложениях Windows
- Запуск приложения в режиме совместимости
- Автоматическое использование параметров совместимости
- Редактор реестра для установки совместимости
- Дополнительные параметры
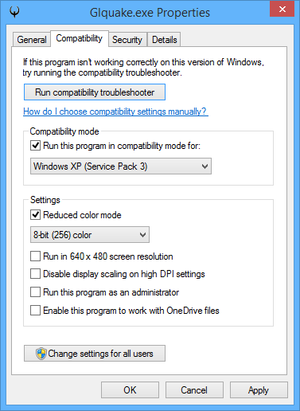
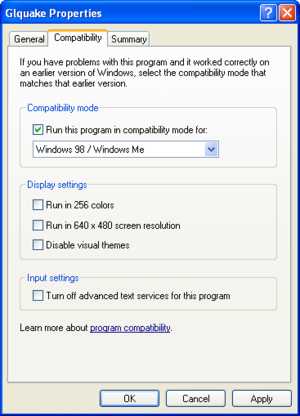
- Режим пониженной цветности
- Запуск с разрешением 640х480
- Отключение масштабирования
- Отключение визуального оформления
- Отключить композицию рабочего стола
- Применение настроек для всех учётных записей
- Выполнять программу от имени Администратора
- Windows Compatibility Mode
- Contents
- Compatibility mode [ edit ]
- Settings [ edit ]
- Reduced color mode (8/8.1/10) [ edit ]
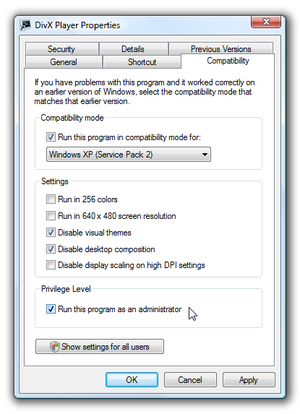
- Run in 256 colors (XP/Vista/7) [ edit ]
- Run in 640×480 screen resolution [ edit ]
- Disable visual themes [ edit ]
- Disable desktop composition [ edit ]
- Disable display scaling on high DPI settings [ edit ]
- Disable fullscreen optimizations [ edit ]
- Run this program as an administrator [ edit ]
- How to Set Compatibility Mode for Apps in Windows 10
- How to Use Windows’ Program Compatibility Troubleshooter
- How to Run an App in Compatibility Mode
Использование режима совместимости в играх и приложениях Windows
Часто, пользователи сталкиваются с тем, что старые утилиты отказываются работать в новой системе, иногда, они могут даже не устанавливаться или выдавать сбои в ходе работы. Лучшим вариантом будет зайти на сайт разработчика и поискать там версию, которая подходит для системы, однако, часто бывает так, что нужной версии не оказывается, а работать с программой нужно.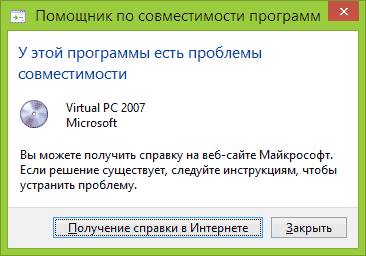
В таких случаях можно использовать режим совместимости (compatibility mode). Он позволяет приложению думать, что оно запускается в одной из предыдущих версий виндовс, что может убрать множество сбоев в работе и позволит пользователю сделать все, что необходимо. Однако, не стоит таким образом запускать антивирусы, утилиты для очистки компьютера или для работы с системными файлами, они могут удалить важные данные.
Запуск приложения в режиме совместимости
Первым делом, нужно рассказать о том, как именно можно запустить нужную утилиту в режиме совместимости. Для начала, потребуется найти исполняемый файл программы или его ярлык, после этого нужно кликнуть по нему правой кнопкой мыши и выбрать свойства во всплывшем меню. Теперь следует перейти на вкладку Совместимость, здесь можно галочкой отметить пункт «Запустить программу в режиме совместимости с», а в строке под ней следует указать нужную версию системы.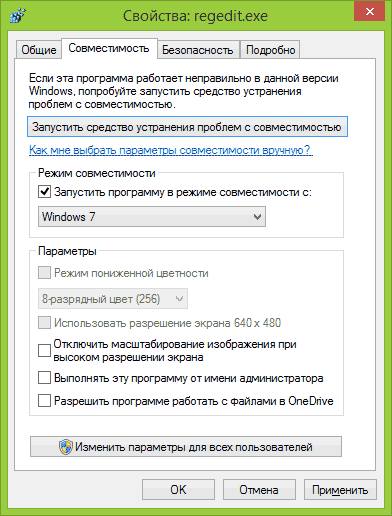
Со стартового экрана можно легко попасть на нужный файл, просто щелкнув по плитке и выбрав расположение файла.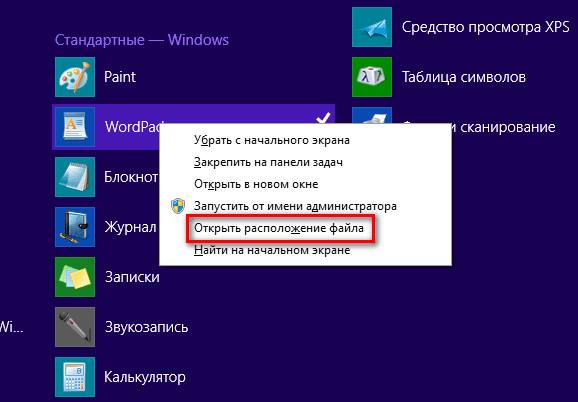
Здесь же можно задать параметры, о которых будет подробнее рассказано далее.
Отключение режима происходит аналогичным образом, но производится в обратном порядке. Т.е. просто снимаем нужную галочку.
Чтобы отключить режим совместимости выполняем последовательность действий в обратном порядке — заходим в свойства и снимаем соответствующую галочку.
Автоматическое использование параметров совместимости
ОС и сама может выставлять нужные параметры, для вызова соответствующего помощника следует нажать на нужный файл ПКМ и выбрать исправление проблем с совместимостью.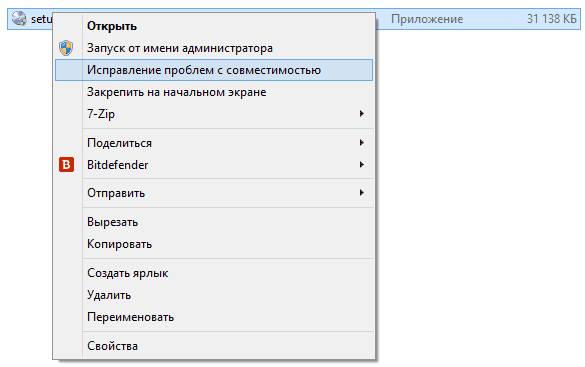
После этого откроется мастер для устранения неполадок. Для начала стоит применить рекомендуемые параметры.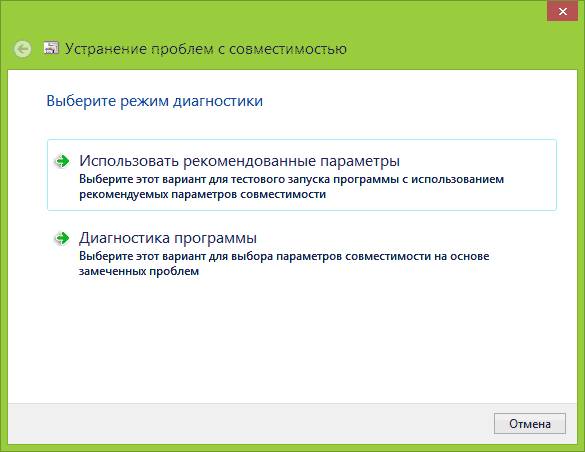
Система подберет те параметры, которые необходимы для приложения по ее мнению. Их можно будет просмотреть в следующем окне.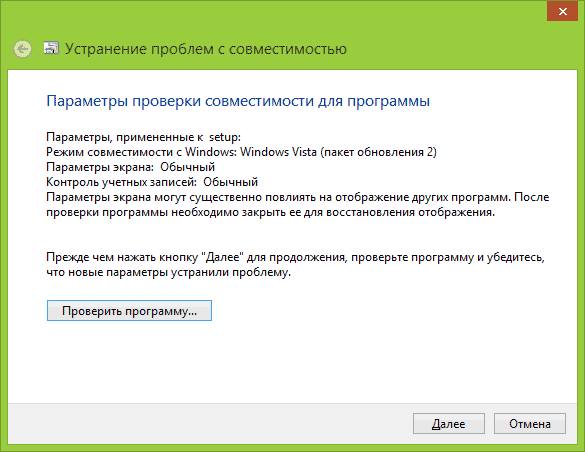
Если таким образом проблему решить не удалось, то можно воспользоваться диагностикой, при этом пользователь сам будет указывать на то, какие ошибки возникают в программе, а параметры будут подбираться исходя из этого.
Редактор реестра для установки совместимости
Есть возможность установки совместимости и через утилиту для редактирования реестра, однако, не имеет особо смысла обычным пользователям применять данные метод. Работа с реестром всегда должна быть точной и аккуратной, иначе есть возможность вызвать еще большее количество ошибок.
Для начала потребует нажать win+r и написать regedit. После открытия нужно пройти по пути HKEY_CURRENT_USER\ Software\ Microsoft\ Windows NT\ CurrentVersion\ AppCompatFlags\ Layers. Теперь нужно нажать ПКМ на пустом месте и во всплывшем меню выбрать создать, а дальше нажать на строковый параметр. Вместо названия переменной нужно указать полный путь до исполняемого файла приложения.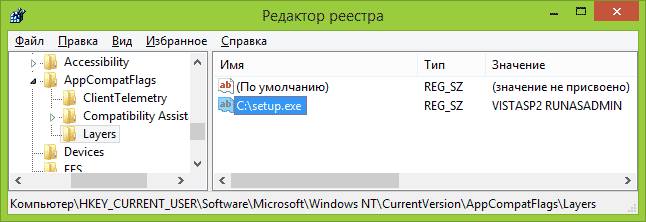
В качестве значения нужно указать:
- Windows 95 — WIN95
- Windows 98 иME — WIN98
- Windows NT 4.0 — NT4SP5
- Windows 2000 — WIN2000
- Windows XP SP2 — WINXPSP2
- Windows XP SP3 — WINXPSP3
- Windows Vista — VISTARTM (VISTASP1 и VISTASP2 — для соответствующих Service Pack)
- Windows 7 — WIN7RTM
А после этого добавить к значению RUNASADMIN. Те же действия придется проделать и для директории по адресу HKEY_LOCAL_MACHINE \ Software \ Microsoft \ Windows NT \ CurrentVersion \ AppCompatFlags \ Layers.
Теперь можно закрывать редактор и перезагружать компьютер.
Дополнительные параметры
В этом разделе будет рассказано о настройках совместимости, которые доступны для утилит.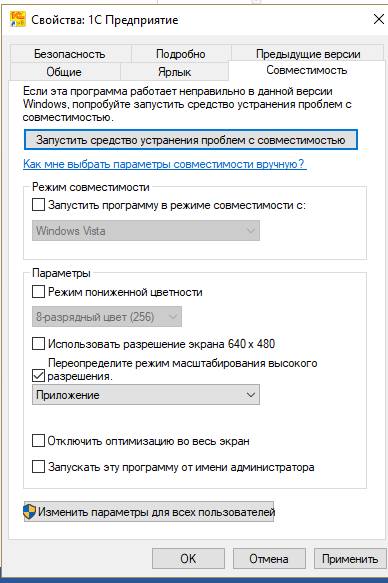
Режим пониженной цветности
Эта настройка должна применяться только для совсем старых приложений. В старых утилитах имелся только ограниченный набор цветов, так что эта опция позволяет ограничить количество применяемых цветов, что поможет избежать сбоев, а также проблем с графической частью утилиты.
Запуск с разрешением 640х480
Тут тоже все довольно просто. Многие утилиты могут не работать вообще с современным разрешениями или могут быть проблемы с графикой и отображением. Если такие проблемы возникли со старой программой, то стоит попробовать применить эту опцию, после чего снова запустить программу и проверить отображение.
Отключение масштабирования
Эта опция позволит отключить стандартное масштабирование, применяемое системой. Использоваться будет только тот параметр разрешения, который задан разработчиком в самой программе. Эту опцию стоит использовать при проблемах с графикой.
Отключение визуального оформления
Убирает использование тем в программе, также убирает все современные эффекты из него. Из-за того, что в утилите не было предусмотрено взаимодействие с такими эффектами, в программе могут возникать ошибки, так что стоит применить эту опцию для старых утилит.
Отключить композицию рабочего стола
Этот пункт отключает некоторые возможности интерфейса Aero, что также может повлиять на работоспособность программы.
Применение настроек для всех учётных записей
Если программа используется на нескольких учетных записях, то, после окончания настройки, когда все параметры будут подобраны правильно, можно нажать ее. При этом, пользователю больше не потребуется проводить настройки, программа будет работать с одинаковыми параметрами для всех учетных записей.
Выполнять программу от имени Администратора
Некоторые утилиты могут работать только с правами администратора, эта опция создана специально для них. Ее следует применять тогда, когда пользователь полностью уверен в надежности приложения и его корректной работе.
Windows Compatibility Mode

Windows (XP and later) includes an underlying compatibility engine that uses compatibility shims to apply fixes and changes for applications that might otherwise not function properly. This is intended as a way to enhance backwards compatibility for older applications, but can also be used for solving or working around various issues that an application might have. While the underlying compatibility engine includes a wide array of compatibility fixes and modes available for use by system administrators (managed through the Compatibility Administrator utility), most of those are not of interest for the average end-user. Instead Microsoft makes a few key compatibility settings easily accessible through the Compatibility tab in the properties of an executable or shortcut.
Note that compatibility settings will not fix problems such as missing DLL errors or rainbow colors. Refer to their respective pages for further details.
Accessing compatibility settings
- Right-click the executable of shortcut of the game
- From the drop-down menu, select Properties.
- Once the window is open, select the Compatibility tab.
Applied compatibility settings are stored in the Windows registry, based on if if it was applied for a single user or all.
- HKEY_CURRENT_USER \Software\Microsoft\Windows NT\CurrentVersion\AppCompatFlags\Layers
- HKEY_LOCAL_MACHINE \Software\Microsoft\Windows NT\CurrentVersion\AppCompatFlags\Layers
Contents
Compatibility mode [ edit ]
Try enabling this setting and choosing a Windows version that the game was originally designed for. The versions listed will vary somewhat depending on the version of Windows that is currently being used as well as the CPU architecture of the game (32-bit/64-bit).
As of Windows 10, here are all the possible options:
- Windows 1.0
- Windows 2.0
- Windows 3.0
- Windows 3.1
- Windows 95
- Windows 98 / Windows ME
- Windows NT 4.0 (Service Pack 5)
- Windows 2000 (SP1, SP2, SP3, SP4)
- Windows XP (Service Pack 2)
- Windows XP (Service Pack 3)
- Windows Server 2003 (Service Pack 1)
- Windows Server 2008 (Service Pack 1)
- Windows Server 2012 (Service Pack 1)
- Windows Server 2016 (Service Pack 1)
- Windows Vista
- Windows Vista (Service Pack 1)
- Windows Vista (Service Pack 2)
- Windows 7
- Windows 8
- Windows 8.1
- Windows 10
Settings [ edit ]
Reduced color mode (8/8.1/10) [ edit ]
Try choosing the appropriate mode when running 256-color and 16-bit games. This is also useful for games that run correctly without this setting but warn about too many colors; enabling this setting will skip the warning.
For Windows 7 and earlier, 16-bit color can be used by changing the desktop color depth before running the game.
Run in 256 colors (XP/Vista/7) [ edit ]
Try this when running 256-color games. This is also useful for 256-color games that run correctly without this setting but warn about too many colors; enabling this setting will skip the warning.
Note: Beginning in Windows 8 onward, this setting does not actually switch the color depth; it merely tells the game it’s running in that depth without actually changing. As such, if the game absolutely requires 8-bit color to actually function (most notably if it uses palette cycling animation or fades that do not work above this depth), this will not solve the problem.
Run in 640×480 screen resolution [ edit ]
This sets the Windows resolution to 640×480 before launching the game.
Disable visual themes [ edit ]
Stops visual themes built in to the operating system from affecting the game.
Disable desktop composition [ edit ]
Disables Aero, the default theme and graphical user interface.
Disable display scaling on high DPI settings [ edit ]
This prevents automatic resizing of programs if large-scale font size is in use. To disable display scaling in Windows 10, tick the «Override high DPI scaling behavior.» and choose Application option in the dropdown.
Disable fullscreen optimizations [ edit ]
This prevents the use of Windows 10’s built-in fullscreen optimizations for games running in exclusive fullscreen mode.
Run this program as an administrator [ edit ]
This setting makes the application run as an administrator, which is required for some older games. It is also possible to work around issues caused by separate third-party injectors by using this option, as those third-party injectors will be unable to inject themselves into the game if they are running without elevated privileges.
How to Set Compatibility Mode for Apps in Windows 10
By Melanie Pinola 24 August 2015
Most software created for previous versions of Windows run well in Windows 10, but you might have some older apps that don’t work well or even at all with the new operating system. You can try to fix any issues you have running these older desktop programs in Windows 10 by changing their compatibility mode settings. If you’re still having problems, learn how to open a port on Windows Firewall.

Windows has a built-in tool called Program Compatibility Troubleshooter that could automatically fix any compatibility problems for you. If the troubleshooter can’t fix the problem, you can manually make an app run in compatibility mode, which will run the app using the settings from an earlier version of Windows. You can have the troubleshooter automatically search for apps that could have issues in Windows 10 or manually run the troubleshooter on a specific app. Here’s how to do both.
How to Use Windows’ Program Compatibility Troubleshooter
1. In the taskbar search box, enter run programs, then click «Run programs made for previous versions of Windows.»
2. Click Next and the troubleshooter will try to detect potential issues with your apps.
3. Select the app that’s having issues in the next window and click Next.
4. Select a troubleshooting option: use the recommended compatibility setting or choose compatibility settings yourself.
If you choose to use the recommended settings, the troubleshooter will test the app using a previous version of Windows so you can see if that resolves the issue.
If you choose the choose to troubleshoot the app, the troubleshooter will ask you which problems you’re experiencing. Depending on your selection, the troubleshooter will offer tests and suggestions to resolve the problem, such as testing the display settings for the app.
5. Click the Test the program button and then click Next.
You can then either choose to save the settings for the app, try different settings, or report the problem to Microsoft and view help articles online.
You’ll have to run the troubleshooter for each app you’re having compatibility problems with.
How to Run an App in Compatibility Mode
Alternatively, you can go into a app’s properties to change its compatibility mode settings. With compatibility mode, you can force an app to use settings from an earlier version of Windows — helpful if you know the app ran well in, say, Windows 7 or Vista. You can also change the display and color settings for the app.
1. Right-click on an app and select Properties. You can do this from the app’s shortcut or by navigating in File Browser to the EXE file.
2. Select the Compatibility tab, then check the box next to «Run this program in compatibility mode for:»
3. Select the version of Windows to use for your app’s settings in the dropdown box.
4. Hit Apply, then run your app and see if this fixed your issues.


