- Manage Insider Preview builds across your organization
- Register your domain
- Join devices to Azure Active Directory
- Choose your diagnostic data settings
- Create and manage policies
- Set up Insider Preview builds using Group Policy
- Set up Insider Preview builds using Intune
- Set up Insider Preview builds using other MDM service providers
- Set up Insider Preview builds using Configuration Manager
- Set up Insider Preview builds with Windows Server Update Services (WSUS)
- Confirm installations
- Высвободил более 5 Гигабайт на диске, удалив файлы etl. Что это и можно ли удалять?
- Можно ли удалить файлы .etl и не повлияет ли это на вашу систему?
- Изменения сбора диагностических данных в Windows Changes to Windows diagnostic data collection
- Сводка изменений Summary of changes
- Изменение таксономии Taxonomy changes
- Изменение поведения Behaviorial changes
- Настройка устройства с Windows 10 для ограничения аварийных дампов и журналов Configure a Windows 10 device to limit crash dumps and logs
- Службы, использующие расширенные диагностические данные Services that rely on Enhanced diagnostic data
Manage Insider Preview builds across your organization
If you’re an administrator, you can manage installations of Windows 10 Insider Preview Builds across multiple devices in your organization using Group Policy, MDM solutions such as Intune, Configuration Manager, or Windows Server Update Services.
Register your domain
First, register your Azure Active Directory domain through our website. By registering your domain, you won’t have to register each device or user in the program and can set important policies around preview builds.
To register your domain:
- You must already be registered with the work email address tied to your Azure Active Directory (AAD) Global Administrator account. Learn more about registering with your work email address.
- It must be in Azure Active Directory. We don’t support Active Directory on premises in the Windows Insider Program.
- Use a production tenant of AAD, not a test tenant, to make the most of the program. The AAD tenant is just used for authentication, so you won’t need to worry about changes to it from the the program.
Join devices to Azure Active Directory
To receive Insider Preview builds, devices must be joined to the same AAD domain that you used to register with the program.
To join individual devices, go to Settings > Accounts > Access work or school, select Join this device to Azure Active Directory, and log in with your AAD account. Get more detailed instructions for this on Microsoft Azure Docs.
If you have your organization’s devices attached to Active Directory Domain Services, you can also bulk import all of them with Azure AD Connect.
Choose your diagnostic data settings
Your privacy is important to us. But, to run Insider Preview builds on a device updating directly from Windows Update, you must allow us to see a certain amount of diagnostic data, so we can investigate issues you might see.
- If you’re setting up Insider Preview builds for the first time, you must have optional data turned on to get started.
- If you’re already running Insider Preview builds in the Dev Channel on devices, use these instructions to update your diagnostic data settings.
Create and manage policies
You can use Windows Update for Business (Group Policy or Mobile Device Management (MDM) tools, such as Intune,) or Windows Server Update Service (WSUS) tools, such as Configuration Manager, to control how and when Windows 10 Insider Preview Builds are installed on devices in your organization.
Set up Insider Preview builds using Group Policy
In the Group Policy Management Console (GPMC), create a Group Policy Object and add it to the Organizational Unit that has the devices you want to manage in it.
Go to Computer Configuration > Administrative Templates > Windows Components > Data Collection and Preview Builds > Allow Telemetry.
Inside Allow Telemetry, select the Enabled radio button. Under Options, set the dropdown to 3 — Full, and apply.
Go to Computer Configuration > Administrative Templates > Windows Components > Windows Update > Windows Update for Business and open Manage preview builds.
Inside Manage preview builds, select the Enabled radio button, and apply. (Under the Options section’s Enable preview builds dropdown, you can also prevent installation on selected devices or set it to stop Insider Preview builds once a release is public.)
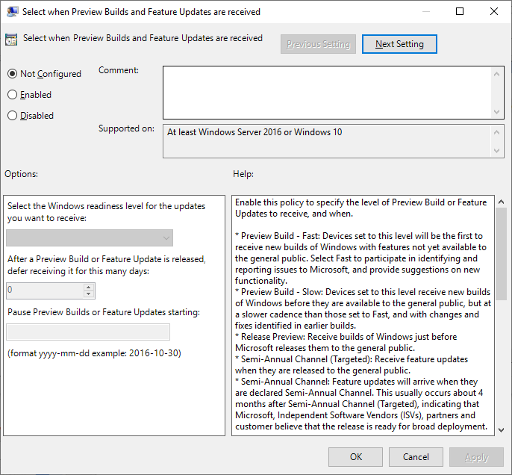
Go back to Computer Configuration > Administrative Templates > Windows Components > Windows Update > Windows Update for Business and open Select when Preview Builds and Feature Updates are received.
Inside Select when Preview Builds and Feature Updates are received, select the Enabled radio button. Under Options, choose the channel you’d like to get Insider Preview builds from the dropdown. (You can also choose to defer or pause builds here.)
You can also schedule update installations, choose active hours, and set policies for restart. Learn more about managing device restarts after updates.
Set up Insider Preview builds using Intune
Log in to the Azure portal and select Intune.
Go to Software Updates > Windows 10 Update Rings and select + Create to make an Update Ring policy.
Add a name and select the Settings section to configure its settings.
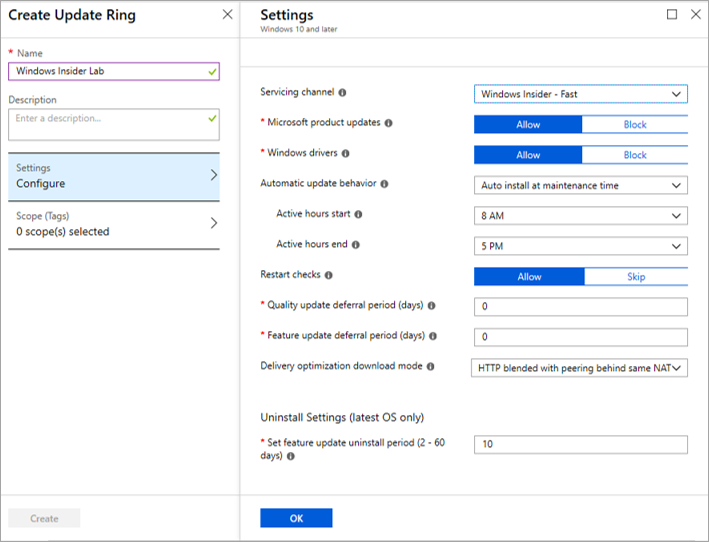
Under Servicing Channel, choose the channel you want to receive Insider Preview builds from.
Under Feature update deferral period, you can also choose to defer Insider Preview builds for a certain number of days after a release.
Select OK to comfirm your settings.
Select Create to save the policy.
Go to Assignments and assign your policy to specific users, devices or groups. You can create groups with one or more users or devices in Intune under Groups.
Select Save to deploy your new policy to these users, devices, or groups.
Set up Insider Preview builds using other MDM service providers
To set up Insider Preview builds through other MDM service providers, use these CSP settings:
Set up Insider Preview builds using Configuration Manager
- In the Products tab of Software Update Point Component Properties, select the checkbox next to Windows Insider Pre-Release. Select OK.
While this option will be visible on every version of Configuration Manager, you must be running Configuration Manager, version 1906 or newer to select it.
- If you already manage your organization’s deployments using Configuration Manager, go to Software Library >Overview >Windows 10 Servicing >All Windows 10 Updates to use the same procedure you currently use to deploy Windows 10 feature updates. In the list of All Windows 10 Updates, you’ll see an option for Windows Insider Pre-release Feature Update to Windows 10 Version 1909.
- Deploy the release the same way you would any other feature update.
Set up Insider Preview builds with Windows Server Update Services (WSUS)
From Products and Classifications in WSUS, check the Windows Insider Pre-release Product and Upgrades. Sync WSUS.
Once the sync completes and shows up on the WSUS console, approve it for the computer group you want the update deployed to, and deploy as you would any other update.
Confirm installations
Once a policy has been set, restart the device to activate the policy. Then, to confirm that your policies have been set correctly, go to Settings > Update & Security > Windows Update on one of the targeted devices and select View configured update policies.
You can also check this key in the Registry Editor on the device:
- HKEY_LOCAL_MACHINE\SOFTWARE\Policies\Microsoft\Windows\WindowsUpdate
Devices set to receive an Insider Preview build show:
BranchReadinessLevel = 2 (Dev Channel), 4 (Beta Channel) or 8 (Release Preview Channel)
Высвободил более 5 Гигабайт на диске, удалив файлы etl. Что это и можно ли удалять?
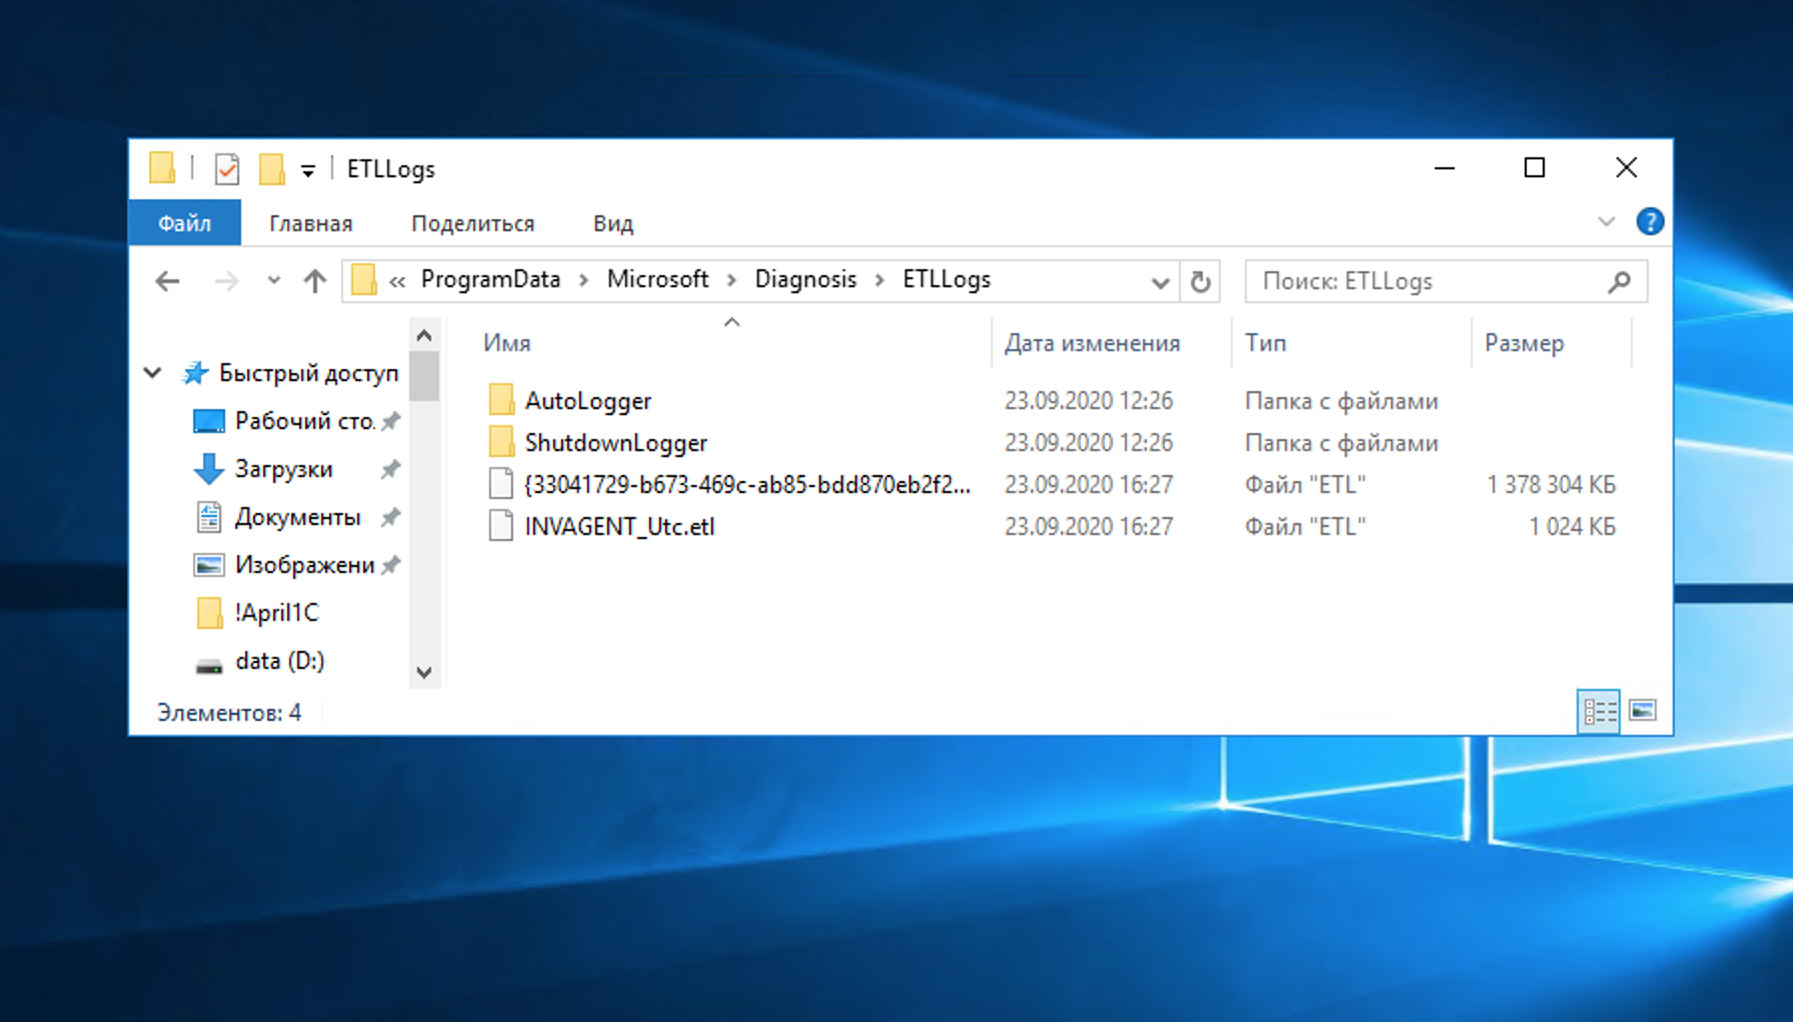
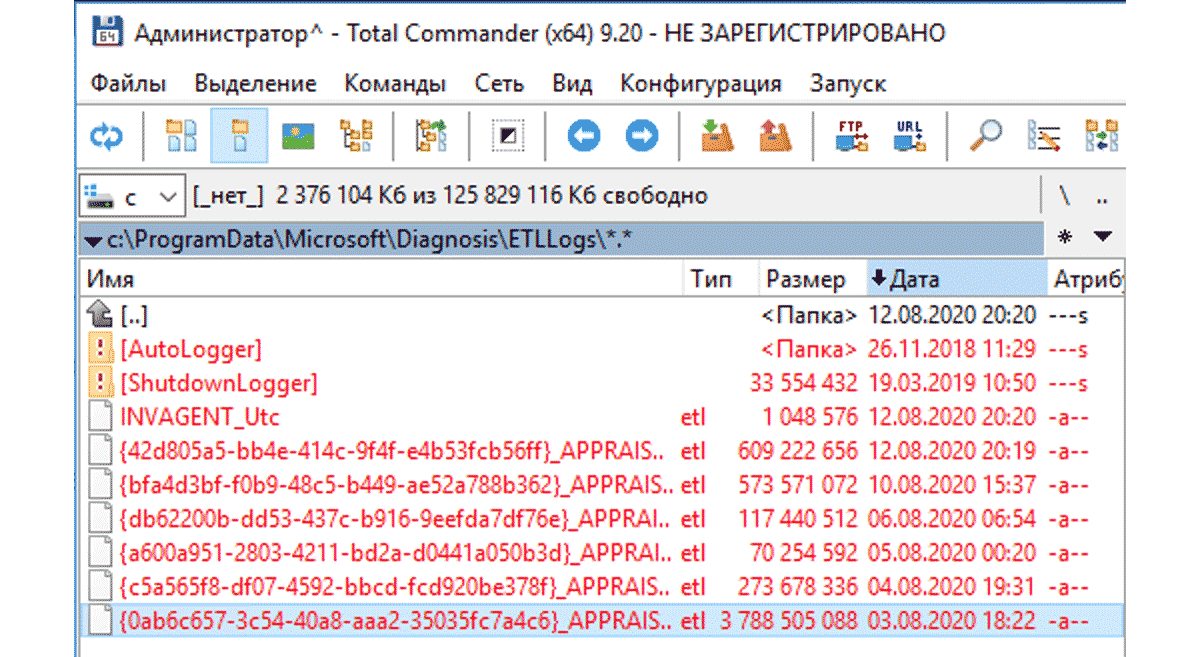
Заметил, что накопился существенный объем файлов с расширение etl в папке C:\ProgramData\Microsoft\Diagnosis\ETLLogs. Откуда они берутся и можно ли их безболезненно удалить?
Сама аббревиатура ETL расшифровывается как Extract, Transform и Load, то есть извлечение, преобразование и загрузка. Подобные файлы накапливают в себе разные системные события, журналы обращений к диску, различные события ядра операционной системы и объединяют их в единое хранилище. Windows 10 хранит в них данные телеметрии, что наводит на мысль о их никчёмности для конечного пользователя.
Стоит отметить, что это не какое-то эксклюзивное изобретение Microsoft и такие данные собираются сейчас повсеместно и используются различными сервисами при машинном обучении, исследовании маркетинговых данных и бизнес-аналитики, да много для чего.
Теоретически, Windows записывает туда различные предупреждения, ошибки или другие события, которые должны использоваться для устранения потенциальных проблем. По заверениям Майкрософт, отправляется только минимальный объем данных, необходимый для защиты Windows. Что там происходит на практике, остаётся только догадываться, но объём этих данных я бы не назвал маленьким. Так на терминальном сервере с 20 пользователями за месяц набегает около 1.5 Гигабайт данных!
Можно ли удалить файлы .etl и не повлияет ли это на вашу систему?
Можно безболезненно удалить накопленные файлы .etl, на работе системы это не отразится. Чтобы приостановить накопление логов в дальнейшем, отключим в групповых политиках телеметрию. В командной строке запускаем редактор групповых политик gpedit.msc и находим нужный параметр:
Конфигурация компьютера > Административные шаблоны > Компоненты Windows > Сборки для сбора данных и предварительные сборки
(Computer Configuration > Administrative Templates > Windows Components > Data Collection and Preview Builds.)
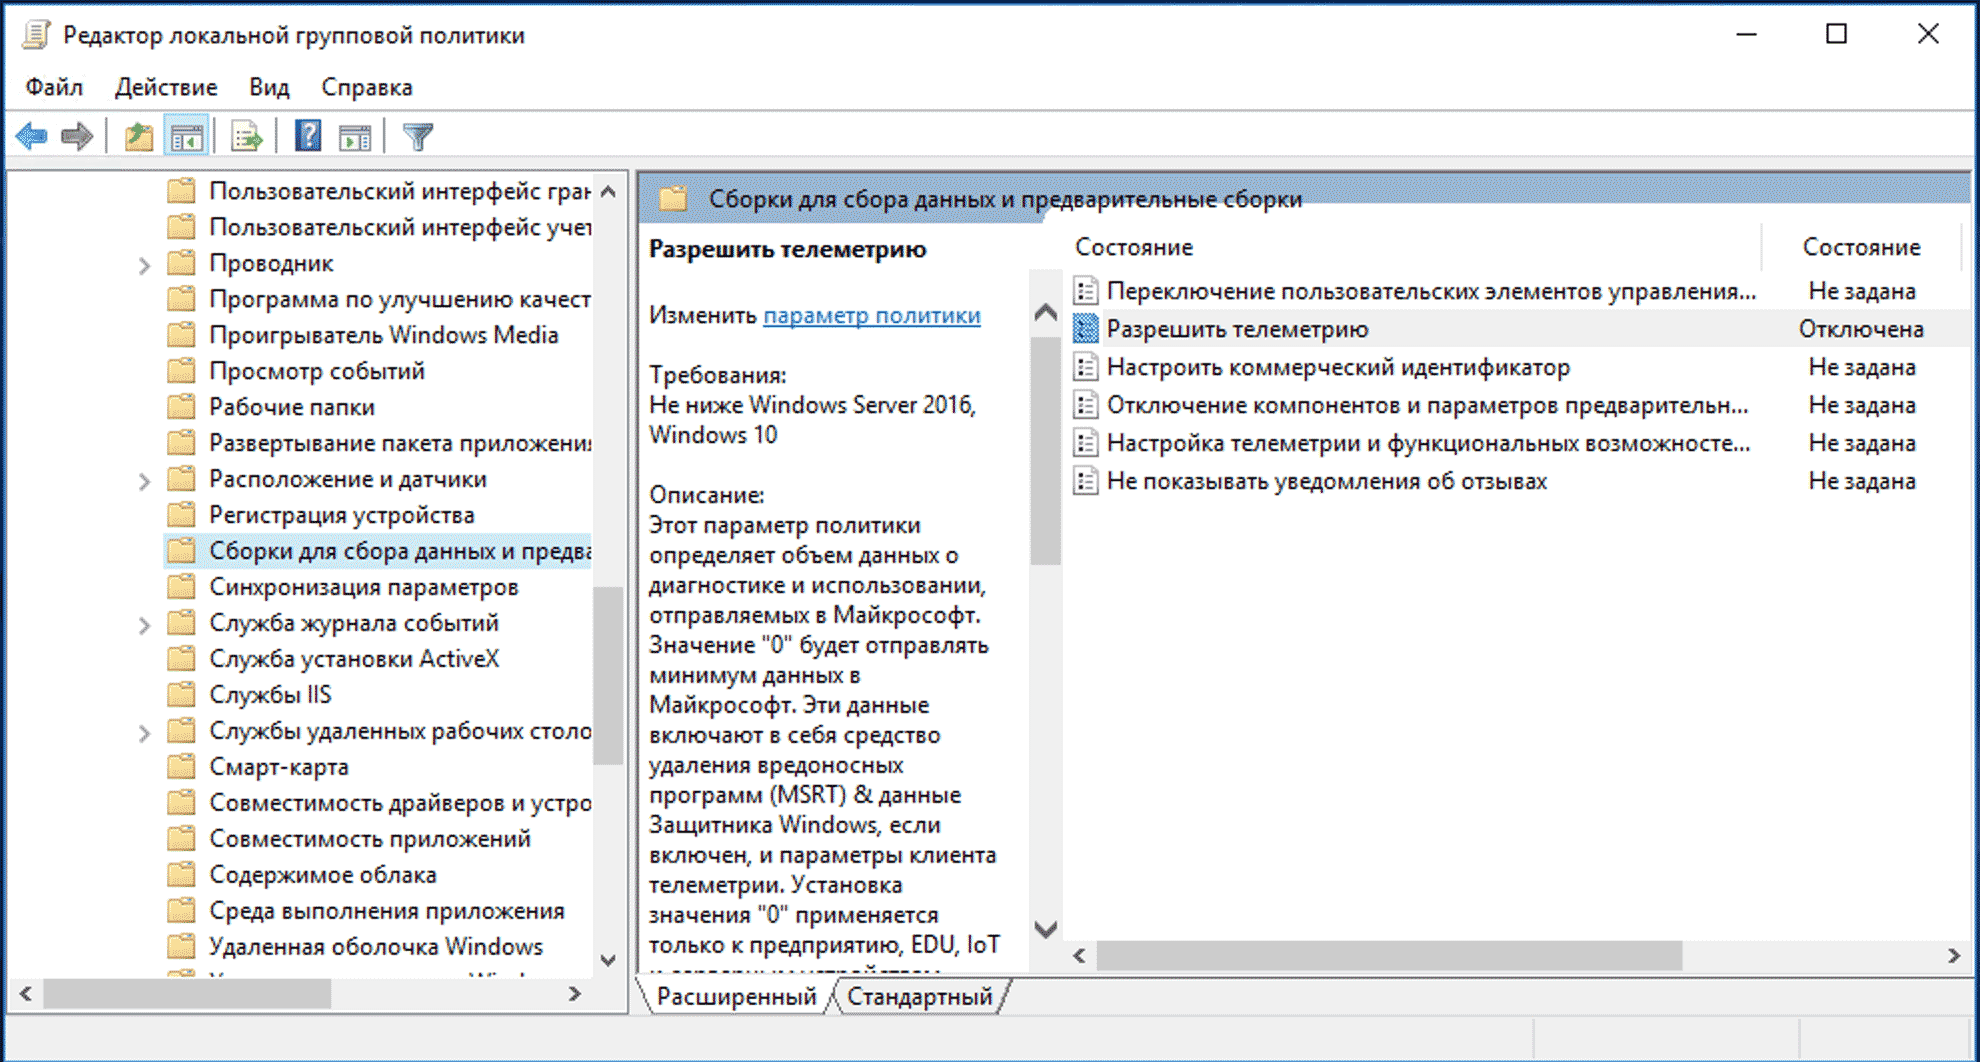
Параметру «Разрешить телеметрию» (Allow Telemetry) выставляем значение 0 или «Отключена». Насколько я понимаю, полностью отключить телеметрию в Windows всё-таки не получится, но таким образом можно существенно снизить объёмы накопление логов.
Если считаете статью полезной,
не ленитесь ставить лайки и делиться с друзьями.
Изменения сбора диагностических данных в Windows Changes to Windows diagnostic data collection
Относится к: Applies to
- Windows 10 версии 1903 и более поздние версии Windows 10, version 1903 and newer
- Следующая версия Windows Server The next version of Windows Server
Корпорация Майкрософт стремится предоставлять эффективные элементы управления данными и обеспечивать прозрачность наших способов обработки ваших данных. Microsoft is committed to providing you with effective controls over your data and ongoing transparency into our data handling practices. В рамках этих усилий мы переводим наши основные продукты и службы на модель, при которой данные, отправляемые в корпорацию Майкрософт с пользовательских устройств, будут классифицироваться как обязательные и необязательные. As part of this effort, we are moving our major products and services to a model where data sent back to Microsoft from customer devices will be classified as either Required or Optional. Мы считаем, что это обеспечит для наших пользователей более удобный интерфейс — им станет проще находить сведения, они будут более понятными и будет проще выполнять с ними действия с помощью предоставляемых нами инструментов. We believe this will provide our customers with a simpler experience – information should be easier to find, easier to understand, and easier to act upon through the tools we provide.
Эта статья предназначена для ИТ-администраторов, и в ней описаны изменения в Windows по обеспечению соответствия с новой таксономией сбора данных. This topic is meant for IT administrators and explains the changes Windows is making to align to the new data collection taxonomy. Эти изменения сосредоточены в двух областях: These changes are focused in two areas:
Вы можете протестировать изменение поведения в Windows 10 Insider Preview сборки 19577 и более поздних версиях. You can test the behavioral changes now in Windows 10 Insider Preview build 19577 and later.
Сводка изменений Summary of changes
В Windows 10 версии 1903 и более поздних вы обнаружите изменения таксономии как в запуске при первом включении компьютера (OOBE), так и на странице параметров конфиденциальности Диагностика и отзывы. In Windows 10, version 1903 and newer, you will see taxonomy updates in both the Out-of-box-experience (OOBE) and the Diagnostics & feedback privacy settings page. Эти изменения описаны в разделе Изменение таксономии. These changes are explained in the section named Taxonomy changes.
Кроме того, в предстоящем выпуске Windows 10 мы упростили элементы управления данными диагностики, перейдя от четырех к трем элементам управления данными диагностики: Диагностические данные отключены, Обязательные и Необязательные. Additionally, in an upcoming release of Windows 10, we’re simplifying your diagnostic data controls by moving from four diagnostic data controls to three: Diagnostic data off, Required, and Optional. Мы также уточняем уровень диагностических данных системы безопасности, чтобы точнее отражать ее поведение, изменяя соответствующий параметр на Диагностические данные отключены. We’re also clarifying the Security diagnostic data level to more accurately reflect its behavior by changing it to Diagnostic data off. Все эти изменения описаны в разделе Изменение поведения. All of these changes are explained in the section named Behavioral changes.
Изменение таксономии Taxonomy changes
С Windows 10 версии 1903 и более поздних как в запуске при первом включении компьютера (OOBE), так и на странице параметров конфиденциальности Диагностика и отзывы будут отражены следующие изменения: Starting in Windows 10, version 1903 and newer, both the Out-of-Box-Experience (OOBE) and the Diagnostics & feedback privacy setting pages will reflect the following changes:
- Уровень диагностических данных Основные называется Обязательные. The Basic diagnostic data level is being labeled as Required.
- Уровень диагностических данных Полные называется Необязательные. The Full diagnostic data level is being labeled as Optional.
Для изменения таксономии не требуется никаких действий, и ваши существующие параметры будут сохранены в рамках этого обновления. No action is required for the taxonomy changes, and your existing settings will be maintained as part of this update.
Изменение поведения Behaviorial changes
В предстоящем выпуске Windows 10 мы упростили элементы управления данными диагностики, перейдя от четырех к трем элементам управления данными диагностики: Диагностические данные отключены, Обязательные и Необязательные. In an upcoming release of Windows 10, we’re simplifying your diagnostic data controls by moving from four diagnostic data controls to three: Diagnostic data off, Required, and Optional. Если на ваших устройствах установлен параметр Расширенный при их обновлении, параметры устройства будут перенесены в более конфиденциальный параметр Обязательные диагностические данные. Это означает, что аналитические службы, использующие расширенный сбор данных, могут работать неправильно. If your devices are set to Enhanced when they are upgraded, the device settings will be migrated to the more privacy-preserving setting of Required diagnostic data, which means that analytic services that leverage enhanced data collection may not work properly. Список служб доступен в разделе Службы, использующие расширенные диагностические данные ниже в этой статье. For a list of services, see the section named, Services that rely on Enhanced diagnostic data, later in this topic. Администраторам следует прочесть подробные сведения и определить, применять ли эти новые политики, чтобы восстановить те же параметры сбора, какими они были до этого изменения. Administrators should read through the details and determine whether to apply these new policies to restore the same collection settings as they had before this change. Список действий см. в разделе Настройка устройства с Windows 10 для ограничения аварийных дампов и журналов. For a list of steps, see the section named Configure a Windows 10 device to limit crash dumps and logs. Дополнительные сведения о службах, использующих расширенные диагностические данные, см. в разделе Службы, использующие расширенные диагностические данные. For more information on services that rely on Enhanced diagnostic data, see Services that rely on Enhanced diagnostic data.
Кроме того, в предстоящем выпуске Windows 10 вы увидите следующие изменения политик: Additionally, you will see the following policy changes in an upcoming release of Windows 10:
| Тип политики Policy type | Текущая политика Current policy | Переименованная политика Renamed policy |
|---|---|---|
| Групповая политика Group Policy | Конфигурация компьютера > Административные шаблоны > Компоненты Windows > Сборки для сбора данных и предварительные сборки >Разрешить телеметрию Computer Configuration > Administrative Templates > Windows Components > Data Collection and Preview Builds >Allow Telemetry
| Конфигурация компьютера > Административные шаблоны > Компоненты Windows > Сборки для сбора данных и предварительные сборки >Разрешить диагностические данные Computer Configuration > Administrative Templates > Windows Components > Data Collection and Preview Builds >Allow Diagnostic Data
|
| Групповая политика Group Policy | Конфигурация компьютера > Административные шаблоны > Компоненты Windows > Сборки для сбора данных и предварительные сборки >Настройка пользовательского интерфейса включения телеметрии Computer Configuration > Administrative Templates > Windows Components > Data Collection and Preview Builds >Configure telemetry opt-in settings user interface | Конфигурация компьютера > Административные шаблоны > Компоненты Windows > Сборки для сбора данных и предварительные сборки >Настройка пользовательского интерфейса включения диагностических данных Computer Configuration > Administrative Templates > Windows Components > Data Collection and Preview Builds >Configure diagnostic data opt-in settings user interface |
| Групповая политика Group Policy | Конфигурация компьютера > Административные шаблоны > Компоненты Windows > Сборки для сбора данных и предварительные сборки >Настройте уведомления об изменениях включения телеметрии Computer Configuration > Administrative Templates > Windows Components > Data Collection and Preview Builds >Configure telemetry opt-in change notifications | Конфигурация компьютера > Административные шаблоны > Компоненты Windows > Сборки для сбора данных и предварительные сборки >Настройте уведомления об изменениях включения диагностических данных Computer Configuration > Administrative Templates > Windows Components > Data Collection and Preview Builds >Configure diagnostic data opt-in change notifications |
В заключительный набор изменений входят две новые политики, позволяющие настраивать сбор диагностических данных в организации. A final set of changes includes two new policies that can help you fine-tune diagnostic data collection within your organization. Эти политики позволяют ограничить объем необязательных диагностических данных, отправляемых в корпорацию Майкрософт. These policies let you limit the amount of optional diagnostic data that’s sent back to Microsoft.
- Политика Ограничить коллекцию дампов — это новая политика, позволяющая ограничить типы аварийных дампов, которые можно отправлять в корпорацию Майкрософт. The Limit dump collection policy is a new policy that can be used to limit the types of crash dumps that can be sent back to Microsoft. Если эта политика включена, отчеты об ошибках Windows будут отправлять только мини-дампы ядра и дампы рассмотрения для пользовательского режима. If this policy is enabled, Windows Error Reporting will send only kernel mini dumps and user mode triage dumps.
- Групповая политика: Конфигурация компьютера > Административные шаблоны > Компоненты Windows > Сборки для сбора данных и предварительные сборки >Ограничить коллекцию дампов Group Policy: Computer Configuration > Administrative Templates > Windows Components > Data Collection and Preview Builds >Limit Dump Collection
- Политика MDM: System/LimitDumpCollection MDM policy: System/LimitDumpCollection
- Политика Ограничить сбор журналов диагностики — это еще одна новая политика, ограничивающая количество журналов диагностики, отправляемых в корпорацию Майкрософт. The Limit diagnostic log collection policy is another new policy that limits the number of diagnostic logs that are sent back to Microsoft. Если эта политика включена, журналы диагностики не отправляются в корпорацию Майкрософт. If this policy is enabled, diagnostic logs are not sent back to Microsoft.
- Групповая политика: Конфигурация компьютера > Административные шаблоны > Компоненты Windows > Сборки для сбора данных и предварительные сборки >Ограничить сбор журналов диагностики Group Policy: Computer Configuration > Administrative Templates > Windows Components > Data Collection and Preview Builds >Limit Diagnostic Log Collection
- Политика MDM: System/LimitDiagnosticLogCollection MDM policy: System/LimitDiagnosticLogCollection
Никакие изменения, упомянутые в этом разделе, не будут выпущены в Windows версии 1809 и более ранних, а также в Windows Server 2019 и более ранних версиях. All of the changes mentioned in this section will not be released on versions of Windows, version 1809 and earlier as well as Windows Server 2019 and earlier.
Настройка устройства с Windows 10 для ограничения аварийных дампов и журналов Configure a Windows 10 device to limit crash dumps and logs
Благодаря разделению расширенного уровня диагностических данных на новые политики мы предоставляем дополнительные элементы управления тем, какие типы аварийных дампов собираются, и отправляются ли дополнительные журналы диагностики. With the Enhanced diagnostic data level being split out into new policies, we’re providing additional controls to manage what types of crash dumps are collected and whether to send additional diagnostic logs. Ниже приведены некоторые инструкции по их настройке. Here are some steps on how to configure them:
- Выберите отправку необязательных диагностических данных, настроив одну из следующих политик. Choose to send optional diagnostic data by setting one of the following policies:
- Групповая политика: Конфигурация компьютера > Административные шаблоны > Компоненты Windows > Сборки для сбора данных и предварительные сборки >Разрешить диагностические данные Group Policy: Computer Configuration > Administrative Templates > Windows Components > Data Collection and Preview Builds >Allow Diagnostic Data. Установите для политики значение Отправлять необязательные диагностические данные. Set the policy value to Send optional diagnostic data.
- MDM: System/AllowTelemetry. MDM: System/AllowTelemetry. Установите для политики значение 3. Set the policy value to 3.
- Включите следующую групповую политику: Конфигурация компьютера > Административные шаблоны > Компоненты Windows > Сборки для сбора данных и предварительные сборки >Ограничить коллекцию дампов Enable the following Group Policy: Computer Configuration > Administrative Templates > Windows Components > Data Collection and Preview Builds >Limit Dump Collection
- Включите следующую групповую политику: Конфигурация компьютера > Административные шаблоны > Компоненты Windows > Сборки для сбора данных и предварительные сборки >Ограничить сбор журналов диагностики Enable the following Group Policy: Computer Configuration > Administrative Templates > Windows Components > Data Collection and Preview Builds >Limit Diagnostic Log Collection
Службы, использующие расширенные диагностические данные Services that rely on Enhanced diagnostic data
Пользователи, применяющие службы, зависящие от диагностических данных Windows, такие как компьютеры, управляемые Майкрософт, или Аналитика компьютеров, могут быть затронуты изменениями поведения после их выпуска. Customers who use services that depend on Windows diagnostic data, such as Microsoft Managed Desktop or Desktop Analytics, may be impacted by the behavioral changes when they are released. Эти службы будут обновлены с учетом этих изменений, и будет опубликовано руководство по их правильной настройке. These services will be updated to address these changes and guidance will be published on how to configure them properly.
В следующих ресурсах содержатся сведения о текущих конфигурациях: The following provides information on the current configurations:


