- Introduction#
- Dependency management#
- System Requirements#
- Installation — Linux / Unix / macOS#
- Downloading the Composer Executable#
- Locally#
- Globally#
- Installation — Windows#
- Using the Installer#
- Manual Installation#
- Using Composer#
- Install Bot Framework Composer
- Install Composer as a desktop application
- Prerequisites
- Installation instructions
- Update instructions
- Use nightly builds
- Build Composer from source
- Prerequisites
- Building instructions
- How to Install and Use Composer – The Complete Tutorial
- Installing Composer
- 1. Installing Composer on Shared Hosting, Linux, or macOS
- 2. Installing Composer on Windows
- Generating and Understanding composer.json
Introduction#
Composer is a tool for dependency management in PHP. It allows you to declare the libraries your project depends on and it will manage (install/update) them for you.
Dependency management#
Composer is not a package manager in the same sense as Yum or Apt are. Yes, it deals with «packages» or libraries, but it manages them on a per-project basis, installing them in a directory (e.g. vendor ) inside your project. By default, it does not install anything globally. Thus, it is a dependency manager. It does however support a «global» project for convenience via the global command.
This idea is not new and Composer is strongly inspired by node’s npm and ruby’s bundler.
- You have a project that depends on a number of libraries.
- Some of those libraries depend on other libraries.
- Enables you to declare the libraries you depend on.
- Finds out which versions of which packages can and need to be installed, and installs them (meaning it downloads them into your project).
- You can update all your dependencies in one command.
See the Basic usage chapter for more details on declaring dependencies.
System Requirements#
Composer requires PHP 5.3.2+ to run. A few sensitive php settings and compile flags are also required, but when using the installer you will be warned about any incompatibilities.
To install packages from sources instead of plain zip archives, you will need git, svn, fossil or hg depending on how the package is version-controlled.
Composer is multi-platform and we strive to make it run equally well on Windows, Linux and macOS.
Installation — Linux / Unix / macOS#
Downloading the Composer Executable#
Composer offers a convenient installer that you can execute directly from the command line. Feel free to download this file or review it on GitHub if you wish to know more about the inner workings of the installer. The source is plain PHP.
There are in short, two ways to install Composer. Locally as part of your project, or globally as a system wide executable.
Locally#
To install Composer locally, run the installer in your project directory. See the Download page for instructions.
The installer will check a few PHP settings and then download composer.phar to your working directory. This file is the Composer binary. It is a PHAR (PHP archive), which is an archive format for PHP which can be run on the command line, amongst other things.
Now run php composer.phar in order to run Composer.
You can install Composer to a specific directory by using the —install-dir option and additionally (re)name it as well using the —filename option. When running the installer when following the Download page instructions add the following parameters:
Now run php bin/composer in order to run Composer.
Globally#
You can place the Composer PHAR anywhere you wish. If you put it in a directory that is part of your PATH , you can access it globally. On Unix systems you can even make it executable and invoke it without directly using the php interpreter.
After running the installer following the Download page instructions you can run this to move composer.phar to a directory that is in your path:
If you like to install it only for your user and avoid requiring root permissions, you can use
/.local/bin instead which is available by default on some Linux distributions.
Note: If the above fails due to permissions, you may need to run it again with sudo.
Note: On some versions of macOS the /usr directory does not exist by default. If you receive the error «/usr/local/bin/composer: No such file or directory» then you must create the directory manually before proceeding: mkdir -p /usr/local/bin .
Note: For information on changing your PATH, please read the Wikipedia article and/or use your search engine of choice.
Now run composer in order to run Composer instead of php composer.phar .
Installation — Windows#
Using the Installer#
This is the easiest way to get Composer set up on your machine.
Download and run Composer-Setup.exe. It will install the latest Composer version and set up your PATH so that you can call composer from any directory in your command line.
Note: Close your current terminal. Test usage with a new terminal: This is important since the PATH only gets loaded when the terminal starts.
Manual Installation#
Change to a directory on your PATH and run the installer following the Download page instructions to download composer.phar .
Create a new composer.bat file alongside composer.phar :
Add the directory to your PATH environment variable if it isn’t already. For information on changing your PATH variable, please see this article and/or use your search engine of choice.
Close your current terminal. Test usage with a new terminal:
Using Composer#
Now that you’ve installed Composer, you are ready to use it! Head on over to the next chapter for a short demonstration.
Found a typo? Something is wrong in this documentation? Fork and edit it!
Composer and all content on this site are released under the MIT license.
Install Bot Framework Composer
There are two ways to install Bot Framework Composer: install Composer as a desktop application and build Composer from source. You can choose either way based on your requirements.
Install Composer as a desktop application
This section describes how to install Composer on your desktop.
Prerequisites
- The Bot Framework Emulator.
- The .NET Core SDK 3.1 and above.
- Supported OS versions.
- Download Bot Framework Composer from one of these locations: Windows | macOS | Linux. The location you choose depends on your machine operating system (OS).
Please make sure you meet all the prerequisites listed above before moving on to the installation instructions.
Installation instructions
Launch the Bot Framework Composer installer. Then follow the wizard steps as described below.
Choose who can access Bot Framework Composer. Then select Next.

Select a location to install Bot Framework Composer. Then select Install. This will take a few minutes.

Select Finish to close the installation wizard.

Select the Bot Framework Composer icon to start the application and enjoy your bot-building journey!

Update instructions
You may have an older version of Bot Framework Composer and want to update the application. Composer’s most recent stable release is available at Bot Framework Composer releases.
To check for updates: select Help from Composer’s top menu bar then select Check for updates.

In the New update available window, you can see the most recent Composer version. There are two options to update Composer: Install the update and restart Composer and Download now and install when you close Composer. Select either option based on your needs, and then select Okay.

After you see the Update complete window, select Okay to reinstall and restart Composer.
Go through the installation wizard to install the new version of Bot Framework Composer on your computer.
Use nightly builds
You may want to try some new features as soon as they are available in the nightly builds. If you haven’t installed Composer, you can download the nightly build and follow the installation instructions to install it. If you have already installed Composer, follow these instructions to check and use the nightly builds:
Select Composer Settings from the main menu then select Application Settings.
In the Application Updates section, toggle Early adopters to On.

Go to the application’s menu bar on top and select Help, then select Check for Updates. You will see the most recent nightly build available.
Go through the installation wizard to install the most recent nightly build of Bot Framework Composer on your computer.
Build Composer from source
This section describes how to run Composer as a hosted web app locally using Yarn.
Prerequisites
- Git
- Node.js. Use the latest LTS 14.x or 12.x release line.
- The latest stable release of Yarn.
- The Bot Framework Emulator.
- The .NET Core SDK 3.1 and above.
- Supported OS versions.
Please make sure you meet all the prerequisites listed above before moving on to the building instructions.
Building instructions
To start, open a terminal and clone the Composer GitHub repository. You will use this terminal for the rest of the steps in this section.
After cloning the repository, navigate to the BotFramework-Composer folder. For example:
Then run the following commands to navigate to the Composer folder and get all required packages:
Next, run the following command to build the Composer application, this command can take several minutes to finish:
If you’re having trouble installing or building Composer run yarn tableflip . This will remove all of the Composer application’s dependencies (node_modules), and then reinstall and rebuild all of the dependencies. Once completed, run yarn install and yarn build again. This process generally takes 5-10 minutes.
Again using Yarn, start the Composer authoring application and the bot runtime:
Once you see Composer now running at: appear in your terminal, you can run Composer in your browser using the address http://localhost:3000 .

Keep the terminal open as long as you plan to work with Composer. If you close it, Composer will stop running.
The next time you need to run Composer, all you have to do is run yarn startall from the Composer directory.
How to Install and Use Composer – The Complete Tutorial
In this article, we are going to show you how to install and use Composer on various platforms. Composer is a dependency manager for PHP. It is a simple and reliable tool that developers use to manage and integrate external packages or libraries into their PHP-based projects. This way, they don’t have to build their webpages or web applications from the ground-up.
To help you master this tool, you will also learn how to create a basic PHP project.
Before you learn how to install Composer, make sure that you have access to the command line interface on your system or server.
Installing Composer
This section will show you how to install Composer on shared hosting and operating systems like Linux, macOS, and Windows.
1. Installing Composer on Shared Hosting, Linux, or macOS
The commands to install Composer on shared hosting, Linux (PC or server), and macOS are the same.
Note that Composer comes pre-installed on Hostinger’s Premium and Business shared hosting plans. If you are using one of them, skip this part. However, if you find out that it’s outdated, you will need to update it by installing the correct version locally.
Follow this instruction to know how to install Composer on your system:
- Connect to your hosting account using SSH connection. You can learn how to do so from this SSH tutorial.
- Download Composer from the official website using the following command:
- Verify the installer’s signature (SHA-384) to ensure that the installer file is not corrupt. Enter:
The long string of characters in the above command (‘e0012edf…’) is the installer’s signature. It changes every time a new version of Composer comes out. Therefore, be sure to fetch the latest SHA-384 from this page.
- Local installation:
- Global installation:
You will get this result:
The command line will return with this result:
2. Installing Composer on Windows
Getting started with Composer on a Windows machine is a bit different. No command-line instructions are necessary for downloading and installing the software.
Simply follow these steps:
- Install PHP on your computer. We recommend using XAMPP for this purpose, as the process is straightforward and you can complete it in a few minutes.
- Once XAMPP is installed, download the latest version of Composer.
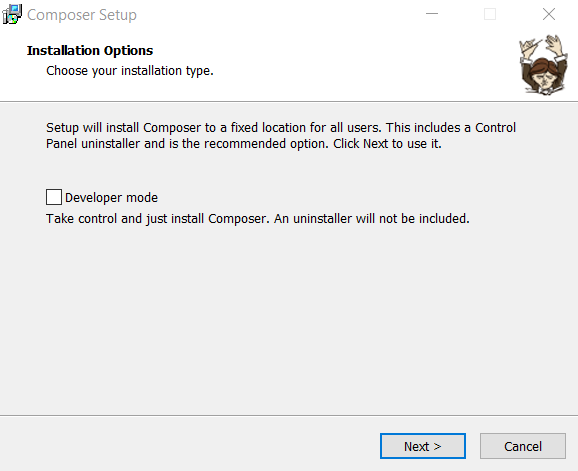
- Run Composer installation wizard. When it asks you to activate the developer mode, ignore it and continue with the installation process.

- Another window will pop up and ask you to locate the PHP command line. By default, it is in C:/xampp/php/php.exe. After specifying the location, click Next.
- You will be prompted with Proxy Settings. Leave the box unchecked and skip this part by hitting Next. Then, on the last window, click Install.
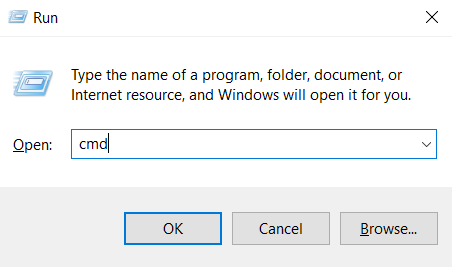
- After completing the installation, open the command prompt. Press CTRL +R, type in “cmd,” and click OK.
- Enter the following command:
Great job! You now have Composer installed on your Windows computer. The installer will automatically add Composer to your PATH variable. Now you can open the command prompt and run the software from anywhere.
Generating and Understanding composer.json
Now comes the interesting part — using Composer in your PHP project.
To achieve this, you need to generate a composer.json file. You can think of it as a way to lookup data from a list for Composer. This file contains packages (dependencies) that should be downloaded.
Furthermore, composer.json also checks for version compatibility with your project. This means if you are using an older package, composer.json will let you know in order to avoid future issues.
You have the option to create and update composer.json yourself. However, considering that this is a tutorial on automating redundant tasks, we don’t recommend you to create the file manually.
Let’s demonstrate the usefulness of composer.json by creating a sample project.
Our project is a simple PHP timer, which allows developers to find out how much time code takes to execute. This is highly useful for debugging and optimization purposes.
You can follow these steps:
- Create a new directory for the project. Since our project is a timer, we’ll simply name the folder phptimer. To do this, execute the following command:
- Enter the newly created directory:
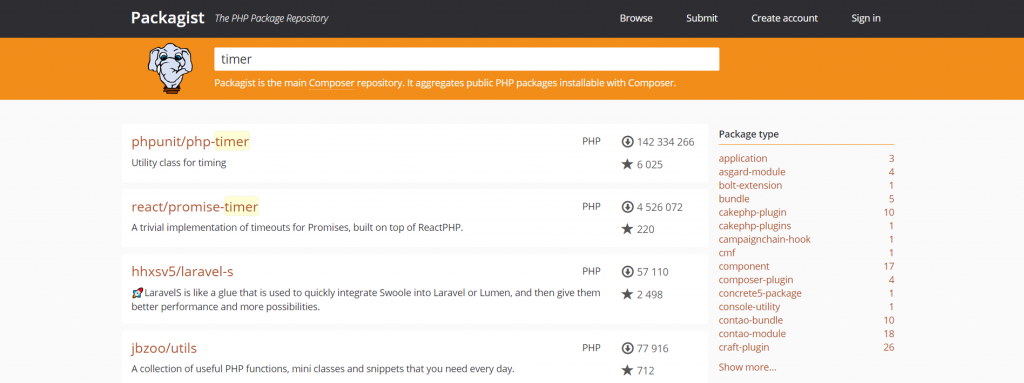
- Find a package or library for the project. The best place to achieve that is Packagist, where you’ll find tons of libraries to help your project development. For this tutorial, we need a timer package. To get it, simply type timer in the search bar:
As you can see, several timer packages are available and each has a name and a small description of what it does. In this example, we choose phpunit/php-timer as it has the most downloads and most GitHub stars. - Specify the desired package so Composer can add it to your project:
The output will show the version of phpunit/php-timer:
The caret (^) symbol is defined as the option for maximum interoperability. This means Composer will always update the package until a certain version breaks the package in some way.
In our case, the package update range is >=1.0.9 THE AUTHOR
Domantas leads the content and SEO teams forward with fresh ideas and out of the box approaches. Armed with extensive SEO and marketing knowledge, he aims to spread the word of Hostinger to every corner of the world. During his free time, Domantas likes to hone his web development skills and travel to exotic places.


