- Устранение ошибки «Startup Repair Offline» при загрузке Windows 7
- Исправляем ошибку «Startup Repair Offline»
- Способ 1: Сброс настроек BIOS
- Способ 2: Подключение шлейфов
- Способ 3: Восстановление запуска
- Способ 4: «Командная строка»
- Заключение
- Methods to Solve Windows 10 Startup Problems
- When your Windows 10 computer has startup problems, you can read this post to learn how to fix Windows 10 startup problem.
- How to Fix Windows 10 Startup Problems
- How to Solve Windows 10 boot problems and Recover Data
- Advanced troubleshooting for Windows boot problems
- Summary
- BIOS phase
- Boot loader phase
- Method 1: Startup Repair tool
- Method 2: Repair Boot Codes
- Method 3: Fix BCD errors
- Method 4: Replace Bootmgr
- Method 5: Restore System Hive
- Kernel Phase
- Clean boot
Устранение ошибки «Startup Repair Offline» при загрузке Windows 7
Исправляем ошибку «Startup Repair Offline»
Буквально данная неисправность означает – «восстановление запуска не в сети». После перезапуска компьютера, система предприняла попытку по восстановлению работы (не подключаясь к сети), но попытка оказалась неудачной.
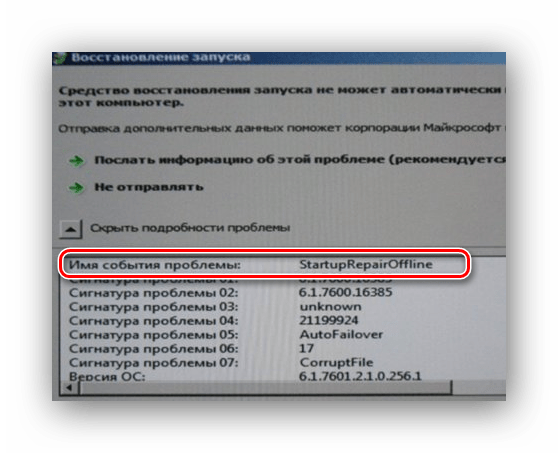
Неисправность «Startup Repair Offline» зачастую появляется из-за проблем с жестким диском, а именно из-за повреждения сектора, на котором находятся системные данные, отвечающие за правильный запуск Windows 7. Также возможны проблемы с поврежденными разделами реестра системы. Перейдем к способам исправления этой неполадки.
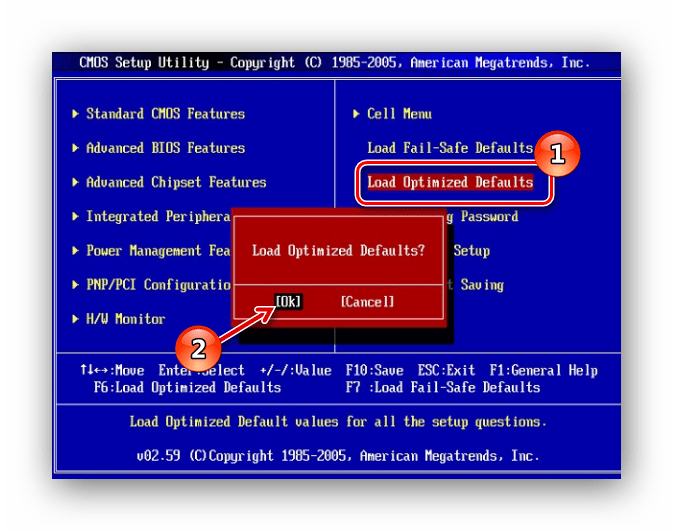
Способ 1: Сброс настроек BIOS
Переходим в БИОС (при помощи клавиш F2 или Del при загрузке компьютера). Производим загрузку настроек по умолчанию (пункт «Load optimized defaults»). Сохраняем сделанные изменения (нажав клавишу F10) и перезапускаем Виндовс.
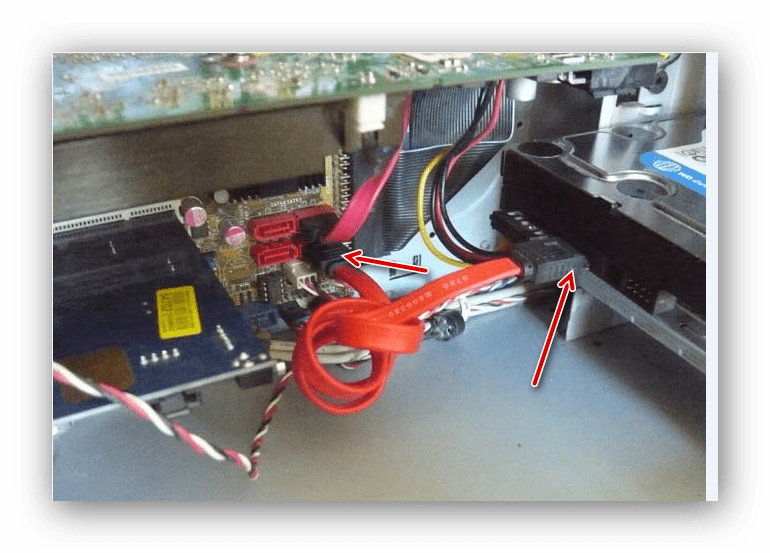
Способ 2: Подключение шлейфов
Необходимо произвести проверку целостности разъемов и плотность подключения шлейфов жесткого диска и материнской платы. Убедитесь, что все контакты подключены качественно и плотно. После проверки перезапускаем систему и проверяем на наличие неисправности.
Способ 3: Восстановление запуска
Так как обычный запуск операционной системы невозможен, рекомендуем воспользоваться загрузочным диском или флешкой с системой, которая является идентичной установленной.
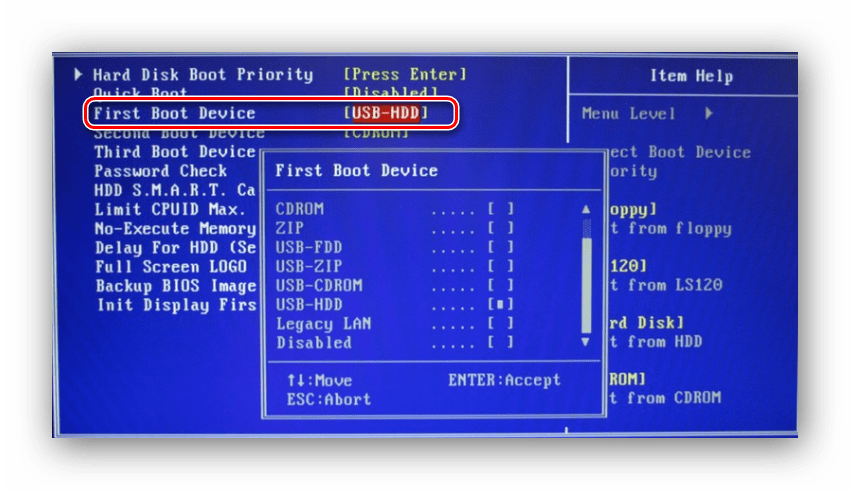
- Выполняем запуск с загрузочной флешки или диска. В БИОСе устанавливаем опцию запуска с диска или флеш-накопителя (устанавливаем в пункте «First Boot Device USB-HDD» параметр «USB-HDD«). Как это сделать на различных версиях BIOS, подробно описано в уроке, который представлен ниже.
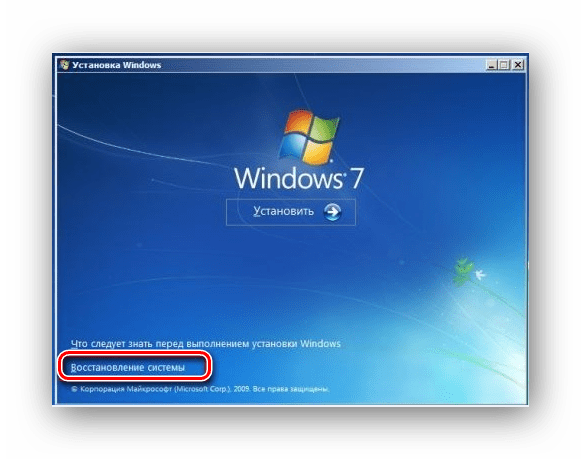
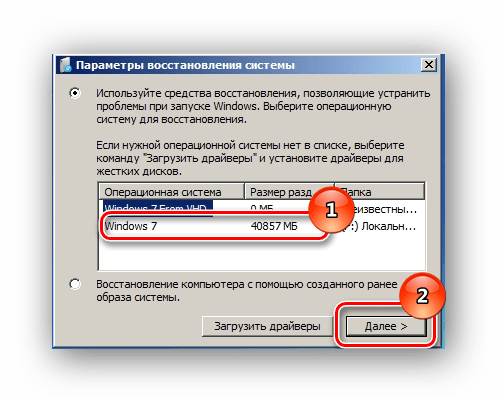
Системой будет произведён поиск неполадок в автоматическом режиме. Жмём на кнопочку «Далее» в открывшемся окне, выбрав необходимую ОС.
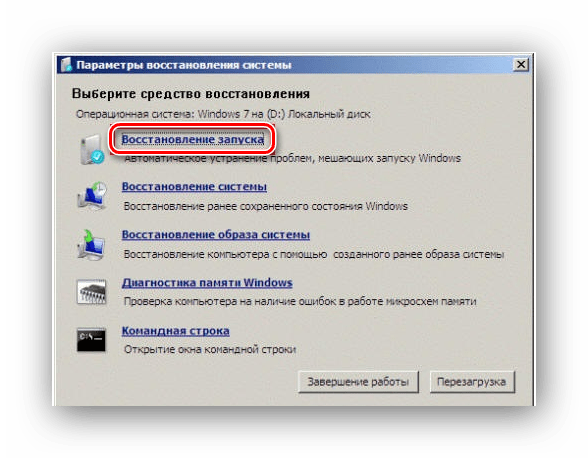
В окошке «Параметры восстановления системы» щелкаем по пункту «Восстановление запуска» и дожидаемся завершения проверочных действий и корректного запуска компьютера. После окончания проверки перезагружаем ПК.
Способ 4: «Командная строка»
Если приведенные выше способы не помогли устранить неполадку, тогда вновь запускаем систему с флешки или установочного диска.
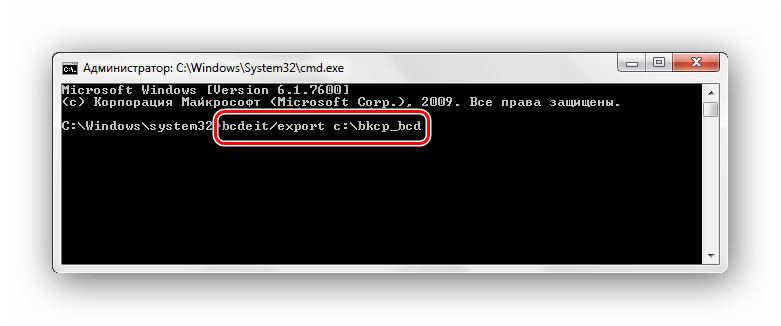
Нажимаем клавиши Shift+F10 в самом начале установочного процесса. Попадаем в меню «Командной строки», где необходимо набрать поочередно определенные команды (после ввода каждой из них нажимаем Enter).
bcdedit /export c:\bckp_bcd
attrib c:\boot\bcd -h -r –s

ren c:\boot\bcd bcd.old


После того, как ввели все команды, перезапускаем ПК. Если Виндовс 7 не запустилась в работоспособном режиме, тогда в данных о неисправности может быть имя проблемного файла (например, библиотеки расширения .dll). Если было указано название файла, то необходимо попробовать совершить поиска данного файла в интернете и поместить его на ваш винчестер в необходимую директорию (в большинстве случаев, это папка windowds\system 32 ).
Заключение
Итак, что же делать с неполадкой «Startup Repair Offline»? Самый простой и эффективный способ – это использование восстановления запуска ОС, применяя загрузочный диск или флеш-накопитель. Если способ с восстановлением системы не исправил проблему, то воспользуйтесь командной строкой. Также проверьте целостность всех соединений компьютера и настройки BIOS. Применение этих методов позволит устранить ошибку запуска Windows 7.
Methods to Solve Windows 10 Startup Problems
When your Windows 10 computer has startup problems, you can read this post to learn how to fix Windows 10 startup problem.

David Darlington
Dec 21, 2020 • Filed to: Windows Computer Solutions • Proven solutions
Your Windows 10 system’s startup operation might malfunction due to different reasons. From a malware attack to a problem related to its Master Boot Record – there could be numerous reasons behind it. Thankfully, most of these issues can be fixed. To help you do the same, we have come up with this guide on how to fix Windows 10 startup problems. We have listed four different solutions to fix it with an easy solution to recover your lost content. Go ahead and read this guide to learn how to fix Windows 10 startup problems.
How to Fix Windows 10 Startup Problems
There are numerous ways to learn how to fix Windows 10 startup problems. To make things easier for you, we have listed the top 4 solutions here.
The solution I: Using Startup Repair
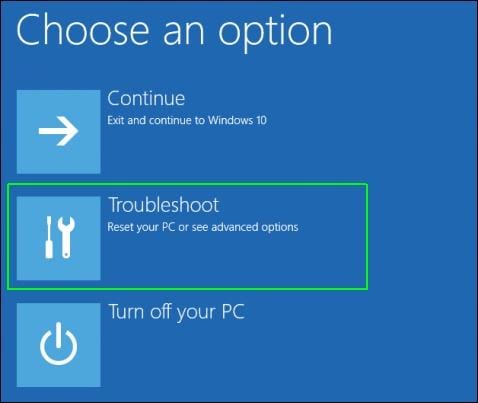
- The automatic startup repair tool is probably one of the best features in Windows 10. This can be accessed by launching the Advanced Settings on your system while it is getting started. From there, you can choose to «Troubleshoot» the issue.
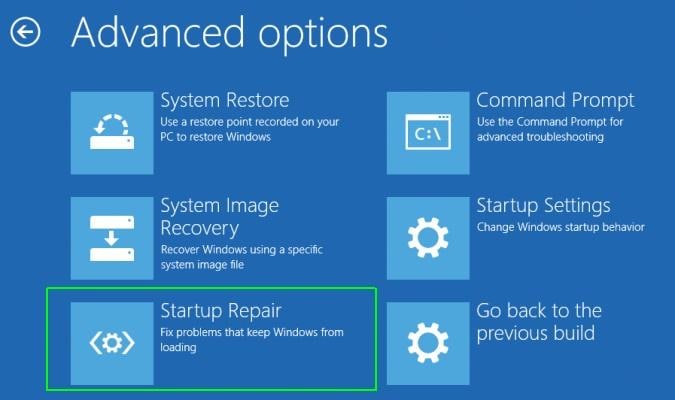
- On the next window, you can click on the «Advanced Options».

- Now, you can click on the «Startup Repair» button and follow the simple on-screen instructions to fix your system.
Solution II: With the bootrec command options
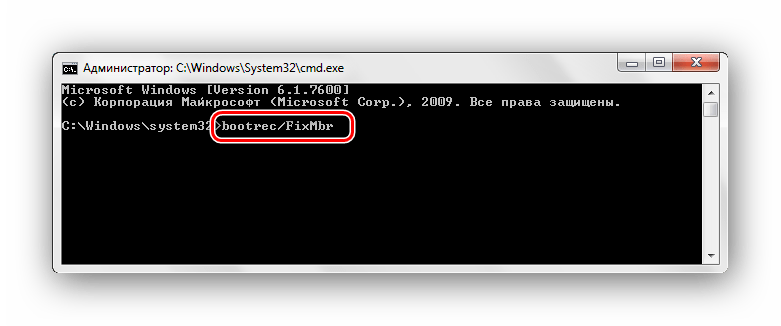
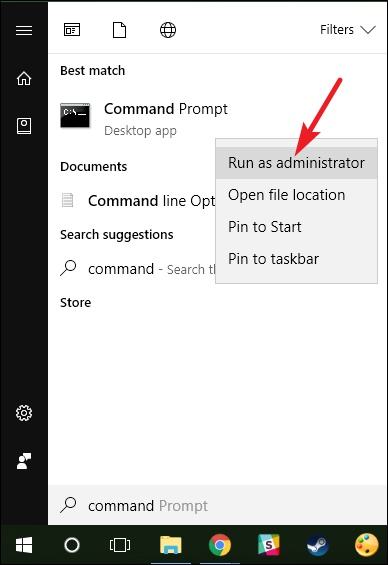
- If you think there is an issue with the Master Boot Record on your system, then you can fix it with the bootrec command and its options. Firstly, you need to launch Command Prompt as an administrator for this.
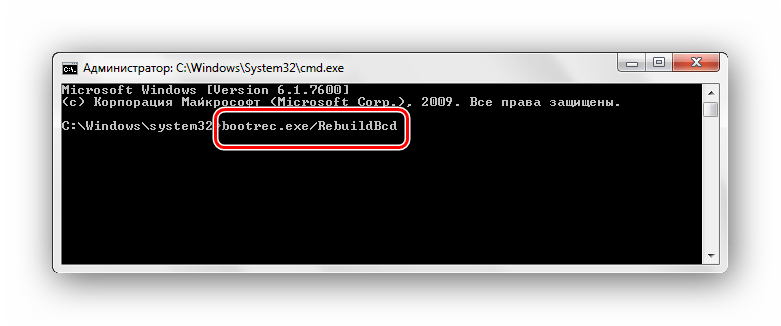
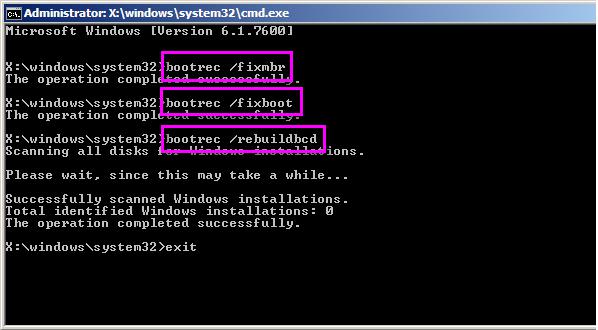
- Now, type the command «bootrec /fixmbr» to write the MBR on the system partition. Instead of the «fixmbr», you can also write «bootrec /fixboot» to write a new boot sector. The bootrec command has other options like «scanos» and «rebuildbcd».
Solution III: Using the System File Check
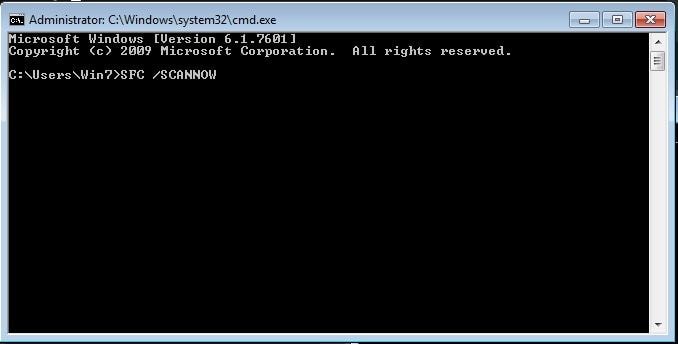
If you are not able to learn how to fix Windows 10 startup problems with the above solutions, then don’t worry – we have another quick fix for you. Most of the users are able to fix minor issues related to their Windows 10 startup with the SFC command. The System File Check command scans the OS for any corrupted or damaged Windows file. To make it work, just launch Command Prompt (as an administrator) and type the command «sfc /scannow».
Solution IV: Running the DISM utility
The DISM utility command is another quick and reliable way to learn how to fix Windows 10 startup problems. You have to launch Command Prompt as an administrator to execute it as well. It stands for Deployment Image Servicing and Management and can scan or restore the health of your system.
After launching Command Prompt, type «dism /online /cleanup-image /scanhealth» and press enter to check the current health of your system. Post that, you can write «dism /online /cleanup-image /restorehealth» to repair it. The DISM utility has other options as well like «checkhealth» or «cleanup-image».
By following these techniques, you would certainly be able to learn how to fix Windows 10 startup problems. Though, if none of these solutions are able to fix the issue, then you can go to your system’s Windows directory > System 32 > LogFiles > Srt and open the SrtTrail.txt file in Notepad. From here, you can view the exact reason for Startup failure.
How to Solve Windows 10 boot problems and Recover Data
If you are not able to boot your system or can’t access your data, then you can use Recoverit as well. With the support of Windows PE, you can create a bootable media. This can help you recover your content if your system has been crashed or can’t boot. As one of the oldest and most popular data recovery tools, it is known to have the highest success rate in the industry. You can use it to recover your important files, photos, videos, and files in more than 550 formats.
Advanced troubleshooting for Windows boot problems
This article is intended for use by support agents and IT professionals. If you’re looking for more general information about recovery options, see Recovery options in Windows 10.
Summary
There are several reasons why a Windows-based computer may have problems during startup. To troubleshoot boot problems, first determine in which of the following phases the computer gets stuck:
| Phase | Boot Process | BIOS | UEFI |
|---|---|---|---|
| 1 | PreBoot | MBR/PBR (Bootstrap Code) | UEFI Firmware |
| 2 | Windows Boot Manager | %SystemDrive%\bootmgr | \EFI\Microsoft\Boot\bootmgfw.efi |
| 3 | Windows OS Loader | %SystemRoot%\system32\winload.exe | %SystemRoot%\system32\winload.efi |
| 4 | Windows NT OS Kernel | %SystemRoot%\system32\ntoskrnl.exe |
1. PreBoot
The PC’s firmware initiates a Power-On Self Test (POST) and loads firmware settings. This pre-boot process ends when a valid system disk is detected. Firmware reads the master boot record (MBR), and then starts Windows Boot Manager.
2. Windows Boot Manager
Windows Boot Manager finds and starts the Windows loader (Winload.exe) on the Windows boot partition.
3. Windows operating system loader
Essential drivers required to start the Windows kernel are loaded and the kernel starts to run.
4. Windows NT OS Kernel
The kernel loads into memory the system registry hive and additional drivers that are marked as BOOT_START.
The kernel passes control to the session manager process (Smss.exe) which initializes the system session, and loads and starts the devices and drivers that are not marked BOOT_START.
Here is a summary of the boot sequence, what will be seen on the display, and typical boot problems at that point in the sequence. Before starting troubleshooting, you have to understand the outline of the boot process and display status to ensure that the issue is properly identified at the beginning of the engagement.

Click to enlarge
Each phase has a different approach to troubleshooting. This article provides troubleshooting techniques for problems that occur during the first three phases.
If the computer repeatedly boots to the recovery options, run the following command at a command prompt to break the cycle:
Bcdedit /set
If the F8 options don’t work, run the following command:
Bcdedit /set
BIOS phase
To determine whether the system has passed the BIOS phase, follow these steps:
- If there are any external peripherals connected to the computer, disconnect them.
- Check whether the hard disk drive light on the physical computer is working. If it is not working, this indicates that the startup process is stuck at the BIOS phase.
- Press the NumLock key to see whether the indicator light toggles on and off. If it does not, this indicates that the startup process is stuck at BIOS.
If the system is stuck at the BIOS phase, there may be a hardware problem.
Boot loader phase
If the screen is completely black except for a blinking cursor, or if you receive one of the following error codes, this indicates that the boot process is stuck in the Boot Loader phase:
- Boot Configuration Data (BCD) missing or corrupted
- Boot file or MBR corrupted
- Operating system Missing
- Boot sector missing or corrupted
- Bootmgr missing or corrupted
- Unable to boot due to system hive missing or corrupted
To troubleshoot this problem, use Windows installation media to start the computer, press Shift+F10 for a command prompt, and then use any of the following methods.
Method 1: Startup Repair tool
The Startup Repair tool automatically fixes many common problems. The tool also lets you quickly diagnose and repair more complex startup problems. When the computer detects a startup problem, the computer starts the Startup Repair tool. When the tool starts, it performs diagnostics. These diagnostics include analyzing startup log files to determine the cause of the problem. When the Startup Repair tool determines the cause, the tool tries to fix the problem automatically.
To do this, follow theseВ steps.
For additional methods to start WinRE, see Windows Recovery Environment (Windows RE).
Start the system to the installation media for the installed version of Windows. For more information, see Create installation media for Windows.
On the Install Windows screen, select Next > Repair your computer.
On the System Recovery Options screen, select Next > Command Prompt.
After Startup Repair, select Shutdown, then turn on your PC to see if Windows can boot properly.
The Startup Repair tool generates a log file to help you understand the startup problems and the repairs that were made. You can find the log file in the following location:
%windir%\System32\LogFiles\Srt\Srttrail.txt
Method 2: Repair Boot Codes
To repair boot codes, run the following command:
To repair the boot sector, run the following command:
Running BOOTREC together with Fixmbr overwrites only the master boot code. If the corruption in the MBR affects the partition table, running Fixmbr may not fix the problem.
Method 3: Fix BCD errors
If you receive BCD-related errors, follow these steps:
Scan for all the systems that are installed. To do this, run the following command:
Restart the computer to check whether the problem is fixed.
If the problem is not fixed, run the following command:
You might receive one of the following outputs:
If the output shows windows installation: 0, run the following commands:
After you run the command, you receive the following output:
- Try restarting the system.
Method 4: Replace Bootmgr
If methods 1, 2 and 3 do not fix the problem, replace the Bootmgr file from drive C to the System Reserved partition. To do this, follow these steps:
At a command prompt, change the directory to the System Reserved partition.
Run the attrib command to unhide the file:
Run the same attrib command on the Windows (system drive):
Rename the Bootmgr file as Bootmgr.old:
Navigate to the system drive.
Copy the Bootmgr file, and then paste it to the System Reserved partition.
Restart the computer.
Method 5: Restore System Hive
If Windows cannot load the system registry hive into memory, you must restore the system hive. To do this, use the Windows Recovery Environment or use Emergency Repair Disk (ERD) to copy the files from the C:\Windows\System32\config\RegBack to C:\Windows\System32\config.
If the problem persists, you may want to restore the system state backup to an alternative location, and then retrieve the registry hives to be replaced.
Starting in Windows 10, version 1803, Windows no longer automatically backs up the system registry to the RegBack folder.This change is by design, and is intended to help reduce the overall disk footprint size of Windows. To recover a system with a corrupt registry hive, Microsoft recommends that you use a system restore point. For more details, check this article.
Kernel Phase
If the system gets stuck during the kernel phase, you experience multiple symptoms or receive multiple error messages. These include, but are not limited to, the following:
A Stop error appears after the splash screen (Windows Logo screen).
Specific error code is displayed. For example, «0x00000C2» , «0x0000007B» , «inaccessible boot device» and so on.
The screen is stuck at the «spinning wheel» (rolling dots) «system busy» icon.
A black screen appears after the splash screen.
To troubleshoot these problems, try the following recovery boot options one at a time.
Scenario 1: Try to start the computer in Safe mode or Last Known Good Configuration
On the Advanced Boot Options screen, try to start the computer in Safe Mode or Safe Mode with Networking. If either of these options works, use Event Viewer to help identify and diagnose the cause of the boot problem. To view events that are recorded in the event logs, follow these steps:
Use one of the following methods to open Event Viewer:
Click Start, point to Administrative Tools, and then click Event Viewer.
Start the Event Viewer snap-in in Microsoft Management Console (MMC).
In the console tree, expand Event Viewer, and then click the log that you want to view. For example, click System log or Application log.
In the details pane, double-click the event that you want to view.
On the Edit menu, click Copy, open a new document in the program in which you want to paste the event (for example, Microsoft Word), and then click Paste.
Use the Up Arrow or Down Arrow keyВ to view the descriptionВ of the previous or next event.
Clean boot
To troubleshoot problems that affect services, do a clean boot by using System Configuration (msconfig). Select Selective startup to test the services one at a time to determine which one is causing the problem. If you cannot find the cause, try including system services. However, in most cases, the problematic service is third-party.
Disable any service that you find to be faulty, and try to start the computer again by selecting Normal startup.
If the computer starts in Disable Driver Signature mode, start the computer in Disable Driver Signature Enforcement mode, and then follow the steps that are documented in the following article to determine which drivers or files require driver signature enforcement: Troubleshooting boot problem caused byВ missing driver signature (x64)
If the computer is a domain controller, try Directory Services Restore mode (DSRM).
This method is an important step if you encounter Stop error «0xC00002E1» or «0xC00002E2»
Examples
Serious problems might occur if you modify the registry incorrectly by using Registry Editor or by using another method. These problems might require that you reinstall the operating system. Microsoft cannot guarantee that these problems can be solved. Modify the registry at your own risk.
Error code INACCESSIBLE_BOOT_DEVICE (STOP 0x7B)
To troubleshoot this Stop error, follow these steps to filter the drivers:
Go to Window Recovery Environment (WinRE) by putting an ISO disk of the system in the disk drive. The ISO should be of same version of Windows or a later version.
Open the registry.
Load the system hive, and name it as «test.»
Under the following registry subkey, check for lower filter and upper filter items for Non-Microsoft Drivers:
HKEY_LOCAL_MACHINE\SYSTEM\ControlSet001\Control\Class
For each third-party driver that you locate, click the upper or lower filter, and then delete the value data.
Search through the whole registry for similar items. Process as an appropriate, and then unload the registry hive.
Restart the server in Normal mode.
For additional troubleshooting steps, see the following articles:
To fix problems that occur after you install Windows updates, check for pending updates by using these steps:
Open a Command Prompt window in WinRE.
Run the command:
If there are any pending updates, uninstall them by running the following commands:
Try to start the computer.
If the computer does not start, follow these steps:
Open A Command Prompt window in WinRE, and start a text editor, such as Notepad.
Navigate to the system drive, and search for windows\winsxs\pending.xml.
If the Pending.xml file is found, rename the file as Pending.xml.old.
Open the registry, and then load the component hive in HKEY_LOCAL_MACHINE as a test.
Highlight the loaded test hive, and then search for the pendingxmlidentifier value.
If the pendingxmlidentifier value exists, delete the value.
Unload the test hive.
Load the system hive, name it as «test».
Navigate to the following subkey:
HKEY_LOCAL_MACHINE\SYSTEM\ControlSet001\Services\TrustedInstaller
Change the Start value from 1 to 4
Unload the hive.
Try to start the computer.
If the Stop error occurs late in the startup process, or if the Stop error is still being generated, you can capture a memory dump. A good memory dump can help determine the root cause of the Stop error. For details, see the following articles:
For more information about page file problems in Windows 10 or Windows Server 2016, see the following:
For more information about Stop errors, see the following Knowledge Base article:
If the dump file shows an error that is related to a driver (for example, windows\system32\drivers\stcvsm.sys is missing or corrupted), follow these guidelines:
Check the functionality that is provided by the driver. If the driver is a third-party boot driver, make sure that you understand what it does.
If the driver is not important and has no dependencies, load the system hive, and then disable the driver.
If the stop error indicates system file corruption, run the system file checker in offline mode.
To do this, open WinRE, open a command prompt, and then run the following command:
If there is disk corruption, run the check disk command:
If the Stop error indicates general registry corruption, or if you believe that new drivers or services were installed, follow these steps:
- Start WinRE, and open a Command Prompt window.
- Start a text editor, such as Notepad.
- Navigate to C:\Windows\System32\Config.
- Rename the all five hives by appending «.old» to the name.
- Copy all the hives from the Regback folder, paste them in the Config folder, and then try to start the computer in Normal mode.


