- Windows connect now service
- Startup Type
- Default Properties
- Default Behavior
- Dependencies
- Restore Default Startup Type for Windows Connect Now — Config Registrar
- Automated Restore
- Windows connect now service
- Windows security encyclopedia
- Windows Connect Now–Config Registrar
- Windows Connect Now – Config Registrar
- Windows 8
- Default Description
- Additional Information
- Default Startup Type
- Service Names
- Default Path and Command Line Options
- Log On As
- Dependencies
- Windows 7
- Default Description
- Additional Information
- Default Startup Type
- Service Names
- Default Path and Command Line Options
- Log On As
- Dependencies
- Windows Vista
- Default Description
- Additional Information
- Default Startup Type
- Service Names
- Default Path and Command Line Options
- Log On As
- Dependencies
- Windows connect now service
Windows connect now service
WCNCSVC hosts the Windows Connect Now Configuration which is Microsoft’s Implementation of Wi-Fi Protected Setup (WPS) protocol. This is used to configure Wireless LAN settings for an Access Point (AP) or a Wi-Fi Device. The service is started programmatically as needed.
This service also exists in Windows 10, 7 and Vista.
Startup Type
| Windows 8 edition | Windows 8 | Windows 8.1 | Windows 8.1 Update 1 |
|---|---|---|---|
| Core | Manual | Manual | Manual |
| Pro | Manual | Manual | Manual |
| Enterprise | Manual | Manual | Manual |
Default Properties
| Display name: | Windows Connect Now — Config Registrar |
| Service name: | wcncsvc |
| Type: | share |
| Path: | %WinDir%\System32\svchost.exe -k LocalServiceAndNoImpersonation |
| File: | %WinDir%\System32\wcncsvc.dll |
| Error control: | normal |
| Object: | NT AUTHORITY\LocalService |
| Privileges: |
|
Default Behavior
The Windows Connect Now — Config Registrar service runs as NT AUTHORITY\LocalService in a shared process of svchost.exe. Other services might run in the same process. If Windows Connect Now — Config Registrar fails to start, the error is logged. Windows 8 startup proceeds, but a message box is displayed informing you that the wcncsvc service has failed to start.
Dependencies
Windows Connect Now — Config Registrar won’t start, if the Remote Procedure Call (RPC) service is stopped or disabled.
Restore Default Startup Type for Windows Connect Now — Config Registrar
Automated Restore
1. Select your Windows 8 release and edition, and then click on the Download button below.
2. Save the RestoreWindowsConnectNowConfigRegistrarWindows8.bat file to any folder on your hard drive.
3. Right-click the downloaded batch file and select Run as administrator.
Windows connect now service


How to Start/Stop Windows Connect Now — Config Registrar service
Service name: wcncsvc
Display name: Windows Connect Now — Config Registrar
WCNCSVC hosts the Windows Connect Now Configuration which is Microsoft’s Implementation of Wi- Fi Protected Setup (WPS) protocol.
This is used to configure Wireless LAN settings for an Access Point (AP) or a Wi- Fi Device. The service is started programmatically as
needed.
Path to executable:
C:\Windows\System32\svchost.exe — k LocalServiceAndNoImpersonation
Services.msc:
This method shows you how to Start/Stop Windows Connect Now — Config Registrar service from Services.msc
Please perform the following steps:
Please go to Start and click on the Search programs and files

Type services.msc and press Enter

Locate Windows Connect Now — Config Registrar service observe his current status and open to make changes
From General tab you can Start/Stop and change the Startup type of Windows Connect Now — Config Registrar service
To finish press ok button and close Services window
Windows security encyclopedia
#microsoft #windows #security
Windows Connect Now–Config Registrar
The Windows Connect Now–Config Registrar (WCNCSVC) service acts as a registrar for the Windows Connect Now service, and it issues network credentials to the enrollee in the service. The Windows Connect Now technology enables a streamlined configuration of secured wireless networks and easier provisioning of wireless hardware. It also supports configuration of devices on out-of-band Ethernet and in-band wireless networks. WCNCSVC hosts the Windows Connect Now Configuration, which is the implementation of Wi-Fi Protected Setup protocol that is provided by Microsoft. This is used to configure wireless LAN settings for an access point or a Wi-Fi device. The service is started programmatically as needed.
Windows Connect Now–NET in Windows 7 communicates with access points and wireless stations by using UPnP architecture, authenticates with them by using a personal identification number (PIN), and provides wireless settings that are based on user selection.
This service is installed by default and its startup type is Manual.
When Windows Connect Now–Config Registrar service is started in its default configuration, it logs on by using the Local Service account.
The Windows Connect Now–Config Registrar service is dependent upon the following system components:
- Remote Procedure Call (RPC)
- DCOM Server Process Launcher
- RPC Endpoint Mapper
Windows Connect Now – Config Registrar
Windows 8
Default Description
WCNCSVC hosts the Windows Connect Now Configuration which is Microsoft’s Implementation of Wi-Fi Protected Setup (WPS) protocol. This is used to configure Wireless LAN settings for an Access Point (AP) or a Wi-Fi Device. The service is started programmatically as needed.
Additional Information
None at this time.
Default Startup Type
| OS | SP0 |
|---|---|
| Windows 8 x86 | Manual |
| Windows 8 x64 | Manual |
| Windows 8 Pro x86 | Manual |
| Windows 8 Pro x64 | Manual |
| Windows 8 Enterprise x86 | Manual |
| Windows 8 Enterprise x64 | Manual |
Service Names
Service Name (registry): wcncsvc
Display Name: Windows Connect Now – Config Registrar
Default Path and Command Line Options
C:\Windows\System32\svchost.exe -k LocalServiceAndNoImpersonation
Log On As
Account: Local Service
Dependencies
Note: No dependencies are listed for any service in the WDP build I used to draft this information.
Windows 7
Default Description
WCNCSVC hosts the Windows Connect Now Configuration which is Microsoft’s Implementation of Wi-Fi Protected Setup (WPS) protocol. This is used to configure Wireless LAN settings for an Access Point (AP) or a Wi-Fi Device. The service is started programmatically as needed.
Additional Information
The first time you connect to a compatible Wireless router, Windows 7 will step through all the necessary setup tasks to make connecting wirelessly “easier”. If you do not have a wireless network or your particular model does not have the “Compatible with Windows 7” logo, this service can safely be disabled.
Default Startup Type
| OS | SP0 | SP1 |
|---|---|---|
| Windows 7 Starter | Manual | Manual |
| Windows 7 Home Basic | Manual | Manual |
| Windows 7 Home Premium | Manual | Manual |
| Windows 7 Professional | Manual | Manual |
| Windows 7 Ultimate | Manual | Manual |
| Windows 7 Enterprise | Manual | Manual |
Service Names
Service Name (registry): wcncsvc
Display Name: Windows Connect Now – Config Registrar
Default Path and Command Line Options
C:\Windows\System32\svchost.exe -k LocalServiceAndNoImpersonation
Log On As
Account: Local Service
Dependencies
What service Windows Connect Now – Config Registrar needs to function properly:
- Remote Procedure Call (RPC) (S, HB, HP, P, U, E)
- DCOM Server Process Launcher (S, HB, HP, P, U, E)
- RPC Endpoint Mapper (S, HB, HP, P, U, E)
What other service require Windows Connect Now – Config Registrar to function properly:
Windows Vista
Default Description
Act as a Registrar, issues network credential to Enrollee. If this service is disabled, the Windows Connect Now – Config Registrar will not function properly.
Additional Information
None at this time.
Default Startup Type
| OS | SP0 | SP1 | SP2 |
|---|---|---|---|
| Vista Home Basic | Manual | Manual | Manual |
| Vista Home Premium | Manual | Manual | Manual |
| Vista Business | Manual | Manual | Manual |
| Vista Ultimate | Manual | Manual | Manual |
| Vista Enterprise | Manual | Manual | Manual |
Service Names
Service Name (registry): wcncsvc
Display Name: Windows Connect Now – Config Registrar
Default Path and Command Line Options
C:\Windows\System32\svchost.exe -k LocalService
Log On As
Account: Local Service
Dependencies
What service Windows Connect Now – Config Registrar needs to function properly:
What other service require Windows Connect Now – Config Registrar to function properly:
Windows connect now service
Установили Windows XP вместе с Windows 7 и потеряли возможность загружать Windows 7?
Восстановление Windows 7 и двойная загрузка
Ввиду невозможности использования загрузчика NTLDR (Windows XP), необходимо восстановить ссылку на загрузчик Windows 7 (winload) в главной загрузочной записи (MBR) и сконфигурировать его для дальнейшего управления обеими операционными системами.
Подготовка и восстановление возможности загрузки Windows 7 достаточно просты.
- Автоматически загрузитесь с Windows 7 DVD. На экране, где вам предлагают „Install now” (установить сейчас), выберите „Repair your computer” (починить компьютер).
Следующий экран ищет установленные локальные версии Windows 7 – должна быть только одна, поэтому нажимайте Next.
Далее загрузится экран с опциями системы восстановления (System Recovery Options). Выберите первую опцию – „Startup Repair” (начало ремонта). Она будет искать проблемы, которые могут повлиять на загрузку Windows 7 (например, потерянный автозагрузчик), и автоматически их исправит.
Если вы нажмете на „Click here for diagnostic and repair details” (нажмите здесь для подробностей относительно диагностики и ремонта) и пролистаете до конца странички, то увидите, что выявленная и исправленная проблема – неисправный загрузочный сектор (что нам и требовалось).
Нажмите Close (закрыть), а затем Finish (завершить), и после перезагрузки системы загрузится Windows 7.
Теперь нам надо сделать двойную загрузку, и EasyBCD является наилучшим приложением для данного действия. Скачаем EasyBCD (заполнять поля «Name» и «Email» необязательно, достаточно нажать «Download!»), зеркало.
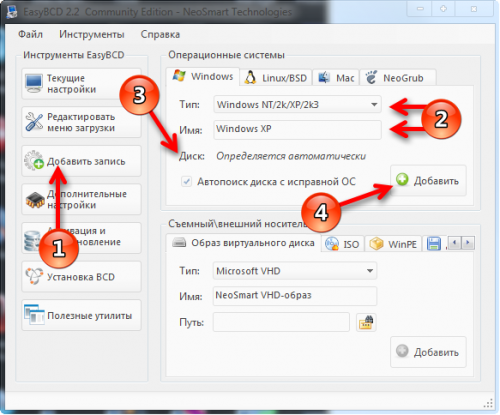
Запустите приложение и нажмите «Add New Entry» (Добавить запись).
На вкладке «Windows» выберите в списке версий „Windows NT/2k/XP/2k3”.
Смените диск на тот, на котором была установлена Windows XP или, если доступно, выберете «Automatically detect correct drive» (Автопоиск диска с исправной ОС) и измените имя на желаемое (например, „Windows XP”), затем нажмите „Add Entry” (добавить значение).
Сообщение отредактировал Shoore — 27.11.14, 19:13
- Практическая часть:
В 32-битных версиях Windows XP, Vista и 7 объем доступной оперативной памяти ограничен 4Гб.
Причем в свойствах системы пользователь видит значения от 2,75 до 3,5 Гб. Это связано с архитектурными особенностями ОС. Обозначается такая версия 32-bit или х-86.
В 64-битных версиях Windows XP, Vista и 7 объем доступной оперативной памяти логически ограничен 16Тб. Обозначается такая версия 64-bit или х-64. Фактически Microsoft из маркетинговых соображений ограничивает объем памяти в 4Гб, 8Гб, 16Гб и т.д. в зависимости от типа лицензии ОС.
Важное замечание: для 64-битной версии Windows необходимы и 64-битные версии драйверов для всех устройств ПК (мат.плата, видеокарта и т.д.), включая периферию (принтер, сканер, блютуз и т.д.).
Если этих драйверов нет, то устройство работать не будет.
Я на своем опыте столкнулся с этим, когда не оказалось драйверов на принтер, сканер, звуковую карту и блютуз (производители обычно не выпускают новые драйвера на старые модели, т.к. им надо продавать новые продукты). Пришлось от использования 64-битной версии отказаться.
Для обычного пользователя ПК все это сводится к следующему:
Если в ПК установлено 4Гб или меньше оперативной памяти, то достаточно будет обычной, 32-битной версии ОС.
Если в ПК установлено больше 4Гб оперативной памяти, то надо ставить 64-битную версию ОС.
Если пользователь хочет увеличить оперативную память в ПК для увеличения быстродействия, то увеличивать стоит только до 4Гб, не более.
При увеличении памяти, например, с 1Гб до 4Гб или с 2Гб до 4Гб производительность ПК не вырастет пропорционально – в 4 или 2 раза.
Визуально скорость работы ОС вырастет — скорость загрузки системы, запуска программ, загрузки/сохранения в играх. Также будет быстрее происходить переключение между задачами.
Источник: pc-user.ru
Сообщение отредактировал svm — 06.05.13, 20:30
Как переразбить HDD без потери данных не используя сторонние программы?
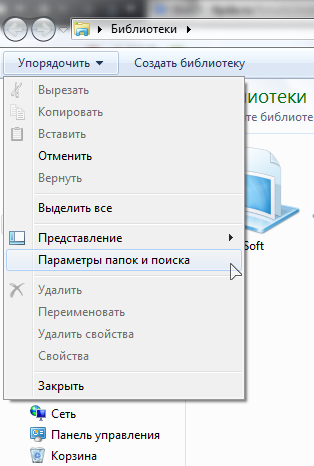
- Идём в «Управление дисками» (Самый простой способ: Win+R >diskmgmt.msc >Enter. Либо: Меню пуск —> вызываем контекстное меню (правая кнопка мыши) на иконке «Компьютер» —> «Управление» —> «Управление дисками»).
- Вызываем контекстное меню (правая кнопка мыши) на области диска С и выбираем «Сжать том».
- Вводим размер остающегося дискового пространства (или соглашаемся с предложением разбить диск пополам) и после недолгого ожидания имеем диск С и нераспределенное пространство после него. При этом никакая переустановка системы не требуется. Затем — всё просто. Оставшееся пространство разбиваем на логические диски, форматируем и имеем обихоженный винт, размеченный уже под наши потребности и привычки.
Если нет желания возиться потом с переименованием дисков, то перед созданием логических дисков переименовываем DVD-привод, присвоив ему букву Z. Тогда, остальные логические диски сразу встанут на свои места. Потом приводу можно будет вернуть букву, следующую за последним логическим.
P.S. Аналогичным функционалом обладает и Vista.
Сообщение отредактировал Shoore — 26.06.13, 01:53
В Windows 7, как и в Windows Vista, существует возможность трехкомпонентной OEM OFF-LINE активации. Сочетание именно ВСЕХ трех составляющих процедуры OEM активации, а именно (OEM SLP Key + OEM Certificate + Full SLIC Table = Windows 7 Activated Offline), дает возможность активировать Windows 7 без интернета!
Вот основные составляющие OEM OFF-LINE активации:
OEM SLP (System-Locked Pre-installation) — специальный двадцатипятизначный OEM SLP ключ-лицензия, доступный только крупным производителям железа.
OEM Certificate — специальный OEMный файл-сертификат. Каждому крупному производителю ПК корпорация Microsoft выдает свой персональный файл-сертификат!
BIOS ACPI_SLIC TABLE — специальная SLIC (Software Licensing Description Table) — таблица, вшиваемая производителем ПК в BIOS системы.
Сообщение отредактировал svm — 07.05.13, 13:31
Почему установка Windows 7 идет очень долго?
Подрабатываю по настройке компов, и тут встретился с одной проблемой: установка семёрки тянется мучительно долго. До запуска окна с выбором языка и т.п. проходит почти 10 минут и далее установка затягивается на часы. Я до конца установки так и не стал ждать. Приходилось ставить ХР.
Оказалось, физически флопа нет, а в биос он включен. Решение такое: надо в биосе отключить «ссылки» на флопик.
PS может, уже такой совет был, но ещё раз продублировать не помешает, и я думаю в шапку закрепить тоже следует.
Сообщение отредактировал Catg — 31.12.10, 17:37
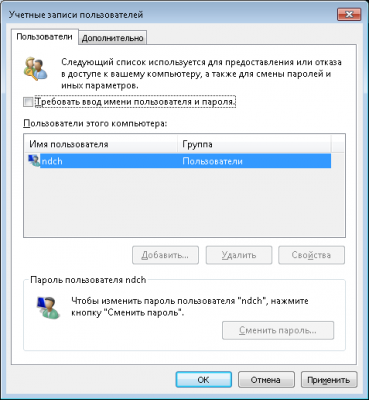
Автоматический вход в систему
В диалоговом окне «Выполнить» (Пуск —> Выполнить / [Win+R]) вводим control userpasswords2 и нажимаем «ОК»
В окне «Учетные записи пользователей» снимаем галочку с чекбокса «Требовать ввод имени пользователя и пароля». Затем нажимаем «ОК».