- How to connect to a network printer
- Connect network printer in Windows 10
- Connect network printer in Windows 8
- Connect network printer in Windows Vista and 7
- Connect network printer in Windows 2000 and XP
- Connect printer in Windows 95, 98, or ME
- Connect printer in macOS
- Install a printer in Windows 10
- Need more help?
- Подключение сетевого принтера в Windows 10
- Подключаем сетевой принтер в Windows 10
- Подготовительные действия
- Способ 1: Меню «Параметры»
- Способ 2: Классическое приложение «PowerShell»
- Способ 3: «Панель управления»
How to connect to a network printer
Below are the steps required to connect to a working printer on a network, and use it to print.
Connect network printer in Windows 10
- Turn on your printer and make sure it is connected to the network.
- How to set up and install a computer printer.
- How to connect a printer to your home network.
- Open the Control Panel.
- Click the Devices and Printers icon or View devices and printers link, depending on the view type you are using in the Control Panel.
- In the Devices and Printers window, click the Add a printer link in the menu bar at the top.

- Let Windows scan for the printer. If detected, select the printer and click Next. If the printer is not listed, click The printer that I want isn’t listed and skip to add the printer by name or TCP/IP address.
If you know the printer’s name, choose Select a shared printer by name and enter the path to the printer. For example, with a network named hope and a printer named hp, the network path would be: \\hope\hp.

If you do not know the printer’s path, but have the printer’s IP address, select Add a printer using a TCP/IP address or hostname.
- How to find a printer IP address.
- If, during the installation, Windows asks for drivers, point to the location of your printer drivers. If you do not have drivers, visit our printer drivers section to find links to all printer drivers.
Connect network printer in Windows 8
- Turn on your printer and make sure it is connected to the network.
- How to set up and install a computer printer.
- How to connect a printer to your home network.
- Open the Control Panel.
- Click Hardware and Sound.
- Double-click the Add a printer icon.
- Select Add a network, wireless or Bluetooth printer and click Next.
- Let Windows scan for the printer. If detected, select the printer and click Next. If the printer is not listed, click The printer that I want isn’t listed and skip to add the printer by name or TCP/IP address.
If you know the printer’s name, choose Select a shared printer by name and enter the path to the printer. For example, with a network named hope and a printer named hp, the network path would be: \\hope\hp.
If you do not know the printer’s path, but have the printer’s IP address, select Add a printer using a TCP/IP address or hostname.
- How to find a printer IP address.
- If, during the installation, Windows asks for printer drivers, point to the location of your drivers. If you do not have drivers, visit our printer drivers section to find links to all printer drivers.
Connect network printer in Windows Vista and 7
- Turn on your printer and make sure it is connected to the network.
- How to set up and install a computer printer.
- How to connect a printer to your home network.
- Open the Control Panel.
- Click Hardware and Sound.
- Double-click the Add a printer icon.
- Select Add a network, wireless or Bluetooth printer and click Next.
- Let Windows scan for the printer. If detected, select the printer and click Next. If the printer is not listed, click The printer that I want isn’t listed and skip to add the printer by name or TCP/IP address.
If you know the printer’s name, choose Select a shared printer by name and enter the path to the printer. For example, with a network named hope and a printer named hp, the network path would be: \\hope\hp.
If you do not know the printer’s path, but have the printer’s IP address, select Add a printer using a TCP/IP address or hostname.
- How to find a printer IP address.
- If, during the installation, Windows asks for printer drivers, point to the location of your drivers. If you do not have drivers, visit our printer drivers section to find links to all printer drivers.
Connect network printer in Windows 2000 and XP
- Turn on your printer and make sure it is connected to the network.
- How to set up and install a computer printer.
- How to connect a printer to your home network.
- Open the Control Panel.
- Double-click the Printers or Printers and Faxes icon.
- Double-click the Add a printer icon.
- Once in the printer wizard, click the Next button to get started.
- Select either A network printer, or a printer attached to another computer or Network Printer and click Next. The option depends on what version of Windows you are using.
- Type the name of the printer’s network address. The address is the name of the computer and then the name of the printer. For example, with a network named hope and a printer named hp, the network path would be: \\hope\hp. If you are adding the printer on a Windows XP computer, click the Browse icon to browse your network and locate the printer. If you’re unable to connect to the printer or browse and see the printer, make sure you have network rights and that any installed firewall is temporarily disabled.
- Once the network path to the printer is typed in, click Next.
- If the computer doesn’t have the printer drivers, you need to install them from a driver’s disc or a download on the Internet. If you no longer have the software or drivers for your printer, locate the drivers for your printer through our printer drivers section.
Connect printer in Windows 95, 98, or ME
- Turn on your printer and make sure it is connected to the network.
- How to set up and install a computer printer.
- How to connect a printer to your home network.
- Open the Control Panel.
- Double-click the Printers icon.
- Double-click the Add a printer icon.
- Click Next to start the Add a printer wizard.
- Select Network Printer and click Next.
- Type the network path for the printer. For example, with a network named hope and a printer named hp, the network path would be: \\hope\hp.
- If the computer doesn’t have the printer drivers, you need to install them from a driver’s disc or a download on the Internet. If you no longer have the software or drivers for your printer, locate the drivers for your printer through our printer drivers section.
Connect printer in macOS
- In the menu bar, click the Apple icon to open the Apple menu.
- In the Apple menu, click System Preferences.

- Click the Printers & Scanners shortcut icon.

- Click the + symbol in the lower-left section of the window.
- In the next window, click the IP tab ( A), type in the IP address for your printer ( B), and then click Add ( C).
- How to find a printer IP address.

- Once you’ve added the printer, you’ll see it on the Printers & Scanners window.
Install a printer in Windows 10
When you connect a printer to your PC or add a new printer to your home network, you can usually start printing right away. Windows 10 supports most printers, so you probably won’t have to install special printer software. Additional printer drivers and support might be available if you update Windows 10.
Note: If your PC is running Windows 10 S, some printers might not work with it, or they might have limited functionality. For more info, see Device support on Windows 10 S.
If your printer is on and connected to the network, Windows should find it easily. Available printers can include all printers on a network, such as Bluetooth and wireless printers or printers that are plugged into another computer and shared on the network. You might need permission to install some printers.
Select the Start button, then select Settings > Devices > Printers & scanners.
Open Printers & scanners settings
Select Add a printer or scanner. Wait for it to find nearby printers, then choose the one you want to use, and select Add device.
If your printer isn’t in the list, select The printer that I want isn’t listed, and then follow the instructions to add it manually using one of the options.
If you use wireless access points, extenders or multiple wireless routers with separate SSIDs, you’ll need to ensure that you’re connected to the same network as the printer for your PC to find and install it.
If you have a new wireless printer that hasn’t been added to your home network, read the instructions that came with the printer, and check the printer manufacturer’s website to learn more and to get up-to-date software for your printer.
In most cases, all you have to do to set up a printer is to connect it to your PC. Simply plug the USB cable from your printer into an available USB port on your PC, and turn the printer on.
Select the Start button, then select Settings > Devices > Printers & scanners.
Open Printers & scanners settings
Select Add a printer or scanner. Wait for it to find nearby printers, then choose the one you want to use, and select Add device.
If your printer isn’t in the list, select The printer that I want isn’t listed, and then follow the instructions to add it manually using one of the options.
Need more help?
If you’re looking for help with a scanner, see Install and use a scanner in Windows 10.
If your printer appears «offline,» find out how you can Change a printer’s status to «online.»
If you’re having problems with your printer after updating to the latest version of Windows 10, see Fix printer problems after updating Windows 10. For driver issues, see the «Step 3: Update drivers» section of this page.
Подключение сетевого принтера в Windows 10
Сейчас практически в каждом доме присутствует несколько компьютеров, подключенных к одной интернет-сети, не говоря уже о различных офисах, где связанных устройств может быть бесчисленное количество. К тому же, многие желают использовать печатное оборудование, но подключать его постоянно к разным ПК совершенно неудобно. В этом случае на помощь приходит встроенная функция операционной системы Windows 10, которая позволяет сделать принтер общим и запускать печать с любого локального аппарата.
Подключаем сетевой принтер в Windows 10
Чтобы выполнить поставленную задачу, вам необходимо соблюдать всего два главных условия — принтер обязательно должен быть подключен к одному из компьютеров и быть в рабочем состоянии (без проблем печатать страницы), а также все ПК должны находиться в одной локальной сети. После того, как вы убедились в осуществлении этих пунктов, можно приступать к подготовительным работам и непосредственному соединению сетевого оборудования.
Подготовительные действия
Первоочередно потребуется произвести несколько простых действий, чтобы в дальнейшем не приходилось на них отвлекаться. Мы выделили все пункты, которые следует учитывать:
- Узнайте имя или IP-адрес ПК, куда подсоединен необходимый принтер. Эта информация потребуется при его добавлении через системные средства. Детальнее об этом читайте в отдельной нашей статье по следующей ссылке.
Предоставьте общий доступ в пределах локальной сети, чтобы обеспечить нормальное взаимодействие оборудования, всех файлов и папок.
Узнайте точное имя принтера, для этого потребуется найти его на компьютере и запомнить или скопировать увиденное название.
Только после выполнения всех этих пунктов можно переходить к добавлению сетевого печатающего аппарата. Мы выделили все доступные методы осуществления этой операции, но в первую очередь остановиться хотелось бы на рекомендованном.
Способ 1: Меню «Параметры»
Меню «Параметры» появилось в Windows 10 и призвано в будущем полностью заменить «Панель управления». Сейчас через него уже можно достаточно просто производить различные действия с периферийным оборудованием, включая принтеры. Подключается сетевой аппарат через это меню буквально в несколько кликов:
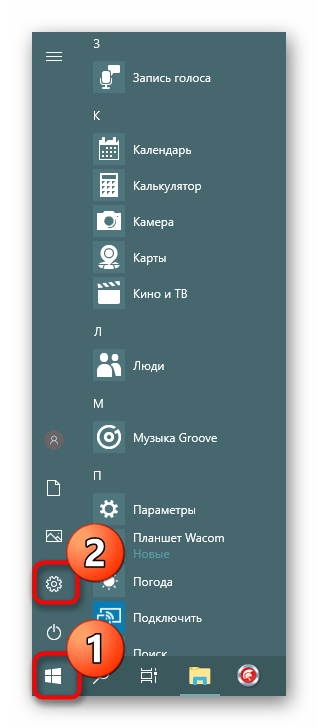
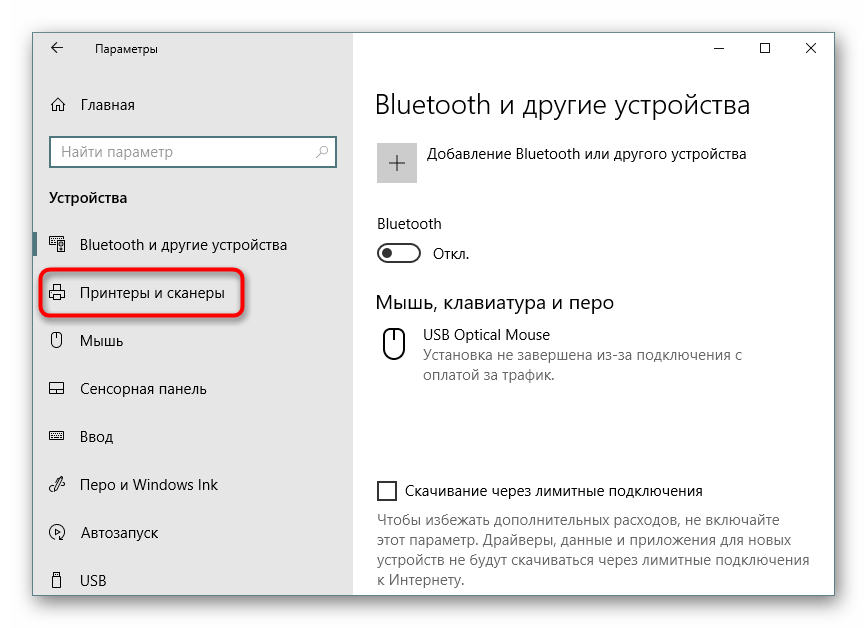
- Откройте меню «Пуск» и зайдите в «Параметры».
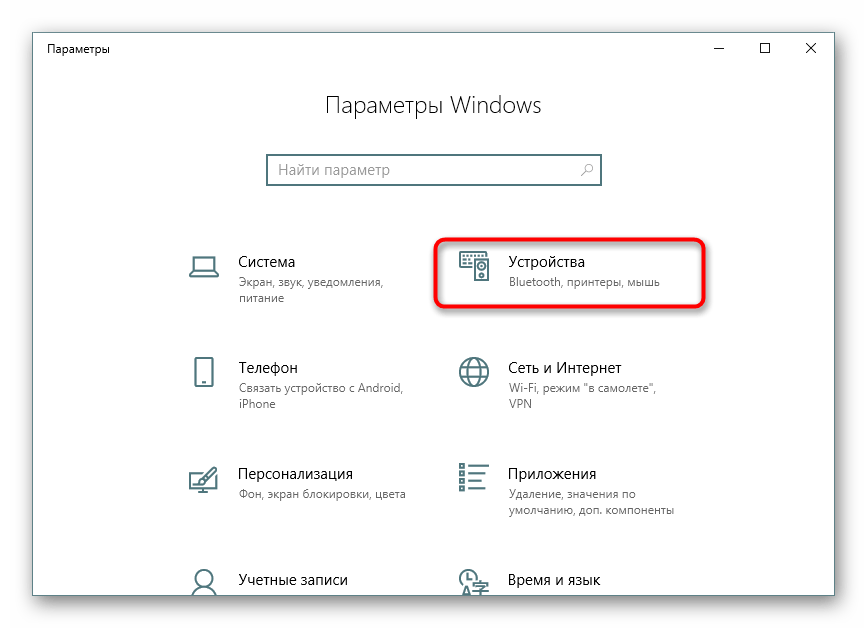
Выберите раздел «Устройства».
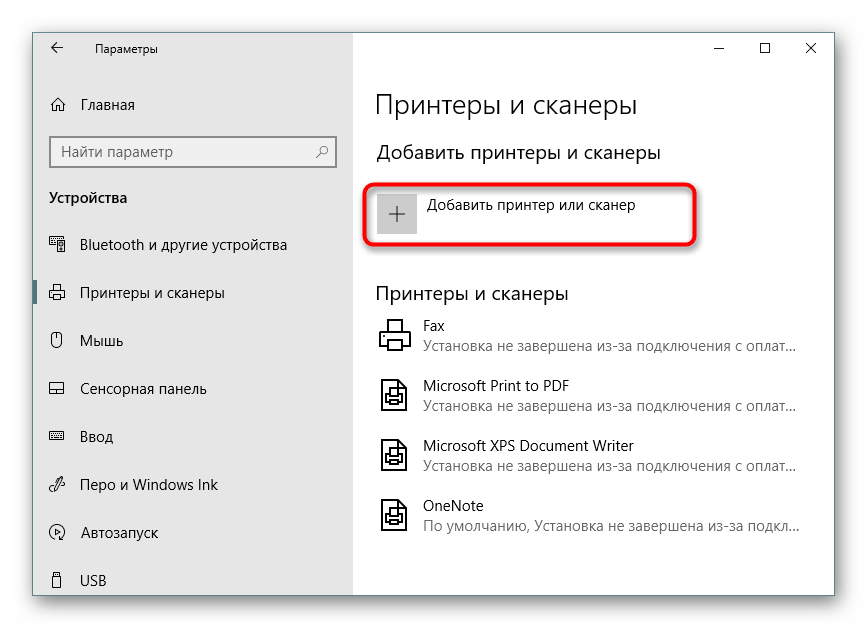
Через боковую панель откройте категорию «Принтеры и сканеры».
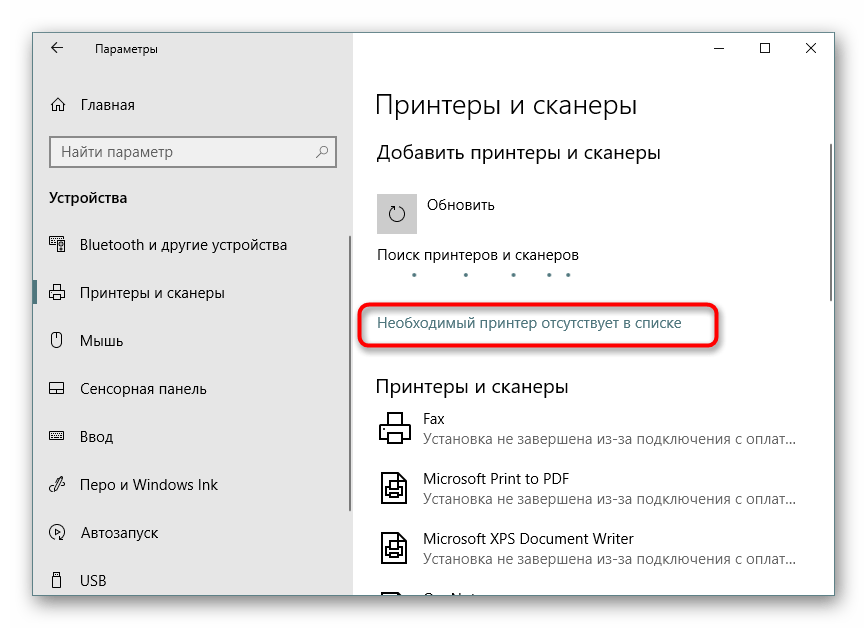
Здесь щелкните на «Добавить принтер или сканер».
Нажмите на надпись «Необходимый принтер отсутствует в списке» при ее появлении.
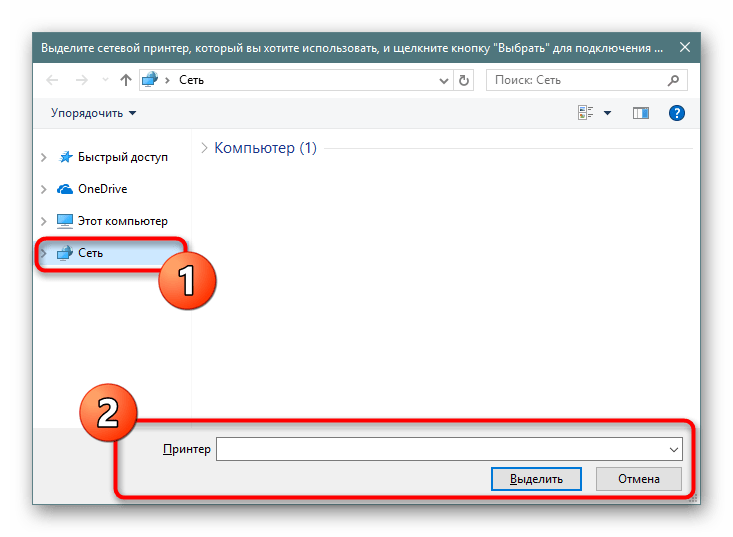
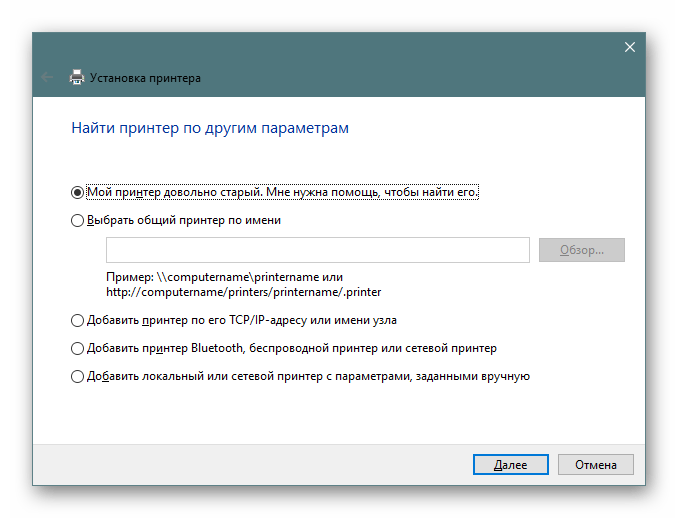
Отметьте маркером пункт «Выбрать общий принтер по имени». Заполните адрес в формате \\Имя или IP-адрес компьютера\полное имя принтера и нажмите на «Далее».
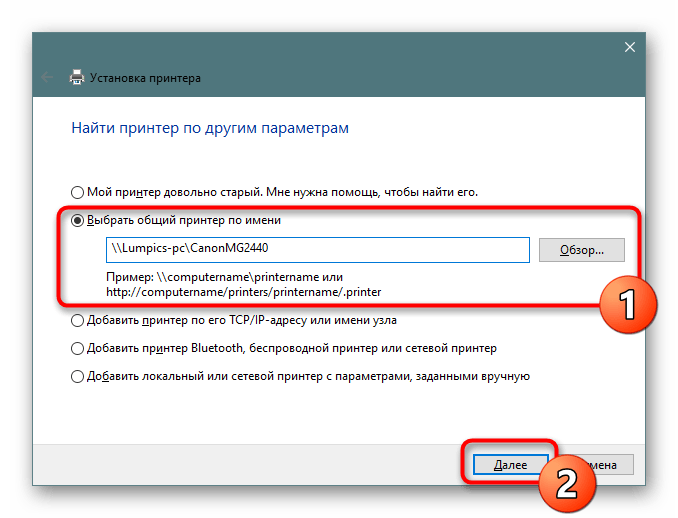
Вы также можете кликнуть на «Обзор», после чего откроется Проводник, где в разделе «Сеть» отобразится список доступных общих принтеров для выбора.
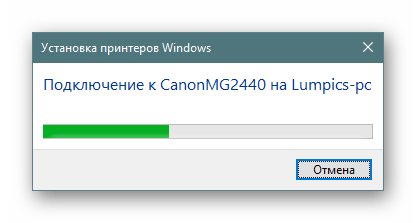
Ожидайте завершения подключения выбранного устройства. При появлении уведомления о необходимости инсталляции драйверов подтвердите его, все остальные действия будут выполнены автоматически.
По окончании инсталляции откроется новое окно с рекомендацией использования принтера по умолчанию и предложением запуска пробной страницы для проверки работоспособности.

После произведения этой инструкции принтер без проблем будет печатать по сети и станет отображаться при выборе оборудования для печати. Не забывайте только предварительно включать его на основном устройстве и проверять наличие бумаги в лотке, чтобы не получать ошибок при отправке.
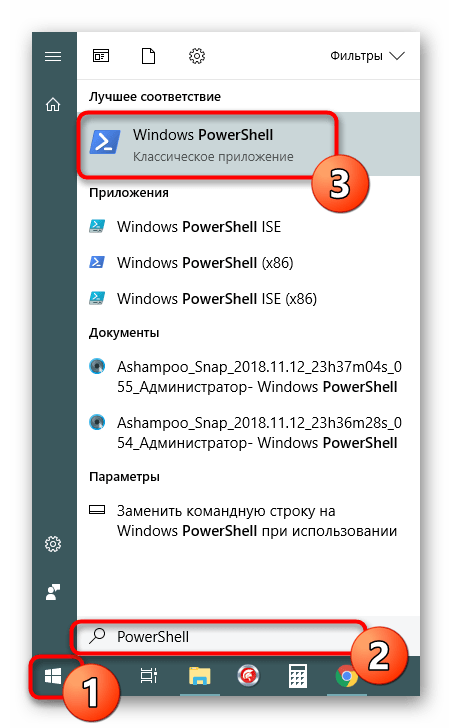
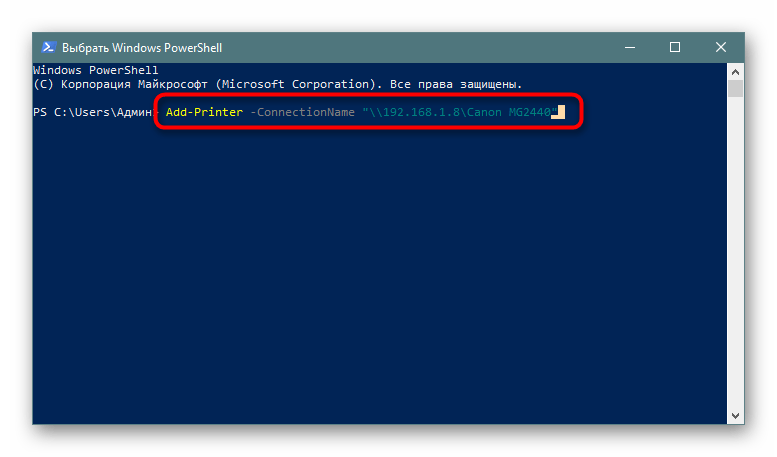
Способ 2: Классическое приложение «PowerShell»
Данный метод заключается в использовании расширенной альтернативы «Командной строке» — классического приложения «Windows PowerShell». Подключение сетевого печатного оборудования таким образом осуществляется путем ввода специальных команд, однако для начала потребуется запустить саму консоль. Сделать это можно через меню «Пуск», введя соответствующее название в поиске.
В консоли потребуется ввести Add-Printer -ConnectionName «\\Имя_Компьютера\Полное_Название_Принтера» для добавления принтера по имени главного ПК. После указания команды нажмите на клавишу Enter, чтобы активировать ее.
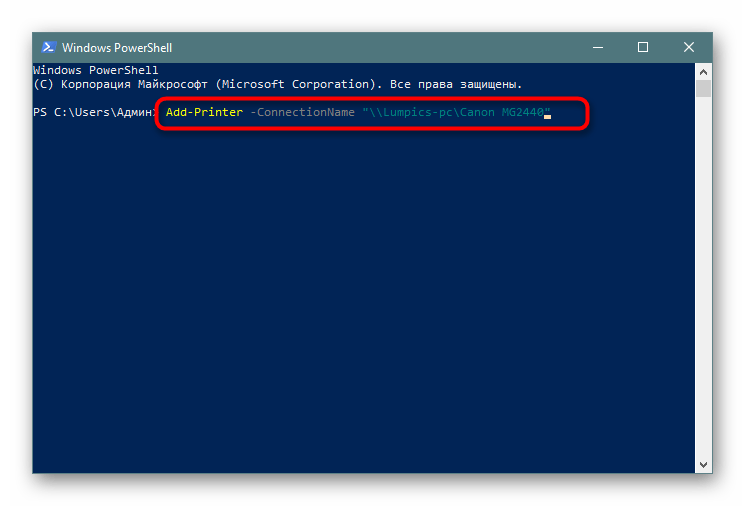
Если вы заинтересованы в соединении аппарата посредству IP-адреса ПК, команда обретет немного другой вид: Add-Printer -ConnectionName «\\192.168.1.8\Полное_Название_Принтера» , где 192.168.1.8 — нужный локальный IP-адрес.
Способ 3: «Панель управления»
Как уже было сказано ранее, «Панель управления» постепенно теряет свои позиции, ведь новое меню «Параметры» гораздо удобнее и функциональнее. Однако еще остались те пользователи, которым надо выполнить рассматриваемую сегодня задачу именно через это классическое приложение, а делается это так:
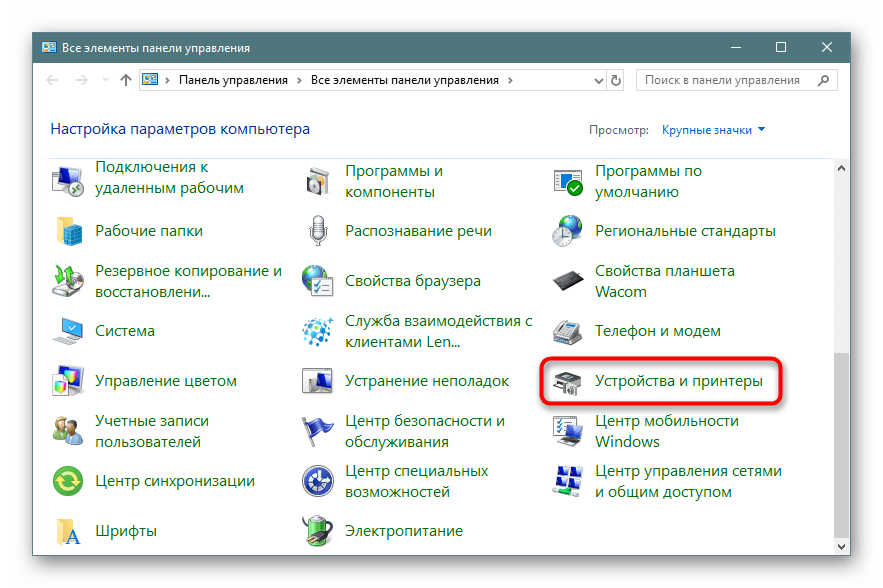
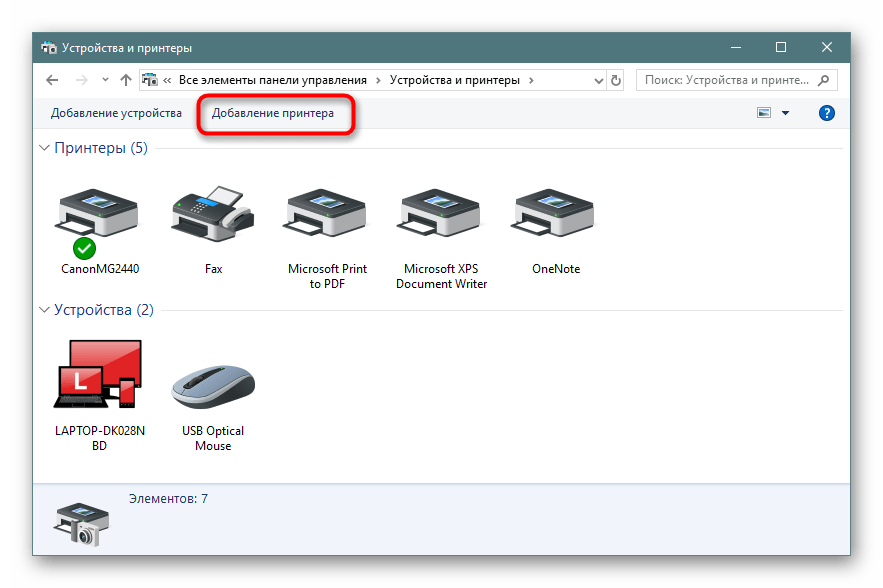
- Запустите «Панель управления» любым удобным способом и перейдите там в раздел «Устройства и принтеры».
На панели сверху щелкните на «Добавление принтера».
Кликните по ссылке «Необходимый принтер отсутствует в списке».
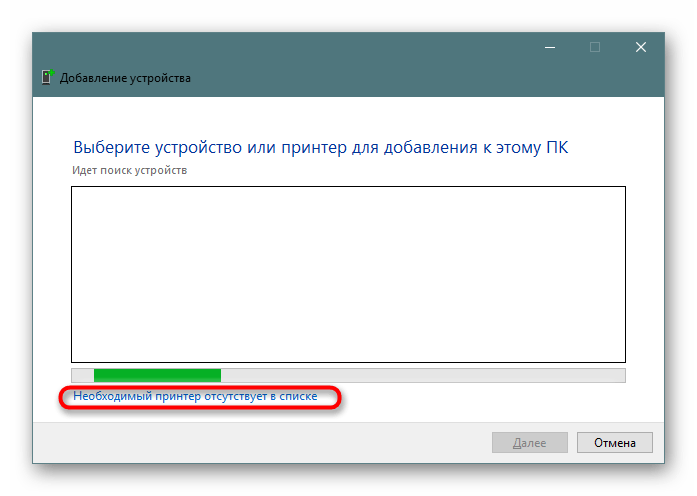
Все остальные действия производятся с точностью так, как это было показано в Способе 1.
Вы были ознакомлены с тремя различными вариантами соединения общего принтера в операционной системе Виндовс 10. Обычно все проходит успешно, однако иногда юзеры сталкиваются с проблемами. Самые частые — отключенная служба печати или ошибка «Локальная подсистема печати не выполняется». Ознакомиться с решением этих трудностей вы можете в отдельной нашей статье далее.


