- Fix: Windows 10 will not connect to WIFI Automatically
- Repair Corrupt System Files
- Forget your WiFi network and then reconnect to it
- Stop your computer from turning its WiFi adapter off to save power
- Edit or Create Group Policy via Registry Editor
- Running the Network Troubleshooter (Post 1709 Update)
- Disabling Microsoft Wi-Fi Direct Virtual Adapter (Post 1709 Update)
- Enabling Computer to put Wi-Fi to Sleep (Post 1709 Update)
- Running a Check Disk Scan
- Setting up a wireless network
- Get the right equipment
- Setting up the modem and Internet connection
- Positioning the wireless router
- Securing your wireless network
- Connect a PC to your wireless network
Fix: Windows 10 will not connect to WIFI Automatically
Many Windows 10 users from all across the globe are complaining of their Windows 10 computers not connecting to saved WiFi networks automatically even though they have made sure that the Connect automatically option for those networks has been enabled. Such users have reported that their computers only connect to WiFi networks they already remember and should connect automatically to when they either manually connect to them from their computer’s WiFi menu or, in some cases, press the hardware WiFi button on their laptop.
This issue may be caused by either a simple glitch or, in most cases, a system upgrade that causes the computer in question to start turning its WiFi adapter off, and thus requiring it to be woken up following every shutdown or restart, in order to save power. The issue may also be caused by LAN being plugged in, so if you have it plugged in, remove it and reboot to test, if it works and you’re okay, leave this as it is but if it doesn’t work and you want both LAN and WiFi to work, then follow the last method to create a group policy. If you are on a domain network, then the domain policy will override this.
Thankfully enough, there are some things that you can do to get rid of this problem. The following are the two most effective solutions that can be used to fix a Windows 10 computer that fails to connect to WiFi networks it remembers automatically.
Repair Corrupt System Files
Download and run Restoro to scan and repair corrupt/missing files from here, if files are found to be corrupt and missing repair them and then see if your system connects to the WiFi automatically, if not then try the other steps suggested below.
Forget your WiFi network and then reconnect to it
If a simple glitch or bug is causing your computer to not connect to a saved WiFi network automatically, the following is bound to work for you:
Click on the WiFi icon in the taskbar.
Click on Network Settings
Under the Wireless Network Connection section, choose Manage Wi-Fi Settings. Then from under Manage Known Networks, Click the name of your wireless network and choose Forget.

Restart your computer. Click on the WiFi icon in the taskbar and click on your WiFi network from the list of available networks.
Make sure that you check the Connect automatically. Click on Connect.
Enter the security code for the network. Once your computer connects to the network, its memory should be refreshed and it should connect to the network automatically even after shutdowns and restarts.
Stop your computer from turning its WiFi adapter off to save power
If your computer has not been connecting automatically to WiFi networks it remembers after a system upgrade to Windows 10 or any of its builds, you would be better off trying the following:
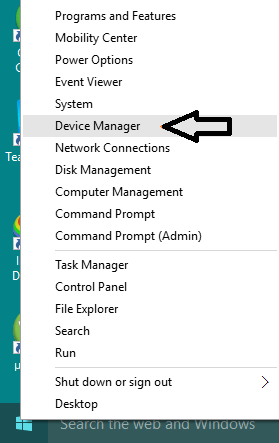
Right click on the Start button and, in the menu that appears, click on Device manager.
Double click on the Network adapters section to expand it.
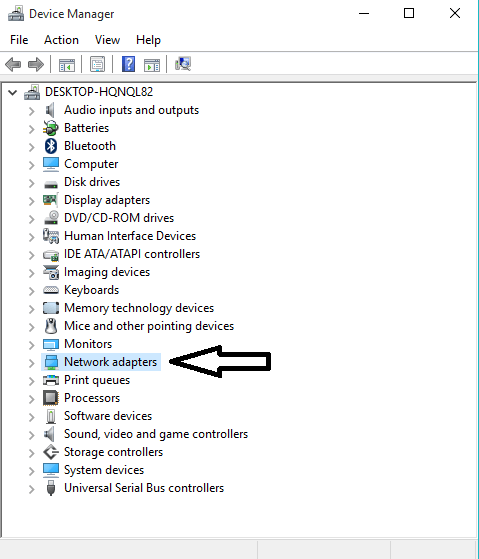
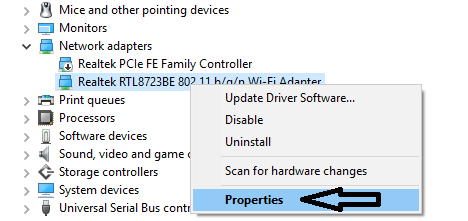
Figure out which of the adapters in the list that appears is your computer’s WiFi adapter and then right click on it. From the right click menu, click on Properties.
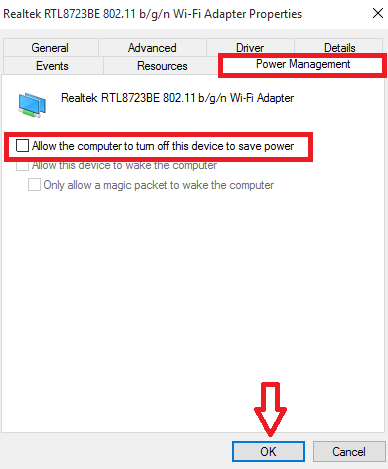
In the dialog that appears, click on the Power management tab to navigate to it. Uncheck the Allow this computer to turn off this device to save power. Click on OK.
Once the change is saved, your computer should start connecting automatically to WiFi networks that it remembers as soon as it wakes up from a shutdown, a restart or a simple sleep. In addition this guide, on 12/22/2015 we troubleshooted the same issue and have found the steps here to work.
Edit or Create Group Policy via Registry Editor
Hold the Windows Key and Press R. In the run dialog, type regedit and click OK. Navigate to the following path in Registry Editor,
See if the GroupPolicy subkey exists, if not with WcmSvc highlighted, right click on WcmSvc and Choose New -> Key and name it GroupPolicy, then click GroupPolicy and then in the right pane, (right-click) and choose New -> DWORD (32-bit) and create value, name it as fMinimizeConnections and Click OK. Now, reboot and test. This policy allows you to connect automatically to wireless network, even with a LAN plugged in and works on both Windows 8/8.1 and 10.
Running the Network Troubleshooter (Post 1709 Update)
You should try running the network troubleshooter before proceeding with any other methods. The Windows Troubleshooter analyzes your Wi-Fi hardware as well as checks the connectivity to the internet by accessing Microsoft’s servers. If there is some discrepancy present, it will inform you and attempt to fix it automatically. In most cases, this worked where users were not able to connect to the internet when they started up their computer.
- Right-click on your Wi-Fi icon and select “Troubleshoot problems”.

- Now Windows will try troubleshooting. Be patient and let the process complete.


Disabling Microsoft Wi-Fi Direct Virtual Adapter (Post 1709 Update)
This function is designed and installed on your system to support sharing of your internet connection (a portable hotspot hosted on your PC). After the update, this feature became available automatically even on devices where it isn’t supported. We can try disabling this function and check if the problem gets fixed.
- Press Windows + R to launch the Run application. Type “devmgmt.msc” in the dialogue box and press Enter.
- Once in the device manager, click on “View” and click “Show hidden devices”.

- Expand the category “Network adapters”. Browse for the entry “Microsoft Wi-Fi Direct Virtual Adapter”. Right-click it and select “Disable device”.

- Restart your computer and check if the problem still persists.
This workaround should work in most cases particularly with older devices where this device is enabled but it isn’t supported. Do note that disabling this device may not let you use the mobile hotspot feature present in Windows 10 by default. If this doesn’t fix the problem for you, you can always enable the device back using the same steps.
Enabling Computer to put Wi-Fi to Sleep (Post 1709 Update)
Another workaround which worked for many users was to enable the option which allowed the computer to put the Wi-Fi device to sleep to save power. Although this won’t work on most devices, it is still worth a shot.
- Press Windows + R to launch the Run application. Type “devmgmt.msc” in the dialogue box and press Enter.
- Once in the device manager, expand the category of “Network adapters”, select your Wi-Fi device and select “Properties”.

- Head over to the Power Management tab and make sure that “Allow the computer to turn off this device to save power” is checked. Save changes, exit and restart your computer.
 Save changes, exit and restart your computer.
Running a Check Disk Scan
There are still many bugs/glitches in Windows 10 even after the update. Therefore, in this step, we will be running a Check disk scan to check and repair these bugs/glitches. In order to do that:
- Press “Windows” + “R” keys simultaneously to open the Run prompt.
- Type in “cmd” and press “Shift” + “ctrl” + “Enter” simultaneously. Typing cmd in the Run Prompt and pressing Shift + Alt + Enter to open an elevated Command Prompt
- Click on “yes” in the prompt to provide administrative privileges.
- Type in the following command and press “Enter” to initiate the scan
- Wait for the scan to be completed and check to see if the issue persists.
 Typing cmd in the Run Prompt and pressing Shift + Alt + Enter to open an elevated Command Prompt
Setting up a wireless network
A wireless network at home lets you get online from more places in your house. This article describes the basic steps for setting up a wireless network and starting to use it.
Get the right equipment
Before you can set up your wireless network, here’s what you’ll need:
Broadband Internet connection and modem. A broadband Internet connection is a high-speed Internet connection. Digital Subscriber Line (DSL) and cable are two of the most common broadband connections. You can get a broadband connection by contacting an Internet service provider (ISP). Typically, ISPs that provide DSL are telephone companies and ISPs that provide cable are cable TV companies. ISPs frequently offer broadband modems. Some ISPs also offer combination modem/wireless routers. You can also find these at computer or electronics stores, and online.
Wireless router. A router sends info between your network and the Internet. With a wireless router, you can connect PCs to your network using radio signals instead of wires. There are several different kinds of wireless network technologies, which include 802.11a, 802.11b, 802.11g, 802.11n, and 802.11ac.
Wireless network adapter. A wireless network adapter is a device that connects your PC to a wireless network. To connect your portable or desktop PC to your wireless network, the PC must have a wireless network adapter. Most laptops and tablets—and some desktop PCs—come with a wireless network adapter already installed.
To check whether your PC has a wireless network adapter:
Select the Start button, type device manager in the search box, and then select Device Manager.
Expand Network adapters.
Look for a network adapter that might have wireless in the name.
Setting up the modem and Internet connection
After you have all the equipment, you’ll need to set up your modem and Internet connection. If your modem wasn’t set up for you by your Internet service provider (ISP), follow the instructions that came with your modem to connect it to your PC and the Internet. If you’re using Digital Subscriber Line (DSL), connect your modem to a phone jack. If you’re using cable, connect your modem to a cable jack.
Positioning the wireless router
Put your wireless router somewhere where it will receive the strongest signal with the least amount of interference. For better results, follow these tips:
Place your wireless router in a central location. Place the router as close to the center of your home as possible to increase the strength of the wireless signal throughout your home.
Position the wireless router off the floor and away from walls and metal objects, such as metal file cabinets. The fewer physical obstructions between your PC and the router’s signal, the more likely that you’ll be using the router’s full signal strength.
Reduce interference. Some networking equipment uses a 2.4 gigahertz (GHz) radio frequency. This is the same frequency as most microwaves and many cordless phones. If you turn on the microwave or get a call on a cordless phone, your wireless signal might be temporarily interrupted. You can avoid most of these issues by using a cordless phone with a higher frequency, such as 5.8 GHz.
Securing your wireless network
Security is always important; with a wireless network, it’s even more important because your network’s signal could be broadcast outside your home. If you don’t help secure your network, people with PCs nearby could access info stored on your network PCs and use your Internet connection.
To help make your network more secure:
Change the default user name and password. This helps protect your router. Most router manufacturers have a default user name and password on the router and a default network name (also known as the SSID). Someone could use this info to access your router without you knowing it. To help avoid that, change the default user name and password for your router. See the documentation for your device for instructions.
Set up a security key (password) for your network. Wireless networks have a network security key to help protect them from unauthorized access. We recommend using Wi-Fi Protected Access 2 (WPA2) security if your router supports it. See the documentation for your router for more detailed info, including what type of security is supported and how to set it up.
Some routers support Wi-Fi Protected Setup (WPS). If your router supports WPS and it’s connected to the network, follow these steps to set up a network security key:
Do one of the following, depending on which version of Windows is running on your PC:
In Windows 7 or Windows 8.1, select Start, start typing Network and Sharing Center, and then choose it in the list.
In Windows 10, select Start , then select Settings > Network & Internet > Status > Network and Sharing Center.
Select Set up a new connection or network.
Select Set up a new network, then choose Next.
The wizard will walk you through creating a network name and a security key. If your router supports it, the wizard will default to Wi‑Fi Protected Access (WPA or WPA2) security. We recommend that you use WPA2, because it offers better security than WPA or Wired Equivalent Privacy (WEP) security. With WPA2 or WPA you can also use a passphrase, so you don’t have to remember a cryptic sequence of letters and numbers.
Write down your security key and keep it in a safe place. You can also save your security key on a USB flash drive by following the instructions in the wizard. (Saving your security key to a USB flash drive is available in Windows 8 and Windows 7, but not in Windows 10.)
Use a firewall. A firewall is hardware or software that can help protect your PC from unauthorized users or malicious software (malware). Running a firewall on each PC on your network can help control the spread of malicious software on your network, and help protect your PCs when you’re accessing the Internet. Windows Firewall is included with this version of Windows.
Connect a PC to your wireless network
Select the Network or icon in the notification area.
In the list of networks, choose the network that you want to connect to, and then select Connect.
Type the security key (often called the password).
Follow additional instructions if there are any.
If you have problems with your Wi-Fi network when using Windows 10, see Fix Wi-Fi problems in Windows 10 for advanced troubleshooting info.


