- Start up your Mac in Windows or macOS with Boot Camp
- Set the default operating system
- Restart in macOS
- Запуск компьютера Mac в системе Windows или macOS с помощью Boot Camp
- Назначение операционной системы по умолчанию
- Перезагрузка в macOS
- Manage windows on Mac
- Move, align and merge windows
- Maximise or minimise windows
- Quickly switch between app windows
- Close windows
- Use Mission Control on your Mac
- Open Mission Control
- Add spaces and switch between them
- Move windows to spaces
- Move or remove spaces
- Get started with the macOS client
- Get the Remote Desktop client
- What about the Mac beta client?
- Add a workspace
- Export and import connections
- Add a remote resource
- Connect to an RD Gateway to access internal assets
- Manage your user accounts
- Customize your display resolution
- Displays have separate spaces
- Drive redirection for remote resources
- Use a keyboard in a remote session
- Support for Remote Desktop gateway pluggable authentication and authorization
Start up your Mac in Windows or macOS with Boot Camp
After you use Boot Camp Assistant to install Windows on your Intel-based Mac, you can set the default operating system to either macOS or Windows. The default operating system is the one you want to use when you turn on or restart your Mac.
Set the default operating system
In Windows on your Mac, click  in the right side of the taskbar, click the Boot Camp icon
  , then choose Boot Camp Control Panel.
If a User Account Control dialog appears, click Yes.
Select the startup disk that has the default operating system you want to use.
If you want to start up using the default operating system now, click Restart. Otherwise, click OK.
You can’t change your startup volume to an external drive while you’re using Windows.
To learn how to change the default operating system using macOS, see Get started with Boot Camp.
Restart in macOS
In Windows on your Mac, do one of the following:
Restart using Startup Manager: Restart your Mac, then immediately press and hold the Option key. When the Startup Manager window appears, release the Option key, select your macOS startup disk, then press Return.
If you’re using a Mac notebook computer with an external keyboard, make sure you press and hold the Option key on the built-in keyboard.
Restart using Boot Camp Control Panel: Click in the right side of the taskbar, click the Boot Camp icon , then choose Restart in macOS.
This also sets the default operating system to macOS.
For more information about restarting in macOS, see the Apple Support article Restart your Mac in macOS or Windows.
Источник
Запуск компьютера Mac в системе Windows или macOS с помощью Boot Camp
После установки на компьютере Mac с процессором Intel операционной системы Windows при помощи Ассистента Boot Camp можно выбрать macOS или Windows в качестве операционной системы по умолчанию. Операционная система по умолчанию загружается после включения или перезагрузки компьютера Mac.
Назначение операционной системы по умолчанию
В ОС Windows на Mac нажмите  в панели задач справа, нажмите значок Boot Camp
  , затем выберите Панель управления Boot Camp.
Если появится окно «Контроль учетных записей пользователей», нажмите «Да».
Выберите загрузочный диск с операционной системой, которую нужно использовать по умолчанию.
Если Вы хотите сразу запустить эту операционную систему, нажмите «Перезагрузить». В противном случае нажмите «ОК».
В операционной системе Windows нельзя изменить загрузочный том на внешний накопитель.
Сведения об изменении операционной системы по умолчанию в macOS приведены в статье Начало работы с Boot Camp.
Перезагрузка в macOS
В ОС Windows на Mac выполните одно из следующих действий.
Перезапуск с помощью диспетчера загрузки. Перезагрузите Mac, затем незамедлительно нажмите и удерживайте клавишу Option. После того как отобразится окно диспетчера загрузки, отпустите клавишу Option, выберите загрузочный диск macOS, затем нажмите клавишу Return.
Если у Вас ноутбук Mac с внешней клавиатурой, нажмите и удерживайте клавишу Option на встроенной клавиатуре.
Перезапуск с помощью панели управления Boot Camp. Нажмите справа на панели задач, нажмите значок Boot Camp , а затем выберите пункт «Перезагрузить в macOS».
При этом macOS также будет назначена операционной системой по умолчанию.
Сведения о перезагрузке в macOS приведены в статье службы поддержки Apple Перезапуск компьютера Mac в macOS или Windows.
Источник
Manage windows on Mac
When you open an app or the Finder on your Mac, a window opens on the desktop. Only one app at a time is active; the name of the app (in bold) and the app menus are shown in the menu bar.

Some apps, such as Safari or Mail, let you open multiple windows or different types of windows at the same time. macOS provides several ways to manage open apps and windows.
Move, align and merge windows
On your Mac, do any of the following:
Move a window: Drag the window by its title bar to where you want it. Some windows can’t be moved.
Align windows: Drag a window close to another one — as the window nears the other one, it aligns without overlapping. You can position multiple windows adjacent to each other.
To make adjacent windows the same size, drag the edge you want to resize — as it nears the edge of the adjacent window, it aligns with the edge and stops.

Merge an app’s windows into one tabbed window: In the app, choose Window > Merge All Windows.
To make a tab a separate window again, select the tab, then choose Window > Move Tab to New Window, or just drag the tab out of the window. See Use tabs in windows.
Maximise or minimise windows
On your Mac, do any of the following in a window:
Maximise a window: Press and hold the Option key while you click the green maximise button  in the top-left corner of an app window. To return to the previous window size, Option-click the button again.
You can also double-click an app’s title bar to maximise the window (as long as the option to do so is set to “zoom” in Dock & Menu Bar preferences).
Minimise a window: Click the yellow minimise button  in the top-left corner of the window or press Command-M.
You can set an option in Dock & Menu Bar preferences to have a window minimise when you double-click its title bar.
Most windows can be manually resized. Drag the window’s edge (top, bottom, or sides) or double-click an edge to expand that side of the window.
Quickly switch between app windows
On your Mac, do any of the following:
Switch to the previous app: Press Command-Tab.
Scroll through all open apps: Press and hold the Command key, press the Tab key, then press the Left or Right arrow key until you get to the app you want. Release the Command key.
If you change your mind while scrolling through the apps and don’t want to switch apps, press Esc (Escape) or the Full Stop key, then release the Command key.
Close windows
On your Mac, do any of the following:
Close a single window: In a window, click the red Close button  in the top-left corner of the window, or press Command-W.
Close all open windows for an app: Press Option-Command-W.
Closing one or all windows for an app does not close or quit the app. To do so, press Command-Q, or click the app’s name in the menu bar, then choose Quit [App]. See Quit apps.
You can hide the active app by pressing Command-H.
Use Mission Control to quickly arrange open windows and spaces in a single layer to easily spot the one you need.
Источник
Use Mission Control on your Mac
Mission Control offers a bird’s-eye view of all your open windows, desktop spaces, and any apps in full screen or Split View, making it easy to switch between them.
Open Mission Control
- Swipe up with three or four fingers on your trackpad, or double-tap the surface of your Magic Mouse with two fingers.
- Open the Mission Control app, which is in your Applications folder.
- Press the Mission Control key on your Apple keyboard or Touch Bar.
Add spaces and switch between them
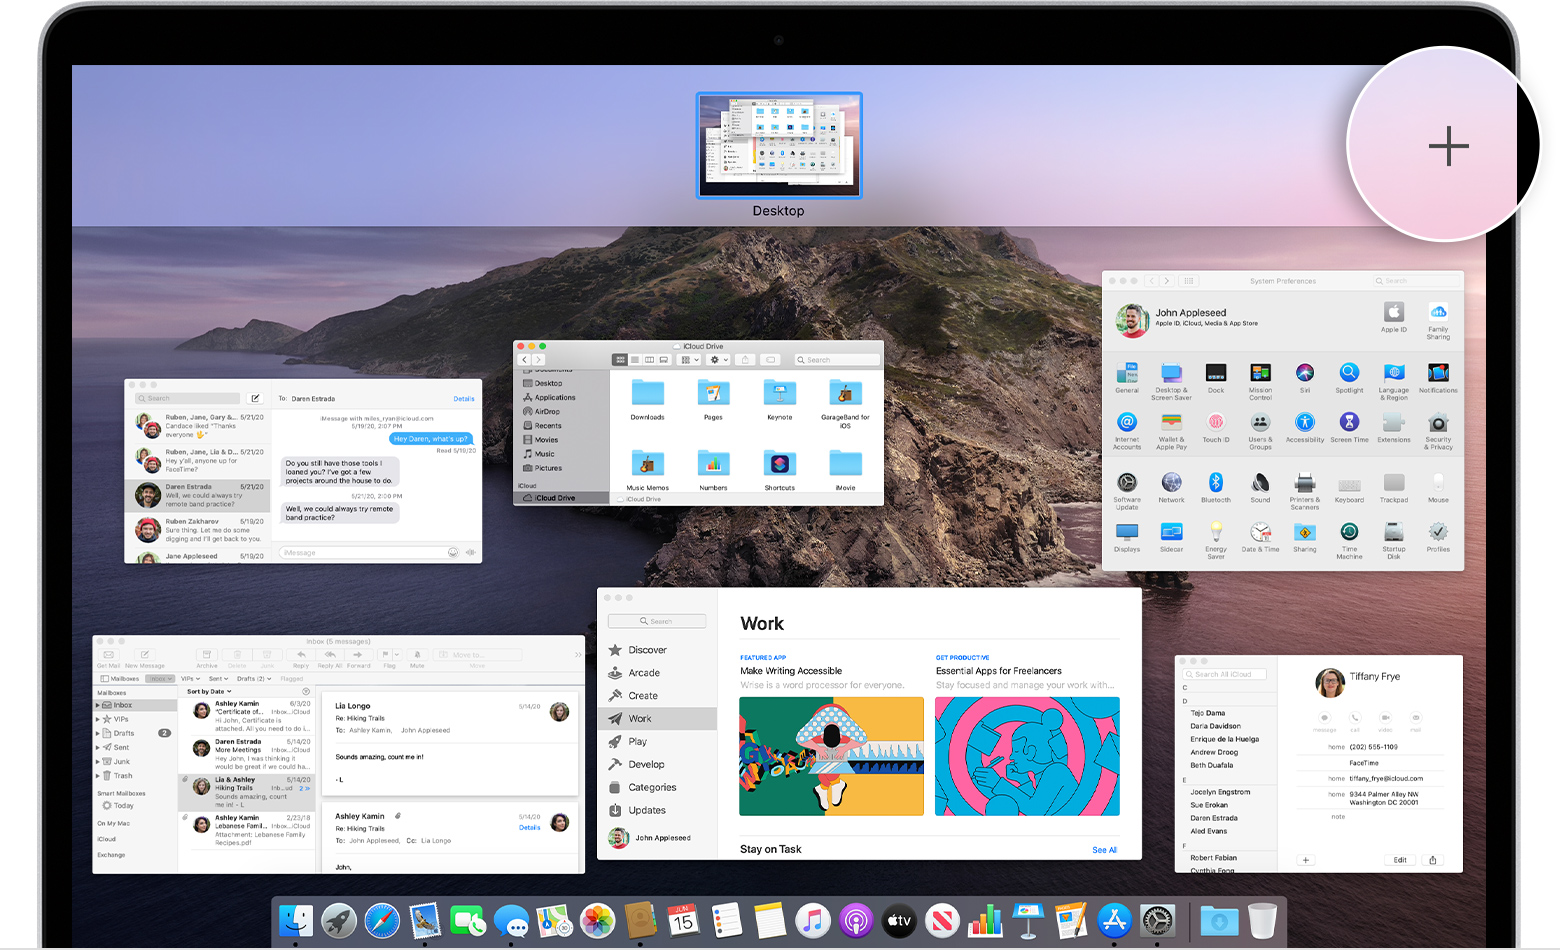
The Spaces bar at the top of the Mission Control window contains thumbnails of each desktop space and each window that is in full screen or Split View.
To add a space, move your pointer to the Spaces bar, then click the add button on the right:
When you have multiple spaces, you can switch between them by clicking the thumbnails the top of the Mission Control window. Or use these methods, which work even when you’re not in Mission Control:
- Swipe left or right with three or four fingers on your trackpad, or swipe left or right with two fingers on your Magic Mouse.
- Press Control–Right Arrow or Control–Left Arrow on your keyboard.
Move windows to spaces
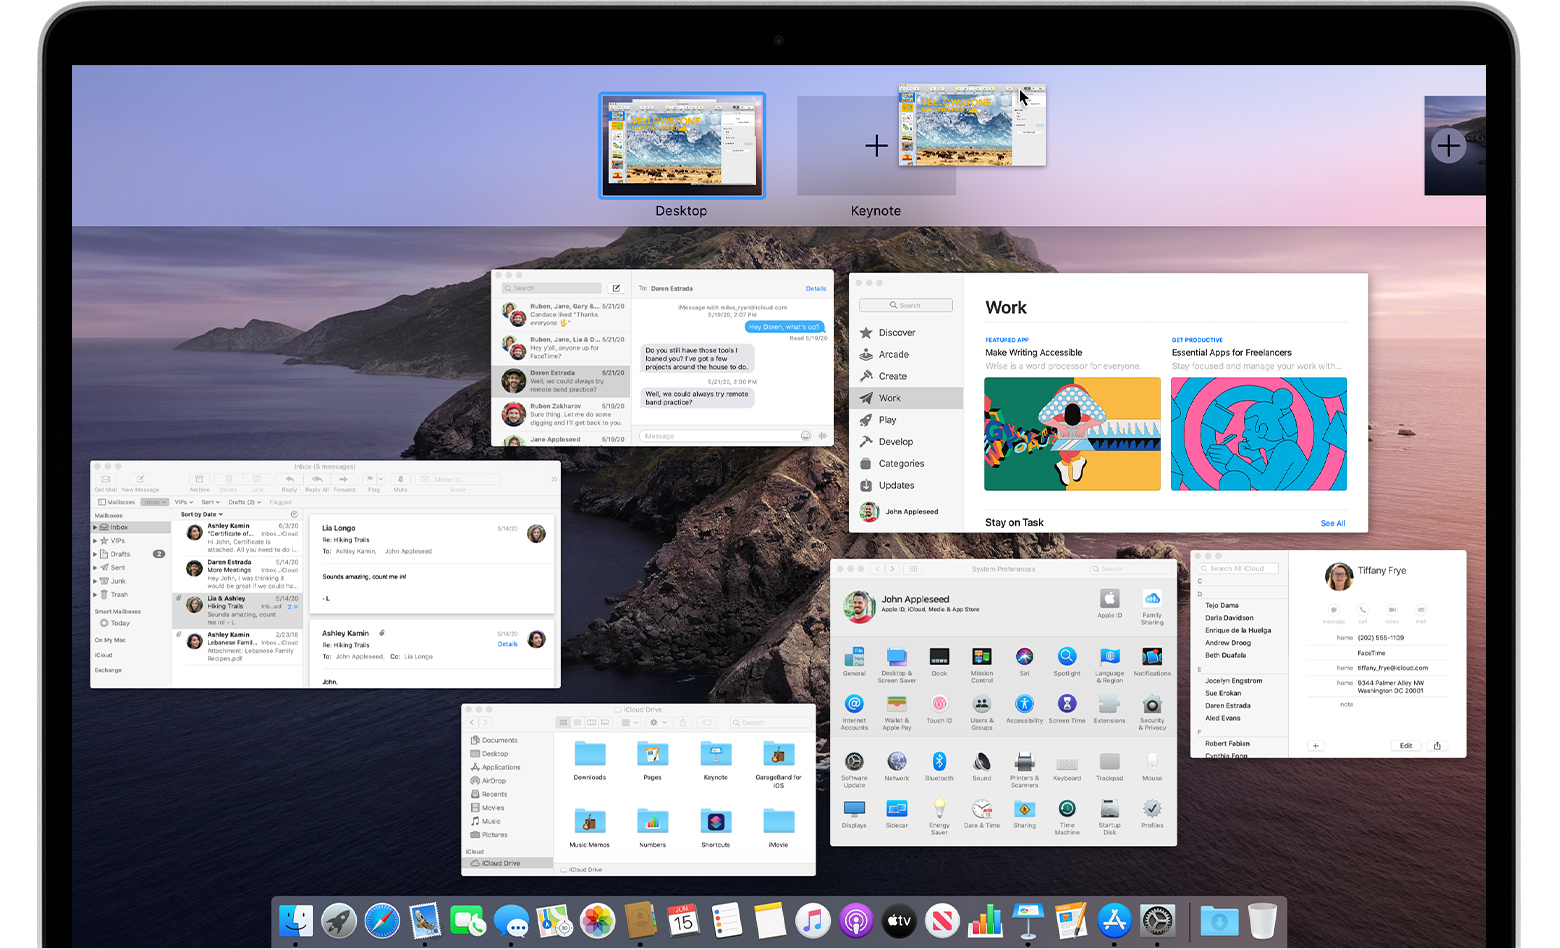
When you have more than one space, you can move windows to and from each space. Just drag the window onto the other space’s thumbnail in the Spaces bar.
If you drag a window onto an empty area of the Spaces bar, that window opens in full screen in its own new space:
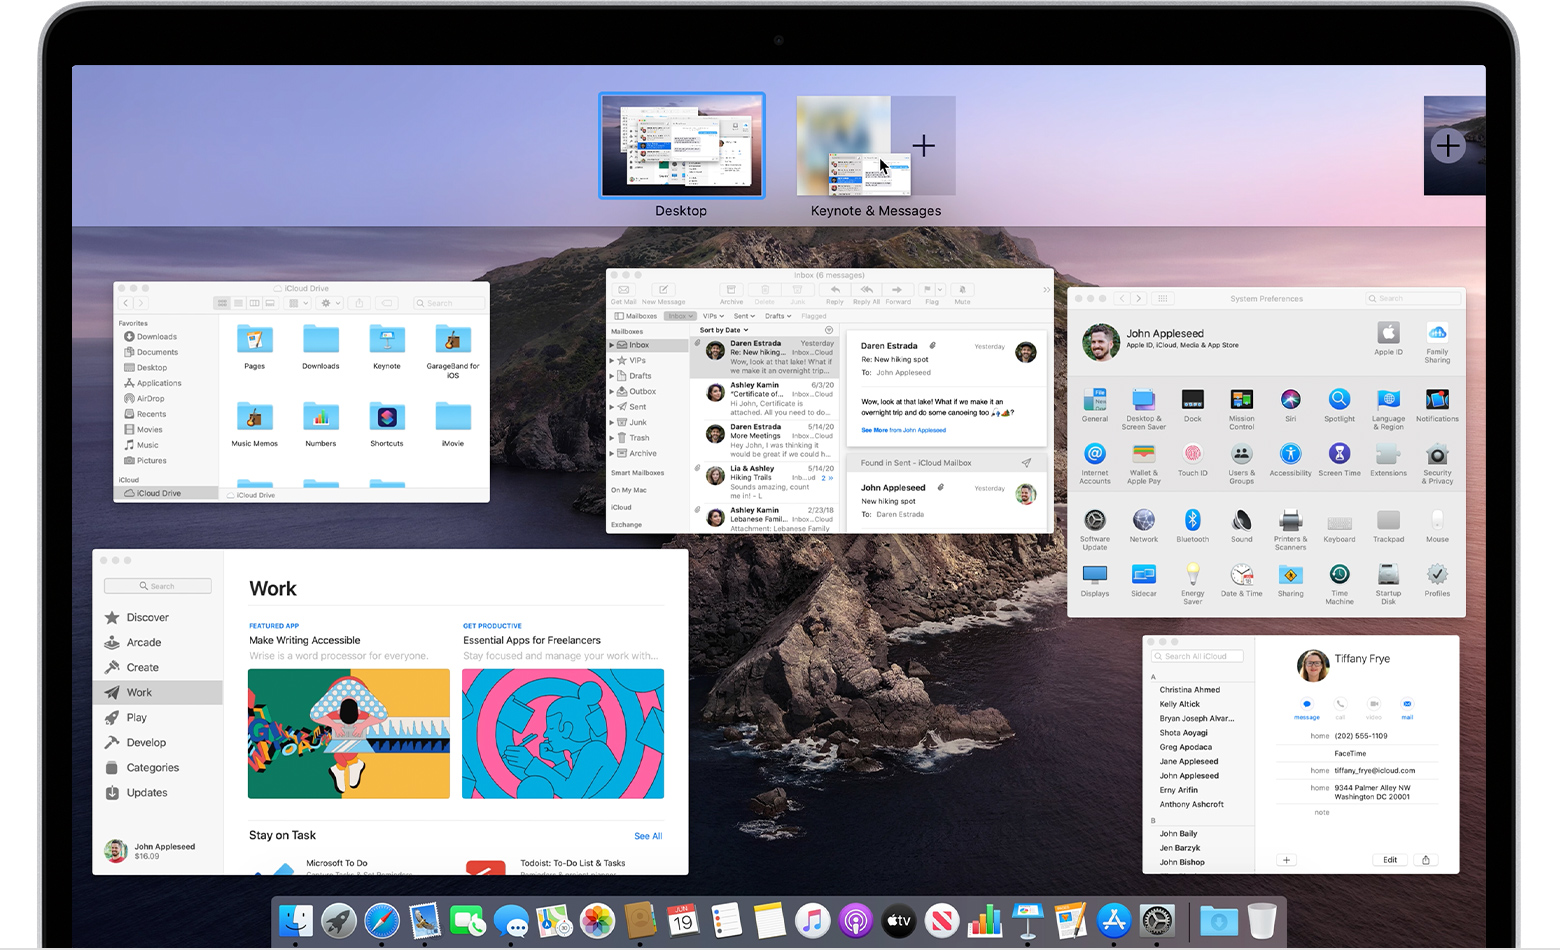
If you drag a window onto the thumbnail of a full-screen app, that window joins the other window in Split View:
Move or remove spaces
To move a space, drag its thumbnail to the left or right of another space in the Spaces bar.
To remove a space, press and hold the Option key, then click or  next to the space’s thumbnail in the Spaces bar. Any windows in that space then automatically move to your first desktop space.
Источник
Get started with the macOS client
Applies to: Windows Server 2022, Windows Server 2019, Windows 10, Windows 8.1, Windows Server 2012 R2, Windows Server 2016
You can use the Remote Desktop client for Mac to work with Windows apps, resources, and desktops from your Mac computer. Use the following information to get started — and check out the FAQ if you have questions.
- Curious about the new releases for the macOS client? Check out What’s new for Remote Desktop on Mac?
- The Mac client runs on computers running macOS 10.10 and newer.
- The information in this article applies primarily to the full version of the Mac client — the version available in the Mac AppStore. Test-drive new features by downloading our preview app here: beta client release notes.
Get the Remote Desktop client
Follow these steps to get started with Remote Desktop on your Mac:
- Download the Microsoft Remote Desktop client from the Mac App Store.
- Set up your PC to accept remote connections. (If you skip this step, you can’t connect to your PC.)
- Add a Remote Desktop connection or a remote resource. You use a connection to connect directly to a Windows PC and a remote resource to use a RemoteApp program, session-based desktop, or a virtual desktop published on-premises using RemoteApp and Desktop Connections. This feature is typically available in corporate environments.
What about the Mac beta client?
We’re testing new features on our preview channel on AppCenter. Want to check it out? Go to Microsoft Remote Desktop for Mac and select Download. You don’t need to create an account or sign into AppCenter to download the beta client.
If you already have the client, you can check for updates to ensure you have the latest version. In the beta client, select Microsoft Remote Desktop Beta at the top, and then select Check for updates.
Add a workspace
Subscribe to the feed your admin gave you to get the list of managed resources available to you on your macOS device.
To subscribe to a feed:
- Select Add feed on the main page to connect to the service and retrieve your resources.
- Enter the feed URL. This can be a URL or email address:
- If you’re accessing resources from Azure Virtual Desktop or Windows 365, you can use one of the following URLs:
- For Azure Virtual Desktop (classic), use https://rdweb.wvd.microsoft.com/api/feeddiscovery/webfeeddiscovery.aspx .
- For Azure Virtual Desktop, use https://rdweb.wvd.microsoft.com/api/arm/feeddiscovery .
- If you’re using Windows 365, use: https://rdweb.wvd.microsoft.com/api/arm/feeddiscovery .
- To use email, enter your email address. This tells the client to search for a URL associated with your email address if your admin configured the server that way.
- If you’re accessing resources from Azure Virtual Desktop or Windows 365, you can use one of the following URLs:
- Select Subscribe.
- Sign in with your user account when prompted.
After you’ve signed in, you should see a list of available resources.
Once you’ve subscribed to a feed, the feed’s content will update automatically on a regular basis. Resources may be added, changed, or removed based on changes made by your administrator.
Export and import connections
You can export a remote desktop connection definition and use it on a different device. Remote desktops are saved in separate RDP files.
To export an RDP file:
- In the Connection Center, right-click the remote desktop.
- Select Export.
- Browse to the location where you want to save the remote desktop RDP file.
- Select OK.
To import an RDP file:
- In the menu bar, select File >Import.
- Browse to the RDP file.
- Select Open.
Add a remote resource
Remote resources are RemoteApp programs, session-based desktops, and virtual desktops published using RemoteApp and Desktop Connections.
- The URL displays the link to the RD Web Access server that gives you access to RemoteApp and Desktop Connections.
- The configured RemoteApp and Desktop Connections are listed.
To add a remote resource:
- In the Connection Center select +, and then select Add Remote Resources.
- Enter information for the remote resource:
- Feed URL — The URL of the RD Web Access server. You can also enter your corporate email account in this field – this tells the client to search for the RD Web Access Server associated with your email address.
- User name — The user name to use for the RD Web Access server you are connecting to.
- Password — The password to use for the RD Web Access server you are connecting to.
- Select Save.
The remote resources will be displayed in the Connection Center.
Connect to an RD Gateway to access internal assets
A Remote Desktop Gateway (RD Gateway) lets you connect to a remote computer on a corporate network from anywhere on the Internet. You can create and manage your gateways in the preferences of the app or while setting up a new desktop connection.
To set up a new gateway in preferences:
- In the Connection Center, select Preferences > Gateways.
- Select the + button at the bottom of the table Enter the following information:
- Server name – The name of the computer you want to use as a gateway. This can be a Windows computer name, an Internet domain name, or an IP address. You can also add port information to the server name (for example: RDGateway:443 or 10.0.0.1:443).
- User name — The user name and password to be used for the Remote Desktop gateway you are connecting to. You can also select Use connection credentials to use the same user name and password as those used for the remote desktop connection.
Manage your user accounts
When you connect to a desktop or remote resources, you can save the user accounts to select from again. You can manage your user accounts by using the Remote Desktop client.
To create a new user account:
- In the Connection Center, select Settings >Accounts.
- Select Add User Account.
- Enter the following information:
- User Name — The name of the user to save for use with a remote connection. You can enter the user name in any of the following formats: user_name, domain\user_name, or user_name@domain.com.
- Password — The password for the user you specified. Every user account that you want to save to use for remote connections needs to have a password associated with it.
- Friendly Name — If you are using the same user account with different passwords, set a friendly name to distinguish those user accounts.
- Select Save, then select Settings.
Customize your display resolution
You can specify the display resolution for the remote desktop session.
- In the Connection Center, select Preferences.
- Select Resolution.
- Select +.
- Enter a resolution height and width, and then select OK.
To delete the resolution, select it, and then select —.
Displays have separate spaces
If you’re running macOS X 10.9 and have disabled Displays have separate spaces in Mavericks (System Preferences > Mission Control), you need to configure this setting in the Remote Desktop client using the same option.
Drive redirection for remote resources
Drive redirection is supported for remote resources, so that you can save files created with a remote application locally to your Mac. The redirected folder is always your home directory displayed as a network drive in the remote session.
In order to use this feature, the administrator needs to set the appropriate settings on the server.
Use a keyboard in a remote session
Mac keyboard layouts differ from the Windows keyboard layouts.
- The Command key on the Mac keyboard equals the Windows key.
- To perform actions that use the Command button on the Mac, you will need to use the control button in Windows (for example Copy = Ctrl+C).
- The function keys can be activated in the session by pressing additionally the FN key (for example, FN+F1).
- The Alt key to the right of the space bar on the Mac keyboard equals the Alt Gr/right Alt key in Windows.
By default, the remote session will use the same keyboard locale as the OS you’re running the client on. (If your Mac is running an en-us OS, that will be used for the remote sessions as well.) If the OS keyboard locale is not used, check the keyboard setting on the remote PC and change it manually. See the Remote Desktop Client FAQ for more information about keyboards and locales.
Support for Remote Desktop gateway pluggable authentication and authorization
Windows Server 2012 R2 introduced support for a new authentication method, Remote Desktop Gateway pluggable authentication and authorization, which provides more flexibility for custom authentication routines. You can now try this authentication model with the Mac client.
Custom authentication and authorization models before Windows 8.1 aren’t supported, although the article above discusses them.
To learn more about this feature, check out https://aka.ms/paa-sample.
Questions and comments are always welcome. However, please do NOT post a request for troubleshooting help by using the comment feature at the end of this article. Instead, go to the Remote Desktop client forum and start a new thread. Have a feature suggestion? Tell us in the client user voice forum.
Источник


