- Как установить шрифты в Windows XP 7 8 10
- Общая информация
- Извлечение из архива
- Windows XP
- Windows 7/Vista
- Windows 8/10
- Видео по теме
- Font Control
- Introduction
- A Consistent Experience
- Easy Integration and Configuration
- Alignment with Common GDI Text Structures
- Add a FontControl
- Declaring a FontControl in Markup
- Adding a FontControl to a Ribbon
- Adding a FontControl to a ContextPopup
- Keytips
- The Ribbon Resource File
- Font Control Properties
- Define a FontControl Command Handler
Как установить шрифты в Windows XP 7 8 10
Операционная система Windows позволяет централизованно управлять шрифтами, которые могут использовать все установленные приложения. Вместо того чтобы загружать данные отдельно в Photoshop, Microsoft Word и еще какие-нибудь программы, можно установить новый шрифт прямо в ОС. После этого он станет доступен для использования с помощью любого софта. В данной статье описывается процесс установки новых шрифтов в разных версиях ОС Windows: XP, 7, 8 и 10.
Общая информация
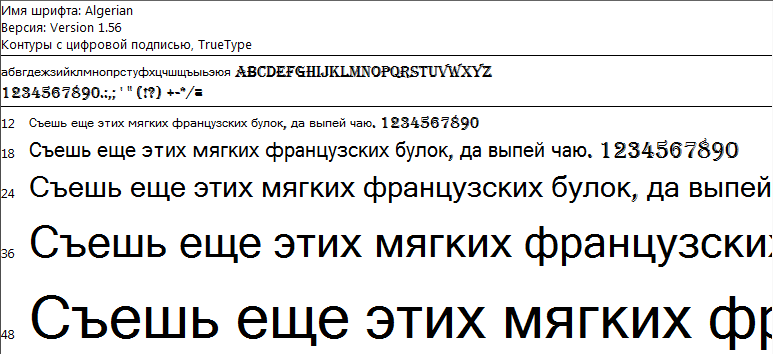
Шрифт определяет внешний вид печатных символов. Наиболее очевидные области, в которых вам могут понадобиться подобные косметические изменения — работы с текстом или графикой. Написание статей, веб-разработка, создание шаблонов грамот или поздравительных открыток — для всего этого могут потребоваться новые нестандартные шрифты.
Подключения можно разделить на 2 этапа: загрузку файла и установку. Найти нужные файлы можно на специализированных сайтах, дизайнерских форумах и торрент-трекерах. Windows поддерживает все популярные расширения: OpenType (OTF), TrueType (TTF), PostScript (PFM). Процесс установки одинаков для всех типов, но немного различается в разных версиях Виндовс.
Извлечение из архива
Часто загруженные из интернета файлы оказываются запакованными в специальную сжатую папку — архив (например, с расширением .rar или .7z). Это делается для экономии места на сервере и уменьшения трафика.

Чтобы работать с содержимым таких объектов их необходимо распаковать. Для этого используются особые программы – архиваторы. Если на вашем персональном компьютере подобного софта нет, его нужно установить.

Скачайте утилиту WinRar с официального вебсайта разработчика — http://www.win-rar.ru/download/. Не забудьте выбрать правильную разрядность своей операционной системы. Программа запустится на любой версии ОС, в том числе, и на 10-й.

Загрузите нужную версию и установите архиватор, следуя указаниям Мастера Установки (Install Wizard). По завершении процесса кликните правой кнопкой мыши по сохраненному архиву, чтобы вызвать настройки, и выберите опцию «Извлечь» («Extract»). В открывшемся окне нужно указать папку, в которую нужно распаковать содержимое. Теперь можно приступать к установке.
Windows XP
В Виндовс XP доступно 2 способа установки новых шрифтов. Оба очень просты – достаточно минимальных навыков владения персональным компьютером.
Первый способ — копирование загруженных файлов в нужную директорию вручную:
- Запустите Проводник Виндовс XP. Это делается с помощью значка «Мой компьютер» в меню «Пуск» или на рабочем столе.
- Откройте раздел диска, на который установлена система (как правило, он имеет букву «C:/»).
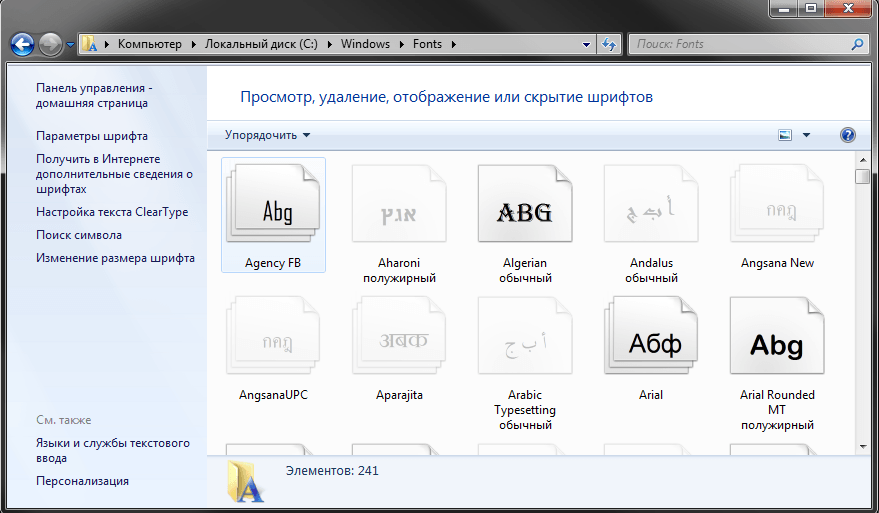
- Перейдите в папку «Windows/Fonts».

- Скопируйте сюда файлы шрифтов, которые хотите установить (не забудьте их предварительно разархивировать).
Вы также можете воспользоваться стандартным инструментом Windows XP:
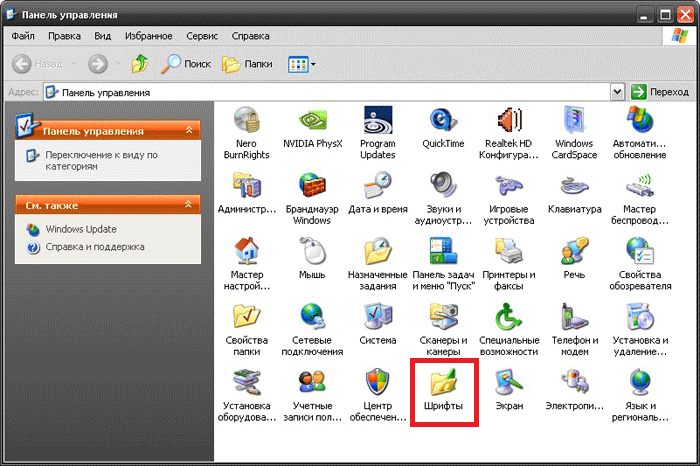
- Вызовите меню «Пуск».
- Откройте «Панель Управления».
- Перейдите в каталог «Шрифты».
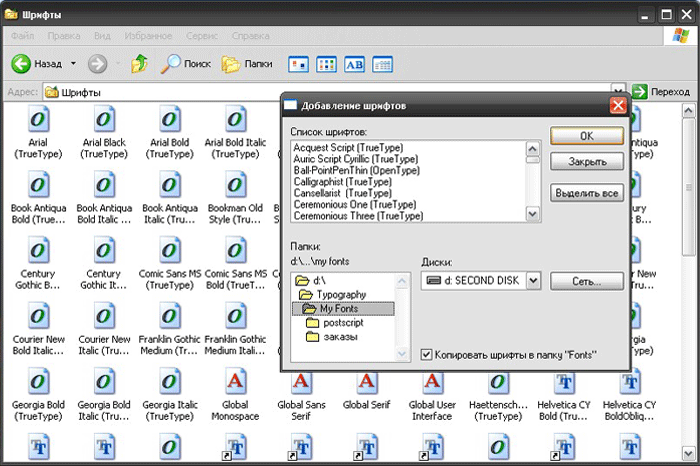
- Кликните по кнопке «Файл», которая расположена в меню сверху.
- В ниспадающем списке нужно выбрать опцию «Установить шрифт».
- Нажмите Сеть… и укажите путь к подготовленным файлам.
- Щелкните OK .
Теперь требуется перезапустить все активные программы, чтобы их настройки обновились. После этого вы сможете выбрать в них новый шрифт.
Windows 7/Vista
По сравнению с версией XP в Windows 7 и Vista разработчики сделали процесс подключения шрифтов еще более простым:
- Выделите файлы шрифтов, которые нужно установить. Если вам нужно выделить несколько объектов, зажмите клавишу Ctrl и нажимайте на них поочередно.
- Вызовите контекстное меню, кликнув по одному из выделенных элементов правой кнопкой мыши.
- Выберите опцию «Установить» («Install») в ниспадающем списке.

Аналогично предыдущей версии, пользователи также могут просто скопировать все файлы в папку «Windows/Fonts».
Если на вашем системном диске осталось мало места, вы можете разместить массивное «тело» шрифта в другом месте и подключить его с помощью ярлыка. Сначала эту функцию нужно включить в системных настройках:
- Вызовите «Пуск».
- Перейдите в «Панель Управления».
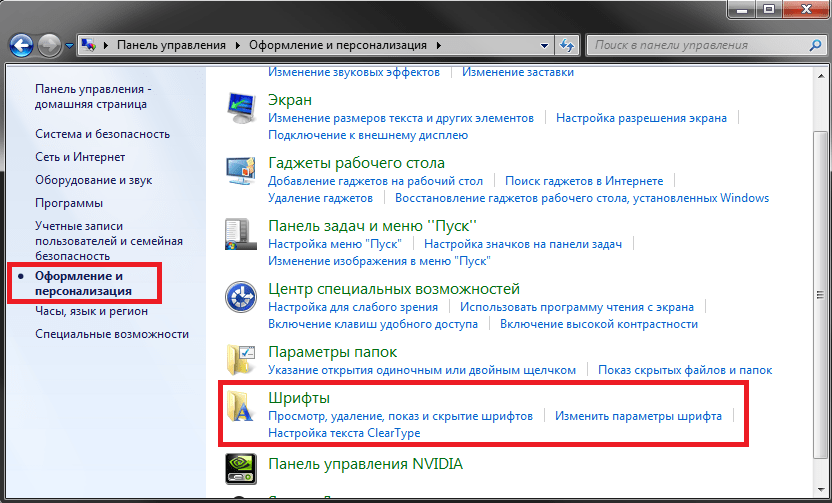
- Откройте категорию «Оформление и Персонализация».
- Выберите раздел «Шрифты».
- В меню, расположенном слева, щелкните по гиперссылке «Параметры шрифта».
- В графе «Параметры установки» поставьте отметку напротив пункта «Разрешить установку с помощью ярлыков».
- Нажмите OK .

Теперь при подключении новых шрифтов вы сможете выбрать опцию «Установить как ярлык».
Обратите внимание: если вы удалите файл или перенесете его в другое место, шрифт перестанет работать.
В Виндовс 10 тоже есть подобная функция, и запускается она точно так же.
Windows 8/10
Процесс подключения шрифтов в Виндовс 8-й и 10-й версий аналогичен.
Во-первых, пользователи могут просто переместить нужные файлы в системный каталог «Fonts», как в предыдущих релизах.

Во-вторых, в Виндовс 10 вы можете просто открыть скачанный шрифт, дважды кликнув по файлу. В открывшемся окне будет презентация внешнего вида символов, а также кнопка Установить . Щелкните по ней, и все будет готово. Как и в прежних версиях, вам потребуется перезапустить все работающие программы, чтобы обновить их настройки.
Видео по теме
Font Control
To simplify the integration and configuration of font support in applications that require word processing and text editing capabilities, the Windows Ribbon framework provides a specialized Font Control that exposes a wide range of font properties such as typeface name, style, point size, and effects.
Introduction
The Font Control is a composite control that consists of buttons, toggle buttons, drop-down list boxes, and combo boxes, all of which are used to specify a particular font property or formatting option.
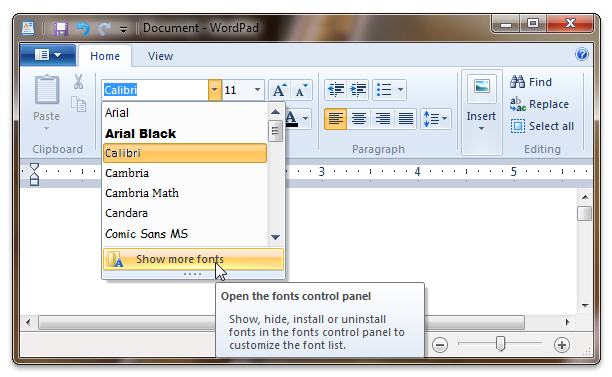
The following screen shot shows the Ribbon Font Control in WordPad for Windows 7.

A Consistent Experience
As a built-in Ribbon control, the Font Control improves overall font management, selection and formatting functionality, and provides a rich, consistent user experience across all Ribbon applications.
This consistent experience includes
Standardized formatting and selection of fonts across Ribbon applications.
Standardized font representation across Ribbon applications.
Automatic, in Windows 7, font activation that is based on the Show or Hide setting for each font in the Fonts control panel. The Font Control only displays those fonts that are set to Show.
In Windows Vista, the Fonts control panel does not offer the Show or Hide functionality, so all fonts are activated.
Font management that is available directly from the control.
The following screen shot shows that the Fonts control panel can be accessed directly from the Font Control.
Support for auto-preview.
Exposure of fonts that are most relevant to a user, such as
- Localized font lists for international users.
- Font lists based on input device.
Support for this functionality is not available on any platform older than Windows 7.
Easy Integration and Configuration
By providing standard, reusable, and easily consumed functionality, the Ribbon Font Control eases the burden of integrating font support into an application.
The details of font selection and formatting are wrapped in one, self-contained logical element that
- Eliminates the complex management of control interdependencies typical of font control implementations.
- Requires a single Command handler for all functionality exposed by the Font Control sub-controls.
This single Command handler allows the Font Control to manage the functionality of various sub-controls internally; a sub-control never interacts directly with the application, regardless of its function.
Other features of the Font Control include
Automatic, DPI-aware generation of a WYSIWYG (what you see is what you get) bitmap representation for each font in the Font family menu.
Localized font family bitmaps and tooltips.
Font enumeration, grouping, and metadata for managing and presenting fonts.
Support for this functionality is not available on any platform older than Windows 7 .
The Text color and Text highlight color drop-down color pickers that mirror the Ribbon Drop-Down Color Picker behavior.
Support of auto-previewing by all Font Control gallery-based sub-controls: Font family, Font size, Text color, and Text highlight color.
Alignment with Common GDI Text Structures
Windows Graphics Device Interface (GDI) text stack components are used to expose font selection and formatting functionality through the Ribbon Font Control. The various font features supported by the LOGFONT Structure, CHOOSEFONT Structure, and CHARFORMAT2 Structure are exposed through the sub-controls that are included in the Font Control.
The sub-controls that are displayed in the Font Control depend on the FontType template declared in the Ribbon markup. The FontType templates (discussed in further detail in the following section) are designed to align with the common Windows Graphics Device Interface (GDI) text structures.
Add a FontControl
This section outlines the basic steps for adding a Font Control to a Ribbon application.
Declaring a FontControl in Markup
Like other Ribbon controls, the Font Control is declared in markup with a FontControl element and associated with a Command declaration through a Command ID. When the application is compiled, the Command ID is used to bind the Command to a Command handler in the host application.
If no Command ID is declared with the FontControl in markup, then one is generated by the framework.
Because the sub-controls of the Font Control are not exposed directly, customization of the Font Control is limited to three FontType layout templates defined by the framework.
Further customization of the Font Control can be accomplished by combining the layout template with FontControl attributes such as IsHighlightButtonVisible, IsStrikethroughButtonVisible, and IsUnderlineButtonVisible.
Font functionality beyond that exposed by the standard Font Control templates and attributes requires a custom font control implementation that is outside the scope of this article.
The following table lists the Font Control templates and the edit control type that each template is aligned with.
| Template | Supports |
|---|---|
| FontOnly | LOGFONT Structure |
| FontWithColor | CHOOSEFONT Structure |
| RichFont | CHARFORMAT2 Structure |
The following table lists the controls that are associated with each template and identifies the controls that are optional for an associated template.
RichFont
FontWithColor
FontOnly
Font size combo box
Font family combo box
Grow font button
Shrink font button
Bold button
Italic button
Underline button
Strikethrough button
Subscript button
Superscript button
Text highlight color button
Text color button
When the layout behavior of a Font Control is declared, the Ribbon framework provides an optional SizeDefinition layout template, OneFontControl , that defines two sub-control configurations based on the size of the Ribbon and the space available for the Font Control. For more information, see Customizing a Ribbon Through Size Definitions and Scaling Policies.
Adding a FontControl to a Ribbon
The following code examples demonstrate the basic markup requirements for adding a Font Control to a Ribbon:
This section of code shows the FontControl Command declaration markup, including the Tab and Group Commands that are required for displaying a control in the Ribbon.
This section of code shows the markup required to declare and associate a FontControl with a Command through a Command ID. This particular example includes the Tab and Group declarations, with scaling preferences.
Adding a FontControl to a ContextPopup
Adding a Font Control to a Context Popup requires a procedure similar to that of adding a Font Control to the Ribbon. However, a Font Control in a MiniToolbar is restricted to the set of default sub-controls that are common to all Font Control templates: Font family, Font size, Bold, and Italic.
The following code examples demonstrate the basic markup requirements for adding a Font Control to a Context Popup:
This section of code shows the FontControl Command declaration markup that is required for displaying a FontControl in the ContextPopup.
This section of code shows the markup required to declare and associate a FontControl with a Command through a Command ID.
Keytips
Each sub-control in the Ribbon Font Control is accessible through a keyboard shortcut, or keytip. This keytip is predefined and assigned to each sub-control by the framework.
If a Keytip attribute value is assigned to the FontControl element in markup, this value is added as a prefix to the framework-defined keytip.
The application should enforce a single-character rule for this prefix.
The following table lists the keytips defined by the framework.
| Sub-control | Keytip |
|---|---|
| Font family | F |
| Font style | T |
| Font size | S |
| Grow font | G |
| Shrink font | K |
| Bold | B |
| Italic | I |
| Underline | U |
| Strikethrough | X |
| Superscript | Y or Z
|
| Subscript | A |
| Font color | C |
| Font highlight | H |
The recommended prefix for a Multilingual User Interface (MUI) EN-US Ribbon is ‘F’, as shown in the following example.
The following screen shot illustrates the Font Control keytips as they are defined in the previous example.

The Ribbon Resource File
When the markup file is compiled, a resource file that contains all resource references for the Ribbon application is generated.
Example of a simple resource file:
Font Control Properties
The Ribbon framework defines a collection of property keys for the Font Control and its constituent sub-controls.
Typically, a Font Control property is updated in the ribbon UI by invalidating the Command associated with the control through a call to the IUIFramework::InvalidateUICommand method. The invalidation event is handled, and the property updates defined, by the IUICommandHandler::UpdateProperty callback method.
The IUICommandHandler::UpdateProperty callback method is not executed, and the application queried for an updated property value, until the property is required by the framework. For example, when a tab is activated and a control revealed in the ribbon UI, or when a tooltip is displayed.
The following table lists the property keys that are associated with the Font Control.
| Property Key | Notes |
|---|---|
| UI_PKEY_FontProperties | Exposes, in aggregate as an IPropertyStore object, all Font Control sub-control properties. The framework queries this property when UI_INVALIDATIONS_VALUE is passed as the value of flags in the call to IUIFramework::InvalidateUICommand. |
| UI_PKEY_FontProperties_ChangedProperties | Exposes, in aggregate as an IUISimplePropertySet object, only Font Control sub-control properties that have changed. |
| UI_PKEY_Keytip | Can only be updated through invalidation. |
| UI_PKEY_Enabled | Supports IUIFramework::GetUICommandProperty and IUIFramework::SetUICommandProperty. |
In addition to the properties supported by the Font Control itself, the Ribbon framework also defines a property key for each Font Control sub-control. These property keys and their values are exposed by the framework through an IPropertyStore interface implementation that defines the methods for managing a collection, also called a property bag, of name and value pairs.
The application translates the font structures to properties that are accessible through the IPropertyStore interface methods. This model emphasizes the distinction between the Font Control and the Windows Graphics Device Interface (GDI) text stack components (LOGFONT Structure, CHOOSEFONT Structure, and CHARFORMAT2 Structure) that are supported by the framework.
The following table lists the individual controls and their associated property keys.
| Controls | Property Key | Notes |
|---|---|---|
| Font size | UI_PKEY_FontProperties_Size | When a run of heterogeneously sized text is highlighted, the Ribbon framework sets the Font size control to blank and the value of UI_PKEY_FontProperties_Size to 0. When the Grow font or Shrink font button is clicked, all highlighted text is resized but the relative difference in text sizes is preserved. |
| Font family | UI_PKEY_FontProperties_Family | GDI font family names vary with system locale. As such, if the value of UI_PKEY_FontProperties_Family is preserved across application sessions, that value should be retrieved on each new session. |
| Grow font | UI_PKEY_FontProperties_Size | See Font size. |
| Shrink font | UI_PKEY_FontProperties_Size | See Font size. |
| Bold | UI_PKEY_FontProperties_Bold | |
| Italic | UI_PKEY_FontProperties_Italic | |
| Underline | UI_PKEY_FontProperties_Underline | |
| Strikethrough | UI_PKEY_FontProperties_Strikethrough | |
| Subscript | UI_PKEY_FontProperties_VerticalPositioning | If the Subscript button is set, then the Superscript cannot also be set. |
| Superscript | UI_PKEY_FontProperties_VerticalPositioning | If the Superscript button is set, then the Subscript cannot also be set. |
| Text highlight color | UI_PKEY_FontProperties_BackgroundColor, UI_PKEY_FontProperties_BackgroundColorType | Provides the same functionality as the HighlightColors template of the DropDownColorPicker element. We highly recommend that only an initial Text highlight color value be set by the application. The last selected value should be preserved and not set when the cursor is repositioned within a document. This allows quick access to the user’s last selection, and the color picker does not have to be reopened. Color swatches cannot be customized. |
| Text color | UI_PKEY_FontProperties_ForegroundColor, UI_PKEY_FontProperties_ForegroundColorType | Provides the same functionality as the StandardColors template of the DropDownColorPicker element. We highly recommend that only an initial Text color value be set by the application. The last selected value should be preserved and not set when the cursor is repositioned within a document. This allows quick access to the user’s last selection, and the color picker does not have to be reopened. Color swatches cannot be customized. |
Define a FontControl Command Handler
This section describes the steps required to bind a Font Control to a Command handler.
Any attempt to select a color swatch from the color picker of a Font Control may result in an access violation if no Command handler is associated with the control.
The following code example demonstrates how to bind Commands that are declared in markup to a Command handler.
The following code example illustrates how to implement the IUICommandHandler::Execute method for a Font Control.
The following code example illustrates how to implement the IUICommandHandler::UpdateProperty method for a Font Control.


