- Manage windows on Mac
- Move, align and merge windows
- Maximise or minimise windows
- Quickly switch between app windows
- Close windows
- Use Mission Control on your Mac
- Open Mission Control
- Add spaces and switch between them
- Move windows to spaces
- Move or remove spaces
- Use Control Centre on Mac
- Use Control Centre
- Customise Control Centre
- Work in multiple spaces on Mac
- Create a space
- Move between spaces
- Move an app window from one space to another
- Delete a space
- Приступая к работе с клиентом macOS Get started with the macOS client
- Получение клиента удаленного рабочего стола Get the Remote Desktop client
- Что насчет бета-версии клиента Mac? What about the Mac beta client?
- Добавление рабочей области Add a workspace
- Экспорт и импорт подключений Export and import connections
- Добавление удаленного ресурса Add a remote resource
- Подключение к шлюзу удаленных рабочих столов для доступа к внутренним ресурсам Connect to an RD Gateway to access internal assets
- Управление учетными записями пользователей Manage your user accounts
- Настройка разрешения экрана Customize your display resolution
- Дисплеи с несколькими рабочими столами Displays have separate spaces
- Перенаправление дисков для удаленных ресурсов Drive redirection for remote resources
- Использование клавиатуры в удаленном сеансе Use a keyboard in a remote session
- Поддержка подключаемой аутентификации и авторизации на шлюзе удаленных рабочих столов Support for Remote Desktop gateway pluggable authentication and authorization
Manage windows on Mac
When you open an app or the Finder on your Mac, a window opens on the desktop. Only one app at a time is active; the name of the app (in bold) and the app menus are shown in the menu bar.
Some apps, such as Safari or Mail, let you open multiple windows or different types of windows at the same time. macOS provides several ways to manage open apps and windows.
Move, align and merge windows
On your Mac, do any of the following:
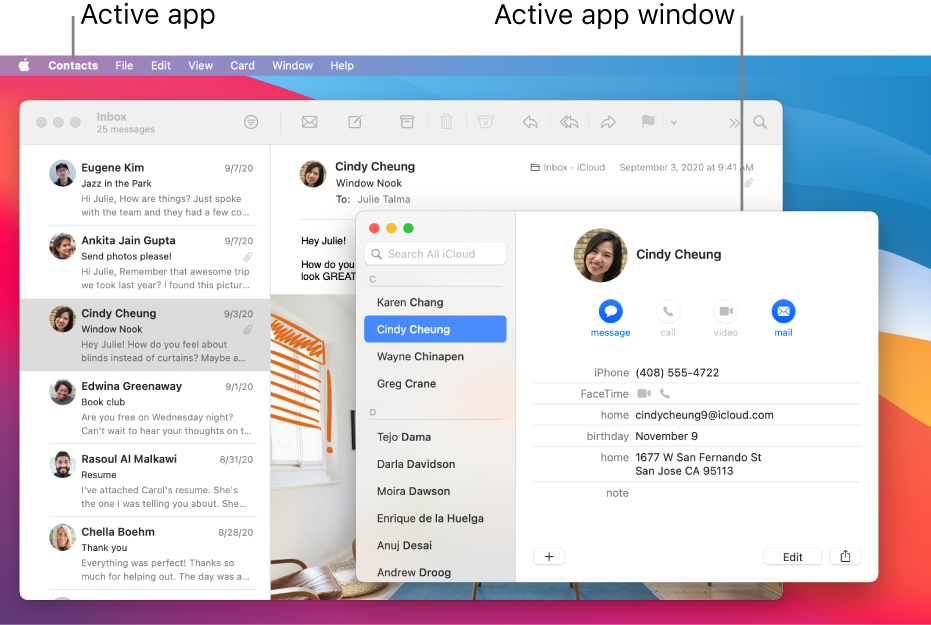
Move a window: Drag the window by its title bar to where you want it. Some windows can’t be moved.
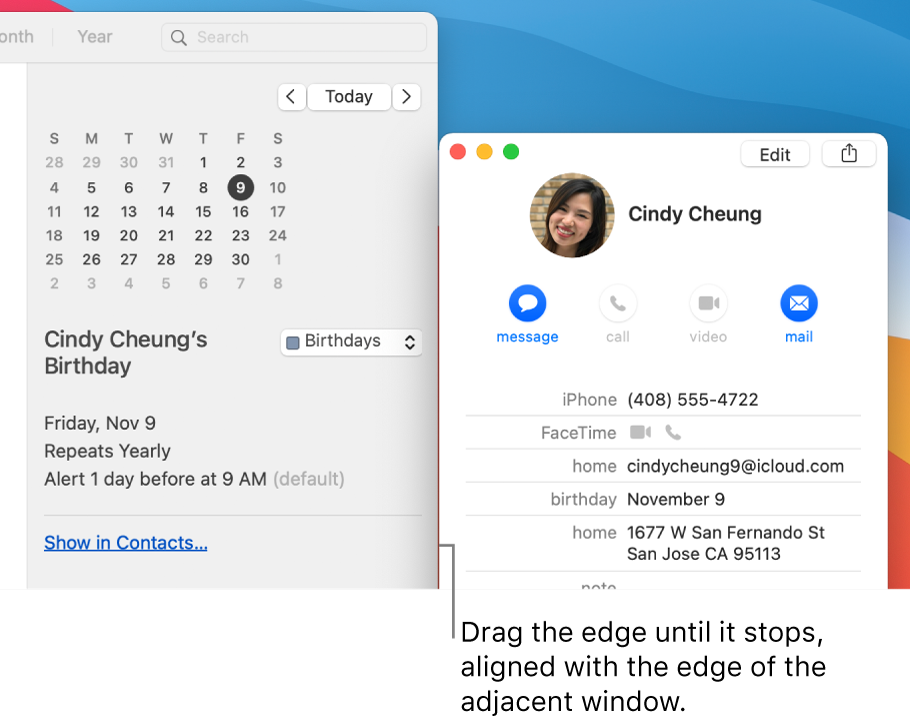
Align windows: Drag a window close to another one — as the window nears the other one, it aligns without overlapping. You can position multiple windows adjacent to each other.
To make adjacent windows the same size, drag the edge you want to resize — as it nears the edge of the adjacent window, it aligns with the edge and stops.
Merge an app’s windows into one tabbed window: In the app, choose Window > Merge All Windows.
To make a tab a separate window again, select the tab, then choose Window > Move Tab to New Window, or just drag the tab out of the window. See Use tabs in windows.
Maximise or minimise windows
On your Mac, do any of the following in a window:
Maximise a window: Press and hold the Option key while you click the green maximise button  in the top-left corner of an app window. To return to the previous window size, Option-click the button again.
You can also double-click an app’s title bar to maximise the window (as long as the option to do so is set to “zoom” in Dock & Menu Bar preferences).
Minimise a window: Click the yellow minimise button  in the top-left corner of the window or press Command-M.
You can set an option in Dock & Menu Bar preferences to have a window minimise when you double-click its title bar.
Most windows can be manually resized. Drag the window’s edge (top, bottom, or sides) or double-click an edge to expand that side of the window.
Quickly switch between app windows
On your Mac, do any of the following:
Switch to the previous app: Press Command-Tab.
Scroll through all open apps: Press and hold the Command key, press the Tab key, then press the Left or Right arrow key until you get to the app you want. Release the Command key.
If you change your mind while scrolling through the apps and don’t want to switch apps, press Esc (Escape) or the Full Stop key, then release the Command key.
Close windows
On your Mac, do any of the following:
Close a single window: In a window, click the red Close button  in the top-left corner of the window, or press Command-W.
Close all open windows for an app: Press Option-Command-W.
Closing one or all windows for an app does not close or quit the app. To do so, press Command-Q, or click the app’s name in the menu bar, then choose Quit [App]. See Quit apps.
You can hide the active app by pressing Command-H.
Use Mission Control to quickly arrange open windows and spaces in a single layer to easily spot the one you need.
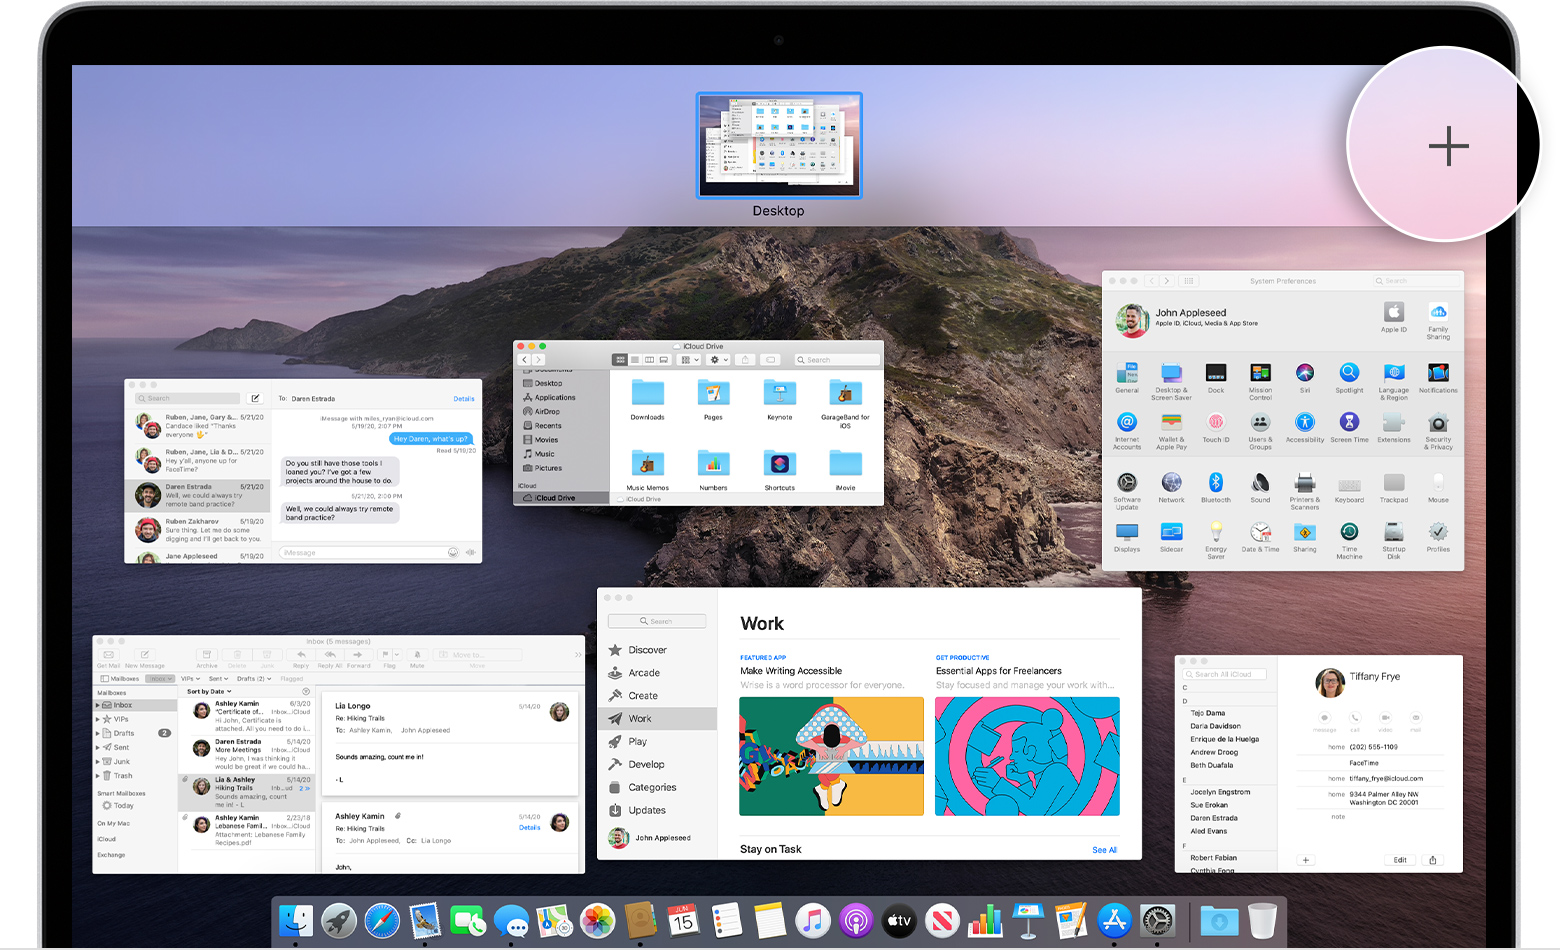
Use Mission Control on your Mac
Mission Control offers a bird’s-eye view of all your open windows, desktop spaces, and any apps in full screen or Split View, making it easy to switch between them.
Open Mission Control
- Swipe up with three or four fingers on your trackpad, or double-tap the surface of your Magic Mouse with two fingers.
- Open the Mission Control app, which is in your Applications folder.
- Press the Mission Control key on your Apple keyboard or Touch Bar.
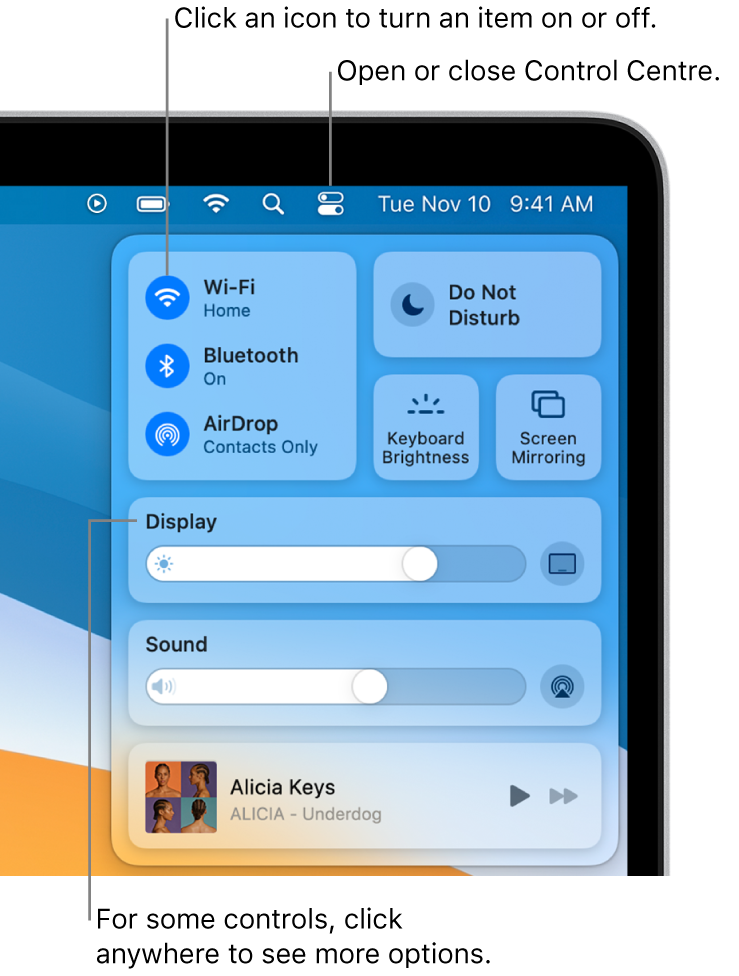
Add spaces and switch between them
The Spaces bar at the top of the Mission Control window contains thumbnails of each desktop space and each window that is in full screen or Split View.
To add a space, move your pointer to the Spaces bar, then click the add button on the right:
When you have multiple spaces, you can switch between them by clicking the thumbnails the top of the Mission Control window. Or use these methods, which work even when you’re not in Mission Control:
- Swipe left or right with three or four fingers on your trackpad, or swipe left or right with two fingers on your Magic Mouse.
- Press Control–Right Arrow or Control–Left Arrow on your keyboard.
Move windows to spaces
When you have more than one space, you can move windows to and from each space. Just drag the window onto the other space’s thumbnail in the Spaces bar.
If you drag a window onto an empty area of the Spaces bar, that window opens in full screen in its own new space:
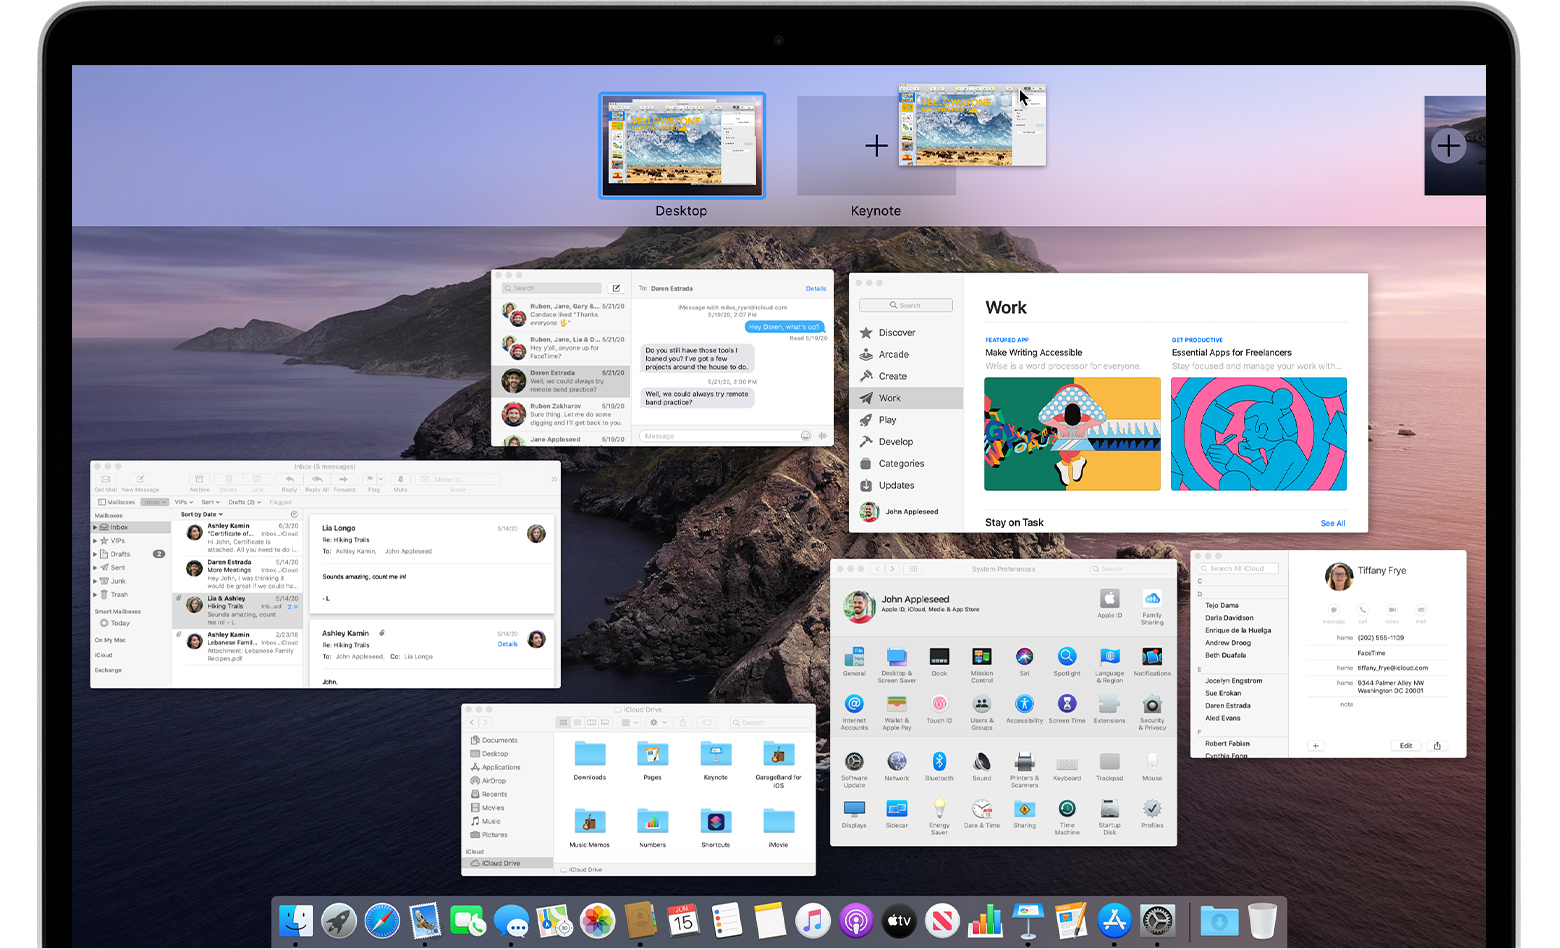
If you drag a window onto the thumbnail of a full-screen app, that window joins the other window in Split View:
Move or remove spaces
To move a space, drag its thumbnail to the left or right of another space in the Spaces bar.
To remove a space, press and hold the Option key, then click or  next to the space’s thumbnail in the Spaces bar. Any windows in that space then automatically move to your first desktop space.
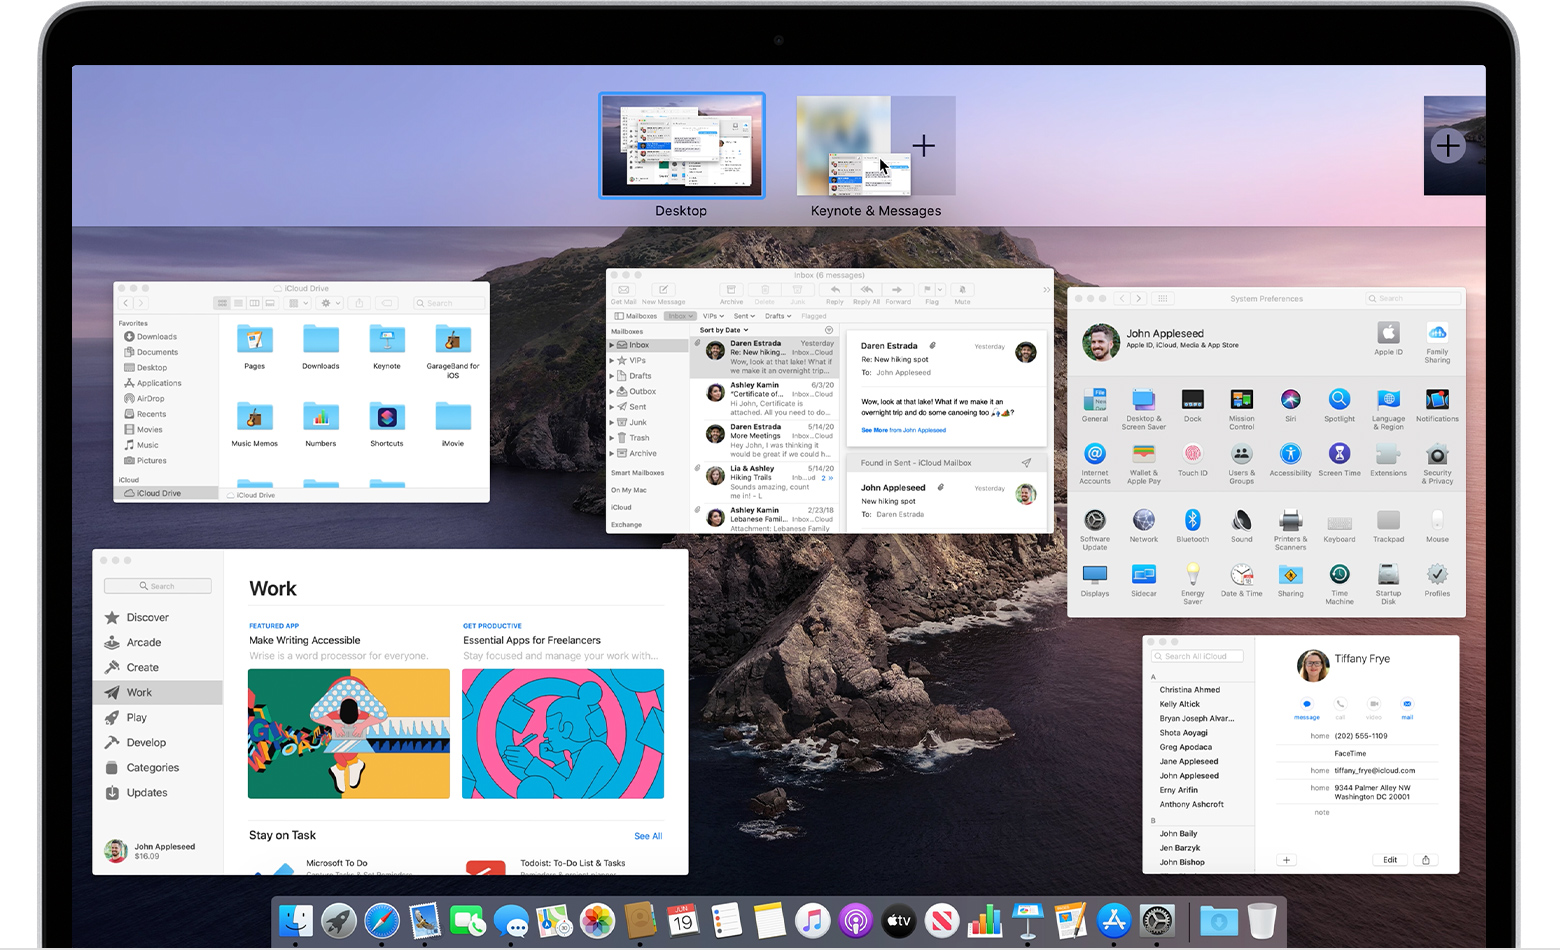
Use Control Centre on Mac
Control Centre on Mac gives you quick access to key macOS system settings — such as volume, brightness, Wi-Fi or Do Not Disturb. You can customise Control Centre to add other items, such as accessibility shortcuts or Fast User switching.
Use Control Centre
On your Mac, click Control Centre  in the menu bar.
Drag a slider (such as the Volume slider) or click an icon (such as the AirDrop icon). To see more options, click anywhere in an item or click the arrow  on the right.
For example, in Display, drag the slider to adjust the display brightness, or click anywhere in Display to show controls to turn Dark Mode and Night Shift on or off.
Tip: If you often use an item, you can drag it from Control Centre to the menu bar to keep it handy there. To remove the item from the menu bar, press and hold the Command key while you drag the item out of the menu bar.
Customise Control Centre
On your Mac, choose Apple menu

> System Preferences, then click Dock & Menu Bar.
Click a section in the sidebar to see items that are always in Control Centre or that you can add.
Control Centre: The items in this section are always shown in Control Centre; you can’t remove them. Select an item in the sidebar to see a preview of it in Control Centre on the right.
Other Modules: You can add the items in this section to Control Centre. Select an item in the sidebar, then select the item’s Show in Control Centre tickbox.
To include an item in the menu bar for even faster access, select its Show in Menu Bar tickbox.
You can’t add items in the Menu Bar Only section to Control Centre.
Work in multiple spaces on Mac
If the desktop on your Mac gets cluttered with open app windows, you can use Mission Control to create additional desktops, called spaces, to organise the windows. When you work in a space, you see only the windows that are in that space.
Create a space
If you’re working with apps in full screen or Split View, their thumbnails are shown in the Spaces bar.
In the Spaces bar, click the Add button  .
.
You can create up to 16 spaces.
When you’ve finished, click the thumbnail for a space to open it.
Tip: Make your spaces unique by assigning a different desktop picture to each one. Just assign System Preferences to all desktops (see the information about assigning apps below), then change the desktop picture in each space.
Move between spaces
On your Mac, do any of the following:
On a trackpad, swipe left or right with three or four fingers. On a Magic Mouse, swipe with two fingers.
Press the Control key and the Right or Left arrow key.
Enter Mission Control, move the pointer to the top edge of the screen, then click a space in the Spaces bar.
If your Mac has a Touch Bar, you can set an option in Keyboard preferences to show spaces in the Touch Bar. Then just tap a space in the Touch Bar to open the space.
Move an app window from one space to another
On your Mac, do any of the following:
Drag the app window you want to move to the edge of the screen. After a moment, the window moves to the next space.
Go to the space that has the window you want to move, enter Mission Control, then drag the window up to the space you want to use.
If you drag the window onto a full screen app in the Spaces bar, you can use the apps in Split View.
Delete a space
On your Mac, enter Mission Control, then move the pointer to the top edge of the screen.
In the Spaces bar, move the pointer over the space you want to delete, then click the Delete button  that appears.
If the space contains open windows, they are moved to another space.
You can quickly stop using an app in full screen or Split View by moving the pointer over the thumbnail in the Space bar, then clicking the Exit button  that appears.
Приступая к работе с клиентом macOS Get started with the macOS client
Область применения. Windows 10, Windows 8.1, Windows Server 2012 R2, Windows Server 2016 Applies To: Windows 10, Windows 8.1, Windows Server 2012 R2, Windows Server 2016
Клиент удаленного стола для Mac можно использовать для работы с приложениями, ресурсами и рабочими столами Windows со своего компьютера Mac. You can use the Remote Desktop client for Mac to work with Windows apps, resources, and desktops from your Mac computer. Используйте следующие сведения, чтобы приступить к работе. Если у вас возникнут вопросы, ознакомьтесь с часто задаваемыми вопросами. Use the following information to get started — and check out the FAQ if you have questions.
- Хотите узнать о новых выпусках для клиента macOS? Curious about the new releases for the macOS client? Ознакомьтесь с разделом Что нового в возможностях удаленного рабочего стола в Mac? Check out What’s new for Remote Desktop on Mac?
- Клиент Mac работает на компьютерах под управлением macOS 10.10 и более поздних версий. The Mac client runs on computers running macOS 10.10 and newer.
- Сведения в этой статье относятся в основном к полной версии клиента Mac. Именно эта версия доступна в Mac AppStore. The information in this article applies primarily to the full version of the Mac client — the version available in the Mac AppStore. Испытайте новые функции, скачав предварительную версию приложения со страницы заметок о выпуске бета-версии клиента. Test-drive new features by downloading our preview app here: beta client release notes.
Получение клиента удаленного рабочего стола Get the Remote Desktop client
Выполните следующие шаги, чтобы приступить к работе с удаленным рабочим столом на компьютере Mac. Follow these steps to get started with Remote Desktop on your Mac:
- Скачайте клиент Удаленного рабочего стола (Майкрософт) из Mac App Store. Download the Microsoft Remote Desktop client from the Mac App Store.
- Настройте свой компьютер для принятия удаленных подключений. Set up your PC to accept remote connections. (Если пропустить этот шаг, вы не сможете подключиться к своему компьютеру.) (If you skip this step, you can’t connect to your PC.)
- Добавьте подключение к удаленному рабочему столу или удаленный ресурс. Add a Remote Desktop connection or a remote resource. Подключение используется для прямого подключения к компьютеру с Windows, а удаленный ресурс — для использования удаленного приложения RemoteApp, рабочего стола на основе сеансов или виртуального рабочего стола, опубликованного локально с помощью удаленного приложения RemoteApp и подключений к удаленному рабочему столу. You use a connection to connect directly to a Windows PC and a remote resource to use a RemoteApp program, session-based desktop, or a virtual desktop published on-premises using RemoteApp and Desktop Connections. Эта функция обычно доступна в корпоративных средах. This feature is typically available in corporate environments.
Что насчет бета-версии клиента Mac? What about the Mac beta client?
Мы тестируем новые функции на нашем ознакомительном канале в AppCenter. We’re testing new features on our preview channel on AppCenter. Хотите ее испытать? Want to check it out? Перейдите на страницу Удаленный рабочий стол для Mac и выберите Скачать. Go to Microsoft Remote Desktop for Mac and select Download. Создавать учетную запись или входить в AppCenter для скачивания бета-версии клиента не нужно. You don’t need to create an account or sign into AppCenter to download the beta client.
Если у вас уже есть клиент, можно проверить наличие обновлений, чтобы убедиться, что вы используете последнюю версию. If you already have the client, you can check for updates to ensure you have the latest version. В окне бета-версии клиента выберите Бета-версия Удаленного рабочего стола (Майкрософт) вверху и щелкните Проверить наличие обновлений. In the beta client, select Microsoft Remote Desktop Beta at the top, and then select Check for updates.
Добавление рабочей области Add a workspace
Подпишитесь на веб-канал, который предоставил администратор, чтобы получить список управляемых ресурсов, доступных вам на устройстве macOS. Subscribe to the feed your admin gave you to get the list of managed resources available to you on your macOS device.
Чтобы подписаться на веб-канал: To subscribe to a feed:
- Выберите Добавить веб-канал на главной странице, чтобы подключиться к службе и получить ресурсы. Select Add feed on the main page to connect to the service and retrieve your resources.
- Введите URL-адрес веб-канала. Enter the feed URL. Это может быть URL-адрес или адрес электронной почты. This can be a URL or email address:
- Этот URL-адрес обычно является URL-адресом Виртуального рабочего стола Windows. This URL is usually a Windows Virtual Desktop URL. Выбор зависит от используемой версии Виртуального рабочего стола Windows. Which one you use depends on which version of Windows Virtual Desktop you’re using.
- Если вы работаете с Виртуальным рабочим столом Windows (классическая модель), используйте: https://rdweb.wvd.microsoft.com/api/feeddiscovery/webfeeddiscovery.aspx . For Windows Virtual Desktop (classic), use https://rdweb.wvd.microsoft.com/api/feeddiscovery/webfeeddiscovery.aspx .
- Если вы работаете с Виртуальным рабочим столом Windows, используйте: https://rdweb.wvd.microsoft.com/api/arm/feeddiscovery . For Windows Virtual Desktop, use https://rdweb.wvd.microsoft.com/api/arm/feeddiscovery .
- Чтобы использовать адрес электронной почты, введите свой адрес электронной почты. To use email, enter your email address. При этом клиент будет искать URL-адрес, связанный с вашим адресом электронной почты, если администратор настроил сервер соответствующим образом. This tells the client to search for a URL associated with your email address if your admin configured the server that way.
- Этот URL-адрес обычно является URL-адресом Виртуального рабочего стола Windows. This URL is usually a Windows Virtual Desktop URL. Выбор зависит от используемой версии Виртуального рабочего стола Windows. Which one you use depends on which version of Windows Virtual Desktop you’re using.
- Выберите Подписаться. Select Subscribe.
- При появлении запроса войдите в систему со своей учетной записью. Sign in with your user account when prompted.
После входа будет показан список доступных ресурсов. After you’ve signed in, you should see a list of available resources.
Когда вы подпишетесь на веб-канал, его содержимое будет регулярно автоматически обновляться. Once you’ve subscribed to a feed, the feed’s content will update automatically on a regular basis. Ресурсы могут добавляться, изменяться или удаляться в соответствии с изменениями, внесенными администратором. Resources may be added, changed, or removed based on changes made by your administrator.
Экспорт и импорт подключений Export and import connections
Можно экспортировать определение подключения к удаленному рабочему столу и использовать его на другом устройстве. You can export a remote desktop connection definition and use it on a different device. Удаленные рабочие столы хранятся в отдельных RDP-файлах. Remote desktops are saved in separate RDP files.
Чтобы экспортировать RDP-файл, сделайте следующее: To export an RDP file:
- В Центре подключений щелкните правой кнопкой мыши удаленный рабочий стол. In the Connection Center, right-click the remote desktop.
- Выберите Экспорт. Select Export.
- Перейдите в расположение, где вы хотите сохранить RDP-файл удаленного рабочего стола. Browse to the location where you want to save the remote desktop RDP file.
- Нажмите кнопку ОК. Select OK.
Чтобы импортировать RDP-файл, сделайте следующее: To import an RDP file:
- В строке меню выберите Файл >Импорт. In the menu bar, select File >Import.
- Перейдите к RDP-файлу. Browse to the RDP file.
- Выберите Открыть. Select Open.
Добавление удаленного ресурса Add a remote resource
Удаленные ресурсы являются программами RemoteApp, рабочими столами на основе сеансов и виртуальными рабочими столами, опубликованными с помощью подключений к удаленным рабочим столам и удаленному приложению RemoteApp. Remote resources are RemoteApp programs, session-based desktops, and virtual desktops published using RemoteApp and Desktop Connections.
- URL-адрес отображает ссылку на сервер веб-доступа к удаленным рабочим столам, что дает вам доступ к удаленному приложению RemoteApp и подключениям к удаленным рабочим столам. The URL displays the link to the RD Web Access server that gives you access to RemoteApp and Desktop Connections.
- Настроенные удаленные приложения RemoteApp и подключения к удаленным рабочим столам отображаются в списке. The configured RemoteApp and Desktop Connections are listed.
Чтобы добавить удаленный ресурс: To add a remote resource:
- В Центре подключений выберите + и щелкните Добавление удаленных ресурсов. In the Connection Center select +, and then select Add Remote Resources.
- Введите сведения об удаленном ресурсе. Enter information for the remote resource:
- URL-адрес веб-канала — URL-адрес сервера веб-доступа к удаленным рабочим столам. Feed URL — The URL of the RD Web Access server. В этом поле можно также ввести учетную запись корпоративной электронной почты. Таким образом, клиент будет искать сервер веб-доступа к удаленным рабочим столам, связанный с вашим адресом электронной почты. You can also enter your corporate email account in this field – this tells the client to search for the RD Web Access Server associated with your email address.
- Имя пользователя — имя пользователя, используемое для сервера веб-доступа к удаленным рабочим столам, к которому вы подключаетесь. User name — The user name to use for the RD Web Access server you are connecting to.
- Пароль — пароль, используемый для сервера веб-доступа к удаленным рабочим столам, к которому вы подключаетесь. Password — The password to use for the RD Web Access server you are connecting to.
- Выберите Сохранить. Select Save.
Удаленные ресурсы будут отображаться в Центре подключений. The remote resources will be displayed in the Connection Center.
Подключение к шлюзу удаленных рабочих столов для доступа к внутренним ресурсам Connect to an RD Gateway to access internal assets
Шлюз удаленных рабочих столов (шлюз RD) позволяет подключаться к удаленному компьютеру в корпоративной сети из любой точки Интернета. A Remote Desktop Gateway (RD Gateway) lets you connect to a remote computer on a corporate network from anywhere on the Internet. Можно создать шлюзы и управлять ими с помощью настроек приложения или при настройке нового подключения к рабочему столу. You can create and manage your gateways in the preferences of the app or while setting up a new desktop connection.
Вот как можно настроить новый шлюз в настройках приложения. To set up a new gateway in preferences:
- В Центре подключений выберите Настройки > Шлюзы. In the Connection Center, select Preferences > Gateways.
- Нажмите кнопку + в нижней части таблицы и введите следующие сведения. Select the + button at the bottom of the table Enter the following information:
- Имя сервера — имя компьютера, который будет использоваться в качестве шлюза. Server name – The name of the computer you want to use as a gateway. Это может быть имя компьютера с Windows, доменное имя в Интернете или IP-адрес. This can be a Windows computer name, an Internet domain name, or an IP address. Вы можете также добавить сведения о порте к имени сервера (например, RDGateway:443 или 10.0.0.1:443). You can also add port information to the server name (for example: RDGateway:443 or 10.0.0.1:443).
- Имя пользователя — имя пользователя и пароль, используемые для шлюза удаленных рабочих столов, к которому вы подключаетесь. User name — The user name and password to be used for the Remote Desktop gateway you are connecting to. Можно также выбрать Use connection credentials (Использовать учетные подключения), чтобы использовать те же имя пользователя и пароль, что и для подключения к удаленному рабочему столу. You can also select Use connection credentials to use the same user name and password as those used for the remote desktop connection.
Управление учетными записями пользователей Manage your user accounts
При подключении к рабочему столу или удаленным ресурсам можно сохранить учетные записи пользователей, чтобы их можно было выбрать снова. When you connect to a desktop or remote resources, you can save the user accounts to select from again. Вы можете управлять своими учетными записями с помощью клиента удаленного рабочего стола. You can manage your user accounts by using the Remote Desktop client.
Чтобы создать учетную запись пользователя, сделайте следующее: To create a new user account:
- В Центре подключений выберите Параметры >Учетные записи. In the Connection Center, select Settings >Accounts.
- Выберите Добавление учетной записи пользователя. Select Add User Account.
- Введите следующие сведения: Enter the following information:
- Имя пользователя — имя пользователя, которое нужно сохранить для использования при удаленном подключении. User Name — The name of the user to save for use with a remote connection. Вы можете ввести имя пользователя в любом из следующих форматов: «имя_пользователя», «домен\имя_пользователя» или user_name@domain.com. You can enter the user name in any of the following formats: user_name, domain\user_name, or user_name@domain.com.
- Пароль — пароль для указанного пользователя. Password — The password for the user you specified. Каждая учетная запись пользователя, которую вы хотите сохранить, чтобы использовать для удаленных подключений, должна иметь пароль. Every user account that you want to save to use for remote connections needs to have a password associated with it.
- Понятное имя — если вы используете одну учетную запись пользователя с разными паролями, задайте понятное имя, чтобы различать эти учетные записи. Friendly Name — If you are using the same user account with different passwords, set a friendly name to distinguish those user accounts.
- Выберите Сохранить, затем выберите Параметры. Select Save, then select Settings.
Настройка разрешения экрана Customize your display resolution
Для сеанса удаленного рабочего стола можно указать разрешение экрана. You can specify the display resolution for the remote desktop session.
- В Центре подключений выберите Предпочтения. In the Connection Center, select Preferences.
- Выберите Разрешение. Select Resolution.
- Выберите + . Select +.
- Введите высоту и ширину разрешения и выберите ОК. Enter a resolution height and width, and then select OK.
Чтобы удалить разрешение, выберите его и щелкните — . To delete the resolution, select it, and then select —.
Дисплеи с несколькими рабочими столами Displays have separate spaces
Если вы используете Mac OS X 10.9 и отключили параметр Displays have separate spaces (Дисплеи с несколькими рабочими столами) в Mavericks (System Preferences > Mission Control (Параметры системы > Управление заданиями)), необходимо точно так же настроить этот параметр в клиенте удаленного рабочего стола. If you’re running Mac OS X 10.9 and have disabled Displays have separate spaces in Mavericks (System Preferences > Mission Control), you need to configure this setting in the Remote Desktop client using the same option.
Перенаправление дисков для удаленных ресурсов Drive redirection for remote resources
Для удаленных ресурсов поддерживается перенаправление дисков, чтобы можно было сохранять файлы, созданные с помощью удаленного приложения, локально на компьютере Mac. Drive redirection is supported for remote resources, so that you can save files created with a remote application locally to your Mac. Перенаправленная папка всегда является вашим домашним каталогом, отображаемым как сетевой диск в удаленном сеансе. The redirected folder is always your home directory displayed as a network drive in the remote session.
Чтобы использовать эту функцию, администратор должен задать соответствующие параметры на сервере. In order to use this feature, the administrator needs to set the appropriate settings on the server.
Использование клавиатуры в удаленном сеансе Use a keyboard in a remote session
Раскладки клавиатуры Mac отличаются от раскладок клавиатуры Windows. Mac keyboard layouts differ from the Windows keyboard layouts.
- Клавиша Command на клавиатуре Mac соответствует клавише Windows. The Command key on the Mac keyboard equals the Windows key.
- Для выполнения действий с использованием кнопки COMMAND на компьютере Mac необходимо использовать клавишу CTRL в Windows (например: действие копирования соответствует сочетанию клавиш CTRL+C). To perform actions that use the Command button on the Mac, you will need to use the control button in Windows (for example Copy = Ctrl+C).
- Функциональные клавиши можно активировать в сеансе нажатием клавиши FN (например: FN+F1). The function keys can be activated in the session by pressing additionally the FN key (for example, FN+F1).
- Клавиша ALT справа от пробела на клавиатуре Mac соответствует клавише ALT GR или правой клавише ALT в Windows. The Alt key to the right of the space bar on the Mac keyboard equals the Alt Gr/right Alt key in Windows.
По умолчанию удаленный сеанс будет использовать тот же язык клавиатуры, что и в ОС, в которой выполняется клиент. By default, the remote session will use the same keyboard locale as the OS you’re running the client on. (Если компьютер Mac работает под управлением операционной системы с языковым стандартом en-US, этот языковый стандарт будет использоваться и для удаленных сеансов.) Если языковый стандарт клавиатуры операционной системы не используется, проверьте параметры клавиатуры на удаленном компьютере и измените их вручную. (If your Mac is running an en-us OS, that will be used for the remote sessions as well.) If the OS keyboard locale is not used, check the keyboard setting on the remote PC and change it manually. В разделе Вопросы и ответы по клиенту удаленного рабочего стола доступны дополнительные сведения о клавиатурах и языковых стандартах. See the Remote Desktop Client FAQ for more information about keyboards and locales.
Поддержка подключаемой аутентификации и авторизации на шлюзе удаленных рабочих столов Support for Remote Desktop gateway pluggable authentication and authorization
В Windows Server 2012 R2 появилась поддержка нового метода проверки подлинности — подключаемой аутентификации и авторизации на шлюзе удаленных рабочих столов, что обеспечивает большую гибкость для пользовательских процедур аутентификации. Windows Server 2012 R2 introduced support for a new authentication method, Remote Desktop Gateway pluggable authentication and authorization, which provides more flexibility for custom authentication routines. Теперь вы можете попробовать эту модель аутентификации в клиенте Mac. You can now try this authentication model with the Mac client.
Пользовательские модели аутентификации и авторизации, выпущенные до Windows 8.1, не поддерживаются, хотя и рассматриваются в статье выше. Custom authentication and authorization models before Windows 8.1 aren’t supported, although the article above discusses them.
Чтобы узнать больше об этой функции, ознакомьтесь со страницей https://aka.ms/paa-sample. To learn more about this feature, check out https://aka.ms/paa-sample.
Мы всегда приветствуем вопросы и комментарии. Questions and comments are always welcome. Тем не менее не стоит публиковать запрос для получения справки по устранению неполадок, используя область комментариев в конце этой статьи. However, please do NOT post a request for troubleshooting help by using the comment feature at the end of this article. Вместо этого перейдите на форум по клиенту удаленного рабочего стола и начните новую беседу. Instead, go to the Remote Desktop client forum and start a new thread. Есть предложение по новым функциям? Have a feature suggestion? Сообщите нам на форуме UserVoice по клиенту. Tell us in the client user voice forum.


