- Windows copy command syntax and examples
- Copy the contents of a file to another file
- Copy file to another directory
- Copy files with white space in name
- Copy multiple files
- Use of environment variables
- Copy-Item копирование файлов и папок из PowerShell
- Копирование файлов и каталогов
- Копирование с заменой и копирование с заменой read-only файлов
- Копирование с фильтрацией по шаблону
- Исключение файлов при копировании
- Копирование файлов на удаленный компьютер по сети
- Ключ PassThru
- Ключ Verbose
- Несколько полезных скриптов с Copy-Item
- Windows copy new files
- Syntax
- Parameters
- Remarks
- Examples
Windows copy command syntax and examples
Using copy command, we can copy files from one directory to another directory. This command is similar to the Linux cp command, but it does not match with the full functionality of cp. Windows copy command can be used to copy files only, we can’t copy directories.
The syntax and usecases of copy command are explained below with examples.
Copy the contents of a file to another file
Example: To copy a file from c:\data\file1.doc to D:\backup\file2.doc
If the destination file already exists you will be prompted for confirmation. To suppress this confirmation you can use /Y switch with copy command. This would be useful if you are executing copy command from a batch file.
If the destination file exists, the above command will overwrite the same without asking the user for confirmation.
Copy file to another directory
When we specify a directory path as the destination, the files will be copied with the same name. We can assign a different name by specifying the new name in the destination path. Example is shown below.
To copy the file 1.doc loated at c:\data\documents to the directory c:\data\newdocs
Copy files with white space in name
If the file name has white space within it, we can wrap up the name in double quotes.
Example: To copy file, my resume.doc to another folder
Copy multiple files
We can’t specify multiple file names in copy command. However, we can use wildcards to identify a group of files and then copy all of them in a single command.
For example, to copy all excel files from current folder to another folder F:\backup
To copy all files in current folder to another folder
Use of environment variables
We can use environment variables in the copy command to specify the path of the folders. Like USERPROFILE, SystemRoot, ProgramFiles, TEMP, WINDIR, APPDATA, HOMEPATH.
For example, to copy a file to a user’s documents folder
The above command copies the file to the My Documents folder of the current logged in user.
You may also want to read
Windows «copy» is funny. Type «copy 1 2» and the file «1» will be copied into a new file «2». Now separate them by a plus sign instead of a space (copy 1+2) and you’ll concatenate 1 and 2 and replace the old file «1» with the result of the concatenation!
Yes, we can concatenate two or more files using copy command. You need to separate the list of files using +. You can redirect the resultant data to a new file also.
The above command will not alter the file 1. It creates a new file 3 with the concatenated data of 1 & 2. If no file name is provided it stores the result in the first file.
My Win7 cannot find a copy command, and when i run xcopy, a window flashes and exits.
I have the same problem. If you solved it, could you please explain how?
If you can not find your copy.exe file, you can download it to your windows directory or C:\ Directory depending the setting on your OS you should also be able to copy and run it from system32 or system folder.
how can i combine 2 .exe files and be able to use both after concatenation
I want to copy 2 different files(.exe,.config) from source to destination server of windows.
can you please help me on this command.
Hello i have a problem with my cmd windows 7.when i try to copy a command. Like help > file.pdf. i mean in extension pdf because i have this problem only with .pdf extension but not with .txt.So whe i execute the command. No problem. Then when i go to open the file.pdf ftom user destination the file.pdf doesn’t open say that is corrupted.please do help me .thanks
i have a file contain many lines as sources and another file has the same numbre of lines as destinations. i want to copy first line as source( c:/test/*.txt) to first line in destination ( d:/test2/), secend line ( c:/test/*.pdf) to second line in destination ( E:/test3/)……
Can I use the DOS/Windows “COPY” command in a BAT file to copy a file or a short string of text to computer memory and then paste (Ctrl +V) that string or file into a document?
Copy-Item копирование файлов и папок из PowerShell
PowerShell командлет Copy-Item используется для копирования файлов между локальными, сетевыми каталогами или между компьютерами по сети через WinRM. Командлет Copy-Item предоставляет большое количество опций, которые можно использовать в разных сценариях копирования файлов и каталогов (по своим возможностям этот командлет почти не уступает утилите robocopy). Например:
- перезапись файлов (override)
- фильтрация по имени/шаблону
- исключение по имени/шаблону
- Verbose режим
- Копирование файлов с/на удаленные компьютеры
Начнем с простых примеров использования Copy-Item и будем переходить к более сложным.
Копирование файлов и каталогов
Чтобы скопировать один файл 1.txt из каталога C:\SourceFolder\ в F:\DestFolder\, выполните:
Copy-Item -Path «C:\SourceFolder\1.txt» -Destination «F:\DestFolder\1.txt»
Можно использовать сокращенный синтаксис командлета, пропустив указание параметров Path и Destination:
cpi «C:\SourceFolder\1.txt» «F:\DestFolder\1.txt»
Теперь скопируем каталог C:\SourceFolder\folder в F:\DestFolder\folder. В папке folder находится файл 1.txt. Обратите внимание что без ключа –Recurse, папка folder копируется без содержимого:
Copy-Item -Path «C:\SourceFolder\folder» -Destination «F:\DestFolder\folder» -Recurse
С помощью Copy-Item также можно просто объединить файлы из несколько директорий в одну (слияние директории), для этого нужно перечислить директории в ключе –Path:
Copy-Item -Path «C:\SourceFolder\*», «C:\SourceFolder2\*», «C:\SourceFolder3\*» -Destination «F:\DestFolder\»
Копирование с заменой и копирование с заменой read-only файлов
Copy-Item по умолчанию при копировании заменяет файлы в целевом каталоге. Никаких дополнительных параметров указывать не нужно. При копировании каталога, если нужно заменить каталог в целевой папке, нужно использовать ключ –Force, иначе будет ошибка “Элемент folder с указанным именем уже существует — DirectoryExists”.

Для перезаписи файла с атрибутом read-only, нужно использовать ключ -Force. Если его не использовать, вы получите ошибку “отказано в доступе по пути… CopyFileInfoItemUnauthorizedAccessError”.

Чтобы скопировать файл с перезаписью файла с read-only атрибутом используйте параметр Force.
Copy-Item -Path «C:\SourceFolder\1.txt» -Destination «F:\DestFolder\1.txt» -Force
Чтобы Copy-Item скопировал файлы из одной папки в другую без замены существующих файлов, можно использовать этот простой скрипт
Copy-Item (Join-Path «C:\SourceFolder\» «*») «F:\DestFolder\» -Exclude (Get-ChildItem «F:\DestFolder\») -Recurse
Этот скрипт скопирует все файлы и папки из C:\SourceFolder в F:\DestFolder без замены файлов уже существующих в F:\DestFolder
Копирование с фильтрацией по шаблону
С помощью Copy-Item можно скопировать файлы/директории выбранные с помощью wildcard символа * или с помощью символа ?. Также поддерживаются некоторые регулярные выражения
- * — обозначает любое количество любых символов
- ? – обозначает 1 любой символ
- [a-z], [0-9] – символы между a-z и цифры между 0 и 9
Для примера возьмём такую структуру файлов:
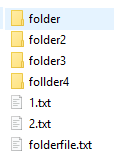
Выполним копирование командой:
Copy-Item -Path «C:\SourceFolder\fol*» -Destination «F:\DestFolder\»
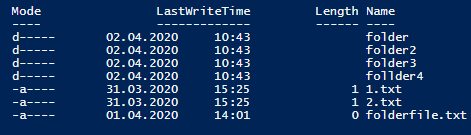
Результат в F:\DestFolder\

Теперь чистим папку назначения и выполняем:
Copy-Item -Path «C:\SourceFolder\folder3» -Destination «F:\DestFolder\»

Папка без цифры в окончании не скопировалась, потому что folder3 подразумевает что после folder будет как минимум еще 1 символ между 0 и 3
Исключение файлов при копировании
С помощью ключа –Exclude можно исключить файлы при копировании. Например, следующай команда скопирует все файлы кроме файлов с расширением txt.
Copy-Item -Path «C:\SourceFolder\*» -Destination «F:\DestFolder\» -Recurse -Force -Exclude «*.txt»
Аналогичным же образом можно применить ключ –Include, например
Copy-Item -Path «C:\SourceFolder\*» -Destination «F:\DestFolder\» -Recurse -Force -Include «*.txt»
Скопирует только txt файлы. Хотя для простоты гораздо удобнее использовать при копировании вид -Path «C:\SourceFolder\*.txt» .
Копирование файлов на удаленный компьютер по сети
Copy-File может копировать не только по SMB протоколу, но и через WinRM (WSMan).
Создайте новую сессию с компьютером testnode1 и выполните копирование в её контексте:
$session = New-PSSession -ComputerName testnode1
Copy-Item -Path «C:\SourceFolder\*» -ToSession $session -Destination «C:\SourceFolder\» -Recurse -Force
Эта команда скопирует файлы с локального компьютера из директории C:\SourceFolder на компьютер testnode1 в C:\SourceFolder\.
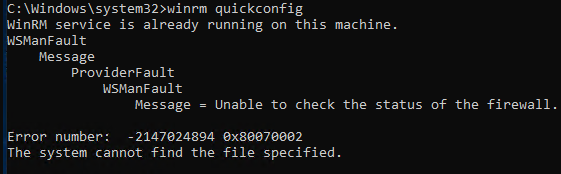
Test-WSMan -ComputerName testnode1

Если WSMan не настроен, вы можете выполнить его быструю конфигурацию. Для этого откройте командную строку с правами администратора и выполните winrm quickconfig
Также можно копировать и через обычные сетевые SMB шары, для этого просто используйте UNC формат сетевого пути.
Copy-Item -Path «C:\SourceFolder\*» -Destination «\\testnode1\C$\copy_tutorial\»
Можно скопировать файл с удаленного компьютера. Принцип такой же, как и при копировании файлов на удаленный компьютер, за исключением параметра –ToSession, вместо него нужно использовать –FromSession:
$session = New-PSSession -ComputerName testnode1
Copy-Item -FromSession $session -Path «C:\SourceFolder\*» -Destination «F:\DestFolder\» -Recurse -Force
Эта команда скопирует содержимое папки C:\SourceFolder\ с компьютера testnode1 на локальный компьютер в директорию F:\DestFolder
Ключ PassThru
Командлет Copy-Item (как и многие другие командлеты PowerShell) не возвращает результатов в консоль. Параметр PassThru применяется скриптах, или для лог-файлов, когда нужно получить список скопированных файлов и работать с ним дальше. Рассмотрим пример
$items = Copy-Item -Path «C:\SourceFolder\*» –Destination «\\testnode1\C$\copy_tutorial\» -PassThru
Переменная $items будет содержать список скопированных файлов, с которым вы можете работать дальше.Это значит что вы можете напрямую работать с этими файлами. Например выполнив команду Remove-Item $items[0] , вы удалите директорию folder.
Ключ Verbose
При использовании ключа -Verbose вы получите подробный лог операций копирования. Например, вывод команды
Copy-Item -Path «C:\SourceFolder\*.txt» -Destination «F:\DestFolder\» -Recurse -Force -Verbose

Несколько полезных скриптов с Copy-Item
Скопировать только файлы:
Get-ChildItem «C:\SourceFolder» -File -Recurse | Copy-Item -Destination «F:\DestFolder»
Скопировать структуру папок, без файлов:
$path = Get-ChildItem «C:\SourceFolder» -Recurse | ?<$_.PsIsContainer -eq $true>
$dest = «F:\DestFolder\»
$parent = $path[0].Parent.Name
$path | foreach <
$_.FullName -match «$parent.+»
New-Item -ItemType directory ($dest + $Matches[0])
>
Copy-Item очень простой и удобный в использовании командлет PowerShell для выполнения операций копирования и перемещения файлов. В сочетании с другими инструментами PowerShell, Copy-Item также является мощным инструментом для написания скриптов.
Windows copy new files
Copies one or more files from one location to another.
You can also use the copy command, with different parameters, from the Recovery Console. For more information about the recovery console, see Windows Recovery Environment (Windows RE).
Syntax
Parameters
| Parameter | Description |
|---|---|
| /d | Allows the encrypted files being copied to be saved as decrypted files at the destination. |
| /v | Verifies that new files are written correctly. |
| /n | Uses a short file name, if available, when copying a file with a name longer than eight characters, or with a file name extension longer than three characters. |
| /y | Suppresses prompting to confirm that you want to overwrite an existing destination file. |
| /-y | Prompts you to confirm that you want to overwrite an existing destination file. |
| /z | Copies networked files in restartable mode. |
| /a | Indicates an ASCII text file. |
| /b | Indicates a binary file. |
| Required. Specifies the location from which you want to copy a file or set of files. Source can consist of a drive letter and colon, a directory name, a file name, or a combination of these. | |
| Required. Specifies the location to which you want to copy a file or set of files. Destination can consist of a drive letter and colon, a directory name, a file name, or a combination of these. | |
| /? | Displays help at the command prompt. |
Remarks
You can copy an ASCII text file that uses an end-of-file character (CTRL+Z) to indicate the end of the file.
If /a precedes or follows a list of files on the command line, it applies to all files listed until copy encounters /b. In this case, /b applies to the file preceding /b.
The effect of /a depends on its position in the command-line string: — If /a follows source, the copy command treats the file as an ASCII file and copies data that precedes the first end-of-file character (CTRL+Z). — If /a follows destination, the copy command adds an end-of-file character (CTRL+Z) as the last character of the file.
If /b directs the command interpreter to read the number of bytes specified by the file size in the directory. /b is the default value for copy, unless copy combines files.
If /b precedes or follows a list of files on the command line, it applies to all listed files until copy encounters /a. In this case, /a applies to the file preceding /a.
The effect of /b depends on its position in the command–line string: — If /b follows source, the copy command copies the entire file, including any end-of-file character (CTRL+Z). — If /b follows destination, the copy command doesn’t add an end-of-file character (CTRL+Z).
If a write operation cannot be verified, an error message appears. Although recording errors rarely occur with the copy command , you can use /v to verify that critical data has been correctly recorded. The /v command-line option also slows down the copy command, because each sector recorded on the disk must be checked.
If /y is preset in the COPYCMD environment variable, you can override this setting by using /-y at the command line. By default, you are prompted when you replace this setting, unless the copy command is executed in a batch script.
To append files, specify a single file for destination, but multiple files for source (use wildcard characters or file1+file2+file3 format).
If the connection is lost during the copy phase (for example, if the server going offline breaks the connection), you can use copy /z to resume after the connection is re-established. The /z option also displays the percentage of the copy operation that is completed for each file.
You can substitute a device name for one or more occurrences of source or destination.
If destination is a device (for example, Com1 or Lpt1), the /b option copies data to the device in binary mode. In binary mode, copy /b copies all characters (including special characters such as CTRL+C, CTRL+S, CTRL+Z, and ENTER) to the device, as data. However, if you omit /b, the data is copied to the device in ASCII mode. In ASCII mode, special characters might cause files to combine during the copying process.
If you don’t specify a destination file, a copy is created with the same name, modified date, and modified time as the original file. The new copy is stored in the current directory on the current drive. If the source file is on the current drive and in the current directory and you do not specify a different drive or directory for the destination file, the copy command stops and displays the following error message:
If you specify more than one file in source, the copy command combines them all into a single file using the file name specified in destination. The copy command assumes the combined files are ASCII files unless you use the /b option.
To copy files that are 0 bytes long, or to copy all of a directory’s files and subdirectories, use the xcopy command.
To assign the current time and date to a file without modifying the file, use the following syntax:
Where the commas indicate that the destination parameter has been intentionally left out.
Examples
To copy a file called memo.doc to letter.doc in the current drive and ensure that an end-of-file character (CTRL+Z) is at the end of the copied file, type:
To copy a file named robin.typ from the current drive and directory to an existing directory named Birds that is located on drive C, type:
If the Birds directory doesn’t exist, the file robin.typ is copied into a file named Birds that is located in the root directory on the disk in drive C.
To combine Mar89.rpt, Apr89.rpt, and May89.rpt, which are located in the current directory, and place them in a file named Report (also in the current directory), type:
If you combine files, the copy command marks the destination file with the current date and time. If you omit destination, the files are combined and stored under the name of the first file in the list.
To combine all files in Report, when a file named Report already exists, type:
To combine all files in the current directory that have the .txt file name extension into a single file named Combined.doc, type:
To combine several binary files into one file by using wildcard characters, include /b. This prevents Windows from treating CTRL+Z as an end-of-file character. For example, type:
If you combine binary files, the resulting file might be unusable due to internal formatting.


