- CopyFileW function (winbase.h)
- Syntax
- Parameters
- Return value
- Remarks
- Examples
- How to Copy Files Using Command Prompt in Windows 7?
- Benefit from Command Prompt Copy Files
- How to Copy Files Using Command Prompt in Windows 7?
- Copy Specific File via Command Prompt
- Copy Directory and Contents Using Command Line
- Easier Way to Copy Files in Windows 7/8/10
- How to Copy Files/Folders in Windows 7 Step by Step?
- Summary
- xcopy
- Syntax
- Parameters
- Remarks
- Examples
CopyFileW function (winbase.h)
Copies an existing file to a new file.
The CopyFileEx function provides two additional capabilities. CopyFileEx can call a specified callback function each time a portion of the copy operation is completed, and CopyFileEx can be canceled during the copy operation.
To perform this operation as a transacted operation, use the CopyFileTransacted function.
Syntax
Parameters
The name of an existing file.
In the ANSI version of this function, the name is limited to MAX_PATH characters. To extend this limit to 32,767 wide characters, call the Unicode version of the function and prepend «\?» to the path. For more information, see Naming a File.
The name of the new file.
In the ANSI version of this function, the name is limited to MAX_PATH characters. To extend this limit to 32,767 wide characters, call the Unicode version of the function and prepend «\?» to the path. For more information, see Naming a File.
If this parameter is TRUE and the new file specified by lpNewFileName already exists, the function fails. If this parameter is FALSE and the new file already exists, the function overwrites the existing file and succeeds.
Return value
If the function succeeds, the return value is nonzero.
If the function fails, the return value is zero. To get extended error information, call GetLastError.
Remarks
The security resource properties (ATTRIBUTE_SECURITY_INFORMATION) for the existing file are copied to the new file.
WindowsВ 7, Windows ServerВ 2008В R2, Windows ServerВ 2008, WindowsВ Vista, Windows ServerВ 2003 and WindowsВ XP:В В Security resource properties for the existing file are not copied to the new file until WindowsВ 8 and Windows ServerВ 2012.
File attributes for the existing file are copied to the new file. For example, if an existing file has the FILE_ATTRIBUTE_READONLY file attribute, a copy created through a call to CopyFile will also have the FILE_ATTRIBUTE_READONLY file attribute. For more information, see Retrieving and Changing File Attributes.
This function fails with ERROR_ACCESS_DENIED if the destination file already exists and has the FILE_ATTRIBUTE_HIDDEN or FILE_ATTRIBUTE_READONLY attribute set.
When CopyFile is used to copy an encrypted file, it attempts to encrypt the destination file with the keys used in the encryption of the source file. If this cannot be done, this function attempts to encrypt the destination file with default keys. If neither of these methods can be done, CopyFile fails with an ERROR_ENCRYPTION_FAILED error code.
Symbolic link behavior—If the source file is a symbolic link, the actual file copied is the target of the symbolic link.
If the destination file already exists and is a symbolic link, the target of the symbolic link is overwritten by the source file.
In WindowsВ 8 and Windows ServerВ 2012, this function is supported by the following technologies.
| Technology | Supported |
|---|---|
| Server Message Block (SMB) 3.0 protocol | Yes |
| SMB 3.0 Transparent Failover (TFO) | Yes |
| SMB 3.0 with Scale-out File Shares (SO) | Yes |
| Cluster Shared Volume File System (CsvFS) | Yes |
| Resilient File System (ReFS) | Yes |
В
Examples
The winbase.h header defines CopyFile as an alias which automatically selects the ANSI or Unicode version of this function based on the definition of the UNICODE preprocessor constant. Mixing usage of the encoding-neutral alias with code that not encoding-neutral can lead to mismatches that result in compilation or runtime errors. For more information, see Conventions for Function Prototypes.
How to Copy Files Using Command Prompt in Windows 7?
This article tells how to copy files using Command Prompt in Windows 7 with simple steps. Also, another powerful tool to copy files in Windows 7/8/10 will be introduced.
![]()
By Teresa  / Last Updated January 5, 2021
Benefit from Command Prompt Copy Files
Copying files with command line has some advantages comparing to traditional way of files copying. For example, it saves the time of manually copy and paste. Also, it supports unattended task while copying. That is to say, you can leave the computer alone and take a break after inputting some certain commands. The task will run automatically.
Unlike some sorts of data backup with CMD, it is a little bit of fiddly to copy each file manually, especially when these files are stored in different locations. If they are placed in one same partition or volume, it would be more convenient to backup entire partition.
Anyway, you may have other reasons to do files copy in Command Prompt. However, the most important thing is to figure out how to perform.
How to Copy Files Using Command Prompt in Windows 7?
Two methods on how to copy and paste files using CMD for different purposes will be introduced below. Choose the one that suits you most.
Copy Specific File via Command Prompt
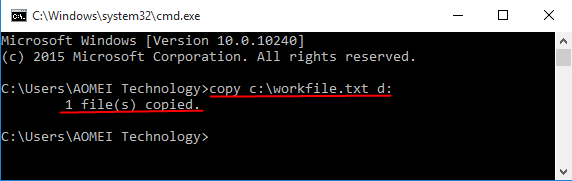
1. Press Windows + R key combination (or click Start) to start Run.
2. Type cmd and hit OK in the box to launch Command Prompt.
3. At the prompt, type copy c:\workfile.txt d: and press Enter to copy the file named “workfile.txt” on the root of C drive to D drive root.
Tips:
To copy some certain file extensions from one drive to another, you can run, for example, copy *.txt d: to copy all texts to D drive at a time.
This method also applies to copying files using Command Prompt in Windows 10.
Copy Directory and Contents Using Command Line
It would be better to copy folders with the help of XCopy command in this method.
1. Open a Command Prompt as instructed.
2. Input xcopy c:\workfile d:\test and press Enter to copy a directory and contents in “workfile” to “test”.
3. To copy a directory with a space in the name, you need to surround it with quotes. For example, type xcopy c:\workfile “d:\test new”.
Tips: By default, the basic XCopy command only copies files in the directory you specify as the source directory. You must use the /E option to copy subdirectories within the source directory as well.
Easier Way to Copy Files in Windows 7/8/10
With covered two methods, it is quite easy to copy files in Windows 7 with command line. Nevertheless, those methods are convenient for some special groups of Windows users who are familiar with command line operations. For the majority of users, that is a little complex. In addition, the XCopy command refuses to work sometimes. That’s why so many people looking for XCopy alternative on the Internet.
Is there simpler way to copy files from one location to another in Windows 7? Apparently, the answer is positive. AOMEI Backupper Professional is reliable backup software that designs for Windows OS only. It allows you to backup files to different places as well as sync files/folders in Daily, Weekly, Monthly, Event-trigger and Real-time mode. Full backup, incremental backup and differential backup are also supported.
For advanced users, the software also provides the way to backup hard disk, system drive, and partition/volume in Command Prompt. You can also do system restore from Command Prompt when the need ever arises in the future. Except for that, command line clone hard drive, partition, or system drive is also available.
How to Copy Files/Folders in Windows 7 Step by Step?
1. Download AOMEI Backupper, install and start it. Connect the external storage to your Windows 7 if necessary.
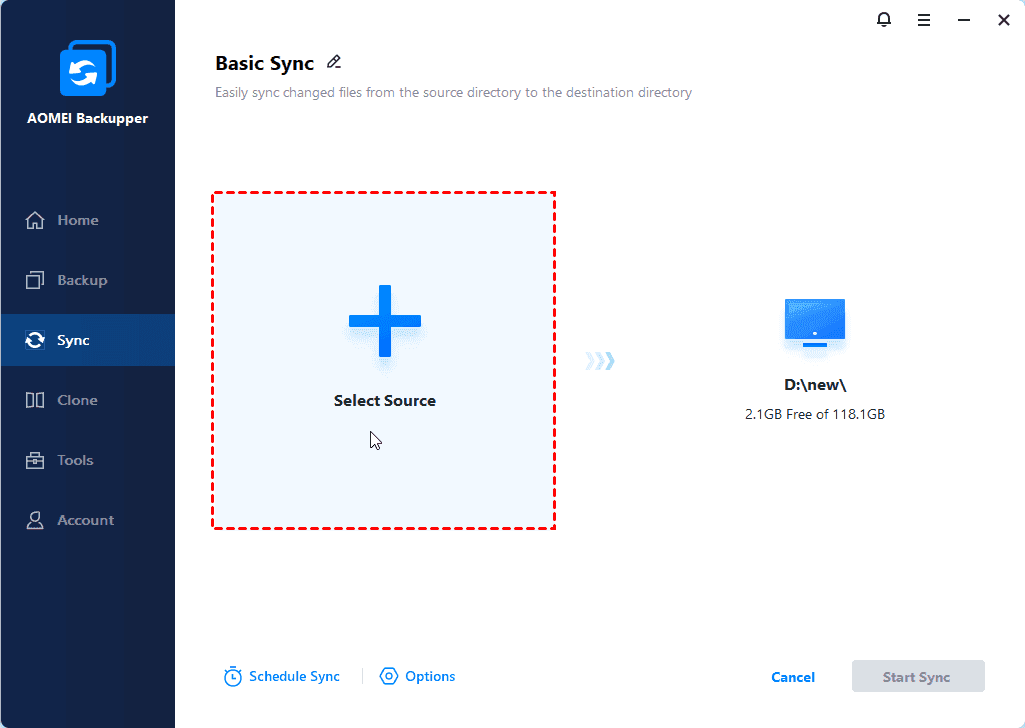
2. Click Sync and select Basic Sync.

3. Choose the files or folders you’d like to copy from by clicking Add Folder.
4. Choose the destination path you’d like to copy to. You are allowed to copy files to OneDrive.
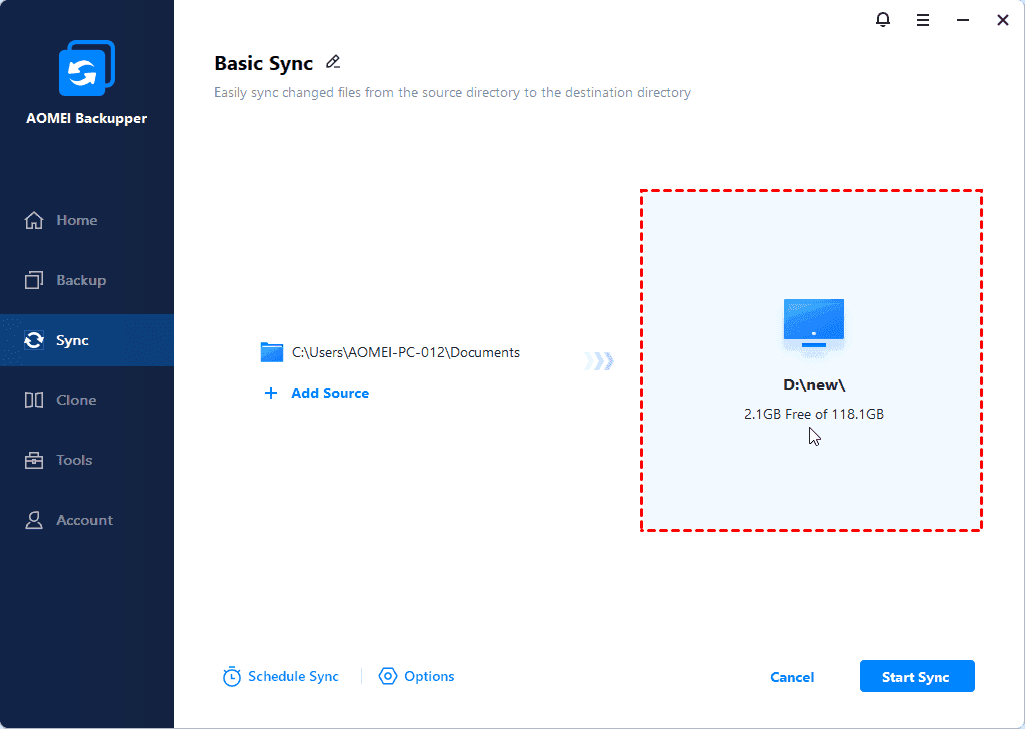
5. Click Start Sync to execute the task.
Tips:
Options: comment the task and set email notification here. You’ll see encrypt backup image, split image and compress image in this option if you run backup task.
Schedule: choose synchronization schedule type from Daily, Weekly, Monthly, Event triggers and USB plug in here.

The program will run missed task at the next system startup by default.
You can add multiple folders and to do synchronize them at a time.
Edit the task name if you want to.
Summary
Two available ways on how to copy files using Command Prompt in Windows 7 are presented in this article. Choose the most helpful one based on your situation. What’s more, another way on how to easily copy files in Windows 7/8/10 is also been discussed. The comprehensive backup software supports move hard drive to new computer in Windows 7 as well.
If you want to protect unlimited computers within your company, you can pick AOMEI Backupper Technician. With the inbuilt AOMEI Image Deploy tool, you are also allowed to deploy/restore system image file on server-side computer to multiple client-side computers over network.
xcopy
Copies files and directories, including subdirectories.
For examples of how to use this command, see Examples.
Syntax
Parameters
| Parameter | Description |
|---|---|
| Required. Specifies the location and names of the files you want to copy. This parameter must include either a drive or a path. | |
| [ ] | Specifies the destination of the files you want to copy. This parameter can include a drive letter and colon, a directory name, a file name, or a combination of these. |
| /w | Displays the following message and waits for your response before starting to copy files: Press any key to begin copying file(s) |
| /p | Prompts you to confirm whether you want to create each destination file. |
| /c | Ignores errors. |
| /v | Verifies each file as it is written to the destination file to make sure that the destination files are identical to the source files. |
| /q | Suppresses the display of xcopy messages. |
| /f | Displays source and destination file names while copying. |
| /l | Displays a list of files that are to be copied. |
| /g | Creates decrypted Destination files when the destination does not support encryption. |
| /d [:MM-DD-YYYY] | Copies source files changed on or after the specified date only. If you do not include a MM-DD-YYYY value, xcopy copies all Source files that are newer than existing Destination files. This command-line option allows you to update files that have changed. |
| /u | Copies files from Source that exist on Destination only. |
| /i | If Source is a directory or contains wildcards and Destination does not exist, xcopy assumes Destination specifies a directory name and creates a new directory. Then, xcopy copies all specified files into the new directory. By default, xcopy prompts you to specify whether Destination is a file or a directory. |
| /s | Copies directories and subdirectories, unless they are empty. If you omit /s, xcopy works within a single directory. |
| /e | Copies all subdirectories, even if they are empty. Use /e with the /s and /t command-line options. |
| /t | Copies the subdirectory structure (that is, the tree) only, not files. To copy empty directories, you must include the /e command-line option. |
| /k | Copies files and retains the read-only attribute on Destination files if present on the Source files. By default, xcopy removes the read-only attribute. |
| /r | Copies read-only files. |
| /h | Copies files with hidden and system file attributes. By default, xcopy does not copy hidden or system files |
| /a | Copies only Source files that have their archive file attributes set. /a does not modify the archive file attribute of the source file. For information about how to set the archive file attribute by using attrib, see Additional References. |
| /m | Copies Source files that have their archive file attributes set. Unlike /a, /m turns off archive file attributes in the files that are specified in the source. For information about how to set the archive file attribute by using attrib, see Additional References. |
| /n | Creates copies by using the NTFS short file or directory names. /n is required when you copy files or directories from an NTFS volume to a FAT volume or when the FAT file system naming convention (that is, 8.3 characters) is required on the Destination file system. The Destination file system can be FAT or NTFS. |
| /o | Copies file ownership and discretionary access control list (DACL) information. |
| /x | Copies file audit settings and system access control list (SACL) information (implies /o). |
| /exclude:FileName1[+[FileName2][+[FileName3]( )] | Specifies a list of files. At least one file must be specified. Each file will contain search strings with each string on a separate line in the file. When any of the strings match any part of the absolute path of the file to be copied, that file will be excluded from being copied. For example, specifying the string obj will exclude all files underneath the directory obj or all files with the .obj extension. |
| /y | Suppresses prompting to confirm that you want to overwrite an existing destination file. |
| /-y | Prompts to confirm that you want to overwrite an existing destination file. |
| /z | Copies over a network in restartable mode. |
| /b | Copies the symbolic link instead of the files. This parameter was introduced in Windows VistaВ®. |
| /j | Copies files without buffering. Recommended for very large files. This parameter was added in Windows Server 2008 R2. |
| /? | Displays help at the command prompt. |
Remarks
Using /z
If you lose your connection during the copy phase (for example, if the server going offline severs the connection), it resumes after you reestablish the connection. /z also displays the percentage of the copy operation completed for each file.
Using /y in the COPYCMD environment variable.
You can use /y in the COPYCMD environment variable. You can override this command by using /-y on the command line. By default, you are prompted to overwrite.
Copying encrypted files
Copying encrypted files to a volume that does not support EFS results in an error. Decrypt the files first or copy the files to a volume that does support EFS.
To append files, specify a single file for destination, but multiple files for source (that is, by using wildcards or file1+file2+file3 format).
Default value for Destination
If you omit Destination, the xcopy command copies the files to the current directory.
Specifying whether Destination is a file or directory
If Destination does not contain an existing directory and does not end with a backslash (), the following message appears:
Press F if you want the file or files to be copied to a file. Press D if you want the file or files to be copied to a directory.
You can suppress this message by using the /i command-line option, which causes xcopy to assume that the destination is a directory if the source is more than one file or a directory.
Using the xcopy command to set archive attribute for Destination files
The xcopy command creates files with the archive attribute set, whether or not this attribute was set in the source file. For more information about file attributes and attrib, see Additional References.
Comparing xcopy and diskcopy
If you have a disk that contains files in subdirectories and you want to copy it to a disk that has a different format, use the xcopy command instead of diskcopy. Because the diskcopy command copies disks track by track, your source and destination disks must have the same format. The xcopy command does not have this requirement. Use xcopy unless you need a complete disk image copy.
Exit codes for xcopy
To process exit codes returned by xcopy, use the ErrorLevel parameter on the if command line in a batch program. For an example of a batch program that processes exit codes using if, see Additional References. The following table lists each exit code and a description.
| Exit code | Description |
|---|---|
| 0 | Files were copied without error. |
| 1 | No files were found to copy. |
| 2 | The user pressed CTRL+C to terminate xcopy. |
| 4 | Initialization error occurred. There is not enough memory or disk space, or you entered an invalid drive name or invalid syntax on the command line. |
| 5 | Disk write error occurred. |
Examples
1. To copy all the files and subdirectories (including any empty subdirectories) from drive A to drive B, type:
2. To include any system or hidden files in the previous example, add the/h command-line option as follows:
3. To update files in the \Reports directory with the files in the \Rawdata directory that have changed since December 29, 1993, type:
4. To update all the files that exist in \Reports in the previous example, regardless of date, type:
5. To obtain a list of the files to be copied by the previous command (that is, without actually copying the files), type:
The file xcopy.out lists every file that is to be copied.
6. To copy the \Customer directory and all subdirectories to the directory \\Public\Address on network drive H:, retain the read-only attribute, and be prompted when a new file is created on H:, type:
7. To issue the previous command, ensure that xcopy creates the \Address directory if it does not exist, and suppress the message that appears when you create a new directory, add the /i command-line option as follows:
8. You can create a batch program to perform xcopy operations and use the batch if command to process the exit code if an error occurs. For example, the following batch program uses replaceable parameters for the xcopy source and destination parameters:
To use the preceding batch program to copy all files in the C:\Prgmcode directory and its subdirectories to drive B, type:
The command interpreter substitutes C:\Prgmcode for %1 and B: for %2, then uses xcopy with the /e and /s command-line options. If xcopy encounters an error, the batch program reads the exit code and goes to the label indicated in the appropriate IF ERRORLEVEL statement, then displays the appropriate message and exits from the batch program.
9. This example copies all the non-empty directories, plus files whose name match the pattern given with the asterisk symbol.


