- Manage a Server Core server
- Managing Server Core with Windows Admin Center
- Managing Server Core remotely with Server Manager
- Managing with Microsoft Management Console
- To configure Windows Firewall to allow MMC snap-in(s) to connect
- Managing with Remote Desktop Services
- Add hardware and manage drivers locally
- Windows core управление компьютером
- Как сменить имя компьютера в Windows Server 2012 R2 core
- Как включить удаленный рабочий стол в Windows Server 2012 R2 core
- Как настроить обновления в Windows Server 2012 R2 core.
- Как задать время в Windows Server 2012 R2 core.
- Как настроить статический ip адрес в Windows Server 2012 R2 core русской версии
- Как присоединить к домену Windows Server 2012 R2 core русской версии
Manage a Server Core server
Applies to: Windows Server 2019, Windows Server 2016, and Windows Server (Semi-Annual Channel)
You can manage a Server Core server in the following ways:
You can also add hardware and manage drivers locally, as long as you do that from the command line.
There are some important limitations and tips to keep in mind when you work with Server Core:
- If you close all command prompt windows and want to open a new Command Prompt window, you can do that from the Task Manager. Press CTRL+ALT+DELETE, click Start Task Manager, click More Details > File > Run, and then type cmd.exe. (Type Powershell.exe to open a PowerShell command windows.) Alternatively, you can sign out and then sign back in.
- Any command or tool that attempts to start Windows Explorer will not work. For example, running start . from a command prompt won’t work.
- There is no support for HTML rendering or HTML help in Server Core.
- Server Core supports Windows Installer in quiet mode so that you can install tools and utilities from Windows Installer files. When installing Windows Installer packages on Server Core, use the /qb option to display the basic user interface.
- To change the time zone, run Set-Date.
- To change international settings, run control intl.cpl.
- Control.exe won’t run on its own. You must run it with either Timedate.cpl or Intl.cpl.
- Winver.exe isn’t available in Server Core. To obtain version information use Systeminfo.exe.
Managing Server Core with Windows Admin Center
Windows Admin Center is a browser-based management app that enables on-premises administration of Windows Servers with no Azure or cloud dependency. Windows Admin Center gives you full control over all aspects of your server infrastructure and is particularly useful for management on private networks that are not connected to the Internet. You can install Windows Admin Center on Windows 10, on a gateway server, or on an installation of Windows Server with Desktop Experience, and then connect to the Server Core system that you want to manage.
Managing Server Core remotely with Server Manager
Server Manager is a management console in Windows Server that helps you provision and manage both local and remote Windows-based servers from your desktops, without requiring either physical access to servers, or the need to enable Remote Desktop protocol (RDP) connections to each server. Server Manager supports remote, multi-server management.
To enable your local server to be managed by Server Manager running on a remote server, run the Windows PowerShell cmdlet Configure-SMRemoting.exe –Enable.
Managing with Microsoft Management Console
You can use many snap-ins for Microsoft Management Console (MMC) remotely to manage your Server Core server.
To use an MMC snap-in to manage a Server Core server that is a domain member:
- Start an MMC snap-in, such as Computer Management.
- Right-click the snap-in, and then click Connect to another computer.
- Type the computer name of the Server Core server, and then click OK. You can now use the MMC snap-in to manage the Server Core server as you would any other PC or server.
To use an MMC snap-in to manage a Server Core server that is not a domain member:
Establish alternate credentials to use to connect to the Server Core computer by typing the following command at a command prompt on the remote computer:
If you want to be prompted for a password, omit the /pass option.
When prompted, type the password for the user name you specified. If the firewall on the Server Core server is not already configured to allow MMC snap-ins to connect, follow the steps below to configure Windows Firewall to allow MMC snap-in. Then continue with step 3.
On a different computer, start an MMC snap-in, such as Computer Management.
In the left pane, right-click the snap-in, and then click Connect to another computer. (For example, in the Computer Management example, you would right-click Computer Management (Local).)
In Another computer, type the computer name of the Server Core server, and then click OK. You can now use the MMC snap-in to manage the Server Core server as you would any other computer running a Windows Server operating system.
To configure Windows Firewall to allow MMC snap-in(s) to connect
To allow all MMC snap-ins to connect, run the following command:
To allow only specific MMC snap-ins to connect, run the following:
Where rulegroup is one of the following, depending on which snap-in you want to connect:
| MMC snap-in | Rule group |
|---|---|
| Event Viewer | Remote Event Log Management |
| Services | Remote Service Management |
| Shared Folders | File and Printer Sharing |
| Task Scheduler | Performance Logs and Alerts, File and Printer Sharing |
| Disk Management | Remote Volume Management |
| Windows Firewall and Advanced Security | Windows Firewall Remote Management |
Some MMC snap-ins don’t have a corresponding rule group that allows them to connect through the firewall. However, enabling the rule groups for Event Viewer, Services, or Shared Folders will allow most other snap-ins to connect.
Additionally, certain snap-ins require further configuration before they can connect through Windows Firewall:
- Disk Management. You must first start the Virtual Disk Service (VDS) on the Server Core computer. You must also configure the Disk Management rules appropriately on the computer that is running the MMC snap-in.
- IP Security Monitor. You must first enable remote management of this snap-in. To do this, at a command prompt, type cscript c:\windows\system32\scregedit.wsf /im 1
- Reliability and Performance. The snap-in does not require any further configuration, but when you use it to monitor a Server Core computer, you can only monitor performance data. Reliability data is not available.
Managing with Remote Desktop Services
You can use Remote Desktop to manage a Server Core server from remote computers.
Before you can access Server Core, you’ll need to run the following command:
This enables the Remote Desktop for Administration mode to accept connections.
Add hardware and manage drivers locally
To add hardware to a Server Core server, follow the instructions provided by the hardware vendor for installing new hardware.
If the hardware is not plug and play, you’ll need to manually install the driver. To do that, copy the driver files to a temporary location on the server, and then run the following command:
Where driverinf is the file name of the .inf file for the driver.
If prompted, restart the computer.
To see what drivers are installed, run the following command:
You must include the space after the equal sign for the command to complete successfully.
To disable a device driver, run the following:
Where service_name is the name of the service that you got when you ran sc query type= driver.
Windows core управление компьютером
Всем привет! Ранее я рассказывал, Как установить Windows Server 2012 R2 core русскую версию, и говорил в ней, что лучше ставить английскую версию, сегодня я расскажу почему, а так же мы рассмотрим базовую настройку Windows Server 2012 R2 core русской версии с помощью sconfig. Этот метод разработчики вшили в свой дистрибутив, дабы он стал более дружелюбным в плане настройки, на мой взгляд, это очень правильное решение.
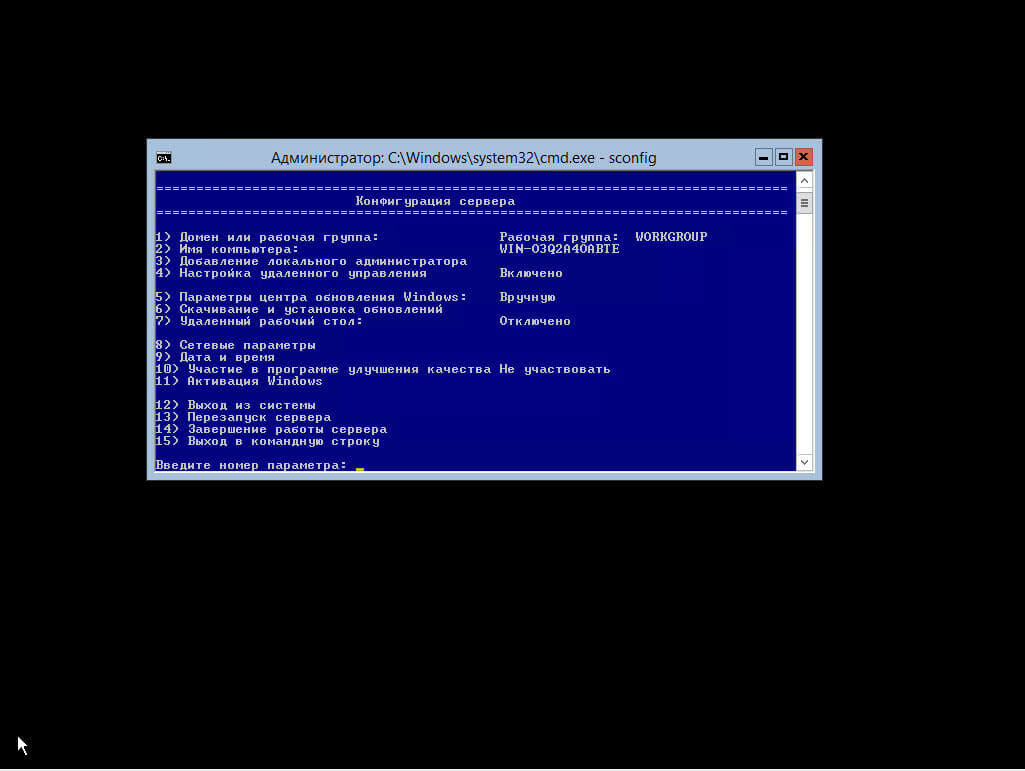
Как я и говорил сегодня мы будем использовать самый быстрый способ настройки с помощью утилиты sconfig. Пишем в командной строке sconfig.

Базовая настройка Windows Server 2012 R2 core русской версии с помощью sconfig-01
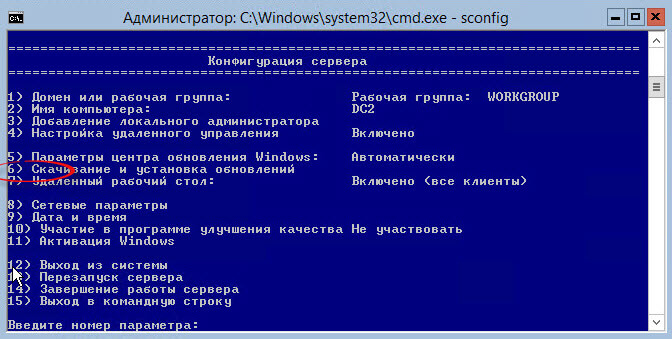
У нас открывается синее окно с Конфигурацией сервера. Видим, что каждый пункт выполняется вводим определенной цифры меню.
Базовая настройка Windows Server 2012 R2 core русской версии с помощью sconfig-02
Как сменить имя компьютера в Windows Server 2012 R2 core
Текущее имя компьютера отображается на экране по умолчанию средства настройки сервера. Чтобы изменить имя компьютера, перейдите на страницу «Computer Name» (Имя компьютера) из главного меню и следуйте инструкциям. Для этого вводим 2 и жмем Enter. Вводим нужное вам имя и снова жмем Enter.
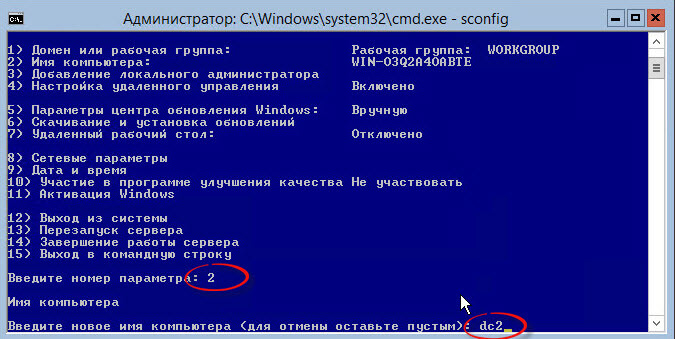
Базовая настройка Windows Server 2012 R2 core русской версии с помощью sconfig-03
Для того чтобы имя приминилось вас попросят перезагрузиться

Базовая настройка Windows Server 2012 R2 core русской версии с помощью sconfig-04
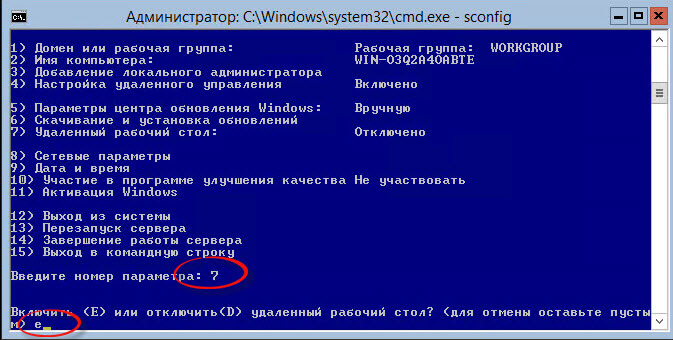
Как включить удаленный рабочий стол в Windows Server 2012 R2 core
Текущее состояние удаленного рабочего стола отображается на экране по умолчанию средства настройки сервера. Чтобы настроить следующие параметры удаленного рабочего стола, используйте параметр главного меню Remote Desktop (Удаленный рабочий стол) и следуйте инструкциям на экране.
- разрешить использование удаленного рабочего стола для клиентов с удаленным рабочим столом с сетевой проверкой подлинности
- разрешить использование удаленного рабочего стола для клиентов с любой версией удаленного рабочего стола
- запретить использование удаленного рабочего стола
Нажимаем 7 и выбираем нужный вам вариант работы удаленного рабочего стола.
Базовая настройка Windows Server 2012 R2 core русской версии с помощью sconfig-05
Видим, что все включилось

Базовая настройка Windows Server 2012 R2 core русской версии с помощью sconfig-06
Как настроить обновления в Windows Server 2012 R2 core.
Текущие параметры Центра обновления Windows отображаются на экране по умолчанию средства настройки сервера. Можно настроить сервер для выполнения обновления в автоматическом или ручном режиме с помощью параметра главного меню Windows Update Settings (Параметры Центра обновления Windows).
Если выбрано значение Automatic Updates (Автоматическое обновление), система автоматически выполняет проверку наличия обновлений и установку обновлений ежедневно в 3:00. Параметры применяются немедленно. Если выбрано значение Manual (Обновление вручную), система не выполняет автоматических проверок наличия обновлений.
Вы можете загрузить и установить обновления с помощью параметра Download and Install Updates (Загрузить и установить обновления) в главном меню в любое время.
Нажимаем 5 и выбираем с помощью A автоматическое получение

Базовая настройка Windows Server 2012 R2 core русской версии с помощью sconfig-07
Вам высветится окно о том что в 3 ночи будут проверяться обновления
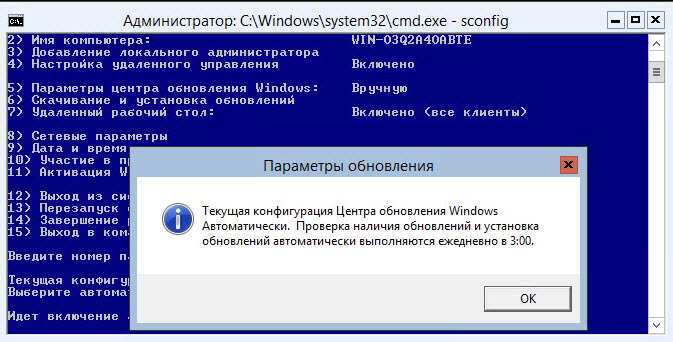
Базовая настройка Windows Server 2012 R2 core русской версии с помощью sconfig-08
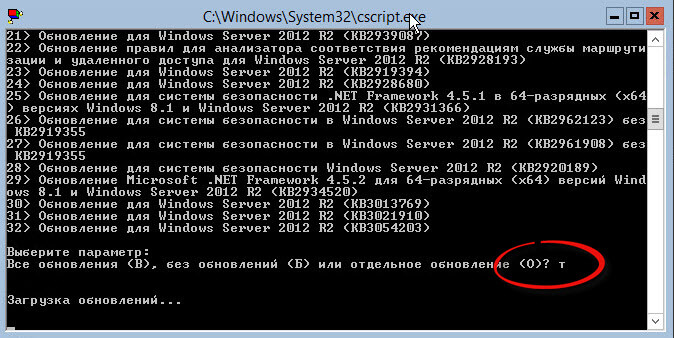
Мы с вами люди которые ждать не особо хотят до 3 ночи, хотим накатить обновления прямо сейчас и вот тут начинаются глюки которые тянутся аж с 2008 года. Выбираем 6 для установки обновлений.
Базовая настройка Windows Server 2012 R2 core русской версии с помощью sconfig-09
У вас откроется новое черное окно в котором будет написано «Найти все обновления (В) или только рекомендуемые обновления (Р)?». Вроде все хорошо жмем B, и должны начаться скачиваться обновления, но херас два и два в уме. Сколько бы рас не нажимали что либо на латинице у вас ничего не выйдет (Прочитать из за чего это происходит можно тут),
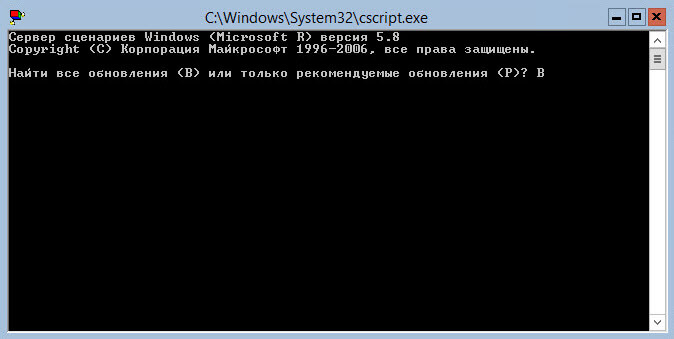
Базовая настройка Windows Server 2012 R2 core русской версии с помощью sconfig-10
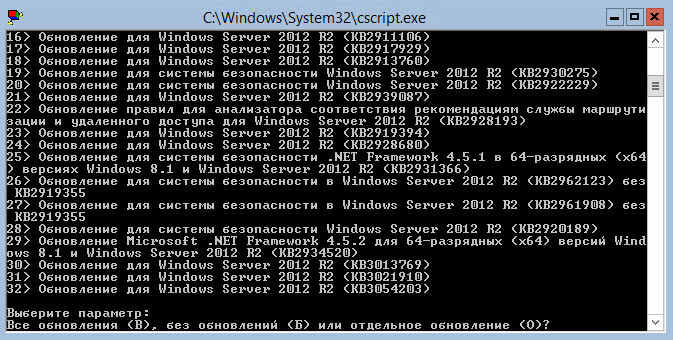
в данном случае можно нажать на кириллице клавишу т и о чудо началось скачивание

Базовая настройка Windows Server 2012 R2 core русской версии с помощью sconfig-11
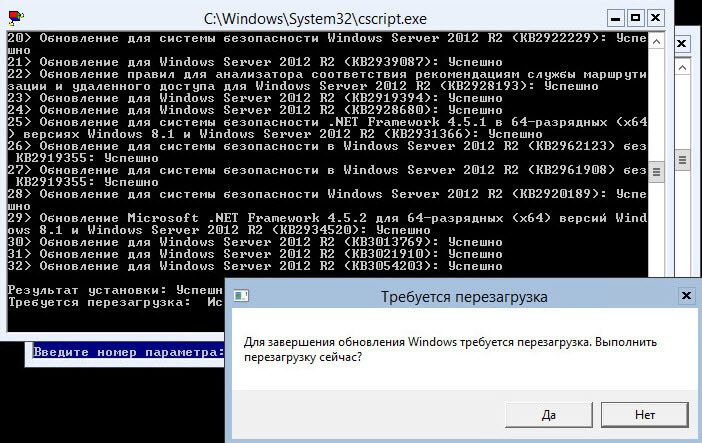
После поиска обновлений, чтобы их установить снова жмем т а не то что просят на экране.
Базовая настройка Windows Server 2012 R2 core русской версии с помощью sconfig-12
Базовая настройка Windows Server 2012 R2 core русской версии с помощью sconfig-13
После установки вас попросят перезагрузиться
Базовая настройка Windows Server 2012 R2 core русской версии с помощью sconfig-14
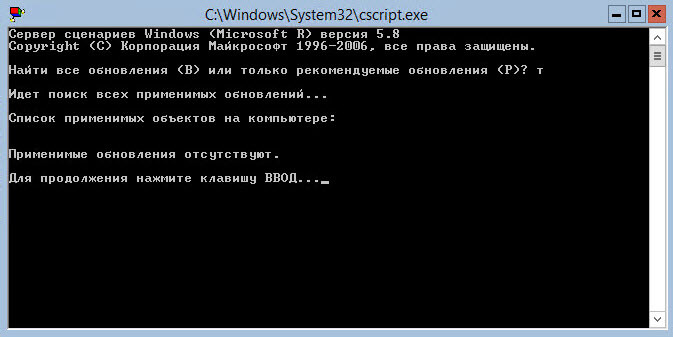
Повторять поиск обновлений придется до тех пор пока больше ничего находится не будет, и число перезагрузок у всех будет индивидуально.
Базовая настройка Windows Server 2012 R2 core русской версии с помощью sconfig-15
Как задать время в Windows Server 2012 R2 core.
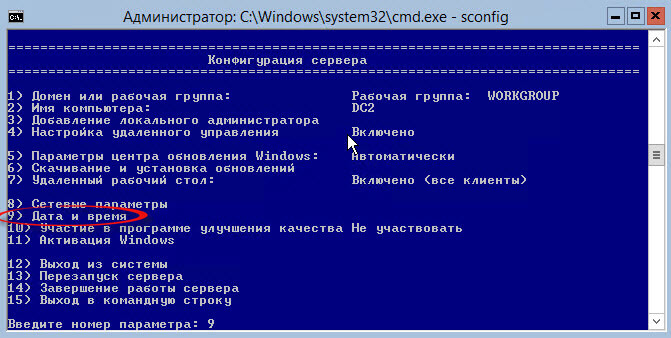
Чтобы изменить параметры даты и времени, используйте параметр главного меню Date and Time (Дата и время) и нажимайте 9
Базовая настройка Windows Server 2012 R2 core русской версии с помощью sconfig-16
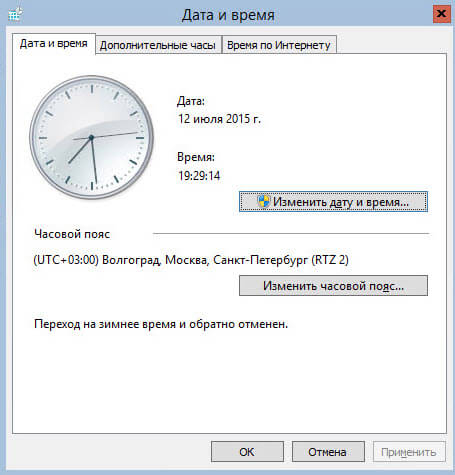
Базовая настройка Windows Server 2012 R2 core русской версии с помощью sconfig-17
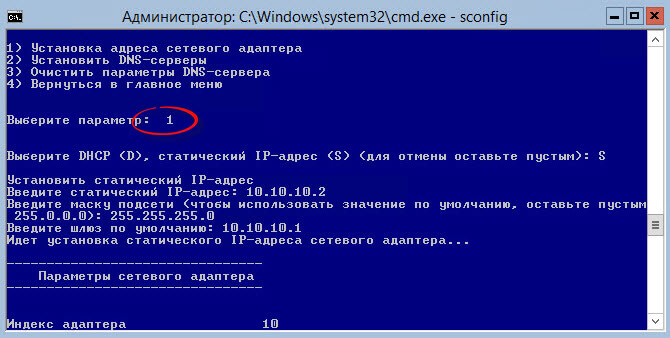
Как настроить статический ip адрес в Windows Server 2012 R2 core русской версии
Далее серверу нужно назначить статический ip адрес. Выбираем 8. У вас появится список сетевых интерфейсов. Слева у каждого интерфейса есть номер в моем случае это 10. Его и нужно вводить для редактирования.

Базовая настройка Windows Server 2012 R2 core русской версии с помощью sconfig-18
В новом меню выбираем Установка адреса сетевого адаптера. Указываем что будет статический ip с помощью буквы D. Устанавливаем нужный IP, маску и основной шлюз.
Базовая настройка Windows Server 2012 R2 core русской версии с помощью sconfig-19
Устанавливаем DNS, нажимаем 2.

Базовая настройка Windows Server 2012 R2 core русской версии с помощью sconfig-20
Задаем основной и дополнительные DNS

Базовая настройка Windows Server 2012 R2 core русской версии с помощью sconfig-21
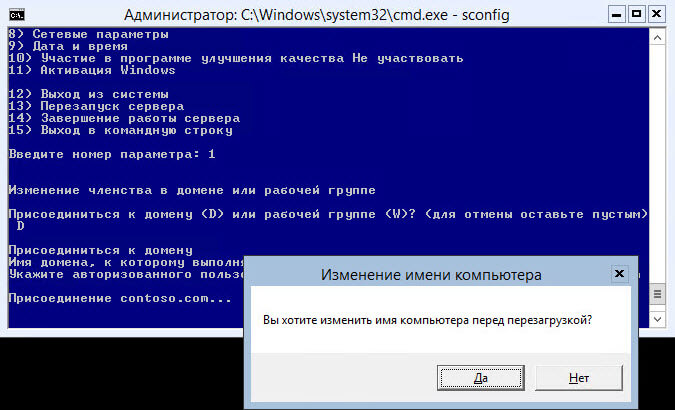
Как присоединить к домену Windows Server 2012 R2 core русской версии
Следующим шагом нужно присоединить к домену. Для этого выбираем 1, и нажимаем D.

Базовая настройка Windows Server 2012 R2 core русской версии с помощью sconfig-22
Задаем имя домена и учетную запись от имени которой будет ввод в домен.
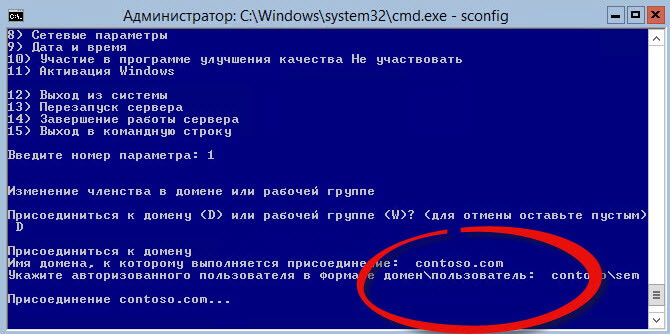
Базовая настройка Windows Server 2012 R2 core русской версии с помощью sconfig-23
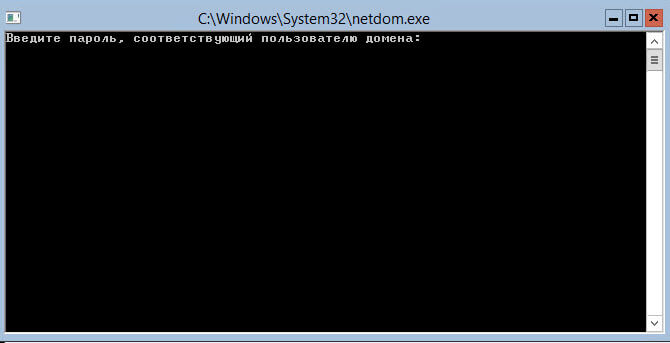
Откроется окно для ввода пароля
Базовая настройка Windows Server 2012 R2 core русской версии с помощью sconfig-24
Базовая настройка Windows Server 2012 R2 core русской версии с помощью sconfig-25
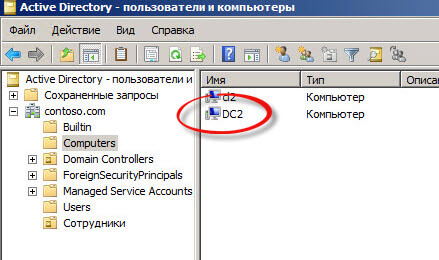
Смотрим в Active Directory Пользователи и компьютеры и видим наш компьютер.
Базовая настройка Windows Server 2012 R2 core русской версии с помощью sconfig-26


