- Mount a drive in a folder
- Mounting a drive in an empty folder
- To mount a drive in an empty folder by using the Windows interface
- To mount a drive in an empty folder using a command line
- To remove a mount point
- Подключение диска в папке Mount a drive in a folder
- Подключение диска в пустой папке Mounting a drive in an empty folder
- Подключение диска в пустой папке с помощью интерфейса Windows To mount a drive in an empty folder by using the Windows interface
- Подключение диска в пустой папке с помощью командной строки To mount a drive in an empty folder using a command line
- Удаление точки подключения To remove a mount point
- Create an ISO File from a Folder in Windows
- Use AnyBurn To Create ISO From The Folders On Your PC
- Create An ISO In Windows 10 Using WinCDEmu
- Use ImgBurn To Create ISO Files From Folders On Windows
- Use a Portable Tool To Create An ISO From Folders
- How can I move my WHOLE User folder to another drive on Windows 10?
- Replies (1)
Mount a drive in a folder
Applies To: Windows 10, Windows 8.1, Windows Server 2019, Windows Server 2016, Windows Server 2012 R2, Windows Server 2012
You can use Disk Management to mount (make a drive accessible) in a folder rather than a drive letter if you want. This makes the drive appear as just another folder. You can mount drives only in empty folders on basic or dynamic NTFS volumes.
Mounting a drive in an empty folder
You must be a member of the Backup Operators or Administrators group, at minimum, to complete these steps.
To mount a drive in an empty folder by using the Windows interface
- In Disk Manager, right-click the partition or volume that has the folder in which you want to mount the drive.
- Click Change Drive Letter and Paths and then click Add.
- Click Mount in the following empty NTFS folder.
- Type the path to an empty folder on an NTFS volume, or click Browse to locate it.
To mount a drive in an empty folder using a command line
Open a command prompt and type diskpart .
At the DISKPART prompt, type list volume , making note of the volume number you want to assign the path to.
At the DISKPART prompt, type select volume , specifying the volume number that you want to assign the path to.
At the DISKPART prompt, type assign [mount=
To remove a mount point
To remove the mount point so that the drive is no longer accessible via a folder:
Подключение диска в папке Mount a drive in a folder
Относится к: Windows 10, Windows 8.1, Windows Server 2019, Windows Server 2016, Windows Server 2012 R2, Windows Server 2012. Applies To: Windows 10, Windows 8.1, Windows Server 2019, Windows Server 2016, Windows Server 2012 R2, Windows Server 2012
Вы можете использовать оснастку «Управление дисками» для подключения диска (предоставления доступа к нему) в папке, а не путем назначения ему буквы диска. You can use Disk Management to mount (make a drive accessible) in a folder rather than a drive letter if you want. В таком случае диск будет отображаться как обычная папка. This makes the drive appear as just another folder. Диски можно подключать только в пустых папках в базовых или динамических томах NTFS. You can mount drives only in empty folders on basic or dynamic NTFS volumes.
Подключение диска в пустой папке Mounting a drive in an empty folder
Для выполнения следующих шагов необходимо как минимум состоять в группе Операторы архива или Администраторы. You must be a member of the Backup Operators or Administrators group, at minimum, to complete these steps.
Подключение диска в пустой папке с помощью интерфейса Windows To mount a drive in an empty folder by using the Windows interface
- В диспетчере дисков щелкните правой кнопкой мыши раздел или том, который содержит папку для подключения диска. In Disk Manager, right-click the partition or volume that has the folder in which you want to mount the drive.
- Щелкните Изменить букву диска или путь к диску, а затем нажмите Добавить. Click Change Drive Letter and Paths and then click Add.
- Щелкните Подключить к следующей пустой папке NTFS. Click Mount in the following empty NTFS folder.
- Введите путь к пустой папке в томе NTFS или нажмите кнопку Обзор, чтобы найти ее. Type the path to an empty folder on an NTFS volume, or click Browse to locate it.
Подключение диска в пустой папке с помощью командной строки To mount a drive in an empty folder using a command line
Откройте командную строку и введите: diskpart . Open a command prompt and type diskpart .
В командной строке DISKPART введите list volume и запомните номер тома, которому требуется назначить путь. At the DISKPART prompt, type list volume , making note of the volume number you want to assign the path to.
В командной строке DISKPART введите select volume и укажите номер тома, которому требуется назначить путь. At the DISKPART prompt, type select volume , specifying the volume number that you want to assign the path to.
В командной строке DISKPART введите assign [mount=
] . At the DISKPART prompt, type assign [mount=
Удаление точки подключения To remove a mount point
Если вы хотите удалить точку подключения, чтобы доступ к диску нельзя было получить через папку, сделайте следующее: To remove the mount point so that the drive is no longer accessible via a folder:
Create an ISO File from a Folder in Windows
A great tool for distribution or backups
If you don’t already know, an ISO file is a container that can hold a number of files in it. It’s usually used to create backups of your CD and DVD discs. However, you can create an ISO from the folders on your Windows PC as well. There are actually multiple apps that help you do it on your machine.
There are many reasons why you may want to create an ISO on your Windows 10 PC. Maybe you want to keep all of your folders in a single place. Or maybe you want to keep some of your folders handy ready to burn to your discs.
Regardless of the reasoning, it’s pretty easy to create an ISO from folders on a Windows computer. Also, check out the video from our sister site where we walk you through the steps in a short video.
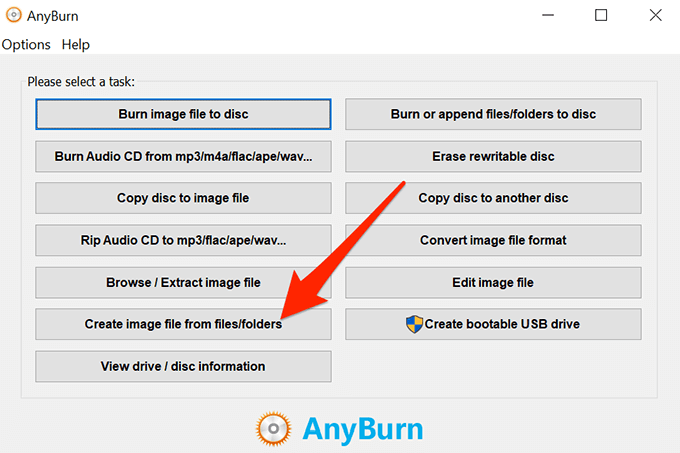
Use AnyBurn To Create ISO From The Folders On Your PC
One of the free apps you can use to create an ISO from your folders is AnyBurn. It’s actually an app that helps you burn your data to your discs but you can use it to create ISO files as well. It has an option on the main interface that helps add your chosen folders to an ISO which you can then save anywhere on your computer.
- Download, install, and launch AnyBurn on your computer.
- You’ll find several options regarding creating ISOs on the main interface. Find the one that says Create image file from files/folders and click on it.
- The following screen will let you choose the folders that you want to add to your ISO. Click on the Add button at the top to add your folders.

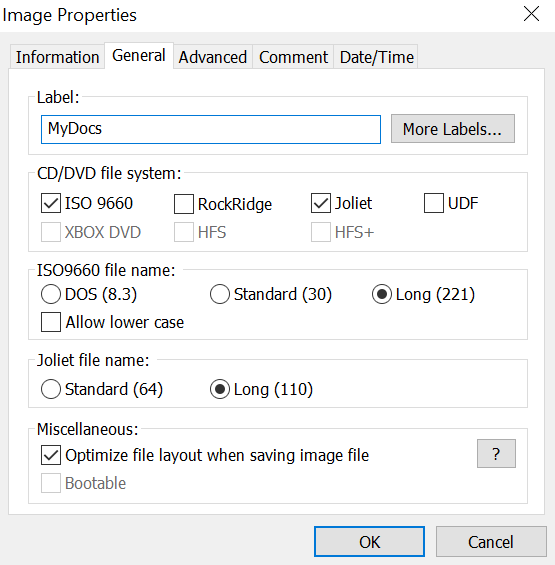
- If you want to specify any custom settings for your file, click on the Properties button at the top. It’ll then let you modify options like the file system for your ISO, file naming standard, compression level, and so on. Click on OK when you’ve configured them.
- Click on the Next button to go to the next screen of the ISO creation process.
- On the following screen, click on the folder icon to choose the folder where you want to save your ISO. You can also enter a name for your file on the same screen.
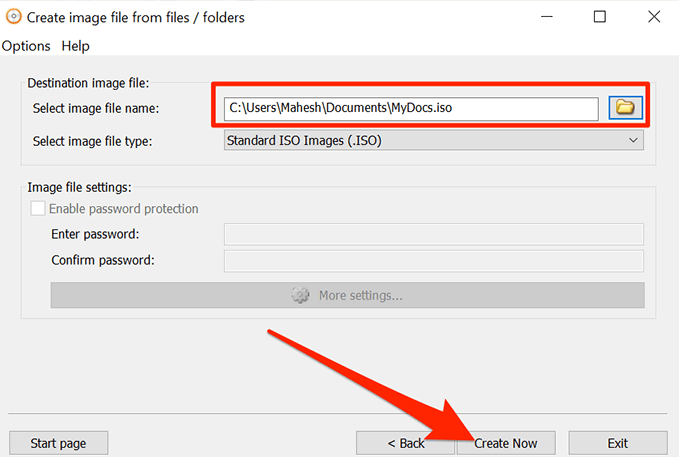
- Finally, click on Create Now to start creating an ISO out of your chosen folders.
Create An ISO In Windows 10 Using WinCDEmu
WinCDEmu is an open-source tool that lets you create virtual drives out of various image file formats on your computer. If you have downloaded an ISO file and you want to view its contents, this app can help you mount that as a drive on your machine.
You can use the app to create ISO files from folders in Windows as well, and it actually provides you with the easiest way to make an ISO from your folders. All you basically need to do is install the app and it’ll add an option to your context menu. You can then use that option to generate an ISO from your folders.
- Download and install the WinCDEmu app on your PC.
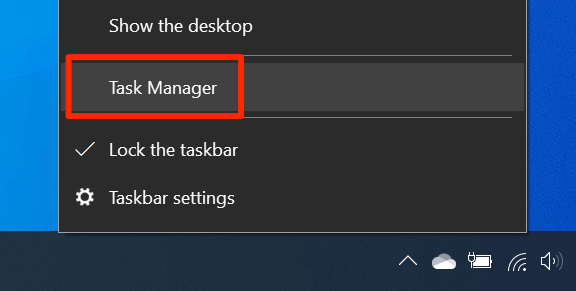
- Right-click on your taskbar and select Task Manager.
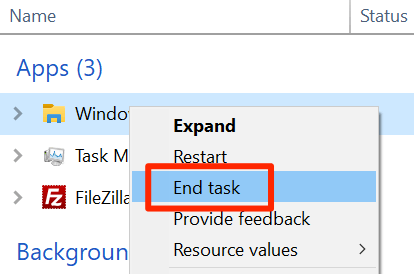
- Right-click on the process that says Windows Explorer and select End task. You need to close the Explorer before you can see the newly added item in the context menu.
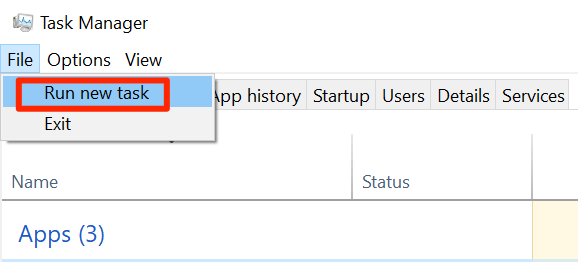
- Click on the File menu in Task Manager and select Run new task.
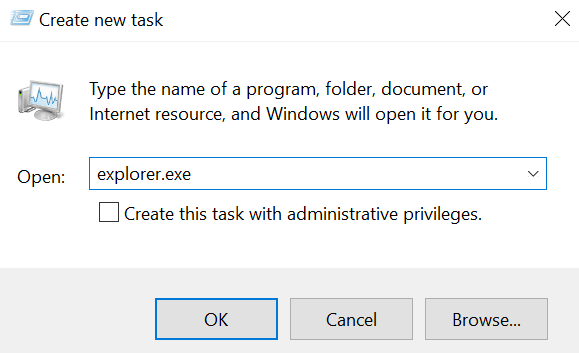
- Type in explorer.exe and hit Enter. It’ll relaunch the Windows File Explorer.
- Find the folder that you want to create an ISO for, right-click on it, and select Build an ISO image.
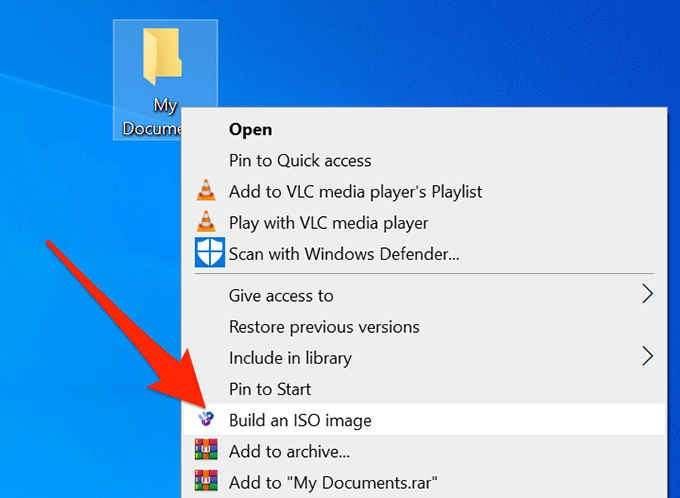
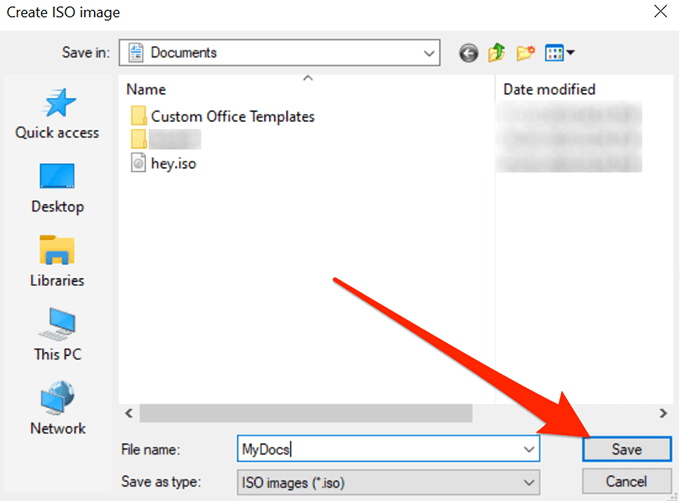
- It’ll ask you to enter a name for your ISO and the location where you want to save it. Enter these details and click on Save.
- It’ll quickly create the ISO for you and let you know when it’s fully built.
Use ImgBurn To Create ISO Files From Folders On Windows
ImgBurn has been a popular app to create and burn image files for a long time. If you’ve ever created a backup of your discs or you’ve burned a disc, you’ll likely recognize the app.
The app can be used to create ISO files from your folders as well.
- Download, install, and open the ImgBurn app on your computer.
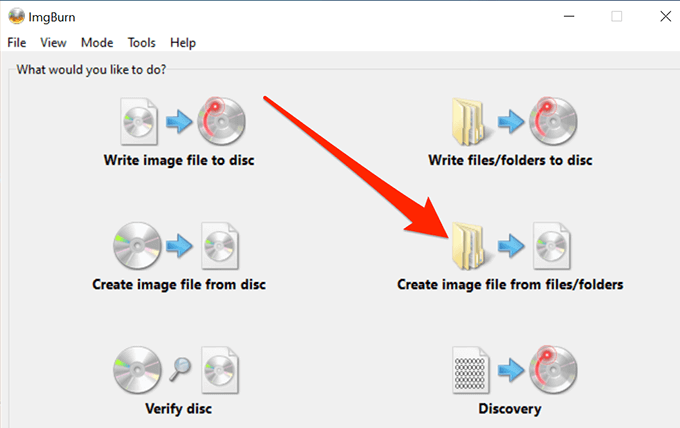
- On the main interface, find and click on the option that says Create image file from files/folders.
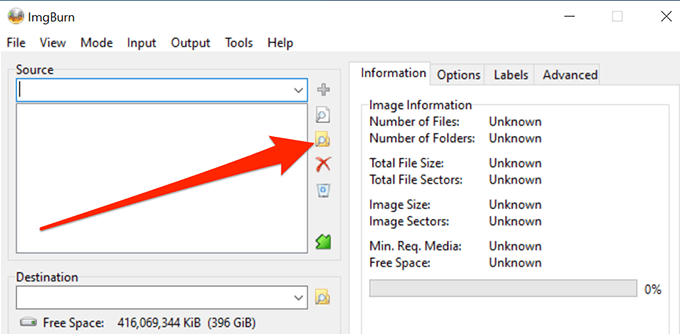
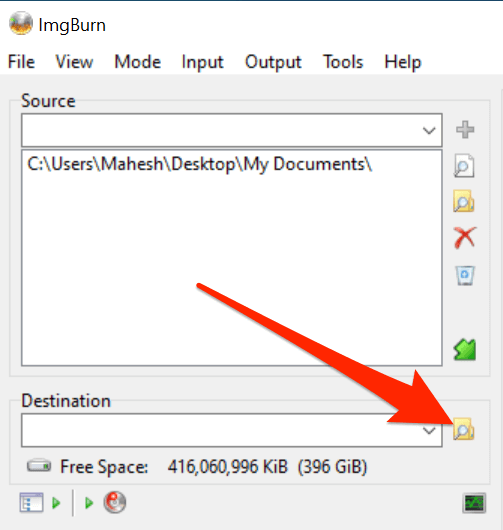
- You’ll see a screen that lets you add the folders you want to include in your ISO. Click on the little folder icon and add the folders for your ISO file.
- Click on the tiny folder icon next to where it says Destination and select a name and target folder for your ISO file.
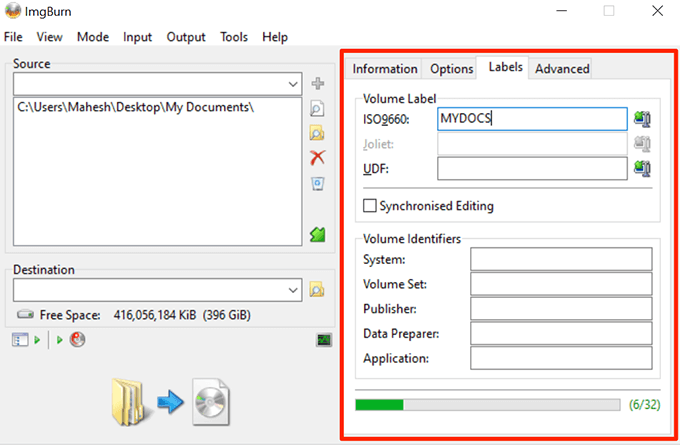
- On the right-hand side pane, you’ll find various options to configure for your ISO. With these options, you can change your image type, enter a label for your image, specify restrictions, and do a few other things.
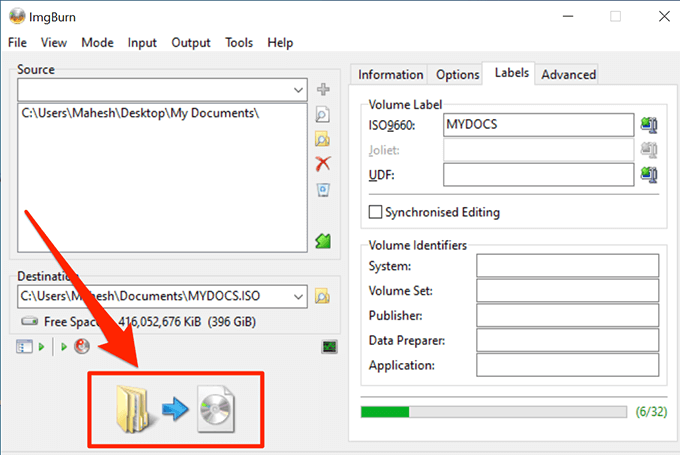
- Finally, click on the large Build button on your screen to start building an ISO file out of your selected folders.
Use a Portable Tool To Create An ISO From Folders
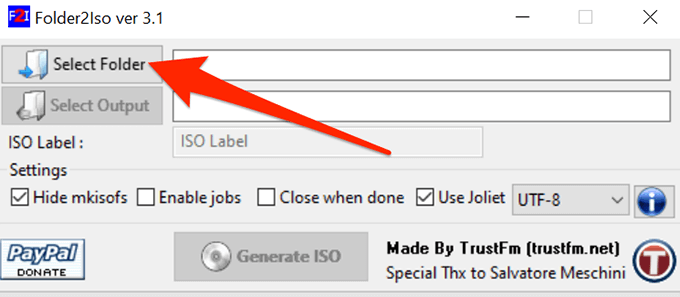
If it’s just a single ISO that you’ll be making and you don’t think you’ll be doing it again anytime soon, you might prefer something that doesn’t require an installation. Folder2Iso can actually help you out as it’s a free and portable tool that helps quickly create ISOs without any hassle.
It works on many versions of Windows including Windows 7, 8, 10, and Linux.
- Download the Folder2Iso app and double-click on it to extract the actual app contents.
- Run the executable file that you extracted from the archive.
- You’ll see a simple interface with only a few options on it. Click on the Select Folder option and select the folder you want to add to your ISO.
- Click on the Select Output button and choose the folder where you’d like to save your ISO file. Remember you can’t choose the folder that you’ve chosen to include in your ISO.
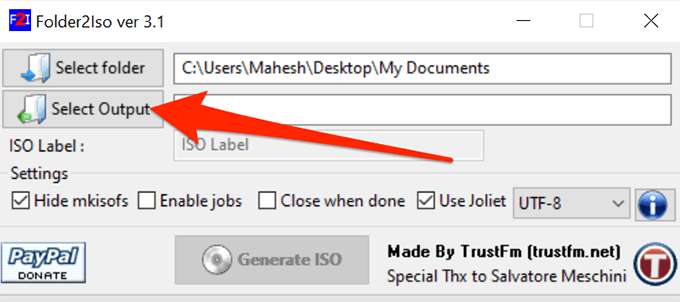
- You can then specify the extra options available on your screen, if you want.
- Click on the Generate ISO button to make an ISO out of your chosen folders.

- The progress bar will go all green when the ISO has been generated.
It’s a good idea to create an ISO from your folders in Windows so you can mount them all as a single drive on your PC. If you have done it on your computer already, let us know what app you chose to do it and why. We await your response in the comments below!
Mahesh has been obsessed with technology since he got his first gadget a decade or so ago. Over the last few years, he’s written a number of tech articles on various online publications including but not limited to MakeTechEasier and Android AppStorm. Read Mahesh’s Full Bio
How can I move my WHOLE User folder to another drive on Windows 10?
I have a bunch of game on my computer on secondary drive and a lot of mods for those games. The path that the games read the mods however can not be changed or else they will not work. This is in where the problems lies. That path is through the users folder which is on my significantly smaller C: drive, so how can I move my user folder to my other dive to solve this problem?
CPU: Intel i7-6700 3.4GHz
256 GB SSD (C: Drive)
Replies (1)
You cannot, but you can redirect the personal folders within your User folder to the larger 1 TB D:\ drive.
Press Windows key + X
Click Disk Management
Could you take a screenshot then post it in a reply here?
If the D: drive is larger than C:, I would try partitioning the drive.
Name one Partition ‘Files’ and the other ‘Apps’.
Open the Files partition, create a folder and name it: BradG813
Press Windows key + R
Type: %userprofile%
Hit Enter
Right click your Documents folder
Click Properties
Select the Location tab
Click Move
Browse to the Files partition we created earlier then select BradG813 folder.
Repeat the same steps for other folders such as Pictures, Videos etc.
Open Start > Settings > System > Storage
Under More storage settings, click ‘Change where new content is saved’
In New apps will save to list box, choose the ‘Apps’ partition we created earlier.
Open Start > Settings > Apps > Apps & Features
Select any large app you have downloaded from the Windows Store
Click Move, choose the ‘Apps’ partition
Note: This is a non-Microsoft website. The page appears to be providing accurate, safe information. Watch out for ads on the site that may advertise products frequently classified as a PUP (Potentially Unwanted Products). Thoroughly research any product advertised on the site before you decide to download and install it.


