- How to Create Custom Resolutions on Windows 7, 8 or 10
- Method 1: Setting a Custom Resolution on an Intel Based Graphics Card
- Method 2: Setting a Custom Resolution on a NVIDIA Based Graphics Card
- Method 3: Setting a Custom Resolution on an AMD Based Graphics Card
- How to create custom resolutions on Windows 10 [EXPERT GUIDE]
- How to set custom resolution on Windows 10?
- 1. Use the Nvidia Control Panel
- 2. Use the AMD Catalyst Control Center
- 3. Use Custom Resolutions/Modes for Intel Graphics driver
- 4. Use Custom Resolution Utility (CRU)
- How to Set Custom Screen Resolutions in Windows 10
- Why Would You Want to Change Your Screen Resolution?
- Pros & Cons of Upgrading to Windows 10 Professional
- Как пользоваться Custom Resolution Utility
- Разогнать герцовку монитора
- Добавить поддержку AMD FreeSync
- Включить HDR на мониторе без поддержки
How to Create Custom Resolutions on Windows 7, 8 or 10
Windows provides you with a preset list of standard screen resolutions for your display based on your graphics card or GPU and monitor hardware. You can easily change the screen resolution of of your display by switching to any of the presets provided by Windows. But what if you want to you a screen resolution that isn’t included in what has been given you?
Custom resolutions give you the flexibility to add virtually any screen resolution and refresh rate for your display. If you want to use a unique resolution that isn’t available in Windows preset list of resolutions, this guide will show you ways you can add any mode.
Note that not all computer manufacturers have custom modes enabled for their drivers, and older graphic drivers may not enable this feature. In this article, I’ll show you how to modify your screen resolution on Intel, AMD or NVIDIA graphics card using their native control software or a 3rd party software for those who don’t still don’t have the ability to customize their screen resolutions.
Method 1: Setting a Custom Resolution on an Intel Based Graphics Card
Before you continue, you need to check if your computer supports the custom graphics feature. This is described in the first three steps of this method. If you don’t meet this criteria, proceed to the 3rd method. The views might also be different on your computer, just follow closely and you’ll get it.
- Verify from here if you have the latest Intel Graphics Driver
- Open the Intel Graphics Driver properties windows by pressing Ctrl + Alt + F12 or right-clicking on the Windows desktop and selecting Graphics If prompted to select an application mode, select Advanced Mode and click OK.
- Under the Display tab, check if there is Custom Resolutions/Custom Modes and select it. If you’re prompted with a warning, click yes to continue.
The Custom Resolution/Modes feature was removed from the Intel HD Graphics Control Panel. You can still access it from C:\Windows\System32\CustomModeApp.exe
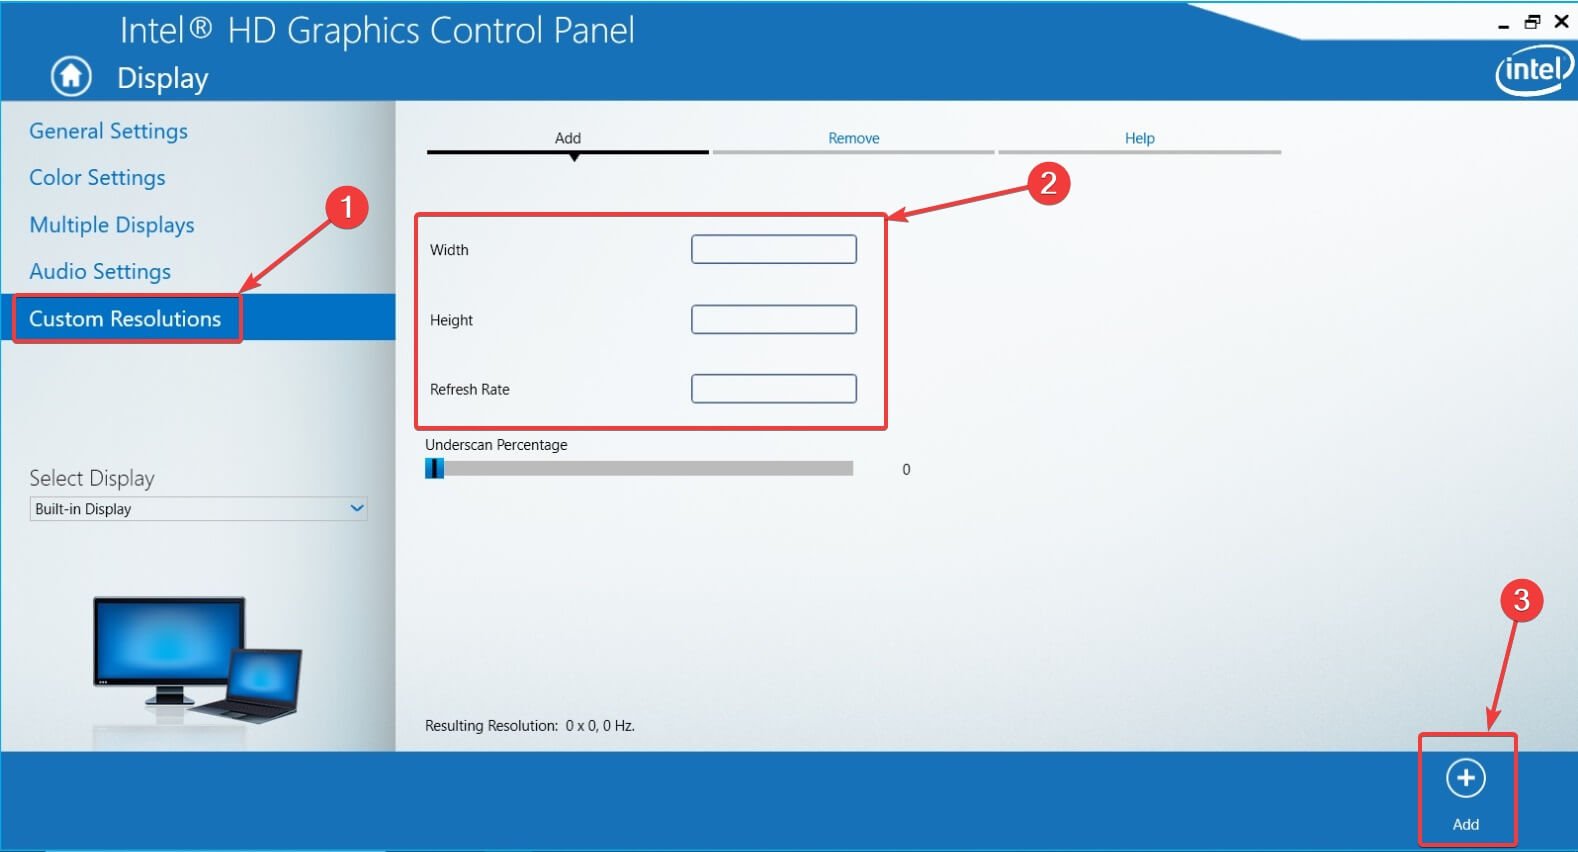
- Under “Basic Settings”, specify your preferred width, height and refresh rate in the boxes provided (e.g. 2400 x 1024).
- Click on Add and then Yes when prompted with a confirmation dialog.
- Click OK if you’re satisfied with the current resolution. To remove the custom resolution, click on Remove next to the custom resolution under “Remove Custom Resolution”.
Method 2: Setting a Custom Resolution on a NVIDIA Based Graphics Card
This method may vary with the version of graphics driver and graphics card but the concept remains the same. Also, make sure you have the latest NVIDIA Graphics Drivers.
- Go to the NVIDIA Display Properties by right-clicking on the Windows desktop on selecting NVIDIA Display.
- Under the Display category, select Change Resolution. Select the icon which represents the display you wish to affect and then click Customize. On the next window, click Create Custom Resolution. If this is the first time, accessing this feature, you will have to accept the End User Licence Agreement.
- Fill in the fields with your preferred values for the display. Here, you can change the Horizontal pixels (width), Vertical lines (height), Refresh rate, Color depth, and Scan type. Click the Test button for the display to check of the custom mode is supported. If it doesn’t test will fail and you cannot set a new custom resolution.
- You can go back to the Change Resolution page to select from your custom resolutions.
Method 3: Setting a Custom Resolution on an AMD Based Graphics Card
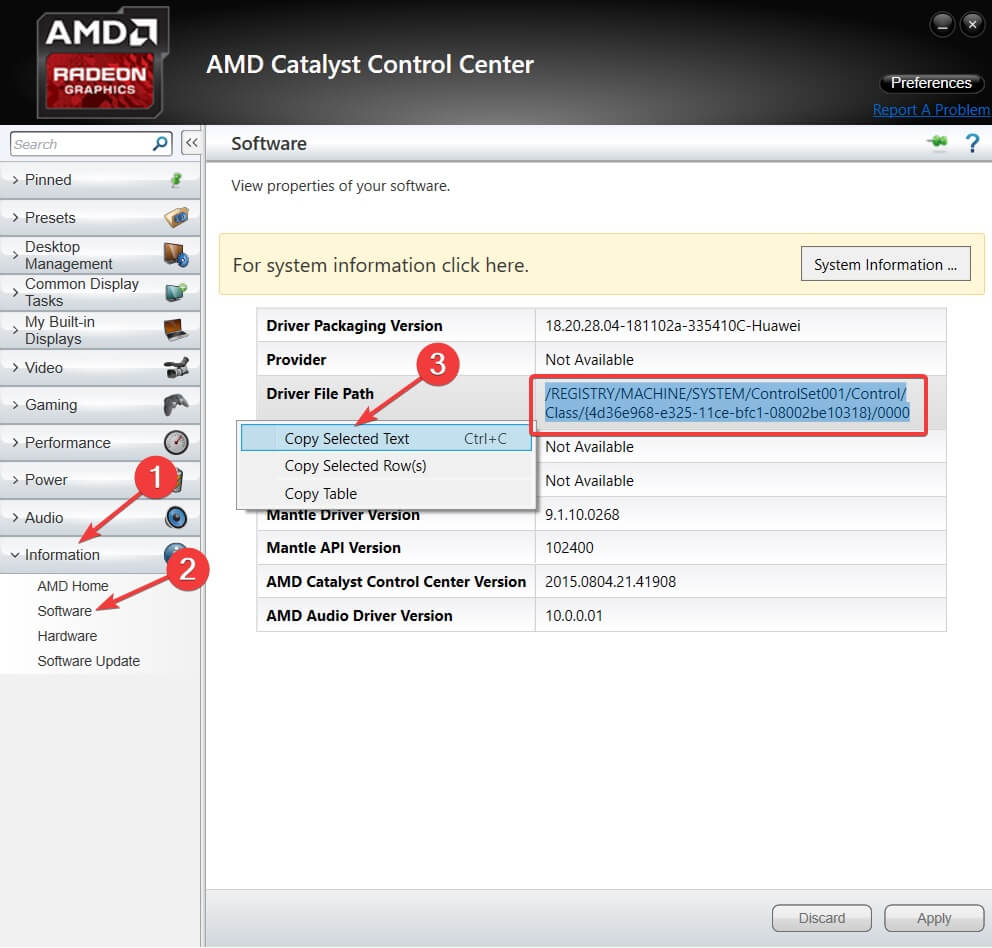
- Right-click on your Windows desktop and select AMD Catalyst Control Center. Go to Information > Software. Copy the 2D driver file path, you will need it later.
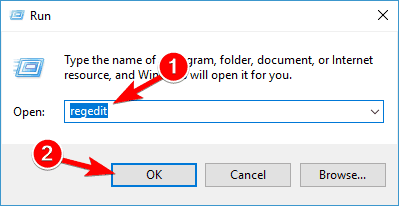
- Press Ctrl + R, type “regedit” and click OK.
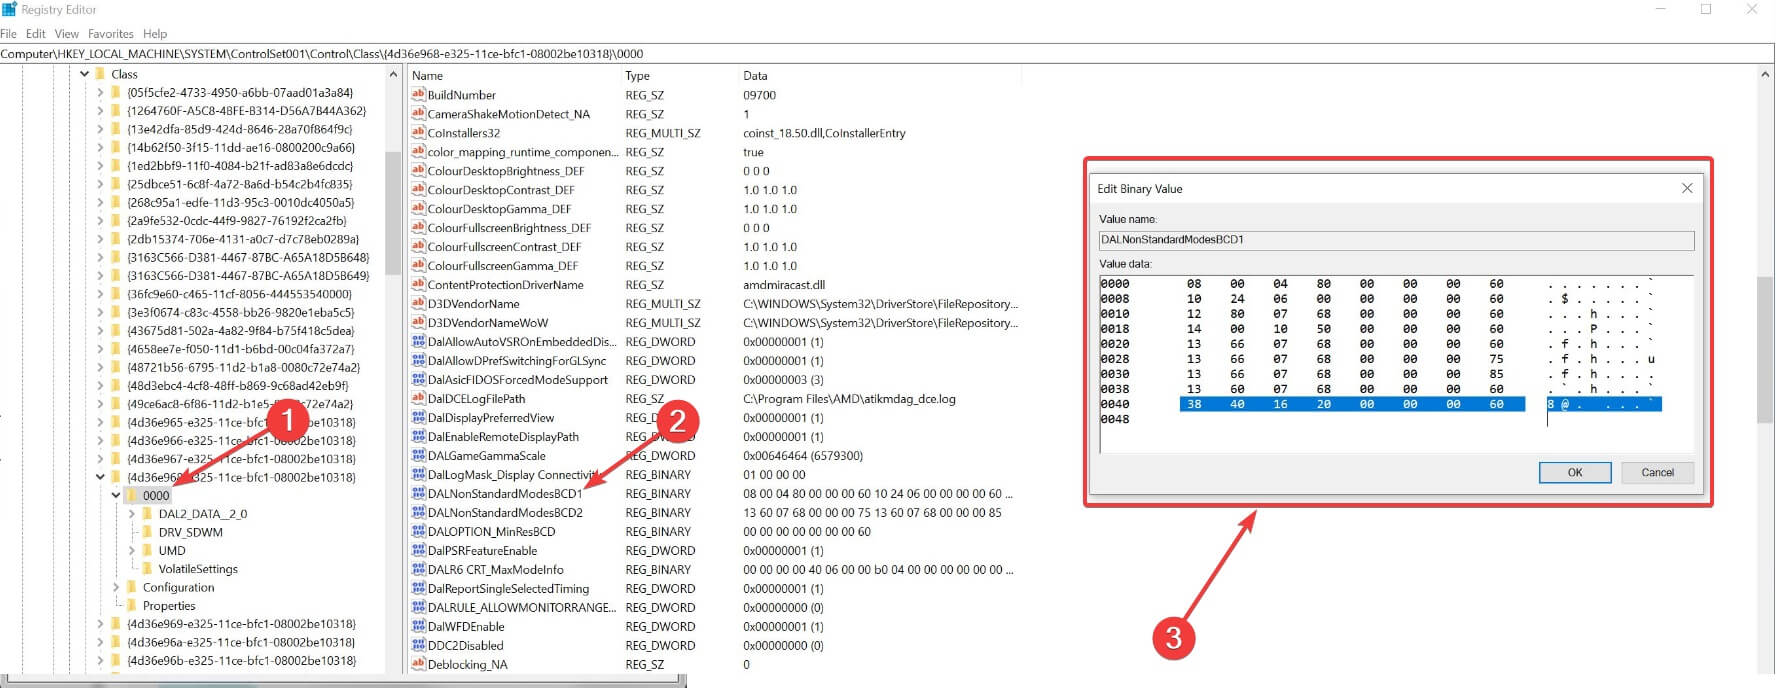
- Go to the registry path as specified in the 2D driver file path
- In the “0000” folder, find a registry entry called DALNonStandardModesBCD1. Right-click and select edit and then enter the following values in order:
- The width of the resolution. E.g 1440 or 0780
- The height of the resolution. Eg. 1880 or 0240
- Type four zeros
- The refresh rate of your monitor. E.g. 0120 for 120Hz or 0060 for 60Hz.
If any of your values does not have up four digits, you have to proceed the values with 0.
- Click on OK and restart your computer. After this, you should be able to choose your custom resolution from the AMD Catalyst Control Center.
How to create custom resolutions on Windows 10 [EXPERT GUIDE]

- Download Restoro PC Repair Tool that comes with Patented Technologies (patent available here).
- Click Start Scan to find Windows issues that could be causing PC problems.
- Click Repair All to fix issues affecting your computer’s security and performance
- Restoro has been downloaded by 0 readers this month.
Sometimes you want to change the resolution of the display to a custom one, and in today’s article we’ll show you how to create custom resolutions on Windows 10.
To do that, just follow the guide below.
How to set custom resolution on Windows 10?
1. Use the Nvidia Control Panel
- Right-click on your desktop and choose NVIDIA Control Panel.
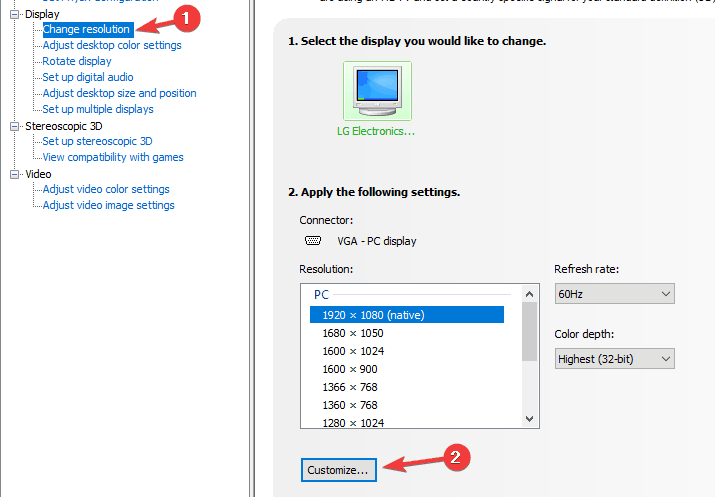
- In the left side-panel, under Display, click on Change resolution.
- In the right section scroll a bit, and under Choose the resolution click the Customize button.

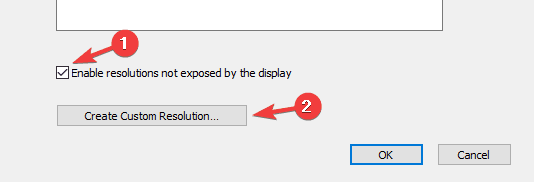
- In the new window that appears, check Enable resolutions not exposed by the display and then click on Create Custom Resolution.
- Now, fill in the boxes with the desired values and then hit the Test button.
- If the test is successful and you’re satisfied with the result, Save the resolution. If not, revert to the previous one.
2. Use the AMD Catalyst Control Center
- Right-click on your desktop and choose AMD Catalyst Control Center.
- Navigate to Information > Software > copy the 2D driver file path.
- Now, press Windows key + R to open Run, and type regedit. Hit Enter.
- In the Registry Editor, navigate to the 2D path from step 2.
- Double-click the 0000 folder and inside find the DALNonStandardModesBCD1 registry key. Right-click it, select Edit and then type your desired values in order: The width of the resolution > The height of the resolution > Type four zeros > The refresh rate of your monitor. If any of the values don’t add up to a 4 digit number, then start the number with 0.
- Click OK and Restart your PC.
- After the restart, when you launch the AMD Catalyst Control Center, you should find the custom resolution there.
3. Use Custom Resolutions/Modes for Intel Graphics driver
- Right-click on your desktop and choose Graphics Proprieties.
- Select Advanced mode if you’re prompted to select an application mode.
- Under Display Devices tab, check to see if the Custom Resolutions/Modes button is available. If it is, click on it. If it’s not, then go to
and run the app.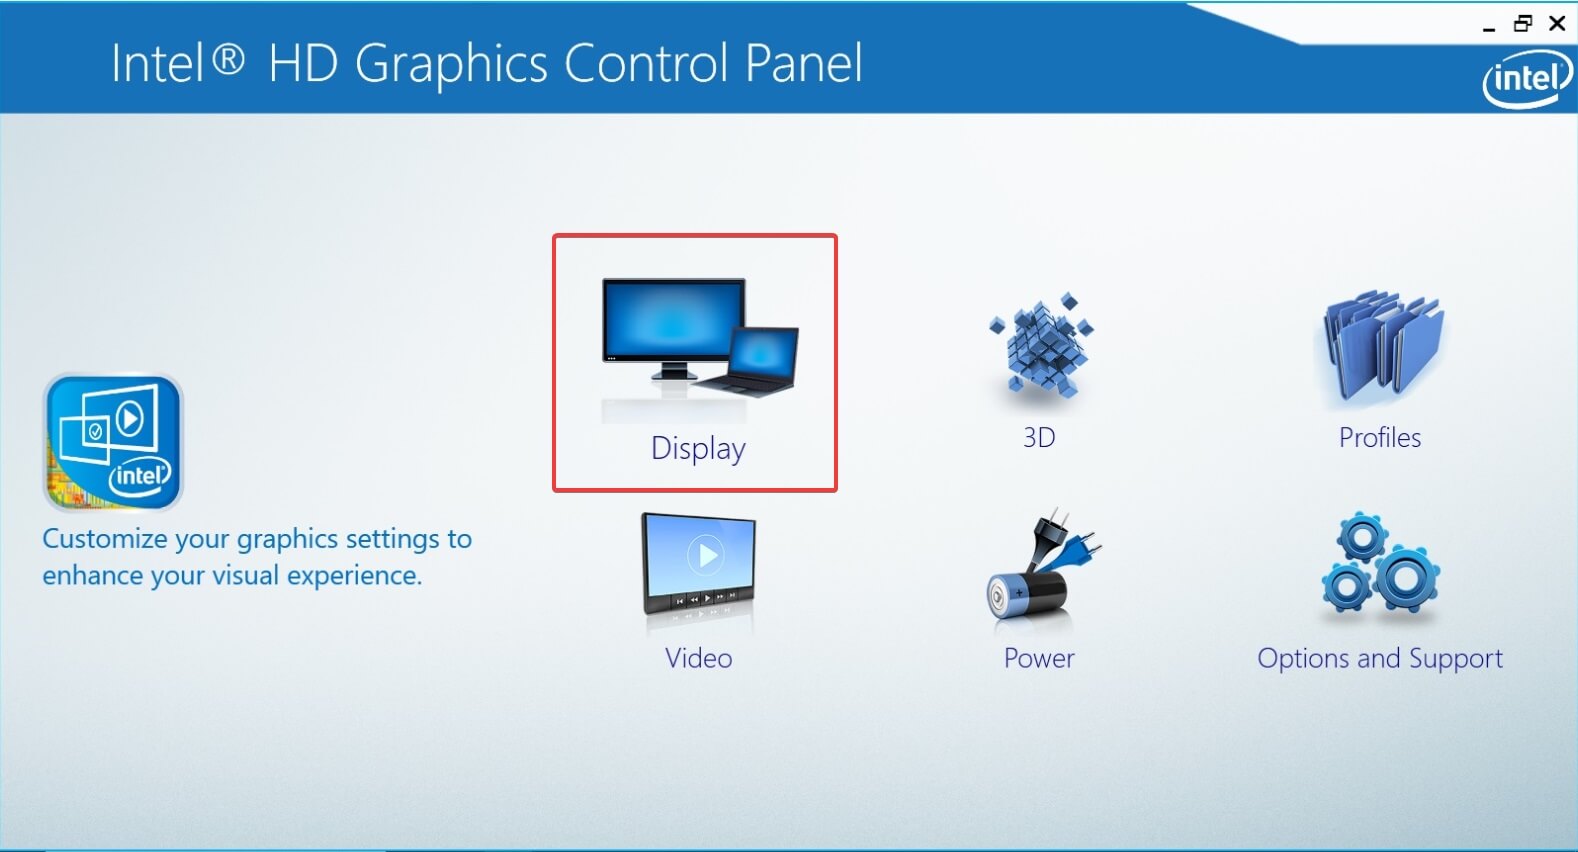
4. Use Custom Resolution Utility (CRU)

- Additionally, you can use Custom Resolution Utility (CRU) to create a resolution.
- The app has support for NVIDIA, AMD and Intel graphics cards so no matter of the system configuration, it will work.
As you can see, it’s not that hard to create and set a custom resolution in Windows 10, regardless of the GPU manufacturer and drivers. What’s your favorite GPU manufacturer and why? Leave the answer along with any other questions you may have in the comments section below.
How to Set Custom Screen Resolutions in Windows 10
Posted on June 20, 2019 by Mona 3 Comments
Microsoft introduced an option to customize screen resolution in Windows 10. You can change the screen resolution of your computer according to your needs.
You will come across a long list of options to choose from. This can be both good and bad for users. Tech lovers will enjoy the multiple options, but some users will find it difficult to pick from too many options.
Regardless of whether you love this feature or hate it, you’ll likely want to at least try it. What’s the point of changing screen resolutions and how do you do it?
Why Would You Want to Change Your Screen Resolution?
These days everyone is excited about high definition display units. Hardware plays a key role in display capabilities of the screen unit, but software can also enhance the user experience to some extent.
Everyone buys HD display units for amazing gaming and cinematic experience. But you can do one more trick to improvise your display quality.
Windows 10 is the leading operating system to date. Limited features were available in older Windows operating systems, but in Windows 10, you can enhance your user experience as much as possible.
One of these examples is choosing the resolution of your display unit within a wide range. This is what you can do customize your screen resolution:
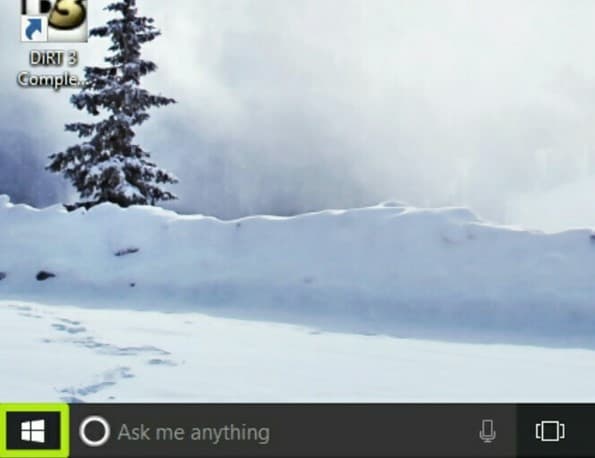
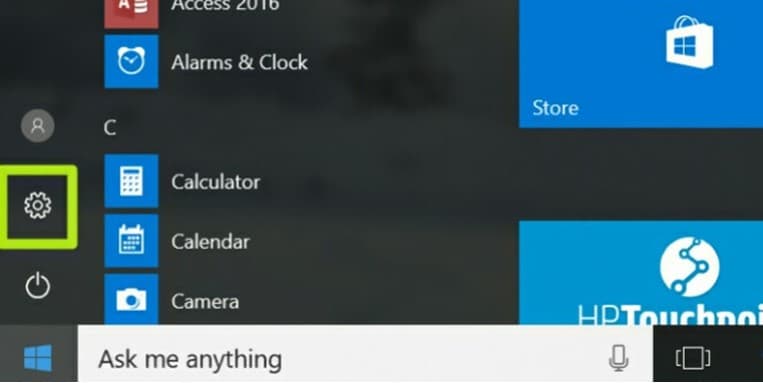
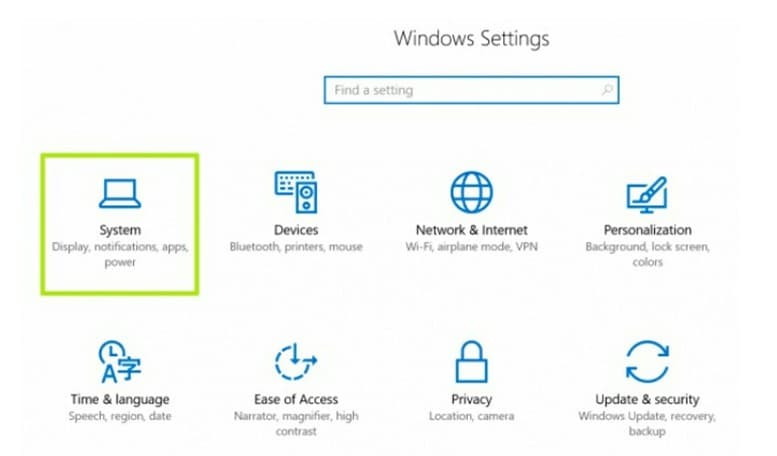
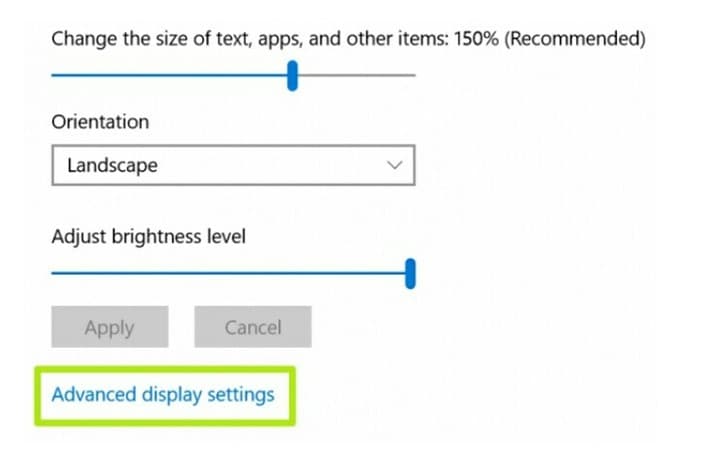
1. Go to the Settings app and explore the Display You will find the resolution settings in Advanced Settings.
2. Look down in the Advanced Settings. Here you have to click on the Adapter Settings. It contains information about the displaying capabilities of your computer.
3. Adapter tab contains only two buttons. Properties button is at the upper side of the Adapter Settings. You will see List All Modes button at the lower side.
4. You have to click on the List All Modes A long list of display resolutions will appear when you click it.
5. Now choose screen resolution of your preference. Most of us do not know about the function of screen resolutions. Windows will also suggest a suitable screen resolution. It is up to us to keep it or change it.
6. Finally, confirm your choice by pressing the Apply Your monitor screen will blink for a second. After the blink, you’ll see the new resolution.
If you don’t like the resolution setting you’ve chosen, you can try other options. Just go back to step one and reset everything again choosing a different resolution until you find one that feels comfortable.
You might also want to change the resolution based on what tasks you are doing at any given moment. Again, all you’ll need to do is follow the steps and adjust the resolution as you do different things in Windows 10. Some people settle on a resolution the like and never change it again, while others are constantly adjusting and readjusting their resolution. Windows 10 gives you the option of making changes whenever you choose.
Pros & Cons of Upgrading to Windows 10 Professional
While Windows 10 S is not a good solution for most users, some might prefer the streamline capabilities of the system for their needs. Because all third-party apps are disabled, Windows 10 S makes for better work computers without the need to block apps afterward.
If you don’t want to go through the online channels, you can purchase a bootable USB flash drive with Windows 10 Pro directly from Amazon and install it that way.
Как пользоваться Custom Resolution Utility
Не так давно открыл для себя многофункциональную утилиту Custom Resolution Utility. С её помощью можно разогнать герцовку и добавить поддержку FreeSync. Мой монитор Samsung S24B350 и видеокарта ASUS Rog Strix RX580 8 Гб, именно с ними будем экспериментировать.
Эта статья расскажет, как пользоваться Custom Resolution Utility. Само название как бы намекает на возможность установки кастомного разрешения. Другими словами CRU показывает, как монитор определяет разрешение и другие возможности, и даёт Вам возможность их изменять.
Разогнать герцовку монитора
Важно! Разработчики и тем более мы не несём ответственности. Вы всё делаете на свой страх и риск. Не стоит ожидать увеличения частоты обновления в два раза. Это может привести к артефактам и необходимости сброса настроек с помощью безопасного режима Windows 10.
Загрузите Custom Resolution Utility с надёжного источника и запустите её с правами администратора. В контекстном меню выберите пункт Запуск от имени администратора.
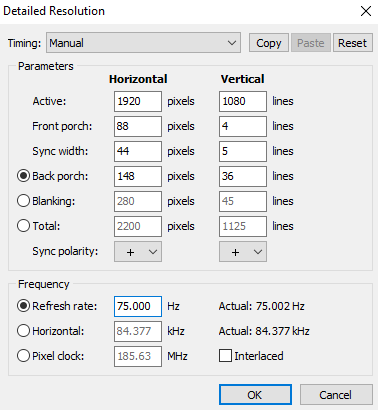
В подробных разрешениях нужно добавить новое, которое будет соответствовать рекомендованному значению. В разделе справа Detailed resolutions нажмите кнопку Add…
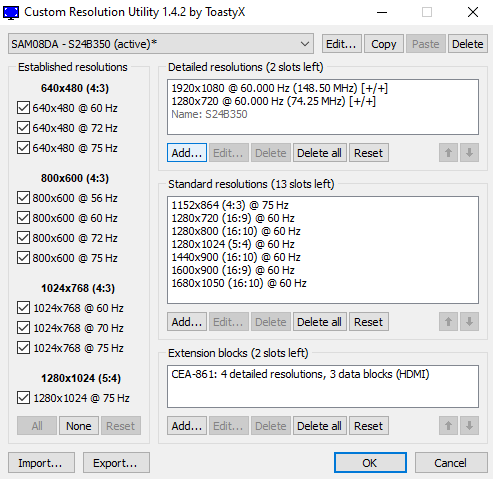
Установите значение Refresh rate на 75 Hz. Заявленное производителем значение 60 Гц. Выбирайте частоту обновления немного выше. Её не получится увеличить в несколько раз.
Нажмите ОК чтобы применить настройки. Это ещё не всё. Нужно перезапустить графический драйвер. Можно запустить restart64.exe в расположении программы или перезапустить ПК.

Откройте Параметры > Система > Дисплей и найдите Дополнительные параметры дисплея. И теперь выберите в списке добавленную ранее частоту обновления экрана.
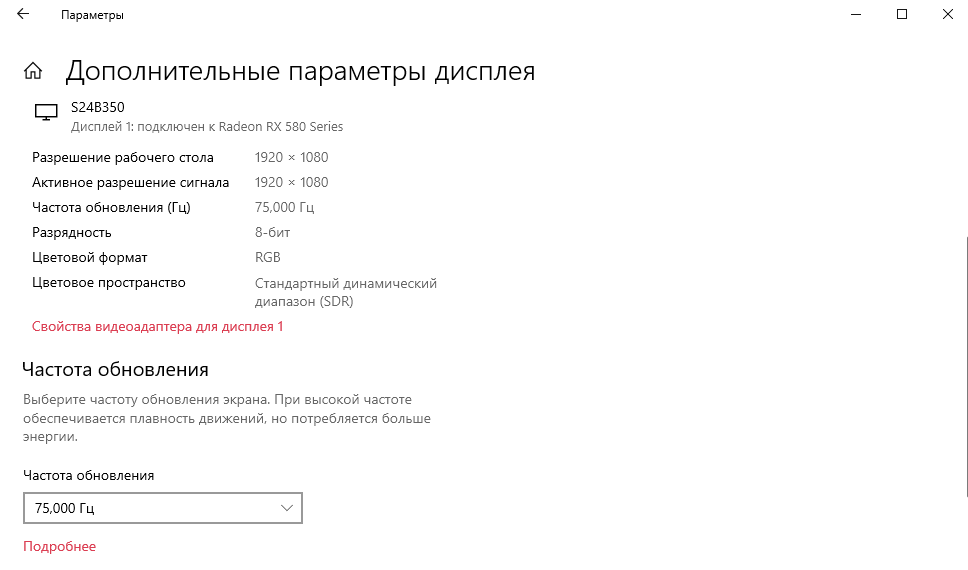
Протестировать частоту обновления можно онлайн на веб-ресурсе TestUFO. Там показывается реальная герцовка Вашего монитора в сравнении. У меня все тесты показывают 75 Гц.
Добавить поддержку AMD FreeSync
В блоке расширений Extension Block откройте Type: CEA-861 нажав Edit… (или добавьте его). В разделе Data Blocks нажмите Add… и выберите FreeSync range, указав диапазон 50-60 Гц.
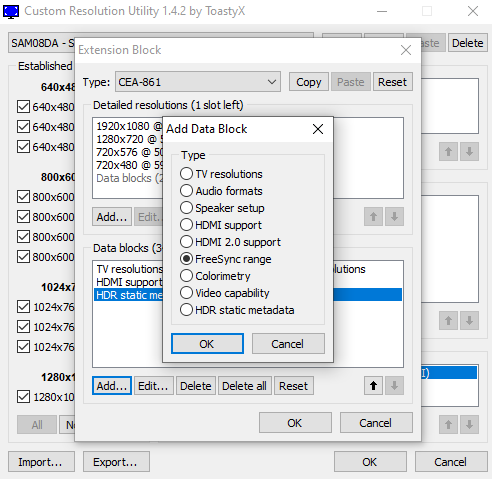
Рекомендуется сначала выбирать небольшой диапазон, чтобы протестировать его работу. Перезапустите графический драйвер запустив restart64.exe или перезагрузкой компьютера.
Включить HDR на мониторе без поддержки
Как и при добавлении FreeSync в разделе Data Blocks нажимаем Add… И в списке отмечаем HDR static metadata, а потом ОК. Ещё установите отметку на Traditional gamma — HDR.

В зависимости от Вашего монитора функция HDR может и не заработать. Хоть отображение HDR только эмулируется, но контент выглядит лучше. В некоторых пользователей разница заметна.
Хоть и технология AMD FreeSync заработала, она мне не нужна. А вот повышение частоты обновления экрана действительно радует. Программа Custom Resolution Utility не нуждается в настройке. Можно её сразу же использовать без установки. Она совместима с Windows 10.
В несколько кликов получилось повысить частоту обновления на целых 15 Гц. Тестирование показывает, что значение соответствует реальному и всё отлично работает. Разницы от повышения на 5 единиц Вы точно не заметите, а от 15—20 Гц — это уже совсем другое дело.


