- Use Snipping Tool to capture screenshots
- Open Snipping Tool
- Work with your screenshots
- How to take and annotate screenshots on Windows 10
- Take a screenshot
- Annotate snips with Snip & Sketch
- Использование приложения «Ножницы» для захвата снимков экрана
- Открытие приложения «Ножницы»
- Работа со снимками экранов
- How to screenshot on Windows (9 ways)
- Quick Steps:
- 1. How to screenshot on Windows: Press the Print Screen key
- 2. How to take a screenshot on Windows 10: Press the Win + Print Screen keys
- 3. How to take a screenshot in Windows 7 or Windows 10: Press Alt + Print Screen to capture the active window
- 4. How to screenshot on a laptop or tablet (Dell, Surface, and others)
- 5. How to take a screenshot on Windows 10 using the Windows + Shift + S keyboard shortcut
- 6. How to take a screenshot on Windows 10 using the Snip & Sketch app
- 7. How to take a screenshot on a PC using the Snipping Tool
- 8. How to take a screenshot on a Microsoft Surface tablet (or other tablets)
- 9. How to screenshot on Windows 10 using Windows + Alt + Print Screen (Xbox Game Bar)
- What’s your favorite method of taking screenshots in Windows?
Use Snipping Tool to capture screenshots
Take a snapshot to copy words or images from all or part of your PC screen. Use Snipping Tool to make changes or notes, then save, and share.
Windows 10 has another screenshot app you might also like to try. When you open Snipping Tool, you’ll see an invitation and keyboard shortcut to Snip & Sketch. For more info on this app, see How to take and annotate screenshots on Windows 10.
Capture any of the following types of snips:
Draw a free-form shape around an object.
Drag the cursor around an object to form a rectangle.
Select a window, such as a dialog box, that you want to capture.
Capture the entire screen.
When you capture a snip, it’s automatically copied to the Snipping Tool window where you make changes, save, and share.
Open Snipping Tool
Select the Start button, type snipping tool in the search box on the taskbar, and then select Snipping Tool from the list of results.
For Windows 8.1 / Windows RT 8.1
Swipe in from the right edge of the screen, tap Search (or if you’re using a mouse, point to the lower-right corner of the screen, move the mouse pointer up, and then select Search), type snipping tool in the search box, and then select Snipping Tool from the list of results.
Select the Start button, then type snipping tool in the search box, and then select Snipping Tool from the list of results.
Work with your screenshots
With your Snipping Tool open, select one of the following to create and work with your screenshots.
In Snipping Tool, select Mode. In earlier versions of Windows, select the arrow next to the New button. Next, when you choose the kind of snip you want, you’ll see the whole screen change slightly to gray. Then, choosing from anything currently displayed on the screen, select the area of your screen that you want to capture.

After you open Snipping Tool, open the menu that you want to capture. For Windows 7, press the Esc key before opening the menu.
Press Ctrl + PrtScn keys. The entire screen changes to gray including the open menu.
Select Mode, or in earlier versions of Windows, select the arrow next to the New button. Select the kind of snip you want, and then select the area of the screen capture that you want to capture.
After you capture a snip, you can write or draw on or around it by selecting the Pen or Highlighter buttons. Select Eraser to remove the lines you’ve drawn.
After you capture a snip, select the Save Snip button.
In the Save As box, type a file name, location, and type, and then select Save.
When you capture a snip from a browser window and save it as an HTML file, the URL appears below the snip. To prevent the URL from appearing:
In the Snipping Tool, select the Options button.
In the Snipping Tools Options box, clear the Include URL below snips (HTML only) check box, then select OK.
After you capture a snip, select the arrow next to the Send Snip button, and then select an option from the list.
How to take and annotate screenshots on Windows 10
Sometimes the easiest way to make a copy of something is to take a snapshot of your screen. While you can already capture your screen using your keyboard’s PrtScn button, you can now press Windows logo key + Shift + S to open the new modern snipping experience (also called the snipping bar), then drag the cursor over the area you want to capture.
Here are some common ways to take and annotate screenshots in Snip & Sketch on Windows 10.
Take a screenshot
Option 1: Using the Snip & Sketch app
Press the Start button and enter Snip & Sketch in the search field.
Press the New button to start snipping with the snipping bar.
The snipping bar allows you to capture the following types of snips:
Rectangular snip. Drag the cursor around an object to form a rectangle.
Free-form snip. Draw a free-form shape around an object.
Full-screen snip. Capture the entire screen.
Once you snip an area of your screen — the snipped image is added to your clipboard and you can paste it immediately in another app. A screen prompt will also allow you to annotate, save or share it using the Snip & Sketch app.
Option 2: With the Print Screen key
While the PrtScn key already captures your full screen and sends it to your clipboard, opening the snipping bar provides you with more snipping tools you can use for precise snipping. For better control of your screen capturing options, you can opt to have your PrtScn key open the new snipping bar instead of having to type Windows logo key + Shift + S.
To turn on the new snipping feature keyboard shortcut Select Start > Settings > Ease of Access > Keyboard
Option 3: With the Window logo key + Shift + S shortcut
Pressing the S key + Windows logo + Shift keys down initiates the snipping bar at any time.
Annotate snips with Snip & Sketch
Opening images for editing with Snip & Sketch
To open an image from Snip & Sketch, select Open File or drag and drop an image from apps like File Explorer or Photos in the Snip & Sketch window.
Annotating images with Snip & Sketch
Snip & Sketch provides a few tools for annotating images, namely pen, pencil and highlighter. Once you click a tool to select it, you can click it again to change its color or thickness.
The tools work better with a pen device, but they can also be used with mouse or touch if you select the Touch Writing button icon.
Use the Eraser tool to remove specific strokes or click it twice to get the option to erase all ink.
Use the ruler or protractor tools and draw straight lines or arches.
Press the ruler/protractor button again to hide the ruler/protractor
Reside or rotate the ruler/protractor by using two finger touch gestures (if the Touch Writing button is selected) or with the mouse wheel.
Use the crop tool to crop the annotated image.
To undo cropping, select the crop tool again and press Cancel to restore the image to its full original area.
Panning the view
Some of the images you annotate might be larger than the size of the Snip & Sketch window. You can use the scroll bars to pan the view, but you can also pan the view with touch input (if the Touch Writing button is not selected) or by dragging with your mouse button while holding the Ctrl key down.
Zoom in and out of screenshots to make them easier to mark up using the magnifying glass icon. You can also zoom in and out of screenshots by pressing the Ctrl key down and tapping the + or — buttons.
Sharing and saving snips
Snip & Sketch copies the annotated snip to your clipboard when you open it and every time you make edits. Snip & Sketch allows you to save the annotated image to a file, share it or open with another app, or print it on paper or to a pdf file.
Using keyboard in Snip & Sketch
While annotating is best done using a pen or mouse — Snip & Sketch provides a lot of keyboard shortcuts you can use. Access keys are activated if you press and hold the Alt key.
Использование приложения «Ножницы» для захвата снимков экрана
С помощью снимков можно копировать слова или изображения со всего экрана ПК или его части. Используйте приложение «Ножницы», чтобы вносить изменения, добавлять заметки, а также сохранять и отправлять снимки.
В Windows 10 есть еще одно приложение для снимка экрана, которое вы также можете попробовать. При открытии инструмента «Ножницы» вы увидите приглашение и сочетание клавиш для приложения «Набросок на фрагменте экрана». Подробнее об этом приложении вы узнаете, как делать снимки экрана и добавлять их в Windows 10.
Поддерживаются следующие типы фрагментов:
Свободный вид фрагмента
Нарисуйте любую фигуру вокруг объекта пальцем, мышью или пером планшета.
Обведите указатель вокруг объекта, чтобы образовать прямоугольник.
Выберите окно, которое требуется захватить, например диалоговое окно.
Выделение всего экрана
Захват всего экрана.
После того как снимок экрана сделан, он автоматически копируется в окно приложения «Ножницы», где его можно изменить, сохранить и отправить.
Открытие приложения «Ножницы»
Нажмите кнопку Пуск , затем в поле поиска рядом с панелью задач введите ножницы и выберите Ножницы из списка результатов.
В Windows 8.1 и Windows RT 8.1
Проведите пальцем от правого края экрана и нажмите Поиск (если используется мышь, поместите указатель в правый нижний угол экрана, переместите его вверх и выберите Поиск), в поле поиска введите ножницы, а затем в списке результатов выберите приложение Ножницы.
Нажмите кнопку » Пуск «, а затем в поле поиска введите ножницы , а затем в списке результатов выберите инструмент «ножницы «.
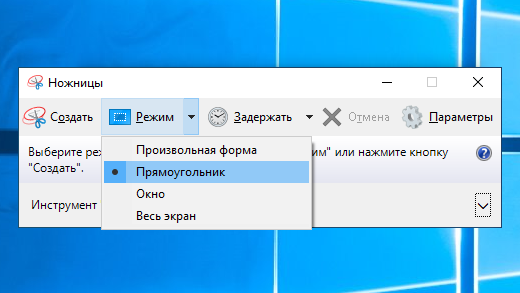
Работа со снимками экранов
После запуска приложения «Ножницы» выберите одну из указанных ниже функций для создания и обработки снимков экрана.
В инструменте «ножницы» выберите режим. В более ранних версиях Windows щелкните стрелку рядом с кнопкой «создать». Затем, когда вы выберете нужный вид фрагмента, вы увидите, что все экранные изменения слегка видны серым цветом. После выбора любого элемента на экране выберите область экрана, которую требуется захватить.
После запуска приложения «Ножницы» откройте меню, снимок которого вам нужен. В Windows 7 нажмите клавишу ESC, прежде чем открывать меню.
Нажмите клавиши CTRL + PRTSCN. После этого весь экран становится серым.
Выбор режимаили в более ранних версиях Windows щелкните стрелку рядом с кнопкой создать . Выберите нужный фрагмент, а затем выберите область захвата экрана, которую вы хотите захватить.
После захвата фрагмента можно делать подписи или рисовать на нем или вокруг него, нажав на кнопку Перо или Маркер. Выберите Ластик, чтобы удалить нарисованные линии.
После захвата фрагмента нажмите кнопку Сохранить фрагмент.
В окне «Сохранение файла» введите имя файла, а также выберите расположение и тип файла, после чего нажмите кнопку Сохранить.
При захвате фрагмента из окна браузера и сохранении его в виде HTML-файла под фрагментом появляется URL-адрес. Чтобы предотвратить появление URL-адреса:
В приложении «Ножницы» нажмите кнопку Параметры.
Вокне «Параметры Ножниц» снимите флажок Включать URL-адрес под фрагментами (только HTML) и нажмите кнопку ОК.
После захвата фрагмента нажмите стрелку рядом с кнопкой Отправить фрагмент, а затем выберите вариант из списка.
How to screenshot on Windows (9 ways)
Do you use Windows, and you need to take a screenshot quickly? Do you have trouble with finding the Print Screen key, or it’s not working, so you’re looking for a new Print Screen shortcut? Do you want to know how to take a screenshot of the active window instead of the whole screen? Wouldn’t you like to learn how to take a screenshot on a PC while playing a game, to get proof of your achievements? On the internet, there are numerous Windows screenshot apps, both paid and free. Still, before looking for such third-party apps, make sure that you’re familiar with the whole range of screenshot options already available in Windows. Without further ado, here’s how to screenshot on Windows:
Quick Steps:
- To take a screenshot on a PC, press the Print Screen button or Fn + Print Screen. Windows creates a screenshot of the whole screen and saves it to the clipboard.
- Press Win + Print Screen or Fn + Windows + Print Screen on your keyboard. Windows saves the resulting image in a folder called Screenshots.
- Press Alt + Print Screen or Fn + Alt + Print Screen on your keyboard to capture the active window, and save it to the clipboard.
1. How to screenshot on Windows: Press the Print Screen key
The first method is also the most popular, as it’s been around for a very long time since the earliest versions of Windows. To take a screenshot on a PC, press the Print Screen button on your keyboard. Alternatively, you can also use the CTRL + Print Screen screenshot shortcut.
The Print Screen button on a computer keyboard
Windows creates a screenshot of the whole screen and saves it to the clipboard. Next, open an image editing program like Paint and paste the picture from the clipboard. You can now save it as a file and do basic editing.
Screenshot of the whole screen, pasted in Paint
Using the Print Screen key for taking screenshots works in both Windows 10 and Windows 7.
2. How to take a screenshot on Windows 10: Press the Win + Print Screen keys
Do you want to take a screenshot of the whole screen and automatically save it as an image on your PC? You can do that using a simple Print Screen shortcut without having to resort to any other tools. To take a fullscreen screenshot on Windows 10, simultaneously press Win + Print Screen on your keyboard.
Using Windows + Print Screen to take a screenshot on Windows 10
When you screenshot on Windows 10 using this method, the operating system saves the resulting image in a folder called Screenshots, found in your user’s Pictures folder. The usual path for your Windows 10 screenshots should look like this: C:\Users\Your User Name\Pictures\Screenshots. The files are named Screenshot (number).png, where the number varies based on how many screenshots you have previously taken. If you want to know more about the location of your screenshots, read: Where are screenshots saved? Change their location in Windows 10 .
Screenshots are saved by Windows in your Pictures folder
In Windows 10, you can also see your screenshots using the Photos app by going to “Folders -> Pictures -> Screenshots.”
Screenshots viewed in the Photos app from Windows 10
Besides creating a screenshot file, Windows 10 also places a copy of the screenshot in the clipboard.
3. How to take a screenshot in Windows 7 or Windows 10: Press Alt + Print Screen to capture the active window
Whether you use Windows 10 or Windows 7, you can also take a screenshot of just the active window instead of your whole screen. Open the window that you want to capture and press the Alt + Print Screen keys on your keyboard. The operating system saves the screenshot in the clipboard. Open Paint or any other photo editing app and paste the image so that you can edit and save it to your Windows computer or device.
Screenshot of an active window in Paint
4. How to screenshot on a laptop or tablet (Dell, Surface, and others)
The previous methods should work perfectly well on desktop computers running Windows and on standard keyboards. However, some unique situations can occur. If you have a Dell laptop, for example, a tablet, or any PC with a keyboard that includes an Fn key, then the Print Screen key might do other things, too, besides taking screenshots. Therefore, when you press a screenshot shortcut that includes the Print Screen button, Windows might not capture your screen. So, instead, use one of the Print Screen shortcuts:
- Fn + Print Screen – takes a screenshot of the whole screen and copies it to the clipboard. It is the equivalent of pressing the standard Print Screen key.
- Fn + Windows + Print Screen – captures a screenshot of the whole screen and saves it as a file on the hard drive without using any other tools. Windows stores the screenshot in the Screenshots subfolder of your Pictures folder. It is the same as pressing Windows + Print Screen on a standard keyboard.
- Fn + Alt + Print Screen – takes a screenshot of the active window. It is the equivalent of pressing Alt + Print Screen on a standard keyboard.
Keyboard shortcuts for screen capture on keyboards with the Fn key
On some keyboards, the Print Screen button might not perform two or more actions. However, it will not work until you press the Fn lock key. The Fn key works on such keyboards as a lock for the function and multimedia keys on the top, including the Print Screen key.
If you have such a keyboard, press the Fn key to unlock the top row of keys, and then use one of the screenshot shortcuts we described in this guide’s first chapters. They should work now.
Fn (Function) key on a keyboard
On some Microsoft Surface tablets, you need to use different screenshot shortcuts because some Type Cover models don’t include a Print Screen button. Instead, Microsoft offers the following Surface specific shortcuts for Windows 10:
- Fn + Spacebar – this shortcut saves an image of your current screen to the clipboard so that you can paste it into any application. It is the equivalent of pressing the standard Print Screen key.
- Fn + Alt + Spacebar – this shortcut saves a screenshot of the active window to the clipboard so that you can paste it into any application. It is the equivalent of pressing the Alt + Print Screen keyboard shortcut.
Keyboard shortcut for taking a screenshot on a Surface Type Cover (1)
5. How to take a screenshot on Windows 10 using the Windows + Shift + S keyboard shortcut
If you use Windows 10, simultaneously press Windows + Shift + S to capture a region of your screen and copy it to your clipboard. When you use this screenshot shortcut, Windows 10 dims your screen and shows a crosshair cursor. Press the left mouse button and drag the cursor to mark the area to capture. Then, release the mouse button. If you have a touchscreen, draw the area you want to screenshot using your finger (or pen).
Screenshot of a region in Windows 10
Windows 10 saves the screenshot in the clipboard. Open Paint, or any other photo editing app you prefer, to paste the screenshot, edit, and save it. This feature was originally part of OneNote, but later, Microsoft decided to integrate it directly to Windows 10, which is excellent.
6. How to take a screenshot on Windows 10 using the Snip & Sketch app
Starting with the October 2018 Update, Windows 10 includes Snip & Sketch, an app that you can use to take screenshots and modify (sketch) the ones you took. In a previous tutorial, we’ve already covered all the details on working with Snip & Sketch. In a few words, to screenshot on Windows 10, in Snip & Sketch, press the New button or use the Ctrl + N keyboard shortcut.
Start a screenshot in Snip & Sketch from Windows 10
Then, choose one of the four options to take a screenshot: rectangular, free-form, window, or fullscreen.
Screenshot options offered by Snip & Sketch in Windows 10
Once you’ve taken the screenshot, Snip & Sketch opens an editing window ready to process the screenshot further.
Editing a screenshot in Snip & Sketch on Windows 10
You can then change the screenshot as you want.
7. How to take a screenshot on a PC using the Snipping Tool
The Snipping Tool is a great desktop app for taking screenshots. It can create all kinds of screenshots, and you can also use it to do some light editing. Read this tutorial we published a while ago to learn everything about Snipping Tool and how to take screenshots with it in Windows 10 and Windows 7.
Taking a screenshot with Snipping Tool in Windows
NOTE: Microsoft scheduled the Snipping Tool for removal from Windows 10, as its purpose is now also fulfilled by the Snip & Sketch app.
8. How to take a screenshot on a Microsoft Surface tablet (or other tablets)
On some Windows 10 tablets, including certain models of Microsoft Surface, HP Envy, or Lenovo tablets, it can be hard to guess how to take a screenshot. If you use your tablet without a keyboard attached, then the Print Screen key is also unavailable. The best solution to screenshot on Windows 10, in this case, is to use the hardware buttons available on your tablet. You can take fullscreen screenshots on many types of Windows 10 tablets by pressing the Windows logo button and the Volume Down key simultaneously.
Take screenshots on a Windows tablet without a keyboard
When using this Print Screen shortcut, the screen gets darker for a moment, signaling that Windows took a screenshot. You can then find that screenshot in your Pictures folder, in the Screenshots subfolder.
9. How to screenshot on Windows 10 using Windows + Alt + Print Screen (Xbox Game Bar)
In Windows 10, you can also use the Xbox Game Bar for taking screenshots of the active window. Although it’s a feature designed for you to use while playing games, you can also benefit from it when you’re not playing. To capture the active window, which can be a game or not, press the Windows + Alt + Print Screen keys.
Taking a screenshot with Win + Alt + Print Screen in Windows 10
When you do that, Windows 10 automatically creates and saves a screenshot on your PC in the Captures subfolder found in your default Videos user folder. The screenshot’s file name includes the name of the game or app in which you took it, its date, and time.
Screenshots taken with Xbox Game Bar have unique names
NOTE: Instead of using the Windows + Alt + Print Screen shortcut, you can also bring up the Xbox Game Bar by pressing Windows + G, and then click or tap the “Take screenshot” button highlighted below.
The Take screenshot button from Windows 10’s Xbox Game Bar
What’s your favorite method of taking screenshots in Windows?
As you can see, there are many ways to shoot a screenshot in Windows. Unless you have complex needs, you can use the built-in tools and features without installing third-party apps for grabbing captures of your screen or apps. Before closing this tutorial, tell us: How do you screenshot on Windows?


