- Add new data sources
- Data Sources window
- Data source for a database or a database file
- Dataset
- Entity classes
- Data source for a service
- Data source for an object
- Data source for a SharePoint list
- Пошаговое руководство. Использование файла конфигурации для определения источника данных Walkthrough: Using a configuration file to define a data source
- Предварительные требования Prerequisites
- Добавление к проекту файла app.config Add an app.config file to the project
- Определение настраиваемого раздела конфигурации Define a custom configuration section
- Добавление настраиваемого раздела конфигурации в файл app.config To add the custom configuration section to the app.config file
- Определение строк подключения Define connection strings
- Определение строк подключения To define connection strings
- Определение источников данных Define data sources
- Определение источников данных To define data sources
- Создание модульного теста, использующего источники данных, определенные в файле app.config Create a unit test that uses data sources defined in app.config
- Создание источника данных Microsoft Access To create a Microsoft Access data source
- Создание источника данных Microsoft Excel To create a Microsoft Excel data source
- Создание модульного теста с помощью источников данных файла app.config To create a unit test using the app.config data sources
Add new data sources
The features described in this article apply to .NET Framework Windows Forms and WPF development. In Visual Studio 2019 (and previous versions), the features are not supported for .NET Core development, for both WPF and Windows Forms.
In the context of .NET data tools in Visual Studio, the term data source refers to .NET objects that connect to a data store and make the data available to a .NET application. The Visual Studio designers can consume the output of the data source to generate the boilerplate code that binds the data to forms when you drag and drop database objects from the Data Sources window. This kind of data source can be:
A class in an Entity Framework model that is associated with some kind of database.
A dataset that is associated with some kind of database.
A class that represents a network service such as a Windows Communication Foundation (WCF) data service or a REST service.
A class that represents a SharePoint service.
A class or collection in your solution.
If you’re not using data-binding features, datasets, Entity Framework, LINQ to SQL, WCF, or SharePoint, the concept of a «data source» does not apply. Just connect directly to the database by using the SQLCommand objects and communicate directly with the database.
You create and edit data sources by using the Data Source Configuration Wizard in a Windows Forms or Windows Presentation Foundation application. For Entity Framework, first create your entity classes, and then start the wizard by selecting Project > Add New Data Source (described in more detail later in this article).
Data Sources window
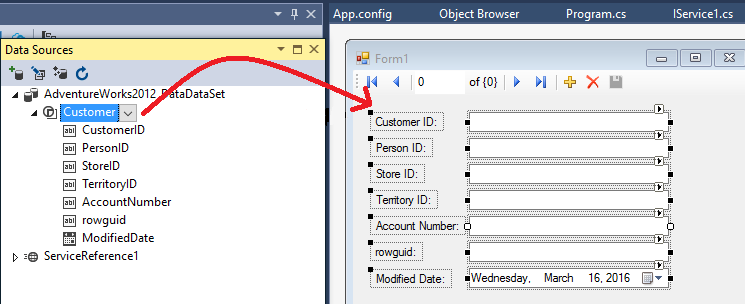
After you create a data source, it appears in the Data Sources tool window.
To open the Data Sources window, make sure your project is open, and then press Shift+Alt+D or choose View > Other Windows > Data Sources.
You can drag a data source from the Data Sources window onto a form design surface or control. This causes boilerplate code to be generated that displays the data from the data store.
The following illustration shows a dataset that has been dropped onto a Windows form. If you select F5 on the application, the data from the underlying database appears in the form’s controls.
Data source for a database or a database file
You can create a dataset or an Entity Framework model to use as a data source for a database or database file.
Dataset
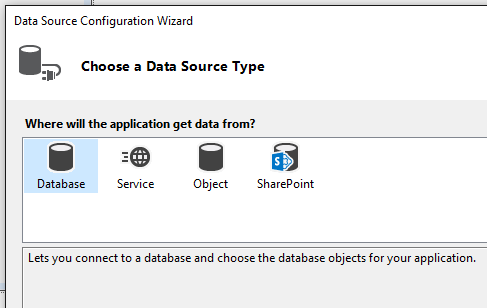
To create a dataset as a data source, run the Data Source Configuration Wizard by selecting Project > Add New Data Source. Choose the Database data-source type, and follow the prompts to specify either a new or existing database connection, or a database file.
Entity classes
To create an Entity Framework model as a data source:
Run the Entity Data Model Wizard to create the entity classes. Select Project > Add New Item > ADO.NET Entity Data Model.

Choose the method you want to generate the model by.

Add the model as a data source. The generated classes appear in the Data Source Configuration Wizard when you choose the Objects category.

Data source for a service
To create a data source from a service, run the Data Source Configuration Wizard and choose the Service data-source type. This is just a shortcut to the Add Service Reference dialog box, which you can also access by right-clicking the project in Solution Explorer and selecting Add service reference.
When you create a data source from a service, Visual Studio adds a service reference to your project. Visual Studio also creates proxy objects that correspond to the objects that the service returns. For example, a service that returns a dataset is represented in your project as a dataset; a service that returns a specific type is represented in your project as the type returned.
You can create a data source from the following types of services:
The items that appear in the Data Sources window are dependent on the data that the service returns. Some services might not provide enough information for the Data Source Configuration Wizard to create bindable objects. For example, if the service returns an untyped dataset, no items appear in the Data Sources window when you complete the wizard. This is because untyped datasets do not provide a schema, and therefore the wizard does not have enough information to create the data source.
Data source for an object
You can create a data source from any object that exposes one or more public properties by running the Data Source Configuration Wizard and then selecting the Object data-source type. All public properties of an object are displayed in the Data Sources window. If you are using Entity Framework and have generated a model, this is where you find the entity classes that are the data sources for your application.
On the Select the Data Objects page, expand the nodes in the tree view to locate the objects that you want to bind to. The tree view contains nodes for your project and for assemblies and other projects that are referenced by your project.
If you want to bind to an object in an assembly or project that does not appear in the tree view, click Add Reference and use the Add Reference Dialog Box to add a reference to the assembly or project. After you add the reference, the assembly or project is added to the tree view.
You may need to build the project that contains your objects before the objects appear in the tree view.
To support drag-and-drop data binding, objects that implement the ITypedList or IListSource interface must have a default constructor. Otherwise, Visual Studio cannot instantiate the data-source object, and it displays an error when you drag the item to the design surface.
Data source for a SharePoint list
You can create a data source from a SharePoint list by running the Data Source Configuration Wizard and selecting the SharePoint data-source type. SharePoint exposes data through WCF Data Services, so creating a SharePoint data source is the same as creating a data source from a service. Selecting the SharePoint item in the Data Source Configuration Wizard opens the Add Service Reference dialog box, where you connect to the SharePoint data service by pointing to the SharePoint server. This requires the SharePoint SDK.
Пошаговое руководство. Использование файла конфигурации для определения источника данных Walkthrough: Using a configuration file to define a data source
В этом пошаговом руководстве демонстрируется использование источника данных, определенного в файле app.config, для модульного тестирования. This walkthrough illustrates how to use a data source defined in an app.config file for unit testing. Вы узнаете, как создать файл app.config, определяющий источник данных, который может использоваться классом DataSourceAttribute. You will learn how to create an app.config file that defines a data source that can be used by the DataSourceAttribute class. В данном пошаговом руководстве представлены следующие задачи: Tasks presented in this walkthrough include the following:
создание файла app.config; Creating an app.config file.
определение настраиваемого раздела конфигурации; Defining a custom configuration section.
определение строк подключения; Defining connection strings.
определение источников данных; Defining the data sources.
доступ к источникам данных с помощью класса DataSourceAttribute. Accessing the data sources using the DataSourceAttribute class.
Предварительные требования Prerequisites
Для выполнения данного пошагового руководства требуется: To complete this walkthrough, you need:
Visual Studio Enterprise Visual Studio Enterprise
Microsoft Access или Microsoft Excel для предоставления данных хотя бы для одного из методов теста; Either Microsoft Access or Microsoft Excel to provide data for at least one of the test methods.
решение Visual Studio, содержащее тестовый проект. A Visual Studio solution that contains a test project.
Добавление к проекту файла app.config Add an app.config file to the project
Если файл app.config уже существует в тестовом проекте, переходите к разделу Определение настраиваемого раздела конфигурации. If your test project already has an app.config file, go to Define a custom configuration section.
Щелкните тестовый проект правой кнопкой мыши в обозревателе решений и выберите Добавить > Новый элемент. Right-click your test project in Solution Explorer, and then select Add > New Item.
Откроется окно Добавление нового элемента. The Add New Item window opens.
Выберите шаблон Файл конфигурации приложения и нажмите кнопку Добавить. Select the Application Configuration File template and click Add.
Определение настраиваемого раздела конфигурации Define a custom configuration section
Просмотрите файл app.config. Examine the app.config file. Он содержит как минимум объявление XML и корневой элемент. It contains at least the XML declaration and a root element.
Добавление настраиваемого раздела конфигурации в файл app.config To add the custom configuration section to the app.config file
Корневым элементом файла app.config должен быть элемент configuration. The root element of app.config should be the configuration element. Создайте элемент configSections в элементе configuration. Create a configSections element within the configuration element. configSections должен быть первым элементом в файле app.config. The configSections should be the first element in the app.config file.
В элементе configSections создайте элемент section. Within the configSections element, create a section element.
В элементе section добавьте атрибут с именем name и задайте для него значение microsoft.visualstudio.testtools . In the section element, add an attribute called name and assign it a value of microsoft.visualstudio.testtools . Добавьте еще один атрибут с именем type и задайте для него значение Microsoft.VisualStudio.TestTools.UnitTesting.TestConfigurationSection, Microsoft.VisualStudio.TestPlatform.TestFramework.Extensions . Add another attribute called type and assign it a value of Microsoft.VisualStudio.TestTools.UnitTesting.TestConfigurationSection, Microsoft.VisualStudio.TestPlatform.TestFramework.Extensions .
Элемент section должен принять следующий вид: The section element should look similar to this:
Имя сборки должно соответствовать версии, которую вы используете. The assembly name must match the version that you are using.
Определение строк подключения Define connection strings
Строки подключения определяют сведения, относящиеся к конкретному поставщику, для доступа к источникам данных. The connection strings define provider-specific information for accessing data sources. Строки подключения, определенные в файлах конфигурации, предоставляют сведения о поставщике данных для повторного использования в приложении. Connection strings defined in configuration files provide reusable data provider information across an application. В этом разделе создайте две строки подключения, которые будут использоваться источниками данных, определенными в настраиваемом разделе конфигурации. In this section, you create two connection strings that will be used by data sources that are defined in the Custom Configuration Section.
Определение строк подключения To define connection strings
После элемента configSections создайте элемент connectionStrings. After the configSections element, create a connectionStrings element.
В элементе connectionStrings создайте два элемента add. Within the connectionStrings element, create two add elements.
В первом элементе add создайте следующие атрибуты и значения для подключения к базе данных Microsoft Access: In the first add element, create the following attributes and values for a connection to a Microsoft Access database:
| attribute Attribute | Значения Values |
|---|---|
| name | «MyJetConn» |
| connectionString | «Provider=Microsoft.Jet.OLEDB.4.0; Data Source=C:\testdatasource.accdb; Persist Security Info=False;» |
| providerName | «System.Data.OleDb» |
Во втором элементе add создайте следующие атрибуты и значения для подключения к таблице Microsoft Excel: In the second add element, create the following attributes and values for a connection to a Microsoft Excel spreadsheet:
| attribute Attribute | Значения Values |
|---|---|
| name | «MyExcelConn» |
| connectionString | «Dsn=Excel Files;dbq=data.xlsx;defaultdir=.\; driverid=790;maxbuffersize=2048;pagetimeout=5» |
| providerName | «System.Data.Odbc» |
Элемент connectionStrings должен принять следующий вид: The connectionStrings element should look similar to this:
Определение источников данных Define data sources
Раздел источников данных содержит четыре атрибута, которые используются тестовой подсистемой для получения данных из источника данных. The data sources section contains four attributes that are used by the test engine to retrieve data from a data source.
name определяет удостоверение, используемое DataSourceAttribute для указания источника данных для использования. name defines the identity used by the DataSourceAttribute to specify which data source to use.
connectionString определяет строку подключения, созданную в предыдущем разделе «Определение строк подключения». connectionString identifies the connection string created in the previous Define Connection Strings section.
dataTableName определяет таблицу или лист, которые содержат данные, используемые в тесте. dataTableName defines the table or sheet that holds the data to use in the test.
dataAccessMethod определяет способ доступа к значениям данных в источнике данных. dataAccessMethod defines the technique for accessing data values in the data source.
В этом разделе мы определим два источника данных для использования в модульном тесте. In this section, you’ll define two data sources to use in a unit test.
Определение источников данных To define data sources
После элемента connectionStrings создайте элемент microsoft.visualstudio.testtools. After the connectionStrings element, create a microsoft.visualstudio.testtools element. Этот раздел файла был создан в разделе «Определение настраиваемого раздела конфигурации». This section was created in Define a Custom Configuration Section.
В элементе microsoft.visualstudio.testtools создайте элемент dataSources. Within the microsoft.visualstudio.testtools element, create a dataSources element.
В элементе dataSources создайте два элемента add. Within the dataSources element, create two add elements.
В первом элементе add создайте следующие атрибуты и значения для источника данных Microsoft Access: In the first add element, create the following attributes and values for a Microsoft Access data source:
| attribute Attribute | Значения Values |
|---|---|
| name | «MyJetDataSource» |
| connectionString | «MyJetConn» |
| dataTableName | «MyDataTable» |
| dataAccessMethod | «Sequential» |
Во втором элементе add создайте следующие атрибуты и значения для источника данных Microsoft Excel: In the second add element, create the following attributes and values for a Microsoft Excel data source:
| attribute Attribute | Значения Values |
|---|---|
| Name | «MyExcelDataSource» |
| connectionString | «MyExcelConn» |
| dataTableName | «Sheet1$» |
| dataAccessMethod | «Sequential» |
Элемент microsoft.visualstudio.testtools должен принять следующий вид: The microsoft.visualstudio.testtools element should look similar to this:
Окончательный файл app.config должен принять следующий вид: The final app.config file should look similar to this:
Создание модульного теста, использующего источники данных, определенные в файле app.config Create a unit test that uses data sources defined in app.config
Определив файл app.config, мы создадим модульный тест, использующий данные, находящиеся в источниках данных, которые определены в файле app.config. Now that an app.config file has been defined, you will create a unit test that uses data located in the data sources that are defined in the app.config file. В этом разделе мы рассмотрим: In this section, we will:
создание источников данных, определенных в файле app.config; Create the data sources found in the app.config file.
использование источников данных в двух методах теста, сравнивающих значения в каждом источнике данных. Use the data sources in two test methods that compare the values in each data source.
Создание источника данных Microsoft Access To create a Microsoft Access data source
Создайте файл базы данных Microsoft Access с именем testdatasource.accdb. Create a Microsoft Access database named testdatasource.accdb.
Создайте таблицу с именем MyDataTable в testdatasource.accdb. Create a table and name it MyDataTable in testdatasource.accdb.
Создайте два поля в таблице MyDataTable с именем Arg1 и Arg2 , используя тип данных Number . Create two fields in MyDataTable named Arg1 and Arg2 using the Number data type.
Добавьте пять сущностей в таблицу MyDataTable со следующими значениями для Arg1 и Arg2 соответственно: (10,50), (3,2), (6,0), (0,8) и (12312,1000). Add five entities to MyDataTable with the following values for Arg1 and Arg2 , respectively: (10,50), (3,2), (6,0), (0,8) and (12312,1000).
Сохраните и закройте базу данных. Save and close the database.
Измените строку подключения так, чтобы она указывала на расположение базы данных. Change the connection string to point to the location of the database. Измените значение Data Source так, чтобы оно отражало расположение базы данных. Change the value of Data Source to reflect the location of the database.
Создание источника данных Microsoft Excel To create a Microsoft Excel data source
Создайте электронную таблицу Microsoft Excel с именем data.xlsx. Create a Microsoft Excel spreadsheet named data.xlsx.
Создайте лист с именем Sheet1 , если он еще не существует в data.xlsx. Create a sheet named Sheet1 if it does not already exist in data.xlsx.
Создайте на листе Sheet1 два заголовка столбцов и назовите их Val1 и Val2 . Create two column headers and name them Val1 and Val2 in Sheet1 .
Добавьте пять сущностей в таблицу Sheet1 со следующими значениями для Val1 и Val2 соответственно: (1,1), (2,2), (3,3), (4,4) и (5,0). Add five entities to Sheet1 with the following values for Val1 and Val2 , respectively: (1,1), (2,2), (3,3), (4,4) and (5,0).
Сохраните и закройте таблицу. Save and close the spreadsheet.
Измените строку подключения так, чтобы она указывала на расположение таблицы. Change the connection string to point to the location of the spreadsheet. Измените значение dbq так, чтобы оно отражало расположение таблицы. Change the value of dbq to reflect the location of the spreadsheet.
Создание модульного теста с помощью источников данных файла app.config To create a unit test using the app.config data sources
Добавьте модульный тест в тестовый проект. Add a unit test to the test project.
Замените автоматически созданное содержимое модульного теста следующим кодом. Replace the auto-generated contents of the unit test with the following code:
Проверьте атрибуты DataSource. Examine the DataSource attributes. Обратите внимание на имена параметров из файла app.config. Notice the setting names from the app.config file.
Выполните построение решения и запустите тесты MyTestMethod и MyTestMethod2. Build your solution and run MyTestMethod and MyTestMethod2 tests.
Разверните элементы как источники данных, чтобы они были доступны для теста в каталоге развертывания. Deploy items like data sources so that they are accessible to the test in the deployment directory.


