- Как включить всем привычный Просмотр Фотографий в Windows 10.
- Как вернуть Классическое Средство Просмотра фотографий в Windows 10?
- Включить Windows Photo Viewer с помощью готового Reg файла.
- Способ 2 — Включить классическое средство просмотра фотографий с помощью Powershell.
- Способ 3 — Как вернуть стандартный просмотрщик изображений с помощью приложения.
- How to Set Windows Photo Viewer as Default Image Viewer in Windows 10
- Way 1: Set Windows Photo Viewer as default app through «Open with»
- Way 2: Set Windows Photo Viewer as default app through Control Panel
- Way 3: Set Windows Photo Viewer as default image viewer through Settings
- How to Set XnView as Default Image Viewer on Windows 10
- Pranob Mehrotra
- Set XnView as Default Image Viewer for All Files
- How to Batch Convert Images with XnView
- How to Capture Your Screen Using XnView
- Time to Dump the Photos App
- Read Next
- 5 Best Alternatives to Windows 10 Photos App
- Top 7 Photo Viewer Apps for Windows 10
- 7 Best Image Viewer Apps for Mac
- Top 7 Useful Ways to Fix Windows 10 Photos Black Screen Error
- 7 Best Ways to Fix Kindle for PC Desktop App Won’t Open on Windows
- What Is Microsoft Power Automate Desktop and Why Do You Need It
- 6 Best Ways to Fix Action Center Greyed Out on Windows 10
- 8 Best Ways to Fix Google Chrome Security Certification Error
- Did You Know
Как включить всем привычный Просмотр Фотографий в Windows 10.
Публикация: 14 Декабрь 2017 Обновлено: 24 Апрель 2020
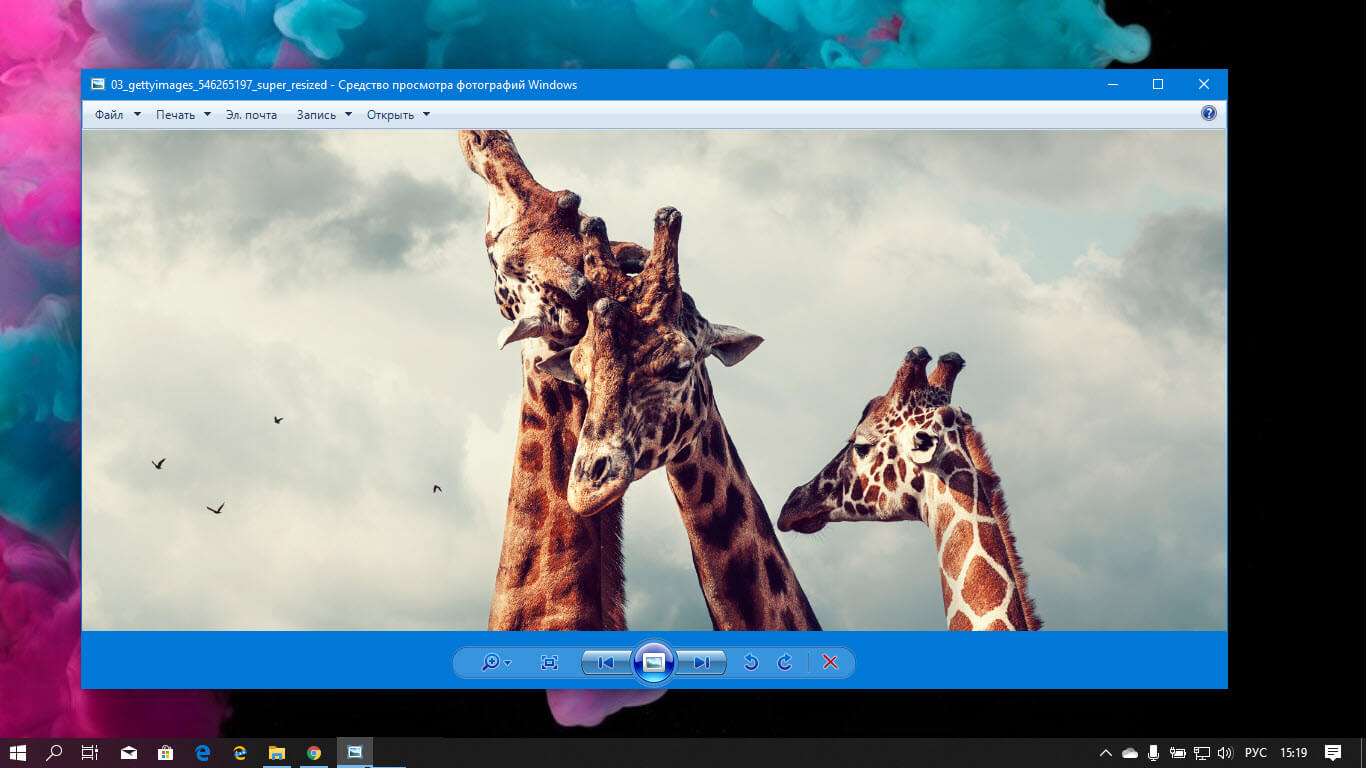
Microsoft в новых версиях Windows 10 скрыла от пользователей старое доброе «Средство Просмотра фотографий Windows», На смену которому пришло современное приложение, под названием «Фотографии» (Photos), нельзя сказать, что новое приложение не удобное, просто не совсем привычное.
Несмотря на то что новое приложение «Фотографии» имеет более богатый функционал в отличии от старого классического, но многие пользователи хотят вернуть «Средство Просмотра фотографий Windows», на самом деле это несложно.
Как вернуть Классическое Средство Просмотра фотографий в Windows 10?

Предлагаем нашим читателям Три способа, с помощью которых, вы сможете установить классический просмотрщик для использования в качестве программы по умолчанию, для просмотра ваших любимых изображений и фотографий.
- Первый способ — позволит вам иметь под рукой готовый Reg файл, вы всегда сможете восстановить средство просмотра фотографий на нескольких компьютерах.
- Второйспособ — более быстрый, просто выполните команду в Windows Powershell.
- Третий способ — с помощью приложения и библиотеки shimgvw.dll
Microsoft, не удалила Просмотрщик из Windows 10, установить в настройках Средство Просмотра фотографий Windows по умолчанию нельзя, так как оно отсутствует в списке Приложения по умолчанию. А в Классической панели управления ассоциировать с ним можно только файлы с расширением TIFF. Давайте исправим это ограничение в Windows 10 и включим всеми любимый старый, добрый «Просмотр фотографий».
Просмотр фотографий Windows может быть активирован путем редактирования реестра. Необходимо добавить набор значений для ассоциации графических файлов в Раздел реестра —
Это можно сделать в ручную или с помощью команды Powershell.
Включить Windows Photo Viewer с помощью готового Reg файла.
Чтобы сэкономить Ваше время, ниже, я добавил уже готовый файл реестра, теперь вам нет необходимость вносить сложные правки в реестре вручную, все что нужно — загрузить архив, распаковать и запустить файл: Windows 10 Photo Viewer.reg.
Шаг 1: Загрузите архив Windows 10 Photo Viewer.zip и распакуйте его.
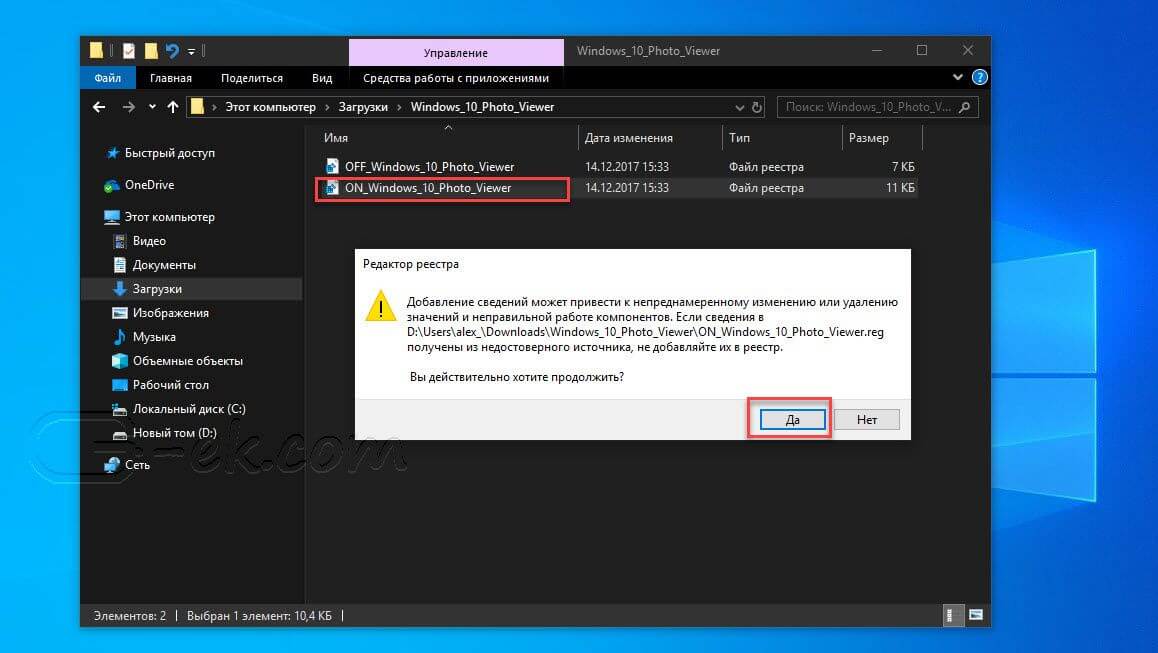
Шаг 2: В полученной папке, найдите и запустите файл — «ON_Windows_10_Photo_Viewer»
Шаг 3: Подтвердите запрос контроля учетных записей и добавление сведений.
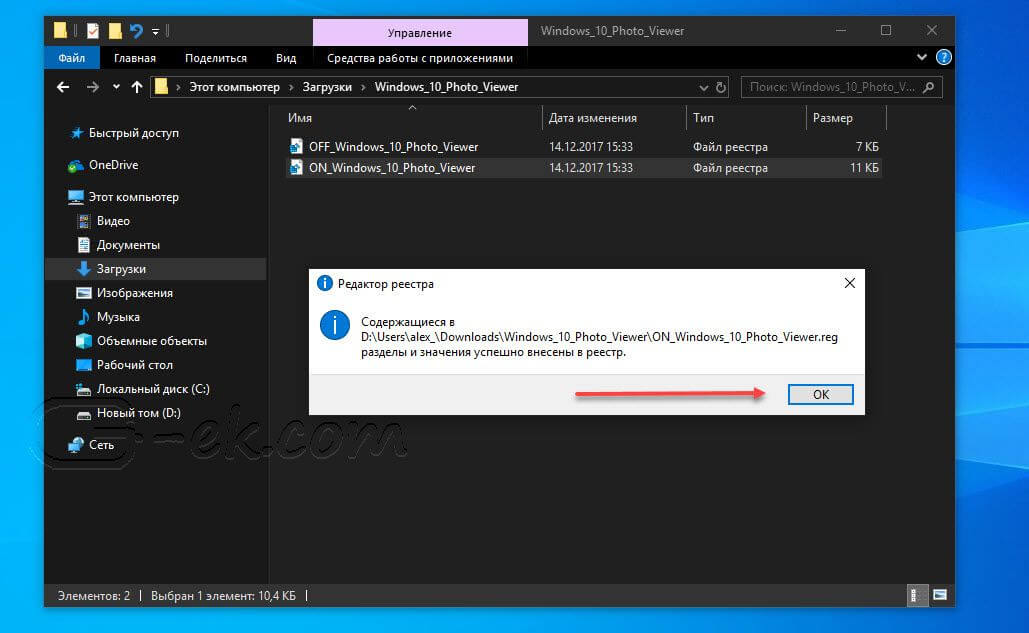
После запуска, все необходимые разделы и значения будут автоматически внесены в реестр, о чем вы будете оповещены, (см. скриншот ниже).
Шаг 4: Теперь откройте Параметры Windows, нажав сочетания клавиш Win + I или нажмите на значок шестеренки в меню «Пуск».
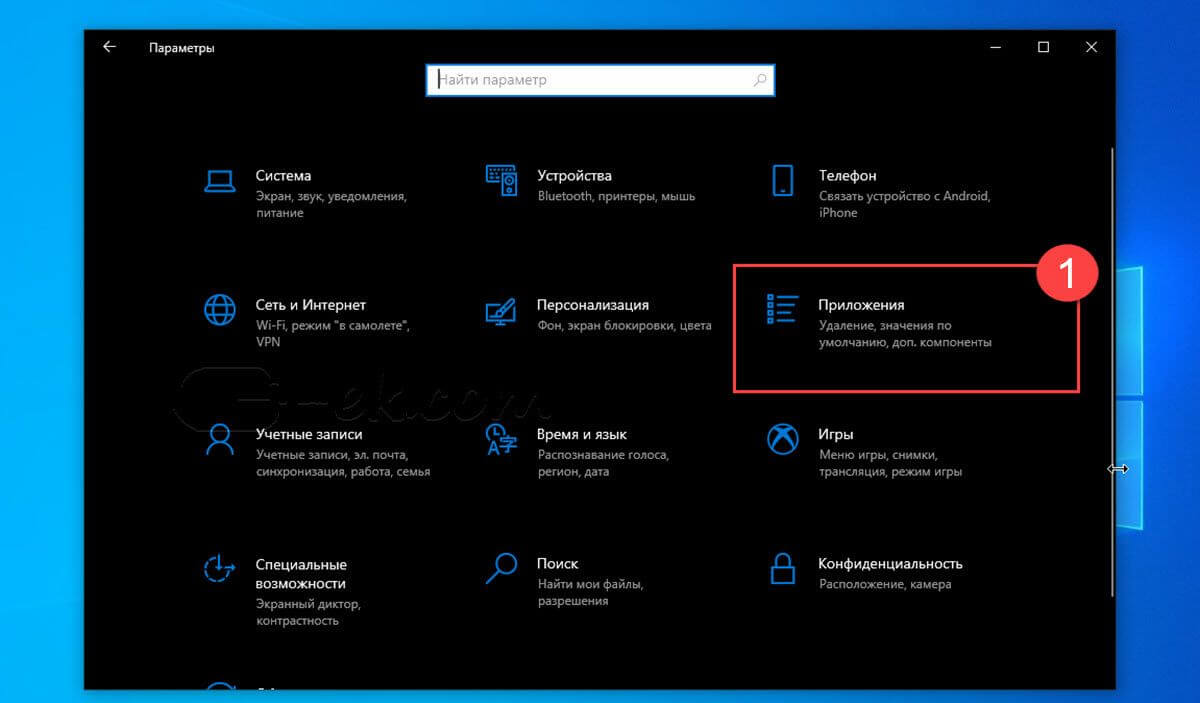
Шаг 5: Перейдите в группу настроек «Приложения» → «Приложения по умолчанию».
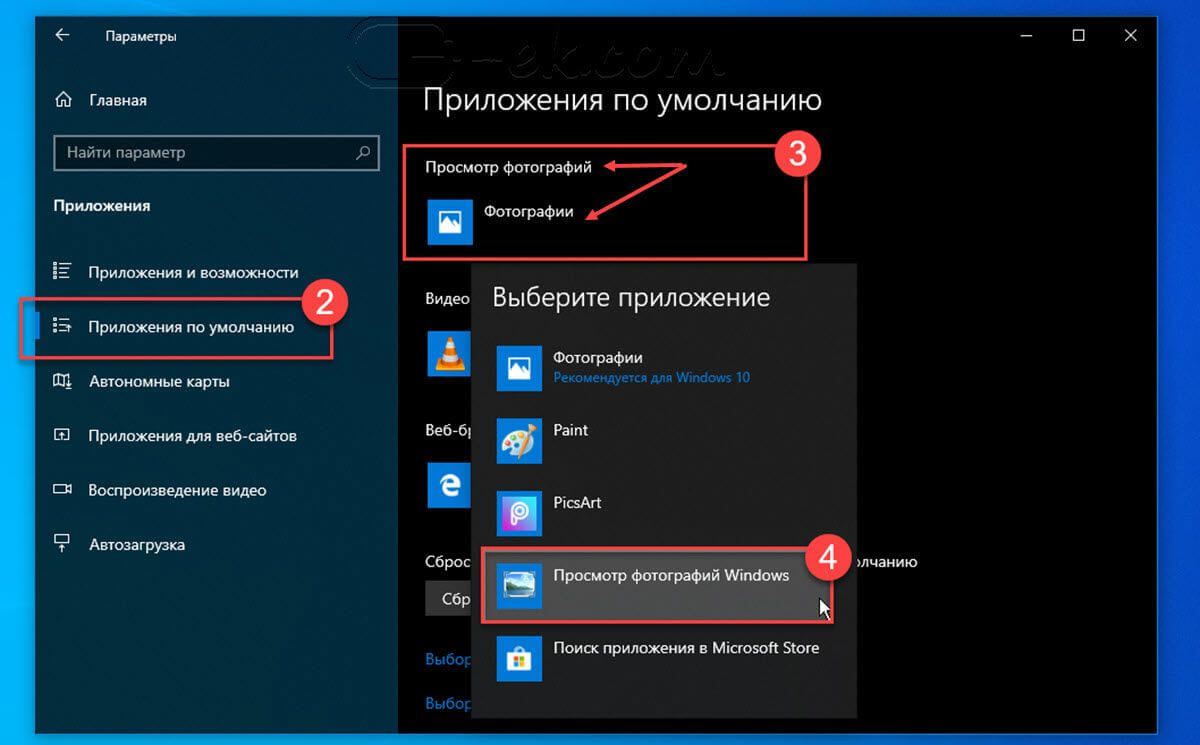
На открывшийся странице «Приложения по умолчанию», найдите раздел «Просмотр фотографий», нажмите на значок приложения которое используется по умолчанию и выберите в выпадающем меню «Просмотр фотографий Windows». См. скрин ниже:
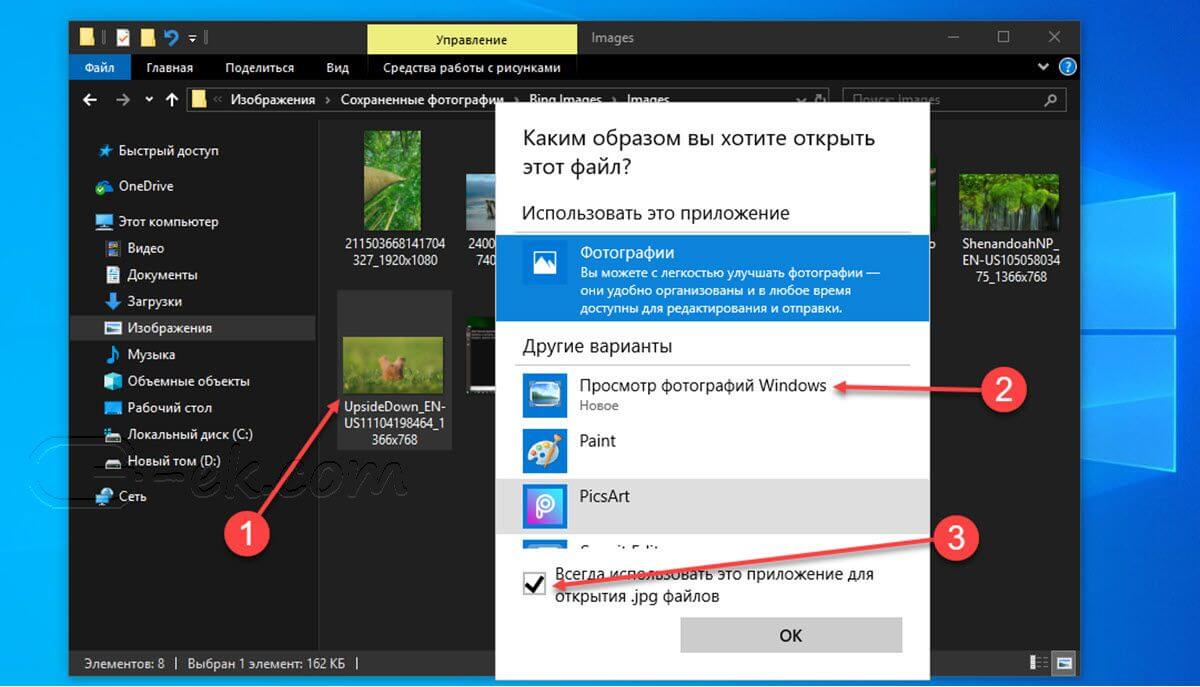
Или, вы можете кликнуть правой кнопкой мыши на любом изображении и выбрать в контекстном меню «Открыть с помощью»
В появившимся окне «Каким образом вы хотите открыть этот файл», выберите «Просмотр фотографий Windows».
Примечание: Если вы захотите вернуть настройки по умолчанию файл отката присутствует в архиве.
Все!
Способ 2 — Включить классическое средство просмотра фотографий с помощью Powershell.
Данный способ отличается от первого, только настройкой Приложения по умолчанию, выполняется для каждого типа изображения.
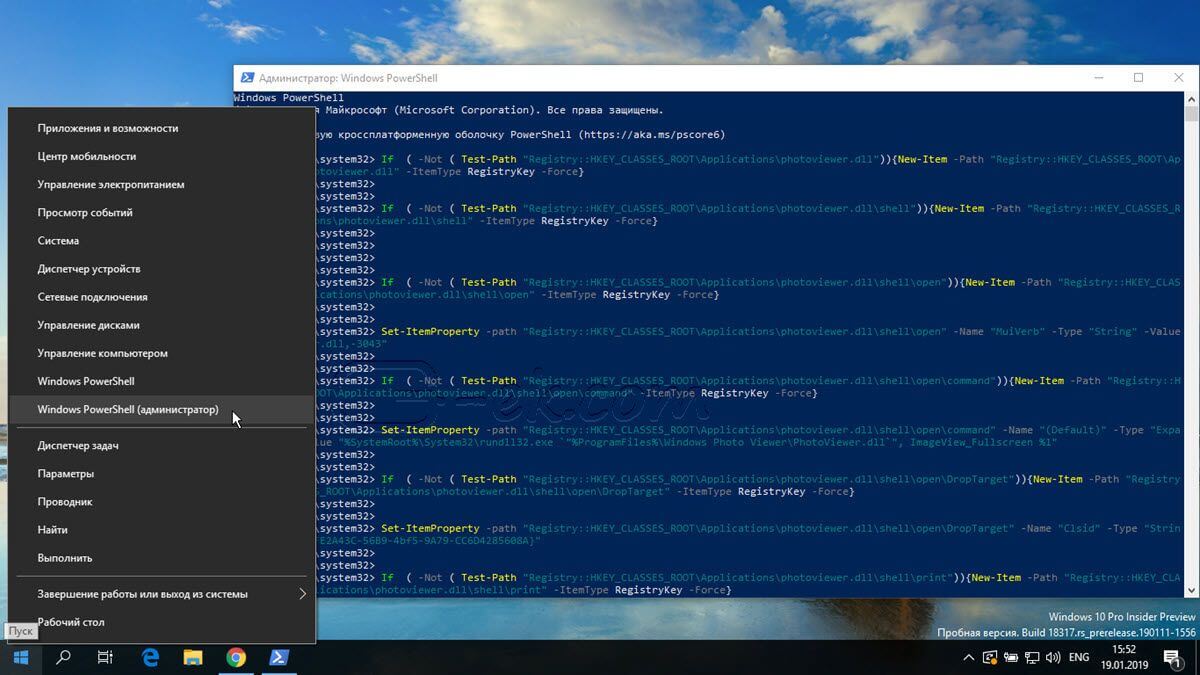
Шаг 1: Кликните правой кнопкой мыши на меню «Пуск».
Шаг 2: В появившемся контекстном меню выберите Windows Powershell (администратор) — Это важно!
Шаг 3: Скопируйте и вставьте следующие команды:
Примечание: Скопируйте и вставьте все команды за один раз включая символ # и нажмите клавишу Enter .
Шаг 4: После выполнения команды закройте окно Powershell и откройте папку с изображениями.
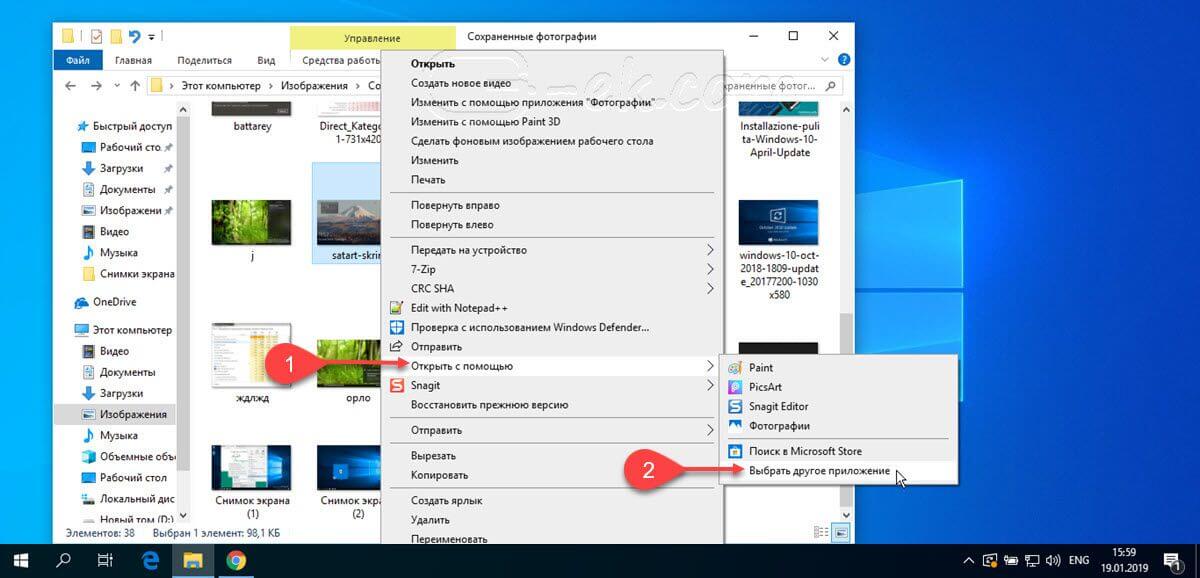
Шаг 5: Нажмите правой кнопкой мыши на любой картинке и выберите в контекстном меню «Открыть с помощью» → «Выбрать другое приложение».
Шаг 6: В открывшимся окне Найдите и нажмите «Просмотр фотографий Windows», Для того чтобы фото и картинки открывались всегда с помощью «Средства Просмотра фотографий Windows» не забудьте поставить галочку как на скриншоте ниже:
Все! вы справились, перейдите в папку с изображениями или фотографиями и дважды кликните на любой картинке, изображение откроется в «Средстве Просмотра фотографий Windows»!
Способ 3 — Как вернуть стандартный просмотрщик изображений с помощью приложения.
Поскольку способы выше работают при условии что в системе есть файл библиотеки динамической компоновки shimgvw.dll. Еще один способ вернуть средство просмотра фотографий, с помощью отдельного приложения которое уже включает в себя нужную библиотеку если ваша по какой либо причине, повреждена.
Оригинальный просмотрщик картинок в Windows — это не совсем обычное приложение. Расположено оно в библиотеке shimgvw, следовательно и запустить его напрямую нельзя — нужен как минимум rundll32.
Чтобы сделать загрузчик не нужно ничего кроме небольшого числа функций WinAPI, получилось мини-приложение не требующее установки, которое включает в себя две библиотеки shimgvw.dll из Windows 7 и XP SP3, с размером всего 502 килобайта. На выходе получаем независимый просмотрщик картинок, который можно записать на флешку и всегда иметь под рукой.
Шаг 1: Загрузите мини приложение: Средство просмотра изображений для Windows 10.
Шаг 2: Распакуйте полученный архив Sredstvo_prosmotra_fotografij.zip в любое место, я скопирую содержимое архива в корневую директорию диска С:\.
Шаг 3: Теперь, откройте папку с изображениями, кликните на одном из них правой кнопкой мыши и выберите «Открыть с помощью» → «Выбрать другое приложение».
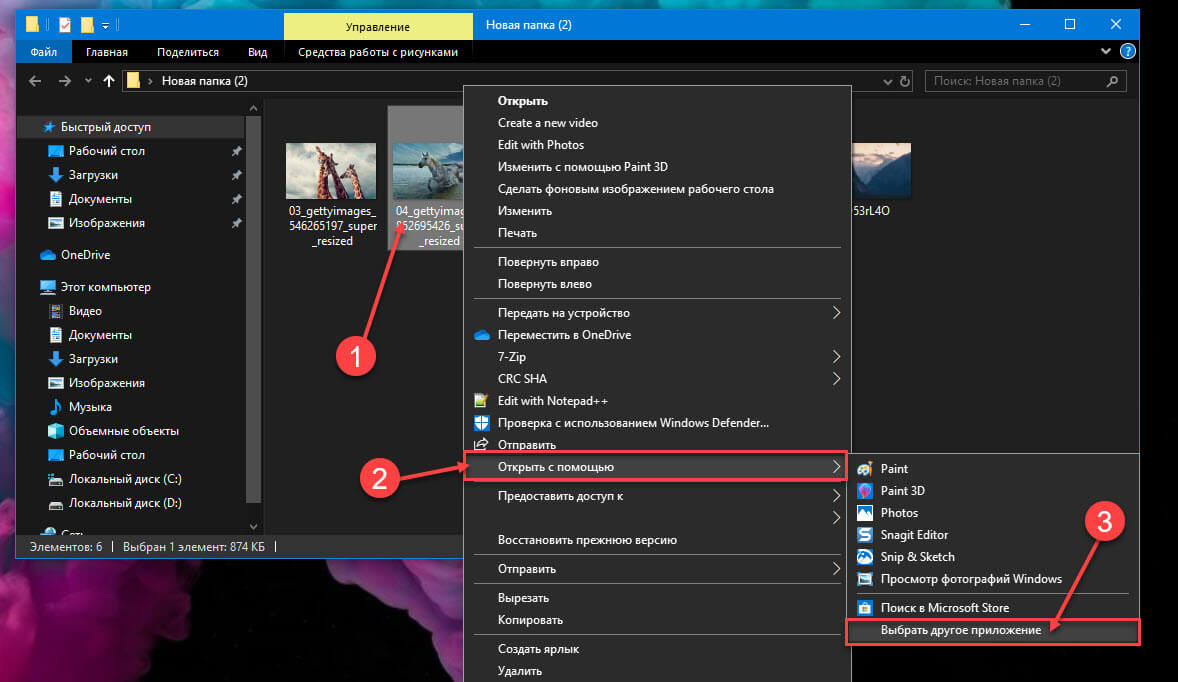
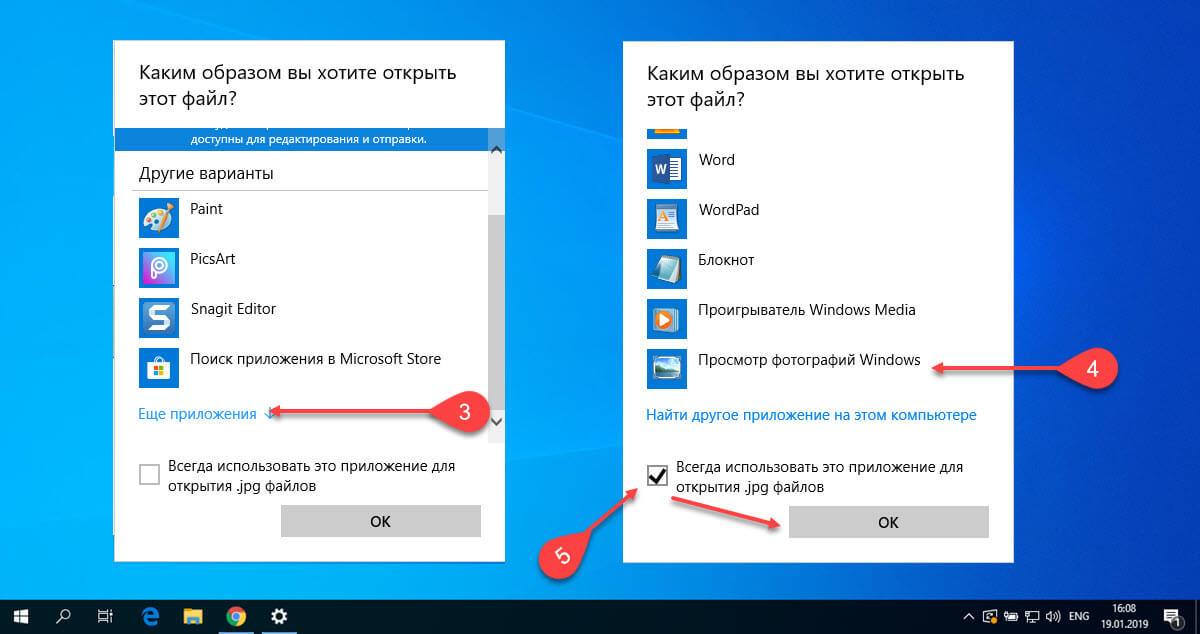
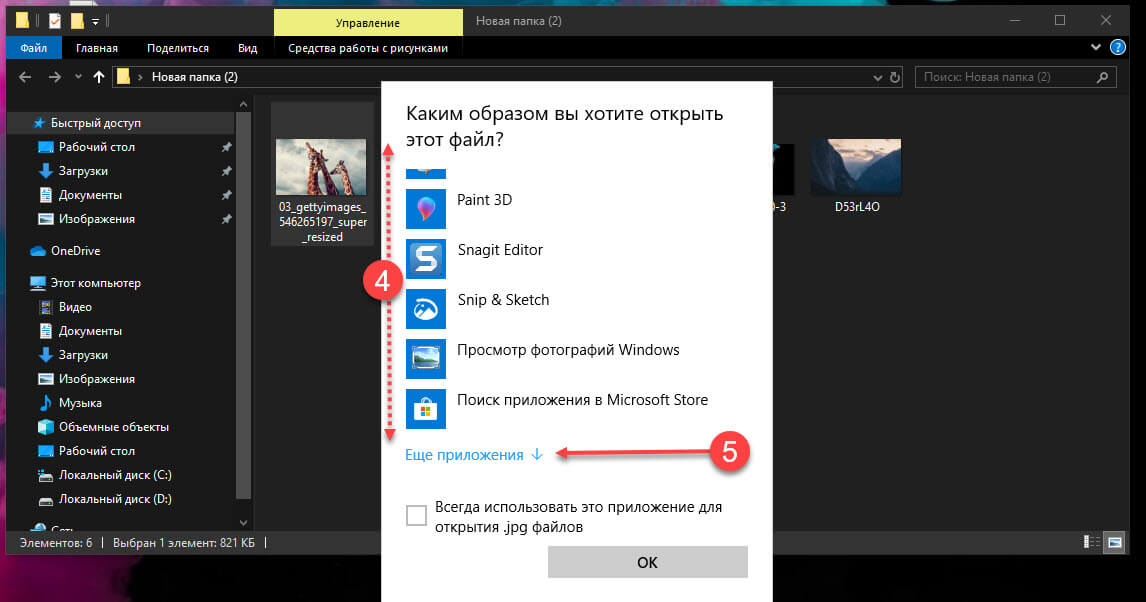
Шаг 3: В окне запроса «Каким образом вы хотите открыть этот файл» прокрутите список в самый низ и нажмите ссылку «Еще приложения».
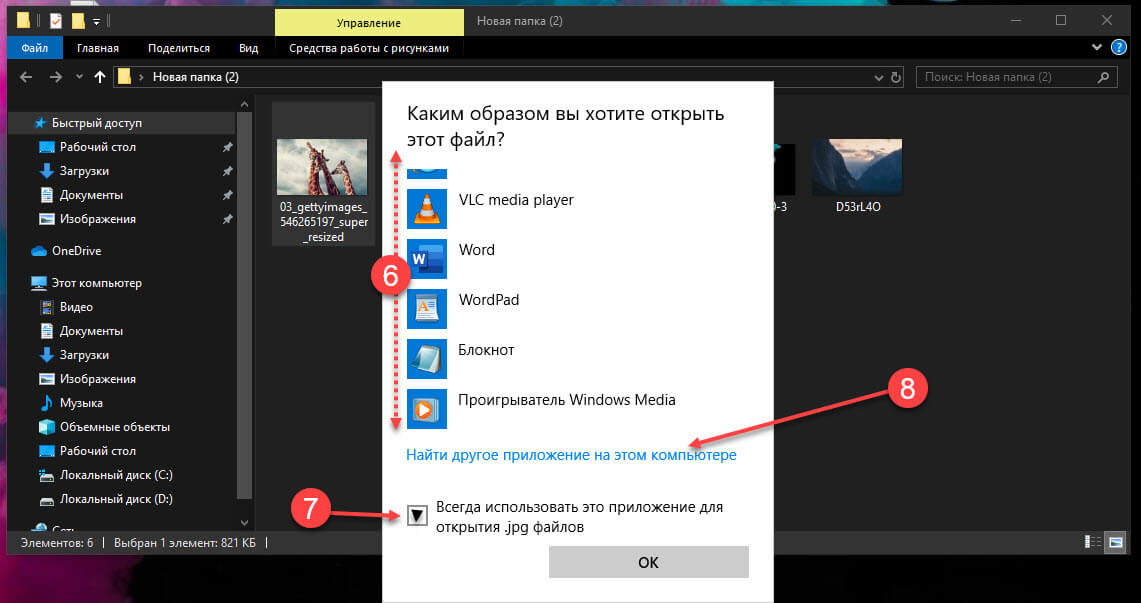
Шаг 4: В следующем окне, установите флажок для «Всегда использовать это приложение для открытия файла jpg» и нажмите ссылку «Найти другое приложение на этом компьютере».
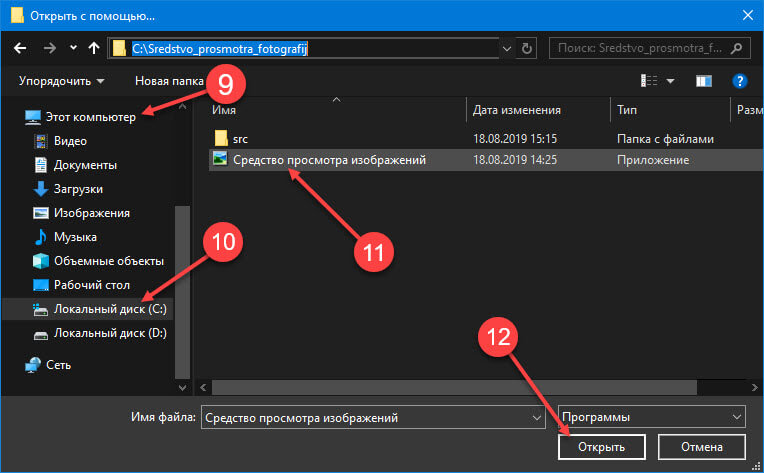
Шаг 5: Теперь перейдите в папку где вы распаковали загруженный архив (я поместил содержимое архива в корень диска С:\Sredstvo_prosmotra_fotografij), выберите файл «Средство просмотра изображений» и нажмите кнопку «Открыть».
Все! Просмотрщик работает!
Повторите эту процедуру для таких типов файлов: .jpg, .jpeg, .png, .tiff, .bmp, .gif, .tif Или, Вы можете настроить ассоциации файлов в приложении «Параметры» перейдите «Приложения» → «Приложения по умолчанию» → «Выбор стандартных приложений для всех типов».
How to Set Windows Photo Viewer as Default Image Viewer in Windows 10
The default image viewer in Windows 10 is the new Metro Photos app instead of the classical Windows Photo Viewer. When you double-click on one picture to view it, by default Windows 10 will automatically run the Photos app to open the picture. However, some users are used to the old Windows Photo Viewer and want to make it as default image viewer in Windows 10. Now, this page will show you how to set Windows Photo Viewer as default image viewer in Windows 10. Three ways are illustrated below.
Way 1: Set Windows Photo Viewer as default app through «Open with»
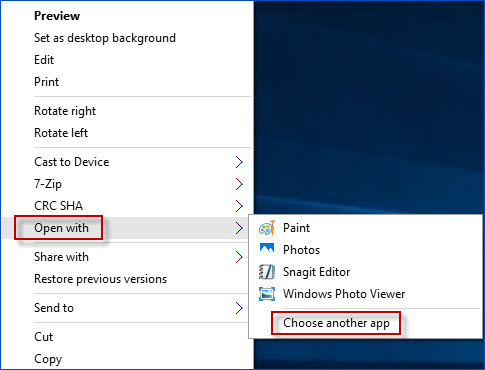
Step 1: Right-click on one picture (.jpg, .jpeg, .gif, .png, .bmp, .etc.), point to Open with and select Choose another app.
Step 2: Select Windows Photo Viewer option, check Always use this app to open .jpg files, and then click OK. (If you can’t see «Windows Photo Viewer» under other options, click on More apps to find it.)
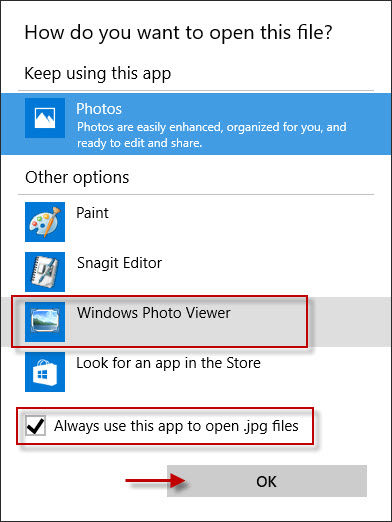
Then your Windows 10 will open photos in JPG format with Windows Photo Viewer app by default. Similarly, you can also set it to use Windows Photo Viewer to open pictures in PNG, GIF, .etc. format by default.
Way 2: Set Windows Photo Viewer as default app through Control Panel
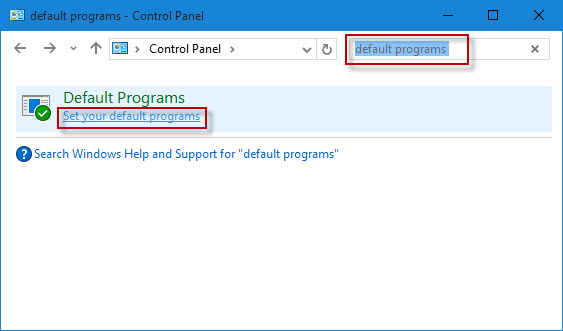
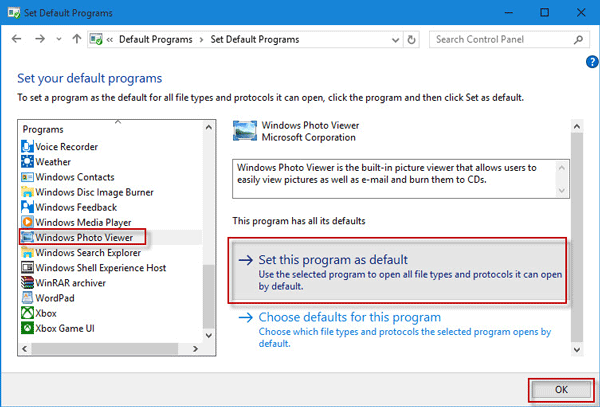
Step 1: Open Windows 10 Control Panel. Type default programs in the search box. Then click the Set your default programs link under Default Programs.
Step 2: Select Windows Photo Viewer from the box on the left pane, click Set this program as default on the right pane and click OK. Then Windows 10 will use Windows Photo Viewer to open all image files by default.
Way 3: Set Windows Photo Viewer as default image viewer through Settings
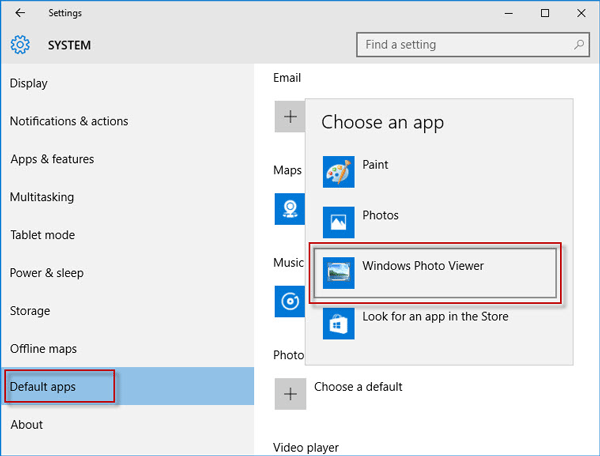
Step 1: Press the key combination »Win + I» to open Settings panel, and then click the first item titled System.
Step 2: Select Default apps on the left pane, on the right pane, click the Choose a default under Photo viewer and then select Windows Photo Viewer from the app list. Then all image files will open with Windows Photo Viewer by default.
Tips: If the Windows Photo Viewer option can’t appear when you use either way above to set Windows Photo Viewer as default, that’s because Windows Photo Viewer is not yet activated and unavailable in your Windows 10. In this case, you need to firstly get Windows Photo Viewer working in Windows 10.
How to Set XnView as Default Image Viewer on Windows 10
Pranob Mehrotra
03 Jul 2019
If you work with a lot of images on your PC, the chances are that you work with a program like XnView. It’s one of the best free media management software out there, and it goes a long way in simplifying how you view images on Windows 10.

On the contrary, the Windows 10 Photos app is quite basic and doesn’t offer much in terms of functionality. So, it’s quite apparent that you would want all your images to open with XnView by default. If you’ve been facing issues with that, then you’ve come to the right place.
In this article, I’ll show you a couple of different ways in which you can set XnView as the default image viewer on Windows 10. And what’s really great is that these methods will work with any other image viewer of your choice, including IrfanView, FastStone, and even Adobe Bridge.
Also on Guiding Tech

Top 3 Adobe Bridge Alternatives for Image Management on Windows 10
Set XnView as Default Image Viewer for All Files
Follow these simple steps to set XnView as your default image viewer using the Windows 10 settings:
Step 1: Click on the Start icon and then type Default apps in the search bar.

Step 2: Select the Default apps option to open up the Windows 10 setting for the same.

Step 3: In the Default apps setting, click on the application mentioned under the Photo viewer option.

Step 4: Then select XnView from the list and you’re all set.

In case you don’t see XnView MP in the list (as shown above), then you’ll need to follow these steps to make sure it shows up in the default apps list.
Step 5: Open up XnView as administrator. To do so, right click on the XnView icon and select run as administrator.

Step 6: Head over to the XnView settings, from within the Tools menu or by using the F12 keyboard shortcut.

Step 7: Select the Integration option from the column on the left to open up the Integration menu.

Step 8: Here, check the box next to the Add ‘Browse with XnViewMP’ to the context menu option.

Step 9: Then click on the Set file associations button.

That will bring up a prompt saying To change your default apps, go to Settings > Apps > Defaults apps. Just click on OK and proceed to the next step.
Step 10: Head back to the Default apps settings and check the list once again. The XnView option should now be available on the list.

Just select the option, and you’re good to go. Now every time you open an associated file, it will launch XnView instead of the default Windows Photos app.
Now that you know how to set XnView as the default image viewer on Windows 10, let’s take a look at some cool tips that will help you make the most out of the software:
How to Batch Convert Images with XnView
XnView isn’t your average image viewer for your Windows PC. It can do a whole lot more, and that’s why we’ve chosen it over the stock Photos app. One of the most useful things that you can do with the software is the batch conversion of images from one format to another.
If you don’t know how to do that, follow these simple steps to get started:
Step 1: Click on the Tools menu in the top toolbar and then select the Batch convert option.

Alternatively, you can use the Ctrl+U keyboard shortcut to open the batch conversion window.
Step 2: In the batch conversion window, add the files you want to convert by clicking on the Add files button in the bottom left corner.

In case all your files are in the same folder, you can also click on the Add folder button to select all the files in one go.
Step 3: Select the files you wish to convert in the Open Image(s) dialog and then click on the Open button.

Step 4: Now switch over to the Actions tab if you want to perform any actions on each image before converting them to the desired file format and click on the Add action button.

Step 5: Then select the actions you want to add to your images from the drop-down menu.

You can use this option to manipulate your images together, edit them, and add filters.
Step 6: Once you’ve added the actions, switch over to the Output tab.

In the Output tab, you’ll be able to select the destination folder for the converted files, choose the output format, and even change the file names.
Step 7: Once you’re satisfied with all the settings, just click on the Convert button in the bottom right corner and the program will process all your images.

How to Capture Your Screen Using XnView
While there are many great screen capture software available for Windows, most of the good ones aren’t free. But did you know that you can also use XnView to capture your screen? Just follow these steps to do so:
Step 1: Click on the Tools menu in the top toolbar and then select the Capture option.

Step 2: In the Capture menu, select the part of the screen you want to capture by clicking on the toggle next to it.

You can choose to capture the entire Desktop, all active windows, a particular active window, or anything that falls within a rectangle.
Step 3: Once you’ve selected what you want to capture, set the Delay by clicking on the small arrows next to it.

By setting a delay, you’ll get enough time to set up your recording beforehand, and you won’t have to crop the beginning later on.
You can even select a Hotkey to trigger the screen capture by selecting the Hotkey option and then choosing a hotkey from the drop-down menu.
Step 4: Now if you want to show your cursor in the recording to make it easier for the viewer to follow your action, click on the check box next to the Include cursor option.

Step 5: Once everything is set, just click on the OK button and the screen capture will start after the specified delay or when you tap on the Hotkey.

Also on Guiding Tech
# images
Time to Dump the Photos App
Now that you know how to set XnView as the default image viewer on Windows 10, it’s time to dump the stock Photos app for good. With XnView, you’ll be able to accomplish a lot more in a shorter time, which will significantly boost your productivity.
Next up: If you’re still in the initial stages of using a third-party image viewer, and aren’t completely sold on XnView, check out the next article. I’m sure it’ll help you decide if you should go with XnView or choose IrfanView instead.
Last updated on 5 Jul, 2019
The above article may contain affiliate links which help support Guiding Tech. However, it does not affect our editorial integrity. The content remains unbiased and authentic.
Read Next

5 Best Alternatives to Windows 10 Photos App
Is # Windows # Photos app bothering you? Are you looking for alternatives? Here, we bring you 5 alternatives or similar apps to Windows Photos.

Top 7 Photo Viewer Apps for Windows 10
Level up your # photo viewing experience on # Windows 10 by learning about the seven best # Photo viewer # apps for # Windows 10.

7 Best Image Viewer Apps for Mac
# Apple Preview is good for viewing # photos, but there are better options on # macOS. Here our the top 7 Image Viewer apps for # Mac which could serve as Preview alternatives.

Top 7 Useful Ways to Fix Windows 10 Photos Black Screen Error
Can’t view the image when you open it in # Photos app? Learn how you can fix Microsoft Photos black # screen error on your # Windows 10 computer.

7 Best Ways to Fix Kindle for PC Desktop App Won’t Open on Windows
Can’t open the Amazon # Kindle app on your # desktop PC? Here are some solutions to fix that issue so you can get back to reading your books in peace in your free time.

What Is Microsoft Power Automate Desktop and Why Do You Need It
Everything you need to know about # Microsoft # Power Automate Desktop. Where to get it, how to use it, how to create your first workflow, and who should use it. Complete guide.

6 Best Ways to Fix Action Center Greyed Out on Windows 10
Is the Action Center greyed out on your # Windows 10 computer? Here is an in-depth look at all the solutions that can help you fix this issue promptly.

8 Best Ways to Fix Google Chrome Security Certification Error
Learn how to fix the # Google # Chrome # Security certification error by following the post below.
Did You Know
Microsoft Edge was initially code-named Project Spartan.


