- Изменить изображение профиля профиля для учетной записи пользователя в Windows 10 2021
- ÐÑÐµÐ¼Ñ Ð¸ СÑекло Так вÑпала ÐаÑÑа HD VKlipe Net
- Изменить изображение профиля профиля для учетной записи пользователя
- Password Recovery
- How to change default User Account picture in Windows 10
- Change default User Account picture in Windows 10
- How to Reset User Profile Picture to Default in Windows 10
- Change your account picture
- Change your account picture
- Delete an account picture
Изменить изображение профиля профиля для учетной записи пользователя в Windows 10 2021
ÐÑÐµÐ¼Ñ Ð¸ СÑекло Так вÑпала ÐаÑÑа HD VKlipe Net
В Windows 10, если вы создаете новую учетную запись пользователя, изображение учетной записи по умолчанию автоматически присваивается , Если вы хотите изменить это изображение профиля по умолчанию при создании новой учетной записи в Windows 10, это простой способ. Очевидно, что вы можете изменить изображение профиля позже в соответствии с вашими предпочтениями — но этот трюк изменит изображение, которое появляется перед изменением изображения профиля вручную.
Изменить изображение профиля профиля для учетной записи пользователя

Для этого вам понадобится Редактор изображений. Поскольку Windows использует различные размеры изображения в разных местах, вам необходимо изменить размер изображения на основе системных требований. В общем, вам нужно восемь (8) разных изображений в двух разных форматах, то есть PNG и BMP.
Итак, выберите изображение, которое вы хотите установить в качестве изображения учетной записи пользователя по умолчанию. Затем измените размер и переименуйте его следующим образом:
- guest.bmp — 448 x 448 пикселей
- guest.png — 448 x 448 пикселей
- user.bmp — 448 x 448 пикселей
- user.png — 448 x 448 пикселей
- user-32.png — 32 x 32 пикселя
- user-40.png — 40 x 40 пикселей
- user-48.png — 48 x 48 пикселей
- user-192.png — 192 x 192 pixel
Затем сделайте Windows Показать скрытые файлы и папки, а затем перейдите к этой папке:
В качестве альтернативы вы можете ввести это в командной строке:

Открыта папка, скопируйте все ваши измененные размеры и переименованные изображения и вставьте их в эту папку. Прежде чем вы это сделаете, вы можете создать резервные копии исходных системных изображений по умолчанию.
Теперь ваше изображение профиля по умолчанию было изменено. Если вы создаете новую учетную запись или у вас есть учетная запись, имеющая изображение профиля по умолчанию для системы, вы увидите новое изображение.
Надеюсь, вам понравится этот небольшой отзыв!
Password Recovery
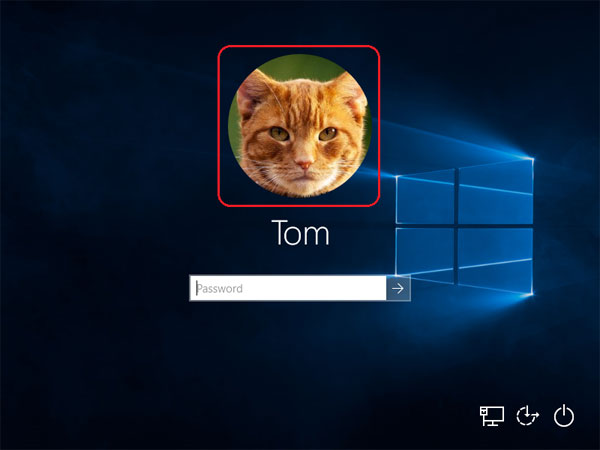
At Windows login screen you can see a list of user accounts with a small picture next to each one. Actually, the same account picture is also shown at the top of the Start menu (or Start screen), and you can click it to log off and switch user accounts.
In this article we’ll show you how to change the user account picture in Windows 10/8, restore the default user picture (avatar) or delete your old or current account picture.
Part 1: Change Account Picture for Windows 10/8 Account
Unlike previous versions of Windows, Windows 10 and Windows 8 don’t include an option to change the account picture from the User Accounts applet in Control Panel. Now, you have to change it from PC Settings. Here’s how:
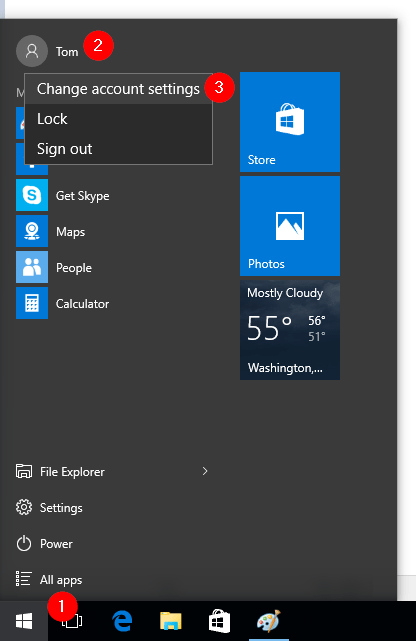
- Click the Start button or press the Windows logo key on your keyboard. This will open the Start Menu (or Start Screen).
- Right-click on the account picture at the top-left corner of the Start menu, and then select “Change account settings“. If a Start screen is shown, right-click on the account picture at the top-right corner of the Start screen and select the “Change account picture” option.
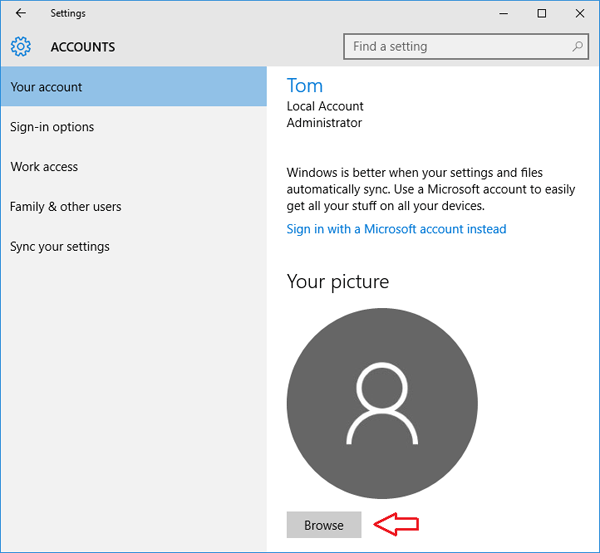
Windows presents the PC Settings screen shown below. From there you can see your current account picture. Click on Browse button and select your favorite picture to set as new account picture.
Part 2: Reset/Restore Account Picture to Default
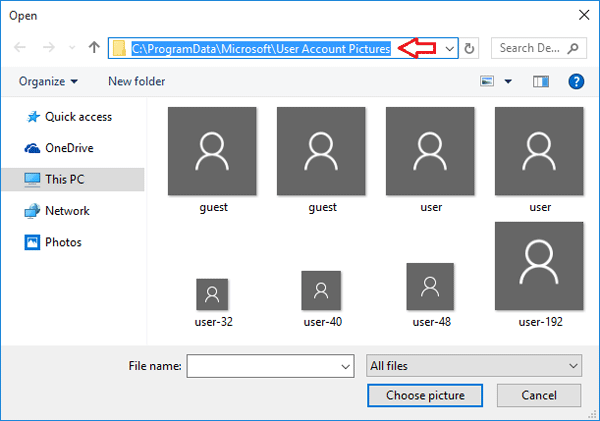
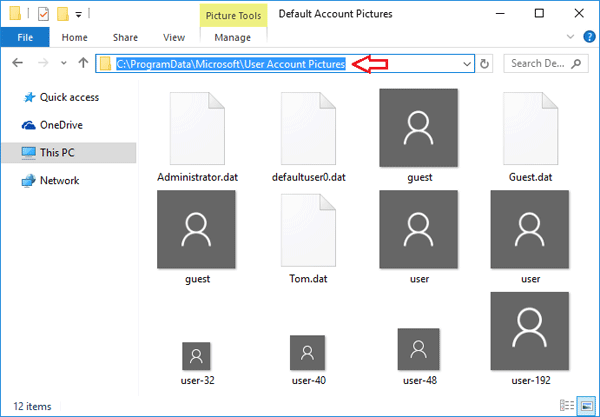
After changing the account picture, you might later find that there is no option to restore the profile picture to default. In Windows 10/8/7, the default account picture images are stored in the hidden system folder: C:\ProgramData\Microsoft\User Account Pictures. Here’s how to reset account picture to default in Windows 10/8:
- Click the Start button or press the Windows logo key on your keyboard. This will open the Start Menu (or Start Screen).
- Right-click on the account picture at the top-left corner of the Start menu, and then select “Change account settings“. If a Start screen is shown, right-click on the account picture at the top-right corner of the Start screen and select the “Change account picture” option.
- Click on Browse button under your current user avatar. When the Open dialog appears, type the following path in the address bar and hit Enter.
C:\ProgramData\Microsoft\User Account Pictures
Part 3: Delete Your Old Account Picture
If you changed your Windows user account picture several times, the previous account pictures will also be shown on the right side of your current account picture.
If you don’t plan to use them again, there is no reason to keep them there. But Windows 10/8 provide no way to remove old user pictures. Here is very simple way to delete the old user account pictures:
- Open the File Explorer.
- Type the following path at the address bar, replacing username with the name of your Windows account.
C:\Users\username\AppData\Roaming\Microsoft\Windows\AccountPictures
Part 4: Hide or Remove Current Account Picture
Is there a way to hide or remove the user picture at the login screen? How to disable the user account picture from the Start menu? Follow these steps and you can hide/remove current account picture completely in Windows 10/8:
- Open the File Explorer.
- Copy and paste the following path in the address bar of File Explorer. Press Enter and you can see all built-in default account pictures. Delete all images.
C:\ProgramData\Microsoft\User Account Pictures
Now you have to clean the cached account images. Copy and paste the following path in the address bar of File Explorer. Press Enter and you’ll see a folder with the name of your account’s SID.
C:\Users\Public\AccountPictures
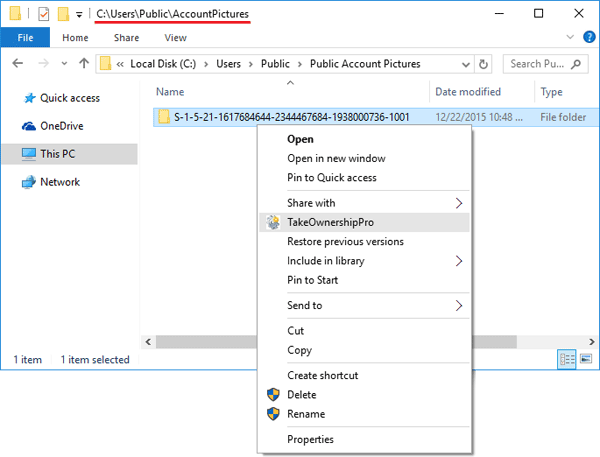
Just rename the folder or delete it. If you want to delete that folder, you need to firstly take ownership of the folder using the freeware TakeOwnershipPro.
Log off or restart your computer. You’ll see the account picture disappeared from Windows login screen.
How to change default User Account picture in Windows 10
In Windows 10, if you create a new user account, a default account picture gets assigned automatically. If you want to change this default profile picture when you create a new account in Windows 10, here is a simple method. Obviously, you can change the profile picture later based on your preference – but this trick will change the image that comes before changing the profile picture manually.
Change default User Account picture in Windows 10
To do this, you need an Image Editor. As Windows uses various image size at different locations, you need to resize the image based on system requirements. In total, you need eight (8) different images in two different formats, i.e., PNG and BMP.
So, select an image that you want to set as the system’s default User Account picture. Then, resize and rename it as follows:
- guest.bmp – 448 x 448 pixel
- guest.png – 448 x 448 pixel
- user.bmp – 448 x 448 pixel
- user.png – 448 x 448 pixel
- user-32.png – 32 x 32 pixel
- user-40.png – 40 x 40 pixel
- user-48.png – 48 x 48 pixel
- user-192.png – 192 x 192 pixel
Next, make Windows Show hidden files & folders and then navigate to this folder:
Alternatively, you can enter this in Run prompt:
One the folder has opened, copy all your resized & renamed images and paste them into this folder. Before you do that, you may want to back up the original default system images.
Now your default profile picture has been changed. If you create a new account or you have an account having the system’s default profile picture, you will see the new image.
How to Reset User Profile Picture to Default in Windows 10
In Windows 10, you can easily set the user profile picture for any user account either using an existing image or by snapping a picture through the web cam. But once you have set the picture, removing it and returning back to the default user profile picture is not so easy. Even if you use a random picture to be used as your profile picture, Windows keeps the older pictures and displays them in the settings. Here we are showing you how you can reset the user profile picture and remove the user set pictures from Windows 10:
- Open the Start menu by clicking on the Windows logo in the bottom-left corner of your Windows 10 desktop screen. In the Start menu, click on the user picture and then choose Change account settings when that option appears.

- Your user account settings will be shown in the PC Settings window. Click on the Browse for one button to choose a picture from your PC.
- Browse to C:\ProgramData\Microsoft\User Account Pictures to choose the user.png picture. This is the default user profile picture used by Windows 10.
- After setting the default user profile picture, you can close the PC Settings window. Now open Windows File Explorer and navigate to the folder: %AppData%\Microsoft\Windows\AccountPictures. You will find all the user profile pictures that you have have used before. You can delete them all.


This way you can not only use the default user profile picture for any user account in Windows 10, but you can also remove all the pictures set by the users.
Change your account picture
If you want your account picture to have more of a personal touch and reflect you, you can change your picture in Windows 10.
Change your account picture
You can change the picture for either a local account or a Microsoft account. Here’s how.
Tip: If you use just a username and password to sign in to Windows 10, you’re using a local account. If you use an email address and password to sign in, you’re using a Microsoft account.
Change your local account picture in Windows 10
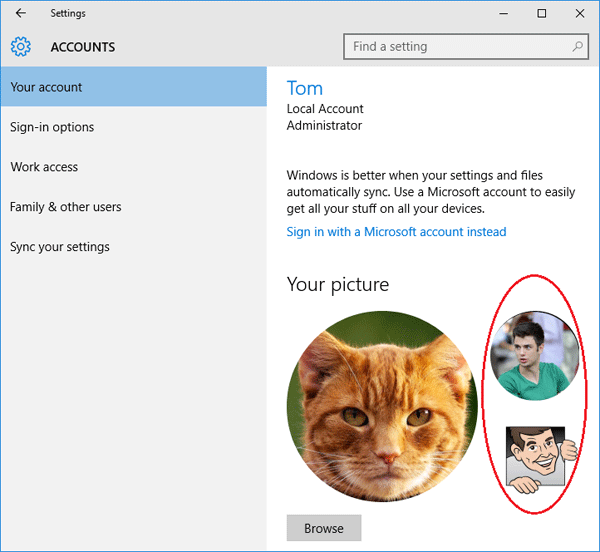
Select the Start button, then select Settings > Accounts > Your info.
Under Create your picture, select Browse for one. Or, if your device has a camera, select Camera and take a selfie.
Note: Windows remembers the last three pictures you’ve used. Select the picture on the Your info page to switch to that one.
Change your Microsoft account picture in Windows 10
Select Add picture or Change picture, then follow the instructions.
Note: Windows remembers the last three pictures you’ve used, so you can easily switch back to a recent favorite.
Delete an account picture
Windows is designed to let you switch between your three most recent pictures on the Your info page. If you really need to delete one of your account pictures:
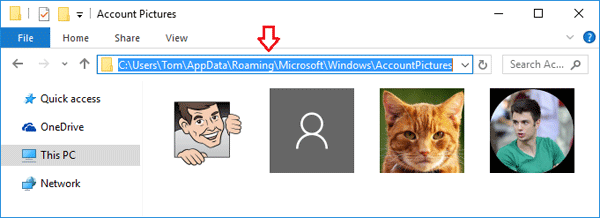
Open File explorer from the taskbar. If you don’t see File explorer on the taskbar, select Start , and type File explorer.
Go to C:\Users\ yourname\AppData\Roaming\Microsoft\Windows\AccountPictures.
Replace yourname with your account name.
If you’re unable to find the AppData folder in File Explorer , it might be hidden. Select the View setting and select the checkbox next to Hidden Items to show all items in a folder.
Delete the account picture you no longer want to use.


