- Antimalware Service Executable High Disk, memory and CPU usage after 2018-03 updates
- Windows 10 High CPU and Disk usage problem Fix
- How to fix windows 10 High RAM and CPU usage problem
- 1) Change a particular registry value-
- 2 ) Disable SysMain to solve windows 10 high cpu usage-
- 3) Disable apps running in Background to solve high ram usage
- 4) Disable Runtime Broker for solving high cpu usage
- 5) Adjust system settings for best performance
- 6) Optimize your Hard Drives for faster performance
- 7) Update Drivers to fix windows 10 high CPU usage
- 8) Turn off Automatically pick an accent color from my background
- Windows Defender — high CPU and disk usage
Antimalware Service Executable High Disk, memory and CPU usage after 2018-03 updates
Antimalware Service Executable is one of the background-running services in Windows Defender. Antimalware Service Executable is running to scan the malware and spyware when you access them. It will detect if there’s anything harmful on your PC Aside from that, it also takes a background scan of your system for any viruses or worms. Its scanning relies heavily on your computer’s CPU, that’s why you find it’s eating the CPU usage on your Windows 10. To get this sorted, I suggest to follow the steps below:
Method 1: Change Windows Defender’s schedule
The error is mainly due to its real-time protection feature. Kindly follow the steps to change Windows Defender’s schedule to fix it.
- On your keyboard, press the Windows logo key and R at the same time to invoke the Run box. Type taskschd.msc and press Enter.
- Double-click on Task Scheduler Library >Microsoft >Windows .
- Double-click Windows Defender in Windows . Then double-click Windows Defender Scheduled Scan .
- Uncheck Run with highest privileges.
- Uncheck all the items in the Conditions section. Then click OK .
Method 2: Add Antimalware Service Executable to Windows Defender exclusion list
- On your keyboard, press the Windows logokey and I at the same time to open the Settings window.
- Click Update & security .
- Click Windows Defender . Then click Add an exclusion in Exclusions .
- Click Exclude a .exe, .com or .scr process
- Type MsMpEng.exe . Then click OK .
Restart your PC and see if the issue persists.
Feel free to post back should you have further concerns.
Windows 10 High CPU and Disk usage problem Fix
April 23, 2020 By Admin
A lot of Windows 10 users are experiencing high disk usage and cpu usage problem. When i digged into the problem, i found that that high ram usage or high cpu consumption by windows 10 os may be due to some extra processes and features turned on mainly and sometime due to outdated drivers in your system. I am listing here the most responsible things which you can fix to solve the problem. Find out what works for you and please feel free to comment about your experience.

How to fix windows 10 High RAM and CPU usage problem
Go for these solutions to reduce RAM and CPU usage on your computer.
1) Change a particular registry value-
NOTE–
Before going ahead to the main fix, we strongly suggest you to create a a backup of the registry on your computer. After opening Registry Editor, click on “File” > “Export” to create the backup.
If anything goes wrong you can retrieve your registry by simply importing the backup.
1. Press Windows key+R together to launch Run window on your computer.
2. Type “regedit” in Run window and then click on “OK“.

Registry Editor window will be opened.
3. In Registry Editor window, on the left hand side, navigate to this location-
HKEY_LOCAL_MACHINE\SYSTEM\CurrentControlSet\Control\Session Manager\Memory Management
4. Now, on the right hand side, double click on “ClearPageFileAtShutDown” to modify it.
![]()
5. In Edit DWORD (32-bit) Value window, set the ‘Value data:‘ to “1” and then click on “OK” to save the value change.

Once it is done, close Registry Editor window.
Reboot your computer to let the changes take effect.
After rebooting check the ram and CPU usage on your computer. It should drop significantly.
2 ) Disable SysMain to solve windows 10 high cpu usage-
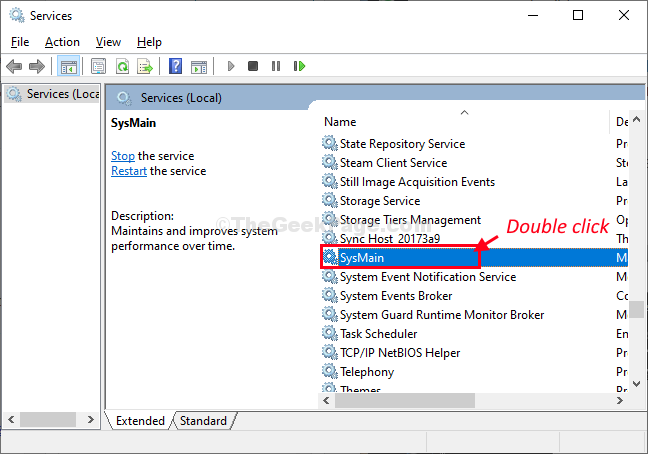
Step 1 – Search services in windows 10 taskbar search box. Click on services.

Step 2 – Scroll down and find “SysMain” in the right side of Services window.
Step 3- Double click on “SysMain” to access it’s properties.
Step 4- In SysMain Properties widow, click on the ‘Startup type:‘ and choose “Disabled” from the drop-down list.
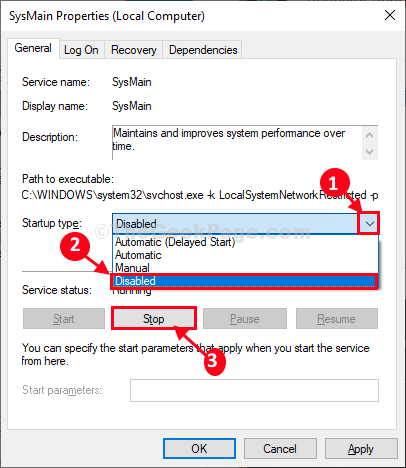
Step 5- Finally, click on “Apply” and then on “OK” to save the changes on your computer.
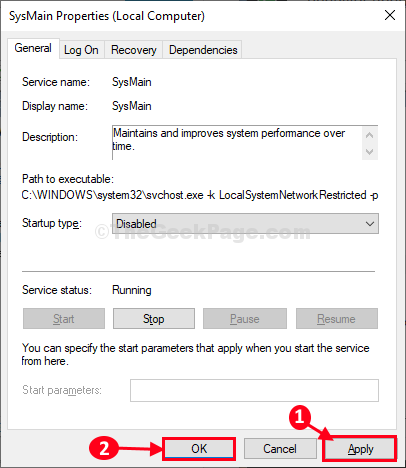
Now, reboot your windows 10 for changes to come into effect.
3) Disable apps running in Background to solve high ram usage
If you want to ask me which one. I would say every one. Why would any app run in background, when we are not using them. Even if they want to update themselves, it can be done once we open it. So, better shut all of them off.
Go to Settings -> Privacy -> Background apps and turn all of them off.

4) Disable Runtime Broker for solving high cpu usage
Step 1 – Press windows key + i to open system control panel.
Click on system.

Step 2 – Now, click on Notifications & actions in the left menu.
There is an option in the right side, saying show me tips about windows. Turn it off.

5) Adjust system settings for best performance
Step 1: – Search view advanced system settings in start menu search box.

Step 2: – Now, click on settings as shown in the pic.

Step 3: – Now, choose adjust for best performance. Finally choose apply and then click ok. Finally restart your PC.

6) Optimize your Hard Drives for faster performance
7) Update Drivers to fix windows 10 high CPU usage
Updating all your drivers can also solve your memory problem, if outdated driver are the reason behind it.
Press windows key + i to open system control panel. Search update device drivers in the search box. Click on update device drivers and proceed.

Note – windows 10 have certain memory requirement. You must be sure that your device is having this much amount of system configuration with it.
Processor
Installed memory (RAM)
1 GB for 32-bit Operating System
2 GB for 64-bit Operating System
Free hard disk space
16 GB for 32-bit version
20 GB for 64-bit version
If your system configuration is above that, please follow the methods illustrated above. If everything else fails, clean install windows 10. I will update this posts with more ways to tackle high cpu and high ram usage problem of windows 10.
8) Turn off Automatically pick an accent color from my background
Step 1 – Press windows key + i to reach system control panel.
Step 2 – Click on personalization as show below.

Step 3 – Now, choose colors from the left menu.
In the right side, Turn off Automatically pick an accent color from my background.


Saurav is associated with IT industry and computers for more than a decade and is writing on The Geek Page on topics revolving on windows 10 and softwares.
Windows Defender — high CPU and disk usage
About a week ago I noticed that Windows Defender («Antimalware Service Executable») is using 25-50% of my CPU at all times. It’s also taking between 140 and 600MB of RAM (my system has 16GB of RAM so that’s not a big issue).
I have not installed any other anti virus product before on this computer. I wish to keep using Windows Defender because it used to be very light wait and non-intrusive (and also free of course 😉 )
I looked for solutions on the internet but none of the proposed solutions worked for me:
- I added MsMpEng.exe and the entire Windows Defender folder as an exception to Windows Defender
- I checked the task scheduler, but the last time any of the Defender tasks ran was about a week ago
- I ran «sfc /scannow» and «dism /online /cleanup-image /restorehealth».
SFC found some issues but after rebooting the problem remained. - I disabled Windows Defender Real-Time protection, but that doesn’t help.
As Windows Defender protects itself from interference from viruses, it’s hard to find any useful information using my usual toolset for dealing with these issues (Process Explorer shows Access Denied errors so I can’t check the handles to see if it’s having issues with a specific file).
Rebooting Windows does not help. Neither shutting down and booting nor selecting reboot in the start menu helps. I have updated all drivers, installed all Windows Updates but nothing seems to help.
I tried disabling ImDisk but that does not help. A scan for viruses comes out clean. I had Metasploit installed for a while but I have removed it, and I have also removed the exclusions I added for Metasploit.
The only cause I can think of is that Defender showed a notification a while ago about a threat it was removing, but the notification never disappeared and defender was hogging the CPU trying to remove it. After about 30 minutes I shut down my computer but the issue seems to persist.
I managed to find some information using Process Hacker (http://processhacker.sourceforge.net/): the CPU usage is caused by a single thread from the WinDefend service, and it seems to be stuck at ntdll.dll!RtlAcquireSRWLockShared+0x3b90 accoding to the «Start address» field of the thread overview.
The I/O total rate Process Hacker indicates is about 9-25MB/s, but no scan is running according to the interface.
I tried killing the process using Process Hacker and restarting the WinDefend service, but that didn’t help.
I’m at a loss for other solutions. Hopefully someone on these forums has an idea of what I can do about this.
Thank you once again for your response.
I solved the problem. It turns out I had the Metasploit .msi installer file in my downloads directory (I tried Metasploit a while back but I have installed it ever since). I found out this was causing the problem by looking through the open process handles one by one again using Process Hacker, and that file kept being reopened.
AVG did not detect the file, Malwarebytes went straight past it but Defender was determined to delete it (but somehow failed). I don’t know why it failed to delete the file in the first place so I think it’s a bug in Defender. The file wasn’t marked read-only, had normal permissions and the directory wasn’t really protected in any special way so Defender should have been able to delete it the moment it detected something was off.
The weirdest thing is that no mention of the .msi file in the event logs, the Defender detection history or any other logs I could find.
I would like to thank everyone who has helped me. Your efforts are greatly appreciated. I’m sorry if I’ve wasted your time.
This certainly hasn’t been a waste of time from my perspective. I couldn’t have come up with a better demonstration of how undetected or un-remediated malware can cause this chronic high CPU utilization by the Antimalware Engine (MsMpEng.exe). So this should help us put a big dent in the SE’s silly notion that a self-exclusion is the magic bullet for this issue – we really do need to use third-party malware-removal tools and specialized process-monitoring utilities if we want to chase down the real culprit.
But you’ve also managed to prove beyond a shadow of a doubt that hunting down the source can be pretty difficult even for a knowledgeable user. So the chances that an average user would have been able to resolve this issue would realistically be slim to none. That’s precisely why I emphasize that the most expedient solution for average users is usually just to move on to another free AV app. Since most of the third-party AV apps out there have better detection rates, and also seem to have fewer high-CPU issues, there really isn’t much of a downside for this solution. So thank you very much for providing us with a marvelous “textbook example” of what I’m talking about.


