- Help protect my PC with Microsoft Defender Offline
- When should I use Microsoft Defender Offline?
- Where can I find scan results?
- Using Windows Defender Offline on Windows 7 and Windows 8.1
- Защита компьютера с помощью автономного Microsoft Defender
- В каких случаях следует использовать автономный Microsoft Defender?
- Где найти результаты проверки?
- Использование автономного Защитника Windows в Windows 7 и Windows 8.1
- Windows Defender not working [FULL FIX]
- Best Antivirus Deals For You:
- Windows Defender won’t start
- What to do if Windows Defender is not working in Windows 10
- 1. Enable real-time protection
- 2. Change date and time
- 3. Use professional software for protection
- Eset Smart Security Premium
- 4. Update Windows
- 5. Change Proxy Server
- 6. Disable third-party antivirus
- 7. Run the SFC scan
- 8. Run DISM
- 9. Reset the Security Center service
Help protect my PC with Microsoft Defender Offline
Microsoft Defender Offline is a powerful offline scanning tool that runs from a trusted environment, without starting your operating system. This topic describes how to use Microsoft Defender Offline in Windows 10, Windows 8.1, and Windows 7.
When should I use Microsoft Defender Offline?
Run Microsoft Defender Offline if:
Windows Security (named Windows Defender Security Center in previous versions of Windows) detects rootkits or other highly persistent malware on your PC and alerts you to use Microsoft Defender Offline. You might see a message stating that malware was found on your device, or receive a message in Windows Security notifying you that additional cleaning is required.
You suspect your PC might have malware that’s hiding on it, but your security software doesn’t detect anything. In this situation, you can start a Microsoft Defender Offline scan from Windows Security settings. Here’s how:
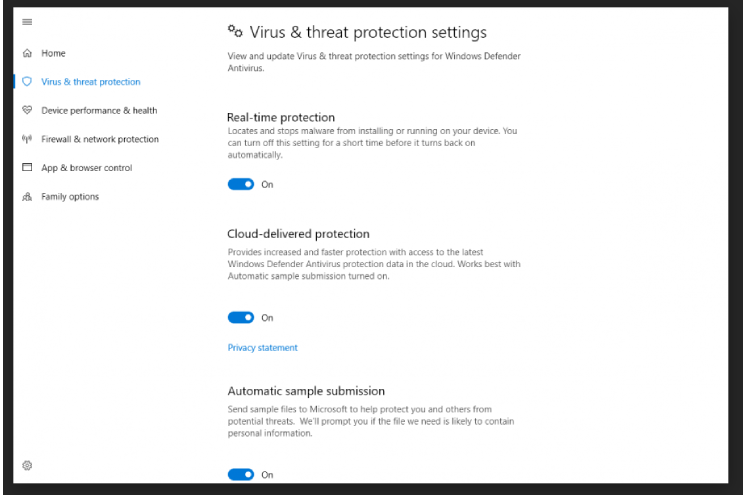
Select Start , and then select Settings > Update & Security > Windows Security > Virus & threat protection .
On the Virus & threat protection screen, do one of the following:
In an up-to-date version of Windows 10: Under Current threats, select Scan options.
In previous versions of Windows: Under T hreat history, select Run a new advanced scan.
Select Microsoft Defender Offline scan, and then select Scan now.
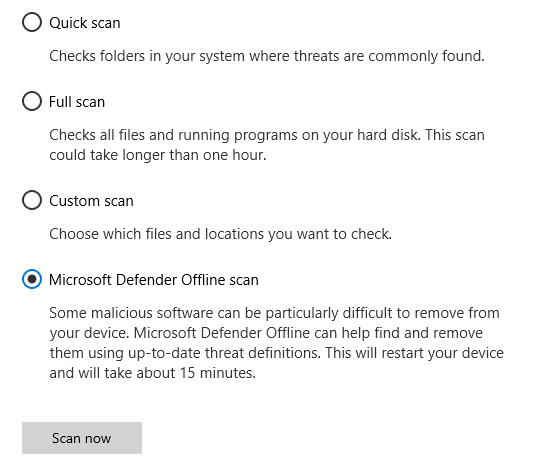
You’ll be prompted that you’re about to be signed out of Windows. After you are, your PC should restart. Microsoft Defender Offline will load and perform a quick scan of your PC in the recovery environment. When the scan has finished (usually takes about 15 minutes), your PC will automatically restart.
Before you use Microsoft Defender Offline, make sure you save any open files and close all apps and programs.
You typically need administrator rights on the PC on which you plan to run Microsoft Defender Offline.
If you experience a Stop error on a blue screen when you run the offline scan, force a restart and try running a Microsoft Defender Offline scan again. If the blue-screen error happens again, contact Microsoft Support.
Where can I find scan results?
To see the Microsoft Defender Offline scan results:
Select Start , and then select Settings > Update & Security > Windows Security > Virus & threat protection .
On the Virus & threat protection screen in Windows 10, under Current threats, select Scan options, and then select Protection history (In previous versions of Windows it may say Threat history).
Using Windows Defender Offline on Windows 7 and Windows 8.1
Note: On older versions of Windows, Microsoft Defender Offline is still called by its old name: Windows Defender Offline
If you’re running Windows Defender Offline on Windows 7 or Windows 8.1, follow these four basic steps:
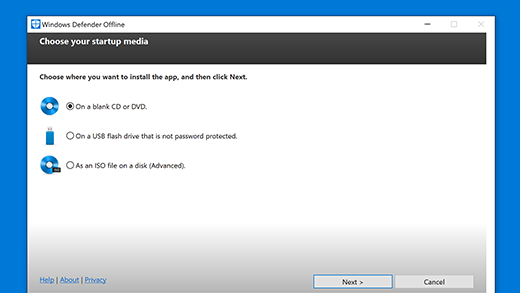
Download Windows Defender Offline and install it to a CD, DVD, or USB flash drive.

Restart your PC using the Windows Defender Offline media. This means having the CD, DVD, or flash drive you created in step 1 inserted in the PC when you restart it. Follow the prompts to boot from the drive containing this media.
Scan your PC for viruses and other malware.
Remove any malware that’s found from your PC.
Windows Defender Offline will walk you through these four steps when you’re using the tool. If you’ve been prompted in Microsoft Security Essentials or Windows Defender Security Center to download and run Windows Defender Offline, it’s important to do so. Doing this helps make sure that your data and PC aren’t compromised.
To get started, find a blank CD, DVD, or USB flash drive with at least 250 MB of free space, and then download and run the tool. You’ll be guided through the steps to create the removable media.
Note: We recommend that you download Windows Defender Offline and create the CD, DVD, or USB flash drive on a PC that isn’t infected with malware—the malware can interfere with the media creation.
Защита компьютера с помощью автономного Microsoft Defender
Автономный Microsoft Defender — это мощный автономный инструмент проверки, который можно запустить из доверенной среды без загрузки ОС. В этом разделе описываются способы использования автономного Microsoft Defender в Windows 10, Windows 8.1 и Windows 7.
В каких случаях следует использовать автономный Microsoft Defender?
Запустите автономный Microsoft Defender, если:
Безопасность Windows (в предыдущих версиях Windows — «Центр безопасности Защитника Windows») обнаруживает на вашем компьютере пакеты программ rootkit или сложно удаляемые вредоносные программы и оповещает вас о необходимости запуска автономного Microsoft Defender. Возможно, появится сообщение о том, что на вашем устройстве обнаружена вредоносная программа, или в системе безопасности Windows появляется сообщение о том, что требуется дополнительная очистка.
Вы подозреваете, что на вашем компьютере есть вредоносные программы, которые скрываются, но программа для обеспечения безопасности не обнаруживает ничего. В этом случае можно запустить проверку компьютера автономным Microsoft Defender, перейдя в раздел «Параметры» меню «Безопасность Windows». Для этого выполните следующие действия.
Нажмите кнопку Пуск и выберите Параметры > Обновление и безопасность > Безопасность Windows > Защита от вирусов и угроз .
На экране «Защита от вирусов и угроз» выполните одно из следующих действий:
В последней версии Windows 10: в разделе текущие угрозывыберите Параметры сканирования.
В предыдущих версиях Windows: в области Ж урнал угроз выберите Запустить новое расширенное сканирование.
Выберите Проверка автономного Microsoft Defender, а затем — Проверить сейчас.
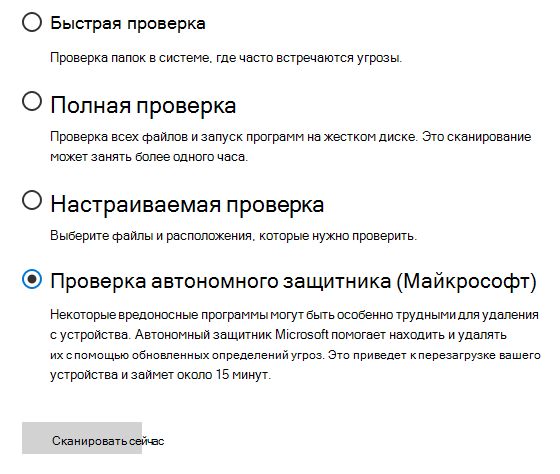
Вам будет предложено выйти из Windows. После этого компьютер должен выполнить перезапуск. Загрузится автономный Microsoft Defender, и он выполнит быструю проверку компьютера в среде восстановления. После завершения проверки (как правило, она занимает около 15 минут) компьютер автоматически выполнит перезапуск.
Перед использованием автономного Microsoft Defender сохраните все открытые файлы и закройте все приложения и программы.
Обычно требуются права администратора на компьютере, на котором планируется запустить автономный Microsoft Defender.
При возникновении неустранимой системной ошибки на синем экране во время автономной проверки выполните принудительный перезапуск и попробуйте еще раз запустить проверку автономного Microsoft Defender. Если ошибка на синем экране снова исчезнет, обратитесь в службу поддержки Майкрософт.
Где найти результаты проверки?
Чтобы просмотреть результаты проверки автономного Microsoft Defender:
Нажмите кнопку Пуск и выберите параметры > Обновление & безопасность > Безопасность Windows > вирус & защита от угроз .
На экране Защита от вирусов & угроз в Windows 10 в разделе текущие угрозывыберите Параметры сканирования, а затем выберите Журнал защиты (в предыдущих версиях Windows это может сказать История угроз).
Использование автономного Защитника Windows в Windows 7 и Windows 8.1
Примечание: В более ранних версиях Windows автономный защитник Майкрософт по-прежнему вызывается старым именем: автономный защитник Windows
Если вы используете автономный Защитник Windows в Windows 7 или Windows 8.1, выполните эти четыре простых действия.
Скачайте автономный Защитник Windows и установите его на компакт-диск, DVD-диск или USB-устройство флэш-памяти.
Перезагрузите компьютер, используя носитель, содержащий автономный Защитник Windows. Это означает, что компакт-диск, DVD-диск или устройство флэш-памяти, созданное на шаге 1, должно быть установлено в компьютер во время перезапуска. Следуйте указаниям для загрузки с диска, содержащего данный носитель.
Проверьте компьютер на предмет наличия вирусов и других вредоносных программ.
Удалите все вредоносные программы, обнаруженные на компьютере.
Автономный Защитник Windows предоставит пошаговые указания по выполнению этих четырех действий. Если Microsoft Security Essentials или Центр безопасности Защитника Windows предлагает скачать и запустить автономный Защитник Windows, важно это сделать. Это поможет обеспечить сохранность данных и компьютера.
Для начала найдите пустой компакт-диск или DVD-диск либо USB-устройство флэш-памяти, на котором свободно не менее 250 МБ, а затем скачайте и запустите средство по созданию съемного носителя. Вам будут предложены подробные указания для создания съемного носителя.
Примечание: Рекомендуется скачивать автономный Защитник Windows и создавать компакт-диск, DVD-диск или USB-устройство флэш-памяти на компьютере, который не заражен вредоносными программами, поскольку они могут препятствовать созданию носителя.
Windows Defender not working [FULL FIX]

- There are instances when a computer is not protected because Windows Defender won’t turn on Windows.
- If Windows Defender real-time protection won’t turn on Windows 10, then you should check its settings.
- Sometimes, the date and time settings are the reason why Windows Defender won’t turn on.
- Using dedicated software solves the failure of the Windows Defender antivirus to turn on in Windows 10.
Often we hear people complaining that they cannot turn on Windows Defender in Windows 10, so today we’ve decided to share with you a few tips on how to fix this issue.
Best Antivirus Deals For You:
| Free 30-day trial + Save on the 3-year subscription |  Check offer! Check offer! | |
| Get the world’s #1 antivirus for free | Free download | |
| Award-winning protection, and free forever | Check offer! | |
| 35-60% Off + 30 Day Money Back Guarantee | Check offer! | |
| Up to 63% Off + Multiple Device Packages | Check offer! |
Windows Defender won’t start
Here are some examples of how this issue may manifest itself:
- Can’t turn on Windows Defender Windows 10 Group Policy
- If you get this error, check out our article about Group Policy Editor and Windows Defender.
- Can’t turn off Windows Defender Windows 10
- If you want to switch to another antivirus program, this problem might prevent you from turning off Windows Defender.
- Windows Defender real-time protection handled by another av program
- Windows Defender and another antivirus program don’t go along (see below).
There are a few possible scenarios for this problem, and we’ll cover most of them in this article.
What to do if Windows Defender is not working in Windows 10
1. Enable real-time protection
- Press the Windows key + Q key on the keyboard to bring up the charms search.
- Type Windows Defender in the search box and then press Enter.
- Head over to the Settings and check Turn on real time protection.

Windows Defender is designed to turn itself off if it detects any other third-party antivirus software. Windows is designed to detect any installed antivirus software, and certain issues can occur if you have two or more antivirus software installed.
These issues include conflicts between antivirus software that can manifest as frequent freezing, crashing to applications, etc.
Since this is a common problem, in order to avoid any conflicts, Windows Defender will turn itself off if Windows detects any other security program.
In addition, if this security software has a Firewall, Windows Firewall will also turn itself off.
This means that if you want Windows Defender to work, you’ll have to choose between it and the third-party antivirus software.
Often users are not aware of whether security software is installed or not because when you buy a new laptop in most cases it comes with a trial version of antivirus software such as Norton, McAfee etc.
When you install applications like Flash or Java it might prompt you to uninstall the free security scanner, and that can cause some problems.
Therefore it’s best to search your PC if you’re not sure whether security software is installed or not. Once you remove it, you might need to manually turn it back on using these steps:
2. Change date and time
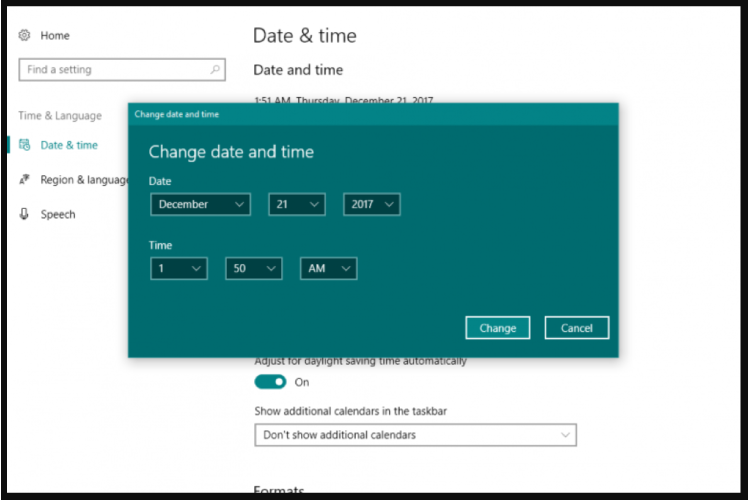
Another cause for Windows Defender to not work properly is incorrect time and date on Windows 10.
In order to fix this, you need to check your time and date and set it to the correct value before trying to turn Windows Defender back on.
We know that this might sound strange, but most of the Windows system functions are dependent on time and date, therefore an incorrect date or time could trigger abnormal behavior in your Windows OS.
3. Use professional software for protection
Windows Defender is a useful feature for your operating system, but if it doesn’t function properly, you can try profesionnal software. This program is constantly improved through updates by its developer so that it will detect and repair the latest malware that will appear.
Try out the ultimate cybersecurity package that will provide you with online safety. This software was created for users that want full protection against online threats.
This means you will also benefit from extra theft protection and a user-friendly password management feature. Feel free to install and use on any Windows, Android, Mac or Linux device, as it is compatible with all four operating systems.
Keep your digital identity under protection from unauthorized third-parties with this software’s advanced antivirus technology. This application will also offer efficient protection of your confidential data from phishing and ransomware.
If you desire more privacy for your files, then you can choose to encrypt them and removable media too. This is professional software that keeps you organized with good password management, by storing and organizing them.

Eset Smart Security Premium
4. Update Windows
- Go to Start, select Settings, and choose Update & Security.
- Navigate to Windows Update, and then select Check for updates.
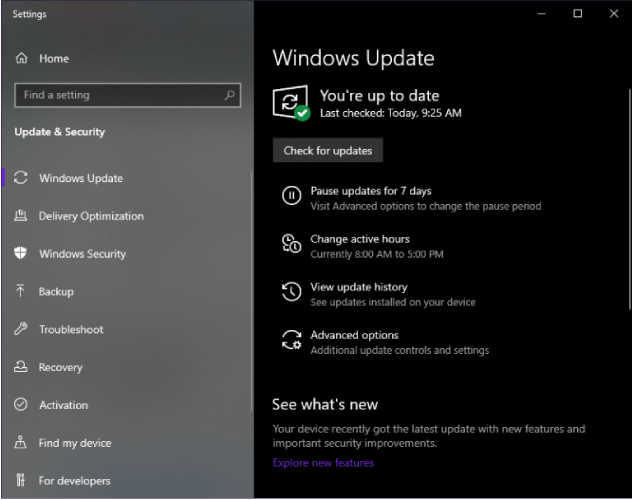
Make sure that you keep your Windows up to date using Windows Update since this can cause some problems with Windows Defender. When it comes to any security software, make sure that you update it frequently.
We suggest that you perform a full Windows Update, then open Windows Defender and run an update from there as well.
If you can’t open the Setting app, we have a special article for how to solve the issue.
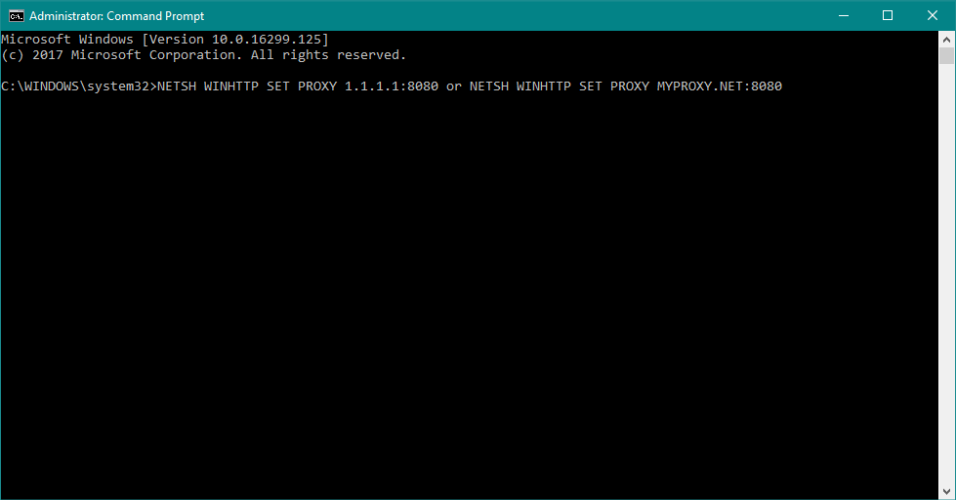
5. Change Proxy Server
- Press Windows key + X and select Command Prompt (Admin).
- Type in one of the following: NETSH WINHTTP SET PROXY 1.1.1.1:8080 or NETSH WINHTTP SET PROXY MYPROXY.NET:8080
- Reboot the system and see if it works.
These three are most common scenarios that can cause problems with Windows Defender, but there are some other not so common scenarios that can cause problems as well.
For example, incorrect Zone settings in Internet Explorer can cause problems, but you can easily fix this by resetting Internet Explorer to factory settings.
Bear in mind that if you are using a Proxy server, Windows Defender will not be able to update. If that’s the case, you’ll need to make some minor tweaks to your Proxy server.
If you’re having trouble accessing Command Prompt as an admin, then you can read one of our guides.
6. Disable third-party antivirus
Windows Defender doesn’t get along with third-party antivirus programs. Just like any two antivirus programs don’t work well with each other.
So, if you want Windows Defender to be your primary security option, make sure to disable any third-party antivirus programs you have installed on your computer.
7. Run the SFC scan
- Go to Search, type cmd, and open Command Prompt as Administrator.
- Enter the following line and press Enter: sfc/scannow
- Wait for the process to finish.
- Restart your computer.

This simple solution shows how to run the SFC scan in Windows 10.
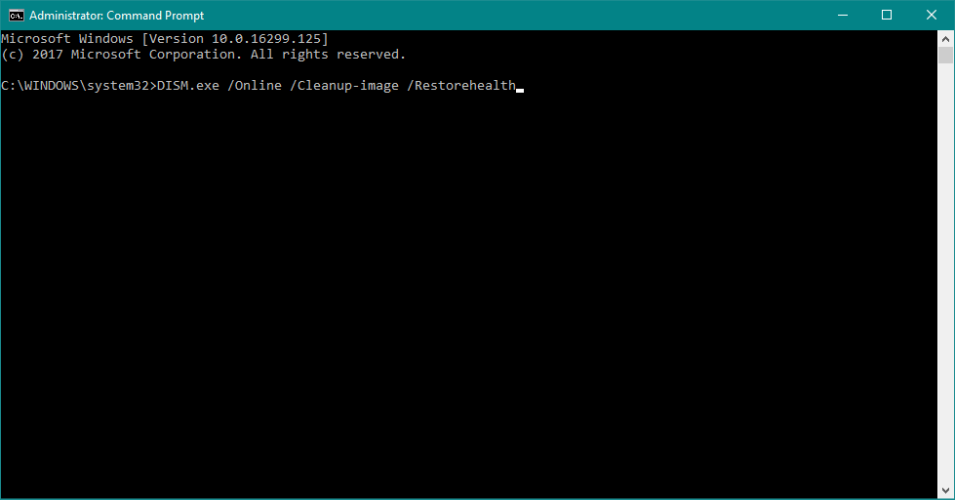
8. Run DISM
- Go to Search, type cmd, and open Command Prompt as Administrator.
- Enter the following command on the command line:
- DISM.exe /Online /Cleanup-image /Restorehealth
- DISM.exe /Online /Cleanup-image /Restorehealth
- In case the DISM can’t obtain files online, try using your installation USB or DVD. Insert media and type following command:
- DISM.exe /Online /Cleanup-Image /RestoreHealth /Source:C:RepairSourceWindows /LimitAccess
- Make sure to replace the following path of your DVD or USB: C:/Repair/Source/Windows
9. Reset the Security Center service
- Go to Search, type services.msc , and open Services.
- Find the Security Center service.
- Right-click the Security Center service, and go to Reset.
- Restart your computer.
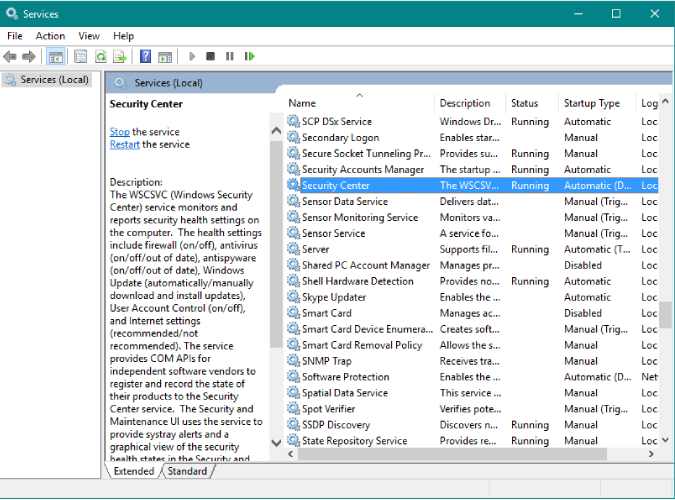
And finally, if none of the solutions from above worked, we’ll try resetting the Security Center service. Hopefully, Windows Defender will start working after that.
That’s about it, we hope at least one of these solutions helped you resolve your problems with Windows Defender. If you have any comments, questions or suggestions, just let us know in the comments down below.


