- Как очистить историю угроз в Защитнике Windows 10
- Очистить журнал защиты в Защитнике Windows 10
- 1. Измените историю защиты
- 2. Удалить сразу всю историю
- Как принудительно очистить журнал Windows Defender и избавиться от предупреждающих значков на иконке Защитника
- Изменение срока хранения Журнала Защитника
- Принудительная очистка Журнала Защитника
- Очистить журнал защиты Защитника Windows в Windows 10
- Очистить журнал защиты из проводника
- Очистить журнал защиты в просмотре событий
- Изменить период автоматической очистки журнала
- How to manually clear Windows Defender Protection History in Windows 10
- Delete Windows Defender Protection History
- 1] Using Set-MpPreference PowerShell cmdlet
- 2] Delete Windows Defender Service folder from the local drive
- 3] Using Event Viewer
- Clear Protection History in Windows Defender on Windows 10 Using Event Viewer
- How to Clear Protection History in Windows Defender on Windows 10 Using Event Viewer
- Method 1
- Method 2
Как очистить историю угроз в Защитнике Windows 10
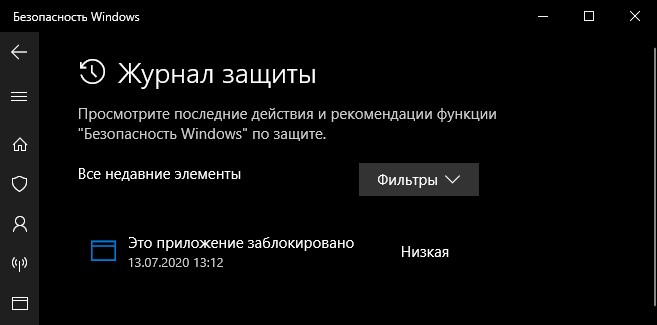
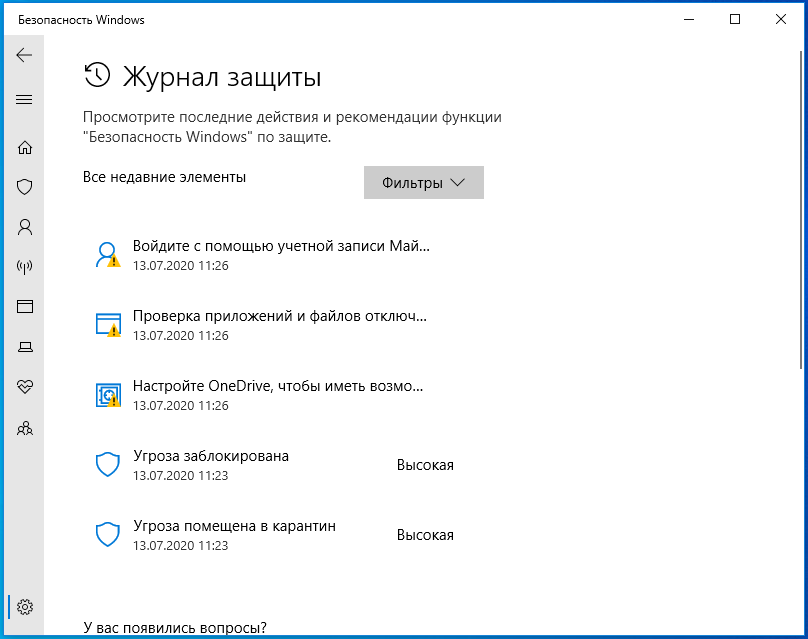
Встроенный антивирус «Защитник Windows» в Windows 10 ведет журнал защиты о найденных угрозах. История в журнале защиты будет отображаться даже, если вы удалите угрозу или поместите её на карантин. Иногда это приводит к сбою и значок безопасности windows на панели задач будет отображаться с желтым восклицательным знаком, и чтобы избавиться от желтого восклицательного знака, нужно очистить историю защиты.
Очистить журнал защиты в Защитнике Windows 10
Антивирус хранит историю обнаруженных угроз в течение тридцати дней. Если ваша история показывает угрозы, которые старше тридцати дней, вы можете изменить срок хранения или просто удалить всё.
1. Измените историю защиты
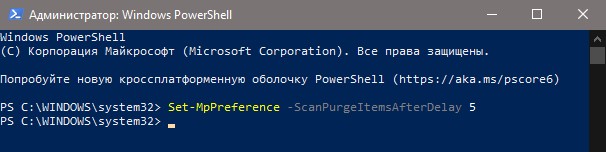
Запустите PowerShell от имени администратора и введите команду ниже:
- Set-MpPreference -ScanPurgeItemsAfterDelay 5
- Где 5 на конце это количество дней хранения истории в журнале защиты.
2. Удалить сразу всю историю
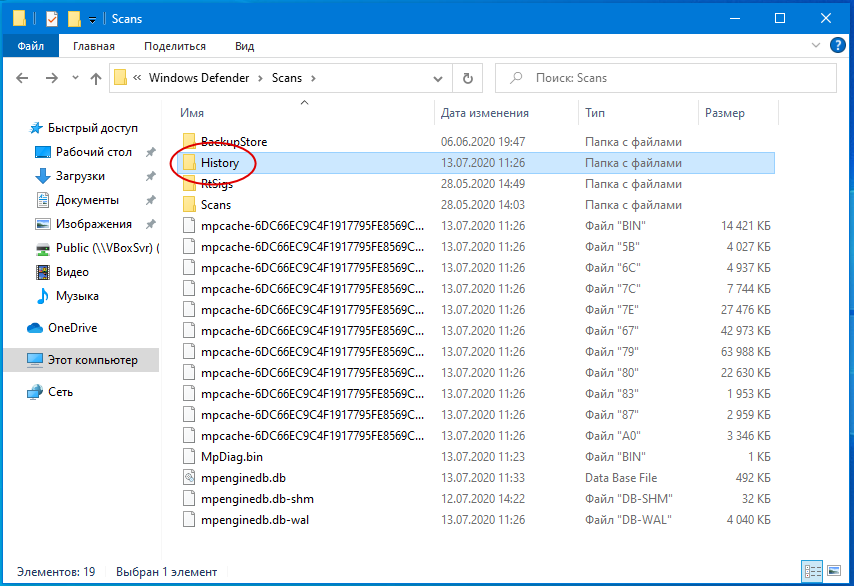
Если вам нужно удалить сразу всю историю, и вы не хотите ждать определенного периода, то перейдите по пути:
- C:\ProgramData\Microsoft\Windows Defender\Scans\History
- Удалите папку Service.
Папка Service будет автоматически создана при обнаружении новой угрозы.
Как принудительно очистить журнал Windows Defender и избавиться от предупреждающих значков на иконке Защитника

Подобно другим антивирусам, встроенный Защитник Windows ведет историю обнаруженных угроз, просмотреть которую можно в журнале защиты. Эти записи будут отображаться в журнале, даже если опасный файл обезврежен и помещен в карантин, что может вызвать своеобразный побочный эффект, проявляющийся наличием красного или желтого значка на иконке Защитника в системном лотке. в Windows 10 2004 разработчики вроде бы должны были решить эту проблему.
Но, судя по отзывам пользователей, сталкиваться с ней приходится и в последней стабильной версии системы.
Чтобы избавиться от этих предупреждающих о несуществующей уже угрозе значков, нужно очистить журнал Windows Defender. В сборках до релиза 1903 сделать это можно было через интерфейс управления безопасностью Windows, в более поздних сборках системы кнопка очистки журнала отсутствует. Данные журнала удаляются автоматически по истечении 30-и дней, но вы можете сократить этот период или просто удалить их принудительно.
Изменение срока хранения Журнала Защитника
Для изменения срока хранения записей в журнале Защитника Windows 10 мы предлагаем использовать консоль PowerShell .
Запустив ее от имени администратора, выполните в ней команду Get-MpPreference и найдите в полученном списке параметр ScanPurgeItemsAfterDelay.
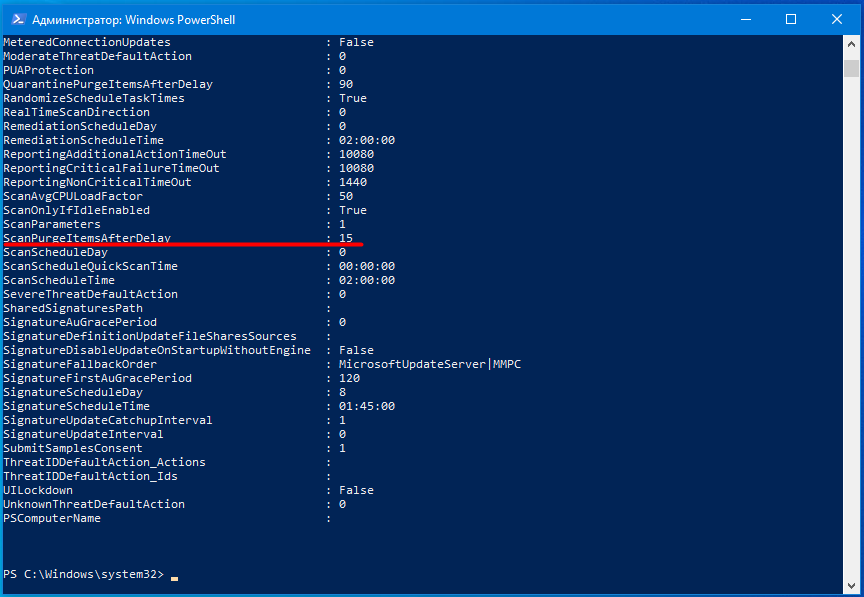
В Windows 10 2004 его значение равняется 15, то есть данные журнала хранятся 15 дней. Чтобы сократить этот срок, скажем, до двух дней, выполните в PowerShell такую команду:
Set-MpPreference -ScanPurgeItemsAfterDelay 2

Принудительная очистка Журнала Защитника
Если вы хотите очистить журнал прямо сейчас, выполните следующие действия.
Перейдите в Проводнике в папку C:\ProgramData\Microsoft\Windows Defender\Scans , а затем зайдите в расположенную в ней папку History , подтвердив вход с правами администратора.
В свою очередь, в ней найдите папку Service и удалите ее.
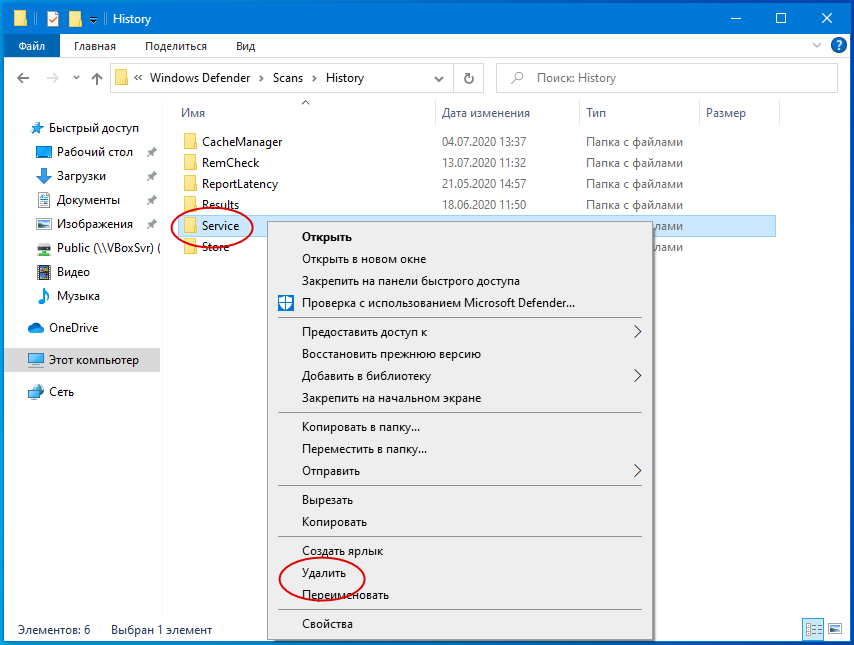
Вместе с ней будет удалена и история действий Windows Defender.
Должен исчезнуть и значок предупреждения на иконке Защитника. Однако, если у вас не настроены базовые функции безопасности, желтый значок предупреждения будет отображаться независимо от того, имеются в журнале записи или нет.
Очистить журнал защиты Защитника Windows в Windows 10
В журнале защиты вы можете посмотреть последние действия и рекомендации функции “Безопасность Windows” по защите. Другими словами, в журнале отображаются найденные угрозы, их описание и предложены различные варианты действий. Сегодня мы рассмотрим как очистить журнал защиты “Защитника Windows” в Windows 10.
Очистить журнал защиты из проводника
1. Откройте проводник (Win+E).
2. Перейдите по пути C:\ProgramData\Microsoft\Windows Defender\Scans\History => нажмите на папку Service правой кнопкой мыши, выберите “Удалить”.

Очистить журнал защиты в просмотре событий
1. В строке поиска или в меню выполнить (Win+R) введите eventvwr и нажмите Enter.

2. Зайдите в “Журналы приложений и служб” => “Microsoft” => “Windows” => “Windows Defender” = > “Operational” = > нажмите на “Очистить журнал”.

3. Нажмите на “Очистить”.

Изменить период автоматической очистки журнала
По умолчанию, “Защитник Windows” очищает элементы из журнала через 30 дней.
1. Откройте PowerShell от имени администратора.
2. Введите команду Set-MpPreference -ScanPurgeItemsAfterDelay 1 (1 в команде означает, через сколько дней удалять элемент из журнала, вы можете ввести другое количество дней) и нажмите Enter.

На сегодня все, если вы знаете другие способы – пишите в комментариях! Удачи Вам 🙂
How to manually clear Windows Defender Protection History in Windows 10
The Protection History page shows detections by Windows Defender and provides detailed and easier to understand information about threats and available actions. Starting with Build 18305, it includes Controlled Folder Access blocks, along with any blocks which were made through the organizational configuration of Attack Surface Reduction Rules. In this post, we will show you how to manually clear protection history in Windows Defender on Windows 10.
If you use the Windows Defender Offline scanning tool, any detections it makes will now also show in this history. Additionally, you will see any pending recommendations (red or yellow states from throughout the app) in the history list.
![]()
Delete Windows Defender Protection History
This specifies the number of days for which items are stored in the scan log folder. After this time, Windows Defender deletes the items. If you specify a null value, Windows Defender will not remove items. If you do not specify a value, Windows Defender will remove items from the default scan log folder, that is, 30 days.
However, if you want to clear the protection history manually, you can do so in any of the three following ways;
- Using Set-MpPreference PowerShell cmdlet
- Delete Windows Defender Service folder from the local drive
- Using Event Viewer
Let’s take a look at the steps involved in relation to each of the listed methods.
1] Using Set-MpPreference PowerShell cmdlet
The Set-MpPreference cmdlet configures preferences for Windows Defender scans and updates. You can modify exclusion file name extensions, paths, or processes, and specify the default action for high, moderate, and low threat levels.
You can specify a different delay period (in days) by running the cmdlet below in PowerShell admin mode (press Win+X and then tap A on the keyboard):
The specified number 1 is the number of days after which the protection history log and items in the log folder will be cleared.
2] Delete Windows Defender Service folder from the local drive
To manually clear the protection history, this method requires you to delete the Service folder under the Windows Defender folder on the local drive.
Here’s how:
- Press Windows key + R to invoke the Run dialog.
- In the Run dialog, copy and paste the path below and hit Enter (if prompted, click Continue).
- Now, right-click the Service folder in that location and select Delete.
You can exit File Explorer.
- Next, open Windows Security >Virus & threat protection >Manage settings.
- Toggle the button to Off then to On again for Real-Time protection and Cloud-delivered protection.
3] Using Event Viewer
To manually clear the Windows Defender protection history using the Event Viewer (eventvwr), do the following:
- Press Windows key + R to invoke the Run dialog.
- In the Run dialog, type eventvwr and hit Enter to open Event Viewer.
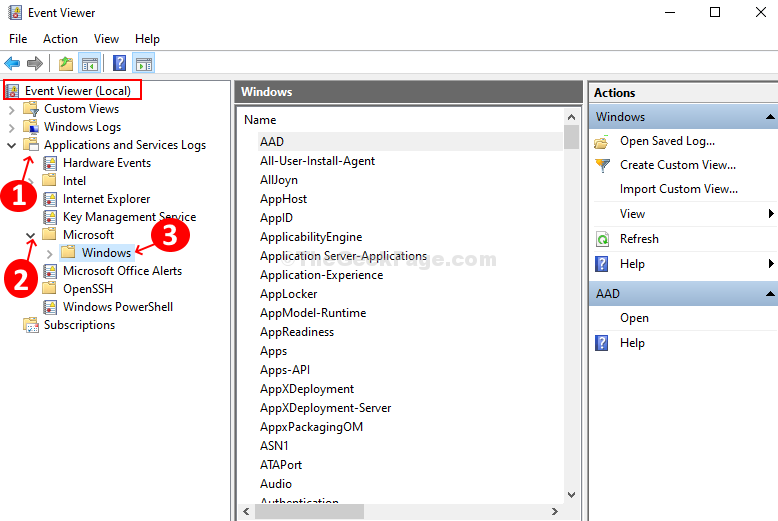
- Under the Event Viewer (Local) section on the left-hand side of the pane, expand the Applications and Services logs option.
- Under this, expand the Microsoft option.
- Click on Windows to open the list of all its files on the middle pane.
- On the middle pane, scroll down to find Windows Defender from the list of files.
- Right-click Windows Defender, and click on Open.
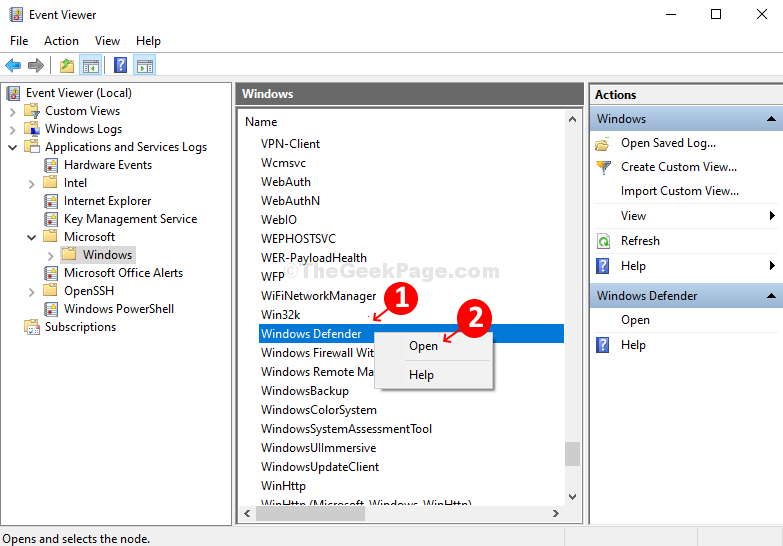
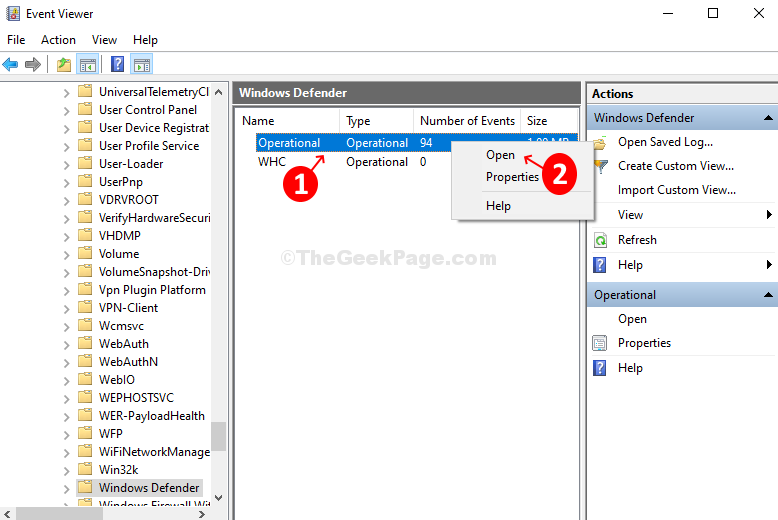
- From the two options in the middle pane, right-click on Operational, and click Open to view all the past logs.
- Now, under Windows Defender folder on the left pane, right-click on Operational.
- Click on Clear Log… on the menu.
- Select Clear or Save and Clear based on your requirement to clear the protection history.
And the above listed are the 3 known ways to manually clear Windows Defender protection history in Windows 10.
Clear Protection History in Windows Defender on Windows 10 Using Event Viewer
September 22, 2020 By Madhuparna
Windows Defender is an antivirus protection for Windows 10 that comes built-in with the OS. It offers real-time protection for your Windows 10 PC by keeping it safe from any viruses, malware, or spyware that may attack any of your frequently used programs like email, web, the cloud, or any other apps.
Whenever the Windows Defender runs a scan on your computer, it automatically stores the protection history. If you want to clear the protection history, you can use the below method.
How to Clear Protection History in Windows Defender on Windows 10 Using Event Viewer
Method 1
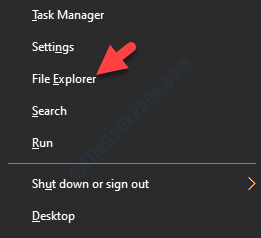
1. Press Windows key + X together from the keyboard and click on File explorer to open file explorer.
2. Go inside C: folder , usually where your windows OS is installed.
3. Click on View and make sure that hidden items is checked.
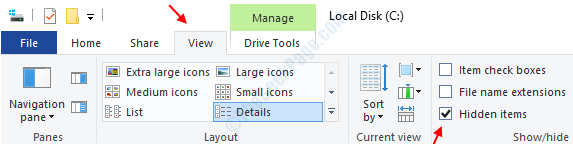
4. Now, you will see hidden folder ProgramData. Click on it.
- Microsoft
- Windows Defender
- Scans
- History
- Service
5. Now, Delete all the files inside it.

Thats it and your problem will be solved.
Method 2
Step 1: Click on the Start button, in the search box type Event Viewer, and hit Enter to open the Event Viewer window.

Step 2: Under the Event Viewer (Local) section on the left-hand side of the pane, expand the Applications and Services logs option. Under this, expand the Microsoft option and click on Windows. It will open the list of all its files on the right-hand side of the pane.
 Step 3: Scroll down, find Windows Defender from the list of files, right-click on it, and click on Open.
Step 4: From the two options, right-click on Operational, and click on Open.
Step 5: It will open all the past logs. Next, go to the Windows Defender folder on the left pane, right-click on Operational. Click on Clear Log on the menu.
![]()
Step 6: It will open a prompt with three options. Select Clear or Save and Clear based on your requirement and you are done clearing the protection history in Windows Defender.
![]()

I find passion in writing Tech articles around Windows PC and softwares


