- Turn on Windows Defender to access company resources
- Turn on Windows Defender
- Turn on real-time and cloud-delivered protection
- Update your antivirus definitions
- Next steps
- Windows Defender not working [FULL FIX]
- Best Antivirus Deals For You:
- Windows Defender won’t start
- What to do if Windows Defender is not working in Windows 10
- 1. Enable real-time protection
- 2. Change date and time
- 3. Use professional software for protection
- Eset Smart Security Premium
- 4. Update Windows
- 5. Change Proxy Server
- 6. Disable third-party antivirus
- 7. Run the SFC scan
- 8. Run DISM
- 9. Reset the Security Center service
- Как включить Защитник Windows 10, если с работой антивируса возникли проблемы
- Содержание
- 1. Заражение системы как причина невозможности запуска Защитника Windows 10
- 2. Повреждение системных файлов Windows 10 как проблема запуска Защитника Windows
- 3. Как включить Защитник Windows с помощью системного реестра
- 4. Как включить Защитник Windows с помощью редактора групповой политики
- 5. O&O ShutUp10 и другие подобные программы как причина невозможности запуска Защитника Windows
- 6. Как включить Защитник Windows, когда ни один из способов не помог
Turn on Windows Defender to access company resources
Organizations want to ensure that devices accessing their resources are secured so they may require you to use Windows Defender. Windows Defender is an antivirus software that’s included in Windows and can help protect your device from viruses and other malware and threats.
This article describe how to update your device settings to meet your organization’s antivirus requirements and resolve access problems.
Turn on Windows Defender
Complete the following steps to turn on Windows Defender on your device.
- Select the Start menu.
- In the search bar, type group policy. Then select Edit group policy from the listed results. The Local Group Policy Editor will open.
- Select Computer Configuration >Administrative Templates >Windows Components >Windows Defender Antivirus.
- Scroll to the bottom of the list and select Turn off Windows Defender Antivirus.
- Select Disabled or Not configured. It might feel counter-intuitive to select these options because the names suggest that you’re turning Windows Defender off. Don’t worry, these options actually ensure that it’s turned on.
- Select Apply >OK.
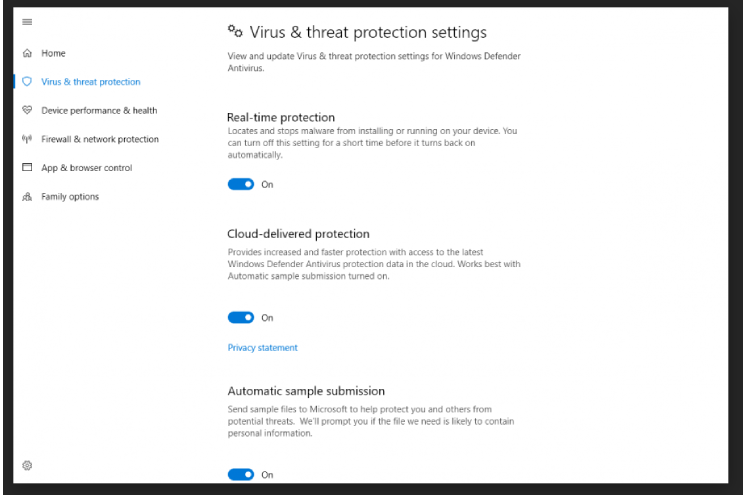
Turn on real-time and cloud-delivered protection
Complete the following steps to turn on real-time and cloud-delivered protection. Together, these antivirus features protect you against spyware and can deliver fixes for malware issues via the cloud.
- Select the Start menu.
- In the search bar, type Windows Security. Select the matching result.
- Select Virus & threat protection.
- Under Virus & threat protection settings, select Manage settings.
- Flip each switch under Real-time protection and Cloud-delivered protection to turn them on.
If you don’t see these options on your screen, they may be hidden. Complete the following steps to make them visible.
- Select the Start menu.
- In the search bar, type group policy. Then select Edit group policy from the listed results. The Local Group Policy Editor will open.
- Select Computer Configuration >Administrative Templates >Windows Components >Windows Security >Virus and threat protection.
- Select Hide the Virus and threat protection area.
- Select Disabled >Apply >OK.
Update your antivirus definitions
Complete the following steps to update your antivirus definitions.
- Select the Start menu.
- In the search bar, type Windows Security. Select the matching result.
- Select Virus & threat protection.
- Under Virus & threat protection updates, select Check for updates. If you don’t see this option on your screen, complete the first set of steps in Turn on Real-time Protection. Then try checking for updates again.
Next steps
Still need help? Contact your company support. For their contact information, check the Company Portal website.
Windows Defender not working [FULL FIX]

- There are instances when a computer is not protected because Windows Defender won’t turn on Windows.
- If Windows Defender real-time protection won’t turn on Windows 10, then you should check its settings.
- Sometimes, the date and time settings are the reason why Windows Defender won’t turn on.
- Using dedicated software solves the failure of the Windows Defender antivirus to turn on in Windows 10.

Often we hear people complaining that they cannot turn on Windows Defender in Windows 10, so today we’ve decided to share with you a few tips on how to fix this issue.
Best Antivirus Deals For You:
| Free 30-day trial + Save on the 3-year subscription |  Check offer! Check offer! | |
| Get the world’s #1 antivirus for free | Free download | |
| Award-winning protection, and free forever | Check offer! | |
| 35-60% Off + 30 Day Money Back Guarantee | Check offer! | |
| Up to 63% Off + Multiple Device Packages | Check offer! |
Windows Defender won’t start
Here are some examples of how this issue may manifest itself:
- Can’t turn on Windows Defender Windows 10 Group Policy
- If you get this error, check out our article about Group Policy Editor and Windows Defender.
- Can’t turn off Windows Defender Windows 10
- If you want to switch to another antivirus program, this problem might prevent you from turning off Windows Defender.
- Windows Defender real-time protection handled by another av program
- Windows Defender and another antivirus program don’t go along (see below).
There are a few possible scenarios for this problem, and we’ll cover most of them in this article.
What to do if Windows Defender is not working in Windows 10
1. Enable real-time protection
- Press the Windows key + Q key on the keyboard to bring up the charms search.
- Type Windows Defender in the search box and then press Enter.
- Head over to the Settings and check Turn on real time protection.

Windows Defender is designed to turn itself off if it detects any other third-party antivirus software. Windows is designed to detect any installed antivirus software, and certain issues can occur if you have two or more antivirus software installed.
These issues include conflicts between antivirus software that can manifest as frequent freezing, crashing to applications, etc.
Since this is a common problem, in order to avoid any conflicts, Windows Defender will turn itself off if Windows detects any other security program.
In addition, if this security software has a Firewall, Windows Firewall will also turn itself off.
This means that if you want Windows Defender to work, you’ll have to choose between it and the third-party antivirus software.
Often users are not aware of whether security software is installed or not because when you buy a new laptop in most cases it comes with a trial version of antivirus software such as Norton, McAfee etc.
When you install applications like Flash or Java it might prompt you to uninstall the free security scanner, and that can cause some problems.
Therefore it’s best to search your PC if you’re not sure whether security software is installed or not. Once you remove it, you might need to manually turn it back on using these steps:
2. Change date and time
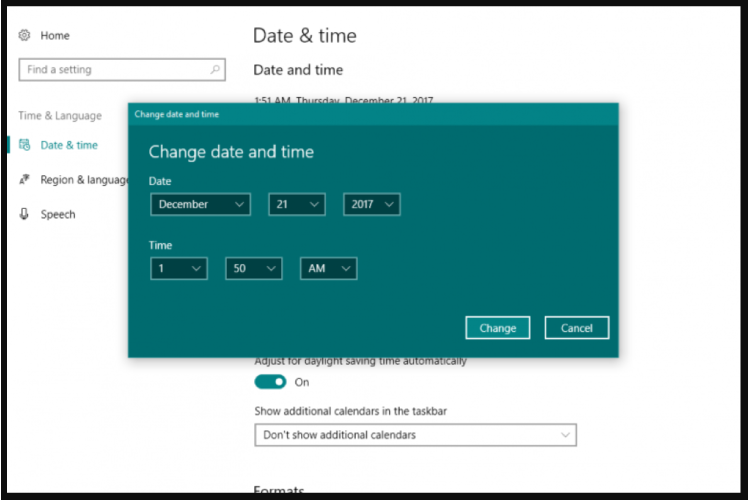
Another cause for Windows Defender to not work properly is incorrect time and date on Windows 10.
In order to fix this, you need to check your time and date and set it to the correct value before trying to turn Windows Defender back on.
We know that this might sound strange, but most of the Windows system functions are dependent on time and date, therefore an incorrect date or time could trigger abnormal behavior in your Windows OS.
3. Use professional software for protection
Windows Defender is a useful feature for your operating system, but if it doesn’t function properly, you can try profesionnal software. This program is constantly improved through updates by its developer so that it will detect and repair the latest malware that will appear.
Try out the ultimate cybersecurity package that will provide you with online safety. This software was created for users that want full protection against online threats.
This means you will also benefit from extra theft protection and a user-friendly password management feature. Feel free to install and use on any Windows, Android, Mac or Linux device, as it is compatible with all four operating systems.
Keep your digital identity under protection from unauthorized third-parties with this software’s advanced antivirus technology. This application will also offer efficient protection of your confidential data from phishing and ransomware.
If you desire more privacy for your files, then you can choose to encrypt them and removable media too. This is professional software that keeps you organized with good password management, by storing and organizing them.

Eset Smart Security Premium
4. Update Windows
- Go to Start, select Settings, and choose Update & Security.
- Navigate to Windows Update, and then select Check for updates.
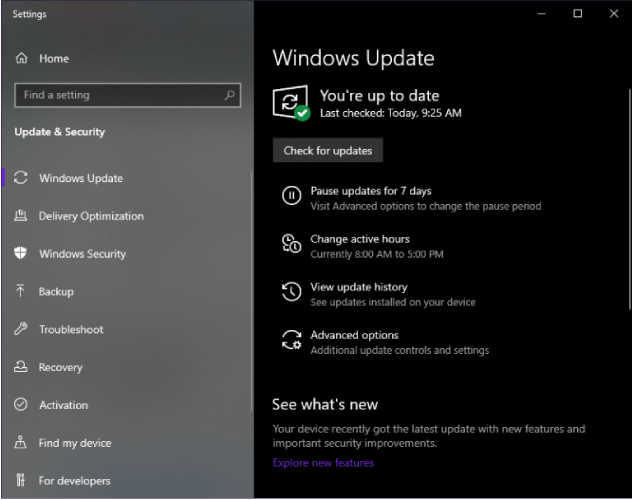
Make sure that you keep your Windows up to date using Windows Update since this can cause some problems with Windows Defender. When it comes to any security software, make sure that you update it frequently.
We suggest that you perform a full Windows Update, then open Windows Defender and run an update from there as well.
If you can’t open the Setting app, we have a special article for how to solve the issue.
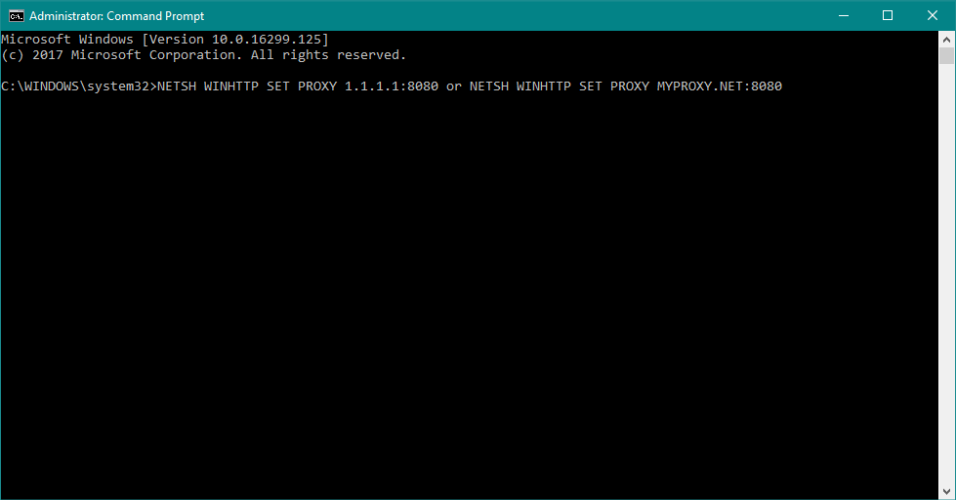
5. Change Proxy Server
- Press Windows key + X and select Command Prompt (Admin).
- Type in one of the following: NETSH WINHTTP SET PROXY 1.1.1.1:8080 or NETSH WINHTTP SET PROXY MYPROXY.NET:8080
- Reboot the system and see if it works.
These three are most common scenarios that can cause problems with Windows Defender, but there are some other not so common scenarios that can cause problems as well.
For example, incorrect Zone settings in Internet Explorer can cause problems, but you can easily fix this by resetting Internet Explorer to factory settings.
Bear in mind that if you are using a Proxy server, Windows Defender will not be able to update. If that’s the case, you’ll need to make some minor tweaks to your Proxy server.
If you’re having trouble accessing Command Prompt as an admin, then you can read one of our guides.
6. Disable third-party antivirus

Windows Defender doesn’t get along with third-party antivirus programs. Just like any two antivirus programs don’t work well with each other.
So, if you want Windows Defender to be your primary security option, make sure to disable any third-party antivirus programs you have installed on your computer.
7. Run the SFC scan
- Go to Search, type cmd, and open Command Prompt as Administrator.
- Enter the following line and press Enter: sfc/scannow
- Wait for the process to finish.
- Restart your computer.

This simple solution shows how to run the SFC scan in Windows 10.
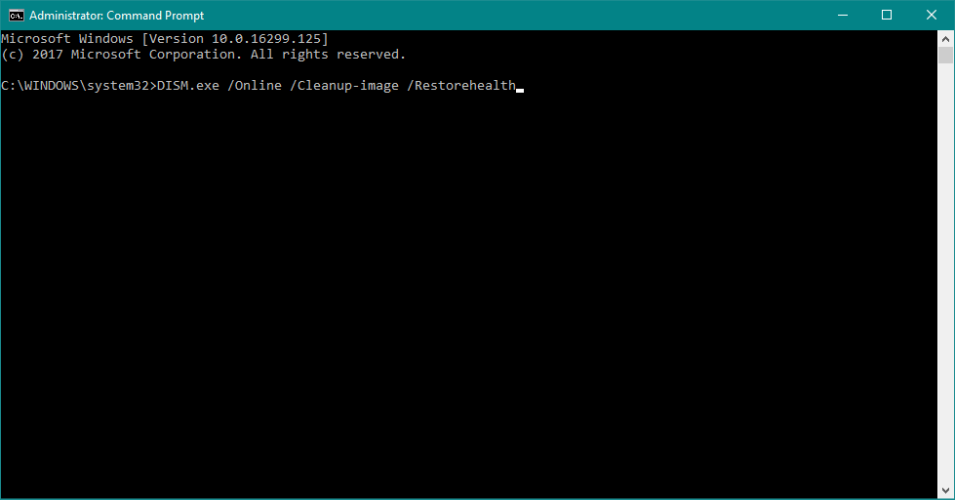
8. Run DISM
- Go to Search, type cmd, and open Command Prompt as Administrator.
- Enter the following command on the command line:
- DISM.exe /Online /Cleanup-image /Restorehealth
- DISM.exe /Online /Cleanup-image /Restorehealth
- In case the DISM can’t obtain files online, try using your installation USB or DVD. Insert media and type following command:
- DISM.exe /Online /Cleanup-Image /RestoreHealth /Source:C:RepairSourceWindows /LimitAccess
- Make sure to replace the following path of your DVD or USB: C:/Repair/Source/Windows
9. Reset the Security Center service
- Go to Search, type services.msc , and open Services.
- Find the Security Center service.
- Right-click the Security Center service, and go to Reset.
- Restart your computer.
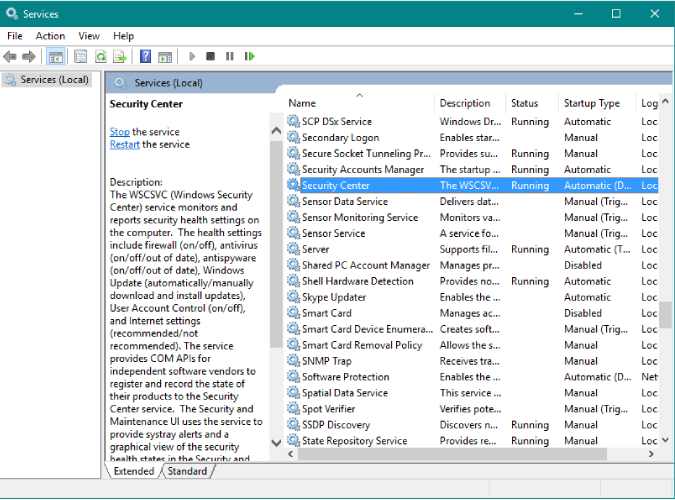
And finally, if none of the solutions from above worked, we’ll try resetting the Security Center service. Hopefully, Windows Defender will start working after that.
That’s about it, we hope at least one of these solutions helped you resolve your problems with Windows Defender. If you have any comments, questions or suggestions, just let us know in the comments down below.
Как включить Защитник Windows 10, если с работой антивируса возникли проблемы
В некоторых случаях при использовании стороннего антивируса, бывает, что Защитник Windows автоматически не отключается и в таком случае пользователь прибегает к различным способам принудительного отключения встроенного антивируса.
В этой статье мы поэтапно разберем все способы решения проблем с обратным запуском Защитника Windows 10.

Итак, если вы столкнулись с тем, что Защитник автоматически не включается и в Параметрах Windows 10 сообщает об отключении системным администратором, то тогда вам стоит выполнить перечисленные ниже рекомендации.
Содержание
1. Заражение системы как причина невозможности запуска Защитника Windows 10
Вредоносная программа может различными способами блокировать включение Защитника Windows. В первую очередь зловредную программу нужно удалить. Для этого выполните сканирование системы антивирусным сканером, стоит выполнить сканирование даже двумя различными сканерами. Советую выбрать сканер из числа Рекомендуемых сканеров на странице: Антивирусные сканеры.

Для лучшей эффективности работы сканеров, проводить сканирование советую в Безопасном режиме загрузки системы.
После того как угроза была устранена, пользователь может столкнутся с тем, что из-за последствий работы вредоносной программы, Защитник Windows все еще не запускается. Для её решения переходим к следующему этапу рекомендаций.
2. Повреждение системных файлов Windows 10 как проблема запуска Защитника Windows
Вредоносная программа или ошибка другой программы могут нарушить целостность системных файлов Windows 10. Это так же может повлиять на работу Защитника Windows.
Для восстановления системных файлов Windows нужно в меню Пуск ввести слово Командная строка или cmd.exe и запустить её от имени Администратора (нажмите правой кнопкой мыши по приложению Командная строка и из появившегося списка действий выберите Запуск от имени администратора).

После того как вы открыли Командную строку от имени Администратора переходим непосредственно к восстановлению поврежденных файлов. В первую очередь с помощью инструмента DISM мы выполним проверку и исправления внутреннего системного образа Windows 10, с помощью которого чуть позже будем восстанавливать файлы системы.
В командной строке Windows поочередно вводим следующие команды DISM:

Следующая команда, как и команда выше, выполняют проверку целостности образа Windows без его восстановления:
Команда восстановления поврежденного образа Windows:
Завершив восстановление образа Windows, переходим к восстановлению системных файлов. Оба этапа являются важными для восстановления повреждений системы.
В Командной строке выполняем команду:
Как правило этого будет достаточно для восстановления системных файлов. У нас на сайте вы можете подробнее прочесть о работе инструмента DISM и о восстановлении системы с помощью команды SFC.
3. Как включить Защитник Windows с помощью системного реестра
Распространенным способом отключения Защитника является отключение с помощью системного реестра. В нашем случае мы будем включать Защитник через редактирование реестра.
В первую очередь нам нужно удалить ключи реестра, отвечающие за отключение Защитника Windows.
Редактор реестра можно открыть через меню Пуск или запуском команды regedit.exe (клавиша Win в сочетании с клавишей R ).
Перед началом любой правки реестра советую сделать резервную копию реестра. Для этого в меню редактора реестра выберите Файл > Экспорт и сохраните указанный файл.
Открыв редактор реестра, в его адресной строке вводим следующий путь:
Если в папке реестра есть подпапка с названием Real-Time Protection, то её нужно удалить, нажав на неё правой кнопкой мыши и выбрать Удалить.

Далее нам нужно создать ключ DisableAntiSpyware:
- Щелкните правой кнопкой мыши по папке “Windows Defender”, выберите Создать > Параметр DWORD (32 бита).
- Назовите параметр DisableAntiSpyware и нажмите Enter.
- Щелкните дважды по созданному ключу и установите значение от 0, затем нажмите ОК. Важно, значение обязательно должно быть 0, т.к другое значение отключит Защитник Windows.

После внесения изменений в реестр, необходимо перезагрузить систему.
4. Как включить Защитник Windows с помощью редактора групповой политики
С помощью редактора групповой политики Windows, можно так же отключать или включать Защитник Windows.
- Для открытия редактора групповой политики нажмите на иконку Поиск (или клавишу Win + R ) и введите gpedit.msc.
- Нужный нам параметр расположен по следующему пути:

- В правой части окна выберите политику Выключить антивирусную программу “Защитник Windows”. В появившемся окне установите состояние политики на Отключено или Не задано и примените изменение, затем нажмите ОК.
- Затем перейдите по следующему пути:

- В правой части окна выберите политику Включить наблюдение за поведением. В появившемся окне установите состояние политики на Отключено или Не задано и примените изменение, затем нажмите ОК.
- Находясь в разделе “Защита в режиме реального времени” выберите политику Отслеживать активность программ и файлов на компьютере. В открывшемся окне установите состояние политики на Не задано и примените изменение, затем нажмите ОК.
- Находясь в разделе “Защита в режиме реального времени” выберите политику Включить проверку процессов, если включена защита реального времени. В открывшемся окне установите состояние политики на Не задано и примените изменение, затем нажмите ОК.
- Находясь в разделе Защита в режиме реального времени” выберите политику Проверять все загруженные файлы и вложения. В открывшемся окне установите состояние политики на Не задано и примените изменение, затем нажмите ОК.
Затем перезагрузите систему.
5. O&O ShutUp10 и другие подобные программы как причина невозможности запуска Защитника Windows
Если вы пользуетесь программой O&O ShutUp10 или другими подобными утилитами, то самое время вспомнить о них и в их настройках выключить опцию отключения Защитника. После применения изменений нужно перезагрузить систему.

6. Как включить Защитник Windows, когда ни один из способов не помог
Бывают случаи, когда ни один из описанных выше способов не помогает включить Защитник. Пользователь все так же получает сообщение о том, что «Невозможно открыть данное приложение. Ваш системный администратор отключил Центр безопасности Защитника Windows«.
В таком случае должен помочь следующий твик реестра — Включить Защитник Windows reg.zip. Твик реестра нужно обязательно запускать в Безопасном режиме системы.
Примечание. Напомню, перед работой с реестром рекомендуется сделать резервную копию реестра (в меню редактора Файл > Экспорт).
В архиве два файла реестра, WinDefend.reg и wscsvc.reg, поочередно нажимаем на них правой кнопкой мыши и из выпадающего списка выбираем Слияние.

Перезагружаем систему. Скорее всего после проделанных рекомендаций у вас включится Защитник Windows.


