- How to Turn On and Off Windows Defender in Windows 10
- How to Disable Windows Defender in Windows 10
- How to Enable Windows Defender in Windows 10
- Other Customization Options
- Cloud-based Protection
- Automatic sample submission
- Exclusions
- Command line to Turn On Windows Defender in Windows 10
- Windows Defender is turned off or not working
- Windows Defender is turned off or not working
- 1] Install the latest Windows Updates
- 2] Reinstall any third-party antivirus you may have installed
- 3] Run an offline malware scan
- 4] Enable Windows Defender via Action Center
- 5] Check Defender Service status
- 6] Re-register these DLL files
- 7] Check Registry setting
- 8] Perform consistency check on WMI repository
- Windows Defender — Turning Off & On
- How to Turn Off Windows Defender in Windows 10
How to Turn On and Off Windows Defender in Windows 10
‘
To turn on and off Windows Defender in Windows 10 PC ascertain the security of Windows PC, You now nowadays the outpacing level of Hazards coming from all around to your PC is the real matter of worry. So we have decided to present a write up on enabling and disabling Windows Defender in Windows 10 along with customization details.
Windows Defender is freely shipped with Windows 10 and is stated as an antivirus app that comes by default in Windows 10. Whatever may be the kind of malware Windows Defender fights with them and protects the PC. Though, there are mouths that say it cannot provide full protection when comes to the serious malware attacks and thus the third party antivirus helps in protecting the computer. With this view, many users disable the Windows Defender and on the other side there are users who have witnessed the proper security with Windows Defender in Windows 10and wish to turn on it in their Windows 10 computers.
You may like to read:
How to Disable Windows Defender in Windows 10
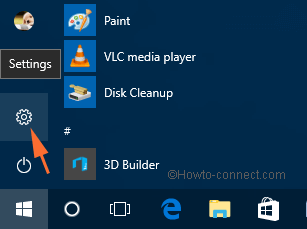
- Launch your Start Menu and tap Settings.
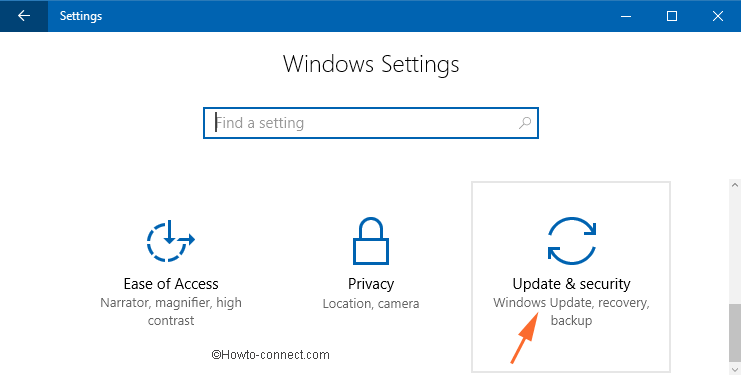
- Click System category of the Settings.
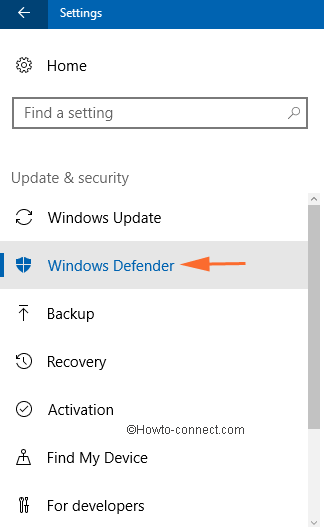
- Scroll down and you can see Windows Defender on the left column. Press it.
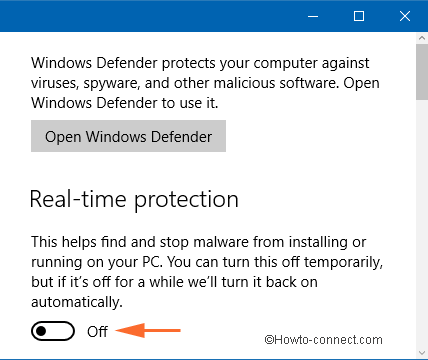
- The right pane of the Windows Defender displays you some sections. The first section is of Real-time protection. Drag the respective slider towards Off.
- Windows Defender has been now disabled. When you open Windows Defender, you can see something like this. (See the below screenshot).
How to Enable Windows Defender in Windows 10
- Unwind the Start Menu by clicking its icon on the Taskbar and pick Settings.
- On the Settings window, click System category.
- The left column, tap Windows Defender.
- Take your attention to the right pane of Windows Defender and you can view the Real-time protection is disabled (Slider is towards OFF). Toggle it to ON.
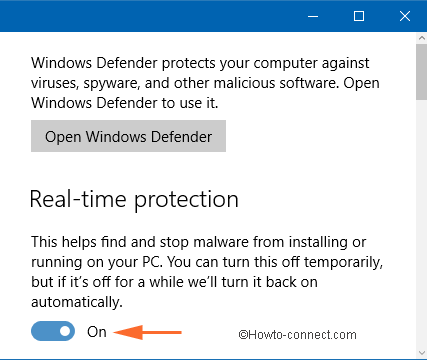
- You have successfully enabled Windows Defender in Windows 10.
Other Customization Options
As you have seen the Windows Defender in the Settings of Windows 10, there are other options. Following are few customizations you can sneak into.
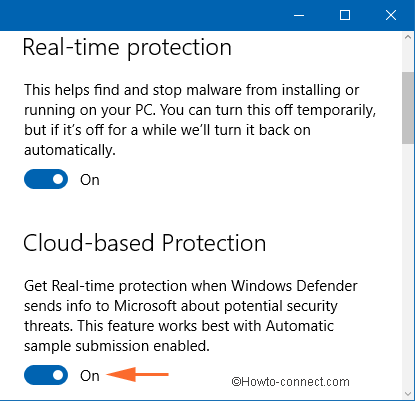
Cloud-based Protection
Windows 10 recommends keeping this toggle On as this assures the best protection to your computer. The problems occurred in your computer are sent to Microsoft and the officials study the problem in the cloud and finds out the reason affecting your computer. They come back to you with the possible best solutions to resolve the problem. So you should have toggled ON Cloud Protection.
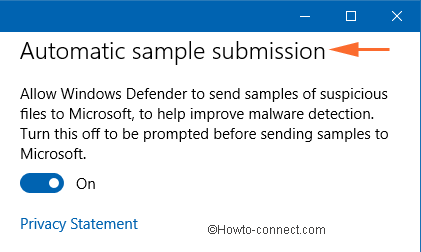
Automatic sample submission
When you enable this option, you agree to send the sample files which help in tracing out the vicious software to Microsoft. The samples are submitted automatically. There is no harm in enabling this option because the company keeps your identity safe.
Exclusions
If you want particular file or folder to be excluded by windows defender in Windows 10 then it provides you an option where you can give off any particular file or folder from a scan by Windows Defender. Read the below steps to know how does it works.
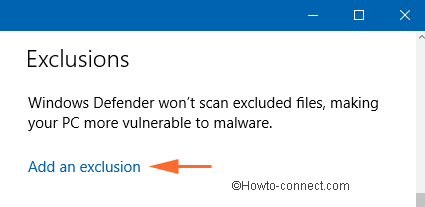
- Click Add exclusions.
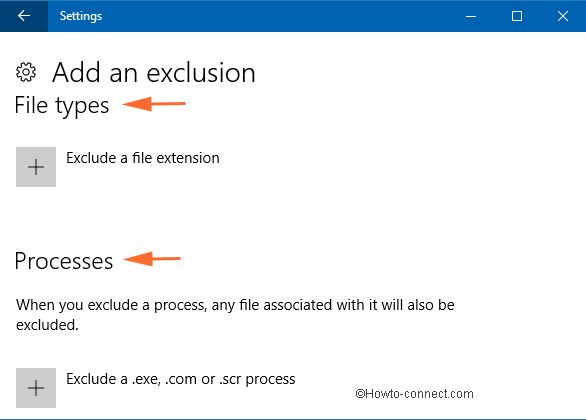
- You can see three sections: Files and folders, File types and Processes. Click on the Plus button of the Exclude a file or Exclude a folder under Files and folders section.

- A window will appear, locate and select your file and lastly click Exclude this file button.

- If you prefer to exclude any process, the files linked with it will also be excluded, like .exe, .com, etc.
- Again click on the Plus button and enter the process name you prefer to exclude from scanning.

- Give a name to your exclusion and click Ok
Command line to Turn On Windows Defender in Windows 10
Simply copy the underneath command and paste in the run box and finally press Enter on Keyboard.
Windows Defender is turned off or not working
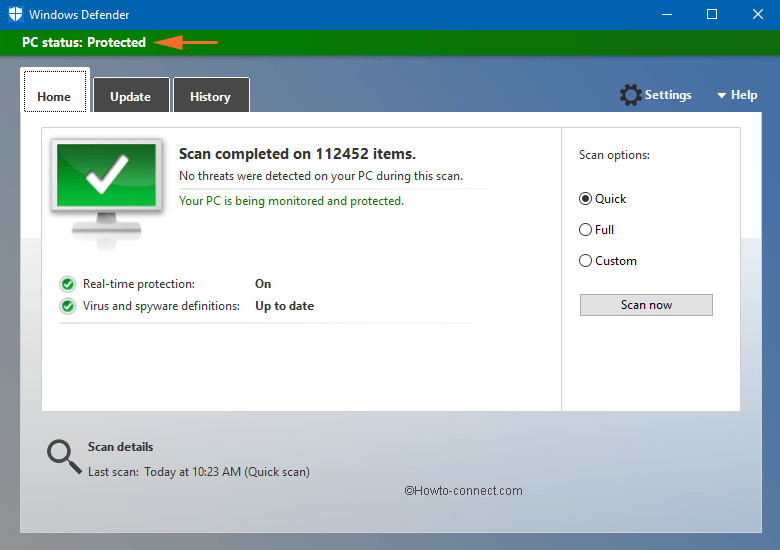
Windows Defender acts as the first line of defense against any malware, spyware infections that might have affected your computer. Microsoft provides this free anti-malware program to customers using Windows 10/8/7/Vista. It allows end-users to schedule a scan or manually run a quick, full, or custom scan.
However, sometimes, a user may experience issues enabling Windows Defender application in Windows. He may find that his Windows Defender is turned off or not working. Also, if your Windows Defender disables itself automatically – every time you start your Windows computer, or at any time randomly when you are working on your PC, here are a few things you may want to investigate.
This article explains you the troubleshooting procedure to resolve the same.
Windows Defender is turned off or not working
You may receive a message: Windows Defender has been turned off, and it isn’t monitoring your computer.
If you have another antivirus software installed, it will turn off Windows Defender. But if you do not and yet, then you might want to carry out the following troubleshooting steps:
- Install the latest Windows Updates
- Reinstall any third-party antivirus you may have installed
- Run an offline malware scan
- Enable Windows Defender via Action Center
- Check Defender Service status
- Re-register these DLL files
- Check Registry setting
- Perform consistency check on WMI repository.
1] Install the latest Windows Updates
Check if you have all the latest Windows Updates installed, including having the latest version of Windows Defender and its definitions.
2] Reinstall any third-party antivirus you may have installed
Did you uninstall any security software recently – especially Norton or McAfee? If so maybe its partial uninstallation is causing issues. Use McAfee Consumer Products Removal Tool or some antivirus removal tool to ensure that you have even removed its remnants.
3] Run an offline malware scan
Have you checked your computer for malware? Or did you just recover from a malware attack? I suggest you download and run a stand-alone portable antivirus scanner and run an offline scan from your USB – or else use an online antivirus scanner service to scan your PC.
4] Enable Windows Defender via Action Center
Open Action Center and see if you can enable Windows Defender.
5] Check Defender Service status
Run services.msc to open Services Manager. Ensure that the Windows Defender service is started and set to Automatic.
6] Re-register these DLL files
If Windows Defender Service (WinDefend) or Windows Defender Network Inspection Service (WdNisSvc) of Windows Defender keeps stopping, turning off or could not start,
Re-register the following dll files and see if it helps you. Run each command in an elevated command prompt one after the other and hit Enter:
You can use our freeware FixWin to reset Windows Defender to default settings.
7] Check Registry setting
Run regedit and navigate to the following key:
Here ensure that the value of these DWORDS is 1: DisableAntiSpyware and DisableAntiVirus.
If it is 0, then you will have to use our freeware RegOwnit to take ownership of these Registry keys and then change its value from 0 to 1. RegOwnit allows you to take ownership of a Windows Registry key using Administrator, Home Users, or the current Logged On User account.
8] Perform consistency check on WMI repository
It may also happen that Windows Security Center may prompt you to “Check Settings” for the Malware Protection, and when you click the “Turn on now” button, it may show an error that says “There are no new definitions available to download for Windows Defender“.
It may be possible that the issue may have been caused due to an inconsistent WMI repository. Restarting the WMI repository should thus help resolve the issue.
Open Command Prompt as an Administrator. Type the following command and hit Enter:
If you get a message “WMI repository is not consistent“, run the following command:
This will perform a consistency check on the WMI repository and resolve the issue. Restart your machine.
Try enabling Windows Defender now.
If you get the following message instead, winmgmt /salvagerepository is failed, ignore this message, and again run “winmgmt /salvagerepository“. This time, it should help.
This post titled Unable to turn on Windows Defender offers some additional troubleshooting suggestions, which may also interest you. You may also want to check the Windows Defender error code you receive and see if any resolution is available at Microsoft.
Windows Defender — Turning Off & On
With some X-Rite products, it might be necessary to turn off Windows Defender to allow the program to run properly on Windows Vista and Windows 7. There have been customers that have had Windows Defender block a custom monitor profile from loading automatically at start up. Turning off Windows Defender has corrected some of these problems.
On Windows Vista:
To turn off Windows Defender:
- Navigate to Control Panel and then double click on «Windows Defender» to open it.
- Select «Tools» and then «Options».
- Scroll to the bottom of the page of options and uncheck the «Use Windows Defender» check box in the «Administrator options» section.
- Click on «Save» and then «Close» in the resulting Windows Defender information window.
- Restart the the computer to turn off Windows Defender.
To turn on Windows Defender:
- Navigate to Control Panel and then double click on «Windows Defender».
- In the resulting Windows Defender information window the user is informed that Defender is turned off. Click on the link entitled: Turn on and open Windows Defender
- Close all windows and restart the computer. Windows Defender should be running normally.
On Windows 7:
To turn off Windows Defender:
- Navigate to Control Panel and then click on «Windows Defender» to open it.
- Select «Tools» and then «Options».
- Select «Administrator» in the left pane.
- Uncheck the «Use this program» check box.
- Click on «Save» and then «Close» in the resulting Windows Defender information window.
- Restart the computer to turn off Windows Defender.
To turn on Windows Defender:
- Navigate to Control Panel and then double click on «Windows Defender».
- In the resulting Windows Defender information window the user is informed that Defender is turned off. Click on the link entitled: click here to turn it on.
- Close all windows and restart the computer. Windows Defender should be running normally.
How to Turn Off Windows Defender in Windows 10

Thursday, June 28, 2018


Windows Defender is the security application that Microsoft puts in every version of Windows. Sometimes, you may want to turn it off to perform certain tasks that Windows Defender may interfere with, or you plan to install other anti-virus applications. In this article, I will show you how to turn off Windows Defender in Windows 10.
Method 1: Turn off windows defender temporarily
Step 1: Click “Settings” in the “Start Menu”. And then choose “Update & Security”.

Step 2: Select “Windows Security” from the left pane and choose “Open Windows Defender Security Center”.

Step 3: Open Windows Defender’s settings, and then click on the «Virus & Threat Protection settings» link.

Step 4: Click the Real-Time Protection, Cloud-Delivered Protection and Automatic Sample Submission switches to turn Windows Defender off.

Method 2: Using Group Policy to disable Windows Defender
Step 1: Press “Win + R” and Type “gpedit.msc”, then hit Enter or OK.

Step 2: Click on Computer Configuration and Administrative Templates.

Step 3: Click on “Windows Components” and double click “Windows Defender Antivirus”.

Step 4: Double click “Turn off Windows Defender Antivirus”.

At last, select the Enable button on the left edge and click OK.
But without the protection of Windows Defender, your computer may be in some threats, so you need to install some powerful third-party program instead. Wise Anti Malware not only fully protects your computer from malware, but also does a better job of cleaning and optimizing. Have a try!


