- Инструкция как удалить драйвер принтера из операционной системы
- Через «Устройства и принтеры»
- Через «Удаление программ»
- Через сервер печати
- Через управление печатью
- Удаление через файловую систему
- Удаление упоминаний о принтере в реестре
- Используем командную строку
- Утилиты для удаления
- Remove or Uninstall a Printer Driver from Windows 10
- How To Remove Or Uninstall Printer Drivers In Windows 10
- Uninstall Printer Software Using Settings
- Remove Printer Driver From Print Server Properties
- Uninstall Printer Driver Using Control Panel
- Use Print Management To Remove Old Printers
- Delete Old Printers Via Registry Editor
- Uninstall Printer Using Command Prompt
- Remove a Printer Using PowerShell
- Delete Remnants From The Windows Driver Store
- What Happens When Drivers Are Deleted?
Инструкция как удалить драйвер принтера из операционной системы
Причин для удаления ПО устройства печати из системы персонального компьютера может быть много самых разнообразных. Распространенными являются: неправильная работа, постоянное зависание печати, проблемы после чистки вирусов, установка не той версии драйвера. Как удалить принтер в Windows 7,8 или 10 полностью мы рассмотрим в этой статье достаточно подробно.
Сам процесс подразумевает не только удаление принтера, но и программного обеспечения, которое управляет его работой, из операционной системы.
В материале приведены сразу несколько способов выполнения поставленной задачи. Описаны подробные действия с иллюстрациями, чтобы даже у неопытных пользователей не возникло проблем с их выполнением. Отдельным разделом дадим инструкцию действий для случая, когда драйвера или принтер не удаляется. Из статьи Вы точно узнаете как полностью удалить драйвера принтера нужной модели из ОС семейства Windows XP, 7, 8 и 10.
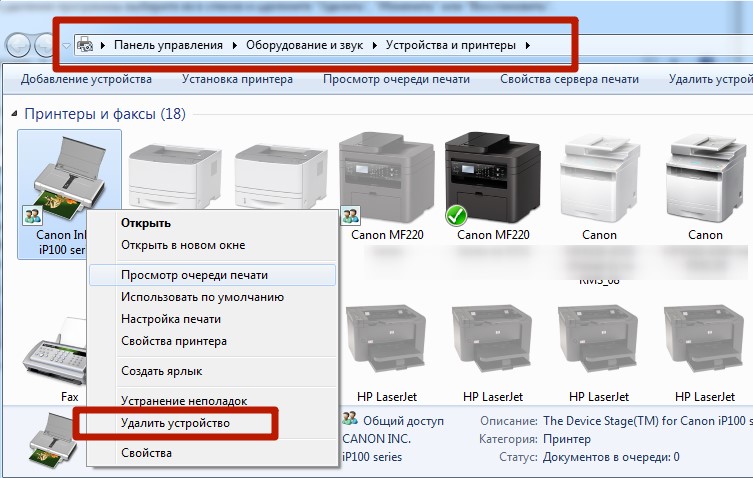
Через «Устройства и принтеры»
Самым простым и логичным будет способ убрать принтер это воспользоваться оснасткой «Устройства и принтеры». Именно в нем можно найти полный список всех устройств, а в том числе печатающих, Вашего компьютера или ноутбука.
- Откройте панель управления любым известным Вам способом. Проще всего это сделать через кнопку «Пуск» на рабочем столе.
- Найдите раздел «Оборудование и звук», а в нем «Просмотр устройств и принтеров». Откройте.
В зависимости от Вашей версии Windows на ПК, названия разделов и меню бывает, что незначительно отличатся. В этом нет проблем. Действуйте по логике.
Сам принтер удален, но его драйвера, информация о нем в реестре системы и другие служебные файлы остаются в файловой системе Windows. Чтобы удалить драйвера принтера полностью, выполните инструкции разделов ниже.
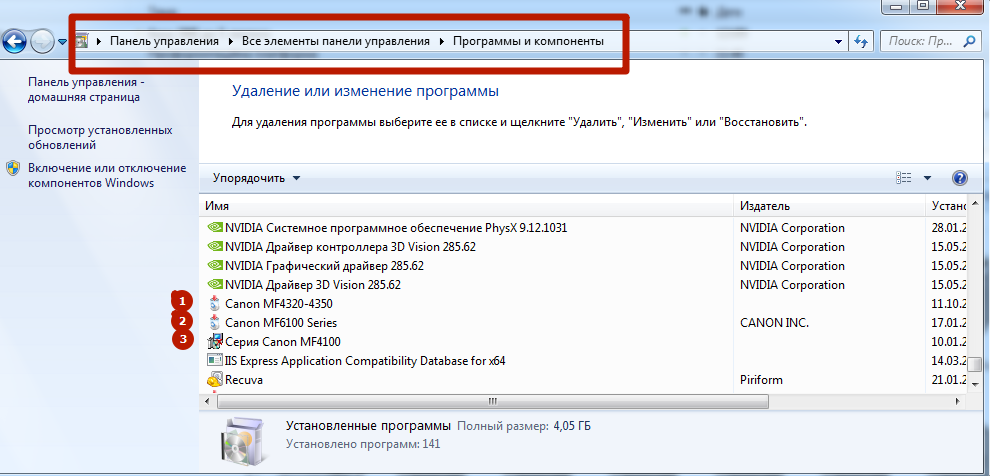
Через «Удаление программ»
Многие пользователи в момент установки драйверов, из прилагаемого к каждому новому принтеру диска, автоматически устанавливают всяческие утилиты и «мануалы» для более удобного пользования. Но когда само устройство уже не будет использоваться, то и смысл в инструкциях к нему теряется. Все это найти легко в специальном разделе панели управления «Удаление программ».
Там же легко удалить и сам драйвер к устройству, который также является программой, но, в большинстве случаев, без интерфейса. Чтобы попасть в упомянутый раздел, его нужно найти в панели.
- Откройте панель. Нажмите вместе Windows+R и в окне наберите control.
- Отыщите раздел «Программы», а внизу «Удаление программ».
- В списке по очереди удалите все программы, которые имеют отношение к Вашему печатающему аппарату.
Через сервер печати
Удаление драйвера принтера можно выполнить и через настройки сервера печати Windows.
- Сделайте вызов командной строки. Для Windows 7 — это сочетание клавиш Windows+R, а для Windows 8 или 10, как альтернативный вариант используйте Windows+X и поиск по фразе «командная строка».
- Наберите без кавычек «printui /s».
- Перед Вами окно свойств и настроек сервера печати операционной системы.
- Выбираем закладку «Драйвер».
- В списке выделите нужный пункт.
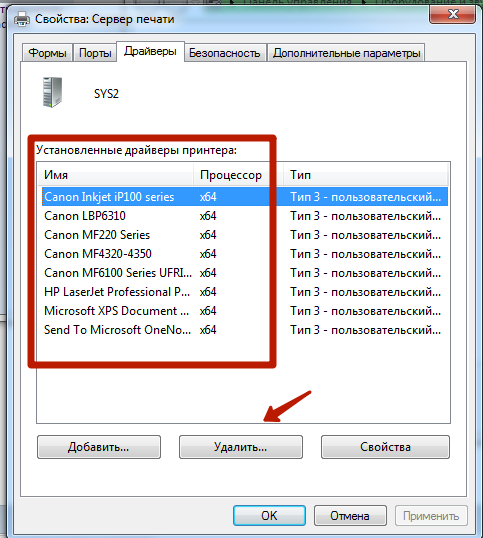
Тут сразу видно для какой модели ПО и разрядность, что удобно в случаи, когда по ошибке было установлено не для того типа процессора что надо. Удалять нужно весь пакет драйверов.
Данный способ поможет гарантировано удалить драйвера принтера. При использовании этого варианта решения проблемы рекомендуем окончательно очистить все упоминания и в реестре системы. Сам значок из списка устройств возможно надо будет убрать вручную.
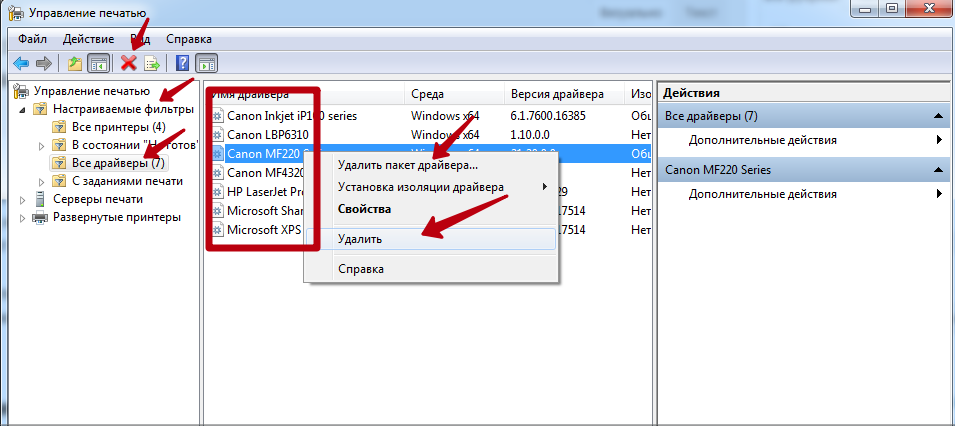
Через управление печатью
- В своей операционной системе запустите командную строку удобным Вам способом.
- Введите команду printmanagement.msc и нажмите клавишу Enter.
- В окне слева найдите пункт «Настраиваемые фильтры» и откройте его.
- Выберите подпункт «Все драйвера».
- Найдите нужный драйвер ориентируясь по названию модели устройства.
- Нажмите по нему один раз и через контекстное меню или меню окна произведите удаление.
Удаление через файловую систему
Удаление файлов напрямую с дисков компьютера или ноутбука можно рассматривать как дополнение к уже перечисленным и подробно описанным вариантам выше очистить систему от драйверов устройства печати. В случае выполнения упомянутых действий очень низкая вероятность наличия следов старого принтера в файловой системе, но для гарантии нужно проверить.
Как правило, установка операционной системы проводится на диск C и стоит начать поиски именно на нем. В версиях Windows XP проверять нужно только папку C:\Program Files, а для Windows 7,8,10 и ее и C:\Program Files (x86). Ищите папки, которые в своем имени содержат названия фирмы принтера. Это могут быть HP, Canon, Epson и другие. Удалите их, но желательно в корзину или сделайте их резервную копию, чтобы в случае ошибки была возможность все восстановить.
Удаление упоминаний о принтере в реестре
Информация о любой устройстве и программе записывается в реестр системы. Он есть в любой версии Виндовса. Принтера и их программное обеспечение не исключение из этого правила. При использовании способа удаления через панель управления нет гарантии, что реестр тоже будет очищен. Но это можно проверить достаточно легко и, при необходимости, сделать самому.
Операции с реестром несут некоторую опасность, потому рекомендуем перед началом работ сделать копию реестра.
Для выполнения задуманных действий следуйте инструкции:
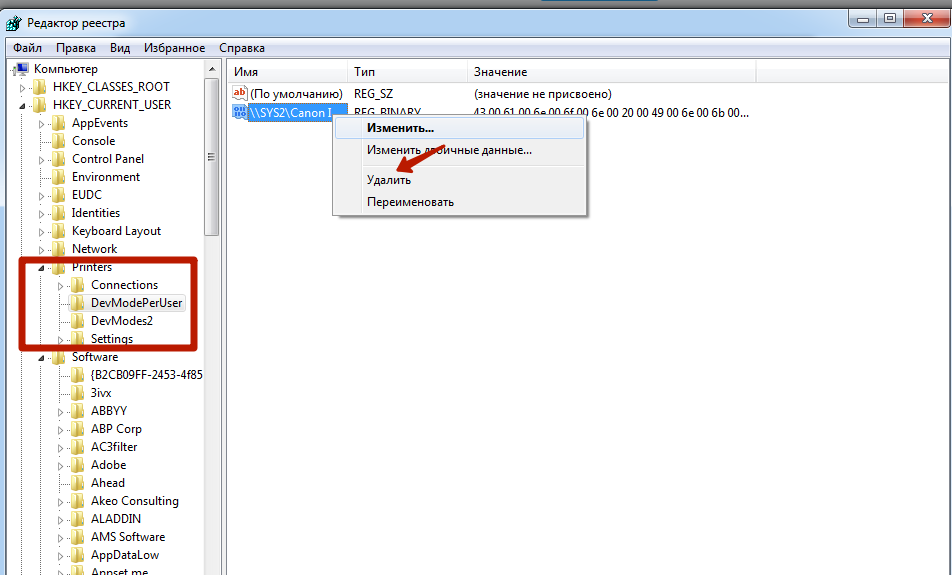
- Откройте реестр, введя в командную строку «regedit» и нажмите «OK».
- Вызовите окно поиска комбинацией клавиш CTRL+F.
- В строке поиска введите часть названия модели принтера или производителя.
- Отметьте все галочки и начните поиск.
- Найденные ветки удаляйте полностью.
Действие по поиску в реестре необходимо произвести несколько раз, а точнее пока поиск не выдаст уведомление, что ничего не найдено.
Используем командную строку
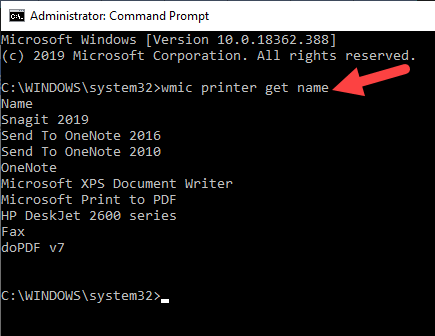
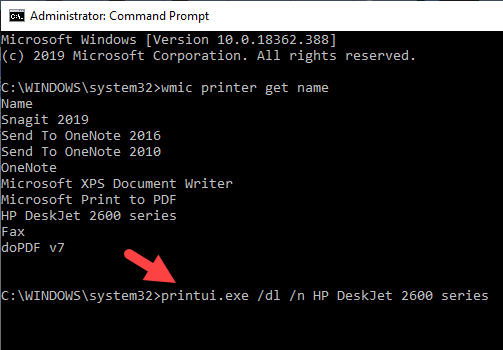
Для удаления определенного принтера через командную строку нужно узнать его системное имя. Для этого открываем строку любым удобным способом и вводим простую команду wmic printer get name. Через некоторое время Вы увидите список всех установленных на компьютер печатающих устройств. Запомните или выпишите название, того которое нужно удалить. Чтобы удалить выполните скрипт printui.exe /dl /n «имя принтера». Чтобы убедиться в успешности процедуры, можно после перезагрузки еще раз просмотреть список командой выше.
Этот способ можно применять во всех версиях Виндовс и к любому принтеру производителей, будь то Кэнон, Эпсон, HP, Samsung, Brother или Xerox.
Утилиты для удаления
Для самых ленивых тоже есть вариант в виде утилит, которые в автоматическом порядке могут найти и удалить все драйвера с компьютера полностью. Они удаляют устройство, подчищают в файловой системе и убирают упоминания в реестре. Вот подборка самых популярных с русским интерфейсом.
- Driver Fusion
- Driver Swerper
- Driver Cleaner Pro
Найти и скачать эти утилиты не составит труда. Ищите версии с русифицированным интерфейсом. Установка происходит в обычном режиме и сразу можно приступить к поиску и чистке. Процесс занимает некоторое время, так как программе нужно сканировать большую часть файловой системы и реестр ПК.
Удаление ненужных или старых версий драйверов не только печатающего устройства, но и других, может даже ускорить работу компьютера. Будьте предельно внимательны при выполнении данных процедур, чтобы не удалить нужное программное обеспечение.
Remove or Uninstall a Printer Driver from Windows 10
Get rid of any that you are not using
If you connect to different printers across several locations all the time, you’ll probably not use all of the printers installed on your device – probably just once or twice. However, your device ends up with many printers installed on it without you realizing it.
Thankfully, you can remove any printer you’re no longer using, except it doesn’t completely get erased from your device – the printer driver remains in your device’s inventory in case you need it again.

If you’re sure you won’t need it, you can remove or uninstall old, obsolete or uninstalled printer drivers, and leftover driver packages or registry entries from your device.
We’re going to walk you through five ways to completely uninstall printer drivers in Windows 10.
How To Remove Or Uninstall Printer Drivers In Windows 10
These are a few of the ways you can remove printer drivers in Windows 10:
- Uninstall printer software using Settings.
- Remove printer driver from Print Server Properties.
- Uninstall printer driver using Control Panel.
- Use Print Management to remove old printers.
- Delete old printers via Registry Editor.
- Uninstall printer using Command Prompt.
- Remove a printer using PowerShell.
- Delete remnants from Windows driver store.
Uninstall Printer Software Using Settings
If you don’t need a particular printer anymore, you can follow the usual steps to uninstall a printer from Settings and then uninstall its software, especially if using a third-party utility.
If the Settings app installed other tools to manage your printer automatically, you’ll have to manually remove the leftover software.
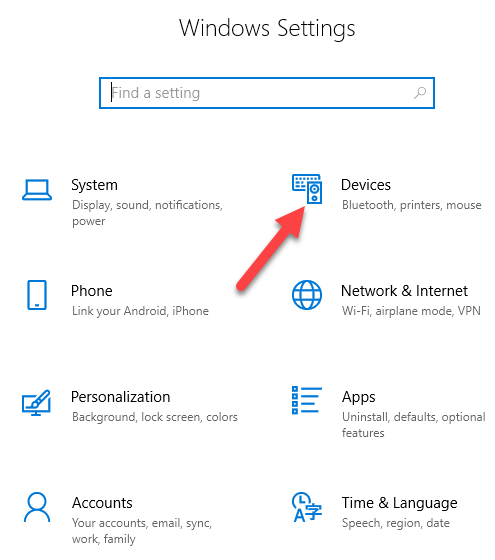
- Open Settings>Devices.
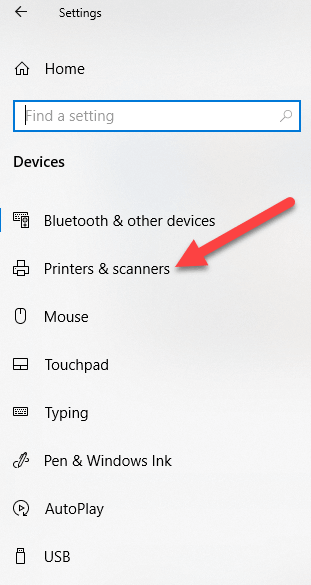
- Click Printers & Scanners.
- Select your printer, click Remove device, and click Yes when asked to confirm the deletion.
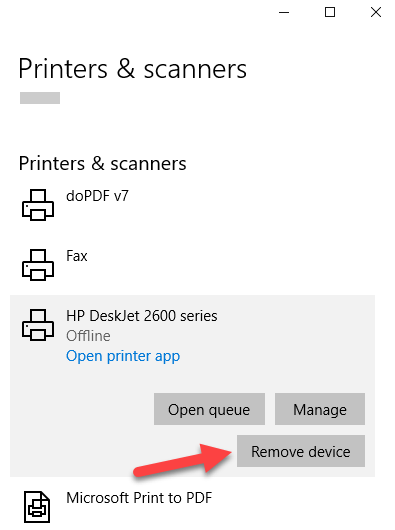
Note: The steps above only remove the printer from the list, so you’ll need to remove any leftover printer software or related applications.
- Open Settings>Apps.
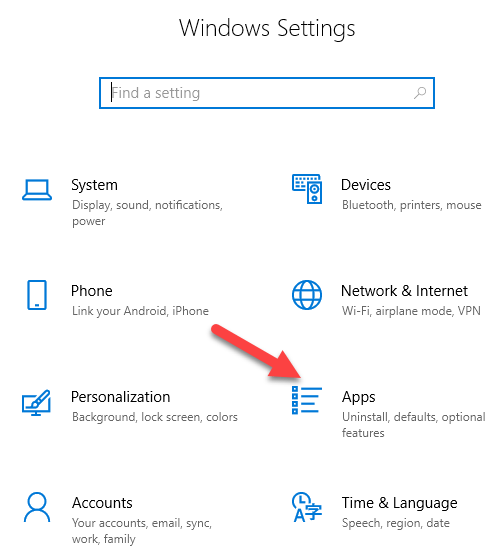
- Click Apps & Features and select the printer software you’d like to remove.
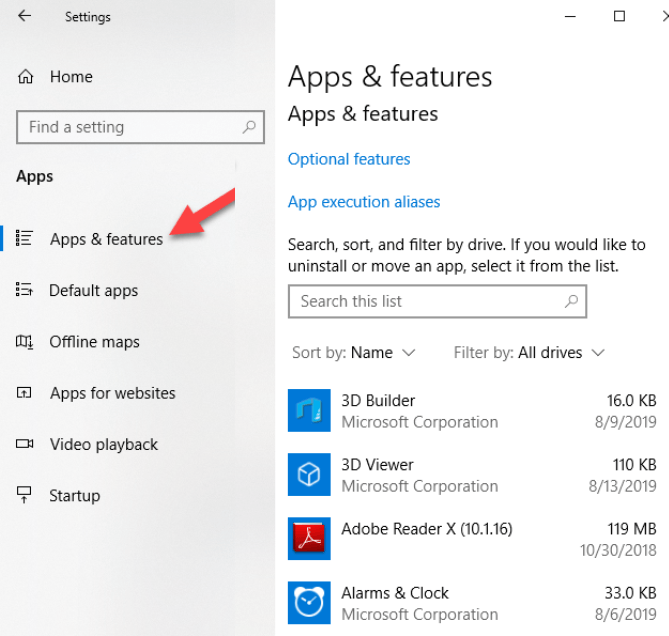
- Click Uninstall and follow the steps to completely remove any leftover printer-related applications.
Remove Printer Driver From Print Server Properties
If you’re still seeing an old printer, or one that you previously uninstalled, appearing on the Printers & Scanners page, you can remove or uninstall the printer driver and driver packages.
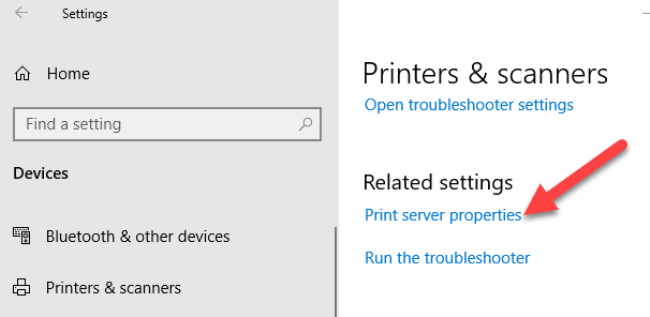
- Open Settings>Devices>Printers and Scanners on the left pane.
- Scroll down to Related settings and click Print Server Properties. Alternatively, you can right-click Start>Run and type printui /s /t2 to go to the Print Server properties page directly.
- Select the Drivers tab. From the list, click on the old printer entry and select Remove.
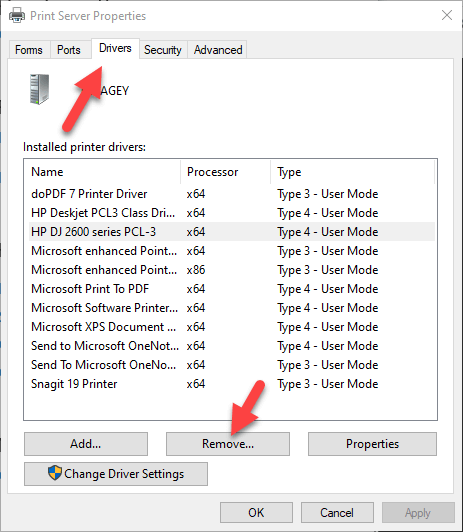
- You’ll get two options in a popup – Remove driver or Remove driver and driver package. Select the latter and click OK.
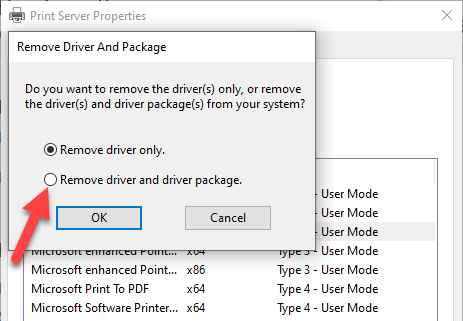
- If you get a confirmation prompt to Remove Driver Package, click Delete.
Uninstall Printer Driver Using Control Panel
You can remove and uninstall your printer and leftover printer driver or related apps from Control Panel using these steps.
- Open Control Panel>Hardware and Sound.
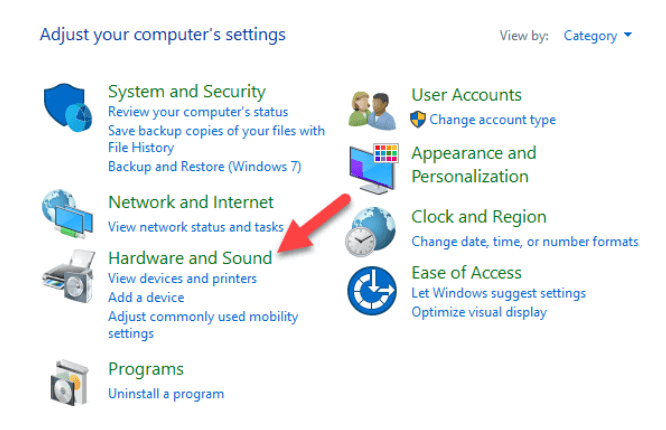
- Click Devices and Printers.

- Under Printers, right-click your device and click Remove device. Click Yes to confirm the action.

- Next, go to Settings>Apps>Apps & Features and select the software you want to remove.
- Click Uninstall and follow the on-screen steps to completely remove the printer software.
Use Print Management To Remove Old Printers
Ideally, if you used the Print Server properties method above, it should remove and uninstall the printer driver. However, you can use the Print Management console to completely remove printers you no longer use, and their drivers.
The Print Management dialog shows you the printers and current print jobs on your device. Before you delete the old printer driver though, make sure it’s not being used by any other printer.
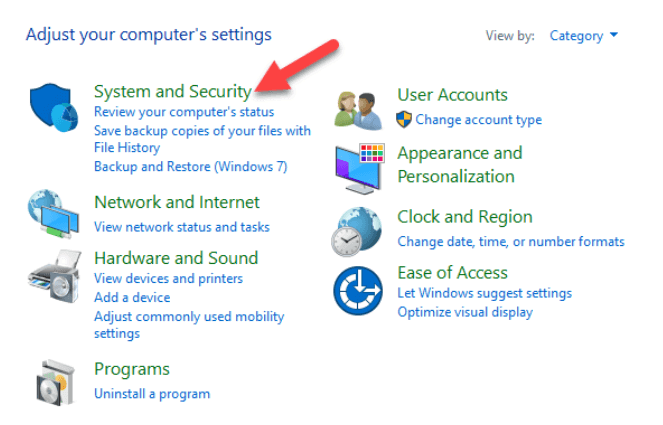
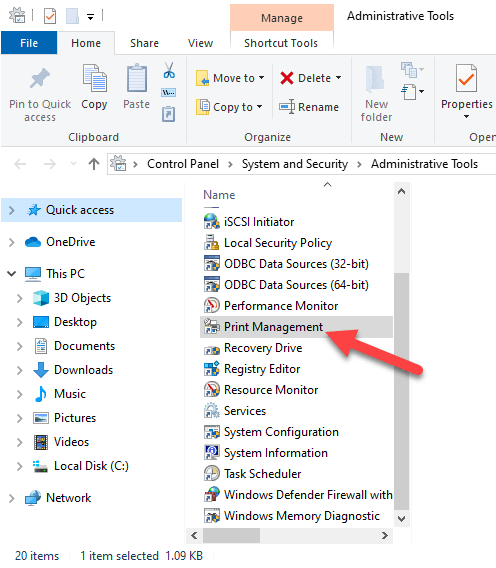
- Open Control Panel>System and Security.
- Click Administrative Tools.
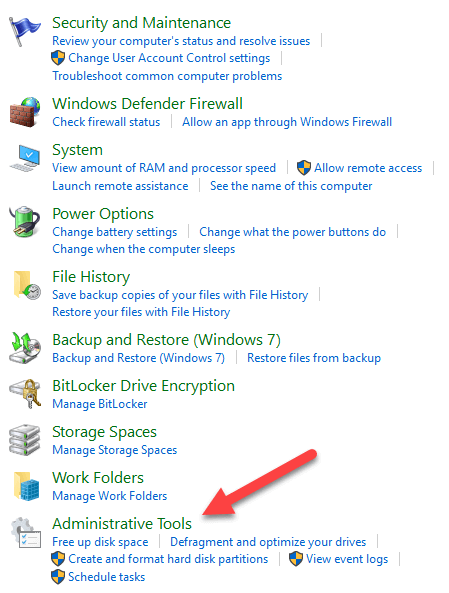
- Double-click the Print Management shortcut.
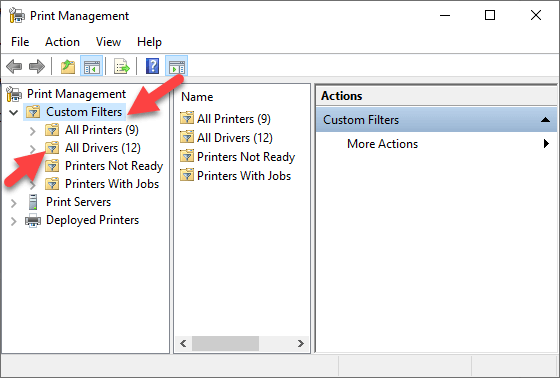
- Under Custom Filters, select All Printers.
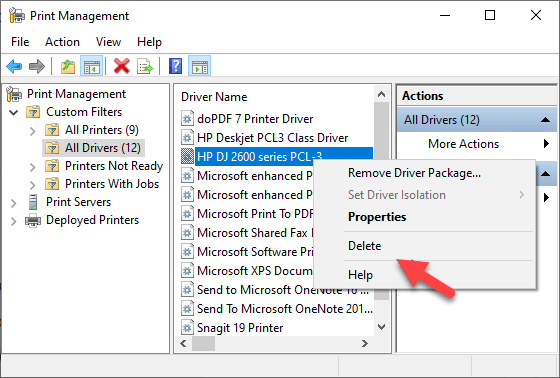
- Right-click the printer you want to remove.
- Click Delete and Yes to confirm the action.
- Open Settings>Apps>Apps & Features and click the printer software you want removed.
- Click Uninstall and follow on-screen instructions to completely remove the printer driver.
Delete Old Printers Via Registry Editor
If you open the Add a printer page and find old printers still listed there, edit the registry to remove leftover entries. To do this, start by creating a system restore point, and then follow the steps below.
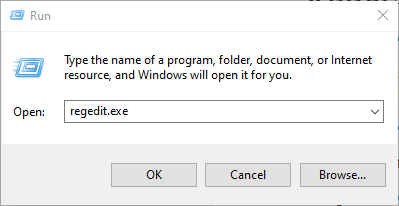
- Right-click Start>Run.
- Type regedit.exe and click OK (or press Enter on your keyboard) to open the Registry Editor.
Find the registry key:
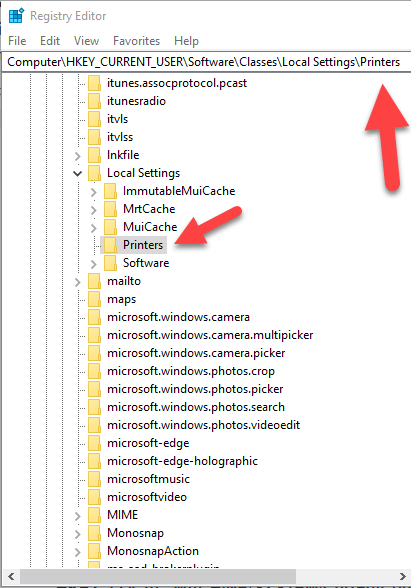
- Right-click the printer from the right pane, and select Delete.
- Check printer entries and delete unwanted items by going to this key: HKEY_CURRENT_USER\Printers\Connections
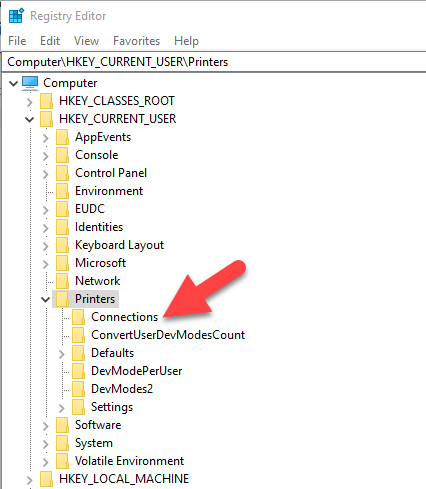
Next, go to this key:
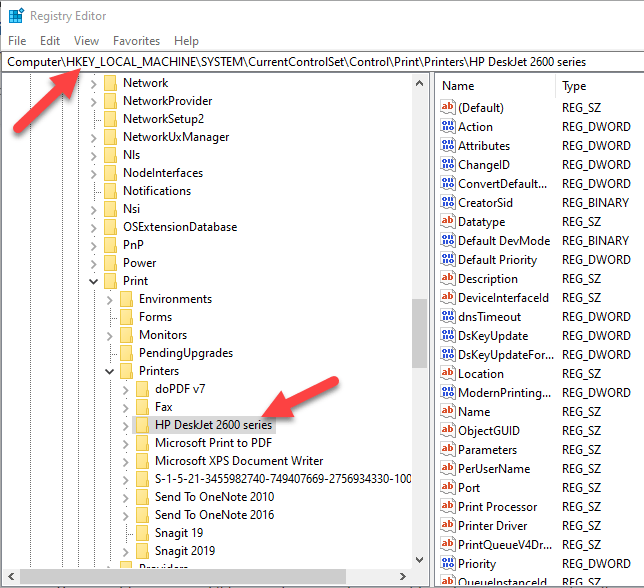
- Click to expand the key, right-click your printer and select Delete.
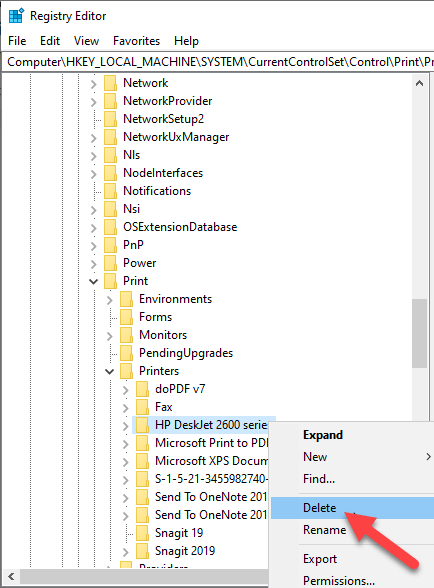
Some subkeys may still have references to your old printer, so you can clear the following as well:
Once this is done, exit the Registry Editor.
Uninstall Printer Using Command Prompt
If you’re a fan of command lines, the Command Prompt is another tool you can use to delete a printer and remove related drivers and apps.
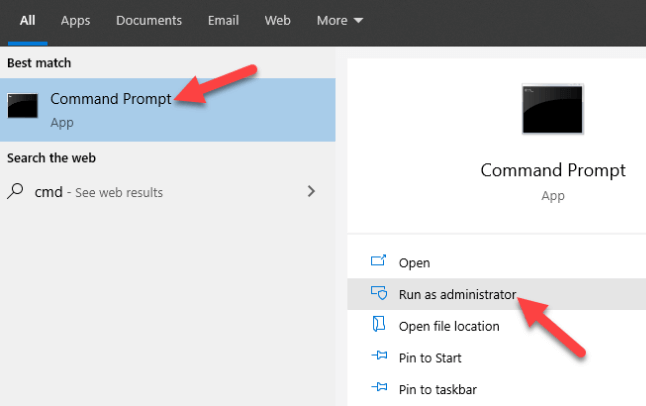
- Click Start and type CMD in the search bar.
- Click Command Prompt and select Run as administrator from the right pane.
- In the Command Prompt window, type this command: wmic printer get name and press Enter to see the list of printers on your device.
- To uninstall the printer, type printui.exe /dl /n “YOUR-PRINTER-NAME” and press Enter. Remember to replace YOUR-PRINTER-NAME with your printer’s full name. For example, printui.exe /dl /n HP DJ 2600 Series CL3.
- To uninstall the printer software, open Settings>Apps>Apps & Features and select the printer software you want to remove. Click Uninstall and follow the on-screen instructions to complete the process.
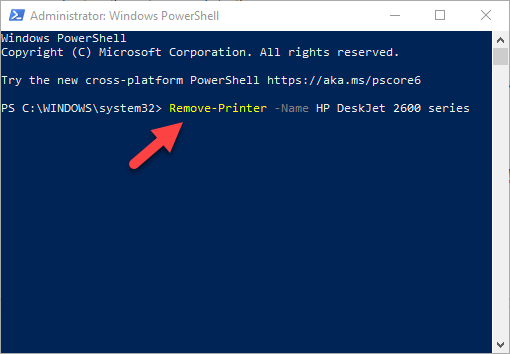
Remove a Printer Using PowerShell
If you prefer PowerShell over Command Prompt, here are the steps to take to remove the printer and related software.
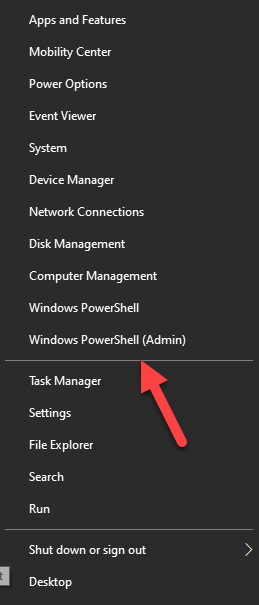
- Right-click Start > Windows PowerShell (Admin).
- Type this command: Remove-Printer –Name “YOUR-PRINTER-NAME”.
- Open Settings > Apps > Apps & Features, and click the software you want removed.
- Click Uninstall and follow the directions to remove it completely.
Delete Remnants From The Windows Driver Store
This solution is meant to remove any remnants of drivers that may still be on your device even after deleting driver packages.
In the driver store, you’ll find inbox and third-party driver packages, which were installed and stored in the folder even before the driver itself got installed.
Each of the subfolders in the store holds a driver package and corresponding .inf file, but it’s a bit difficult to find the specific driver package you’d like to remove.
The good news is you can use a third-party tool to explore the Windows driver store and completely remove the old printer driver once for all. It’ll also save you lots of space that would otherwise have been occupied by junk files.
What Happens When Drivers Are Deleted?
A device driver is a piece of software that tells your computer’s operating system how to communicate with the device it’s connected to.
For example, to connect to your printer and execute the print command, a printer driver is needed to bridge the gap between the two devices, and deliver the print job to you.
Without the printer driver, your printer is just hardware that doesn’t work. Similarly, deleting the printer driver after deleting the printer from your computer renders it inoperative.
However, if you delete the driver, you can undo the deletion using System Restore, from the previous restore point created when you deleted the driver from your computer.
Alternatively, Windows will automatically install the driver on your operating system by searching for it from its extensive library of drivers. If it doesn’t find a suitable driver, it’ll search for a driver online through Windows Update. Otherwise, you can visit the device manufacturer’s website to find the specific driver for your printer.
Elsie is a technology writer and editor with a special focus on Windows, Android and iOS. She writes about software, electronics and other tech subjects, her ultimate goal being to help people out with useful solutions to their daily tech issues in a simple, straightforward and unbiased style. She has a BCom degree in Marketing and currently pursuing her Masters in Communications and New Media. Read Elsie’s Full Bio


